Unity
Unduh
Mode fokus
Ukuran font
Prerequisites
Before you begin, complete the push prerequisite configuration for the corresponding native platforms. See iOS Prerequisites and Android Prerequisites.
Implementation steps
Step 1: Integrate the message push plugin
After completing manufacturer configuration for each native platform, integrate the push plugin by updating
Packages/manifest.json and adding the related dependencies:{"dependencies": {..."com.tencent.timpush.unity": "https://github.com/TencentCloud/TIMSDK.git#push_unity"}}
Step 2: Configure push parameters
Upload the iOS APNs push certificate obtained in Manufacturer configuration to the Tencent Cloud Console. The Console assigns a certificate ID, as shown below:
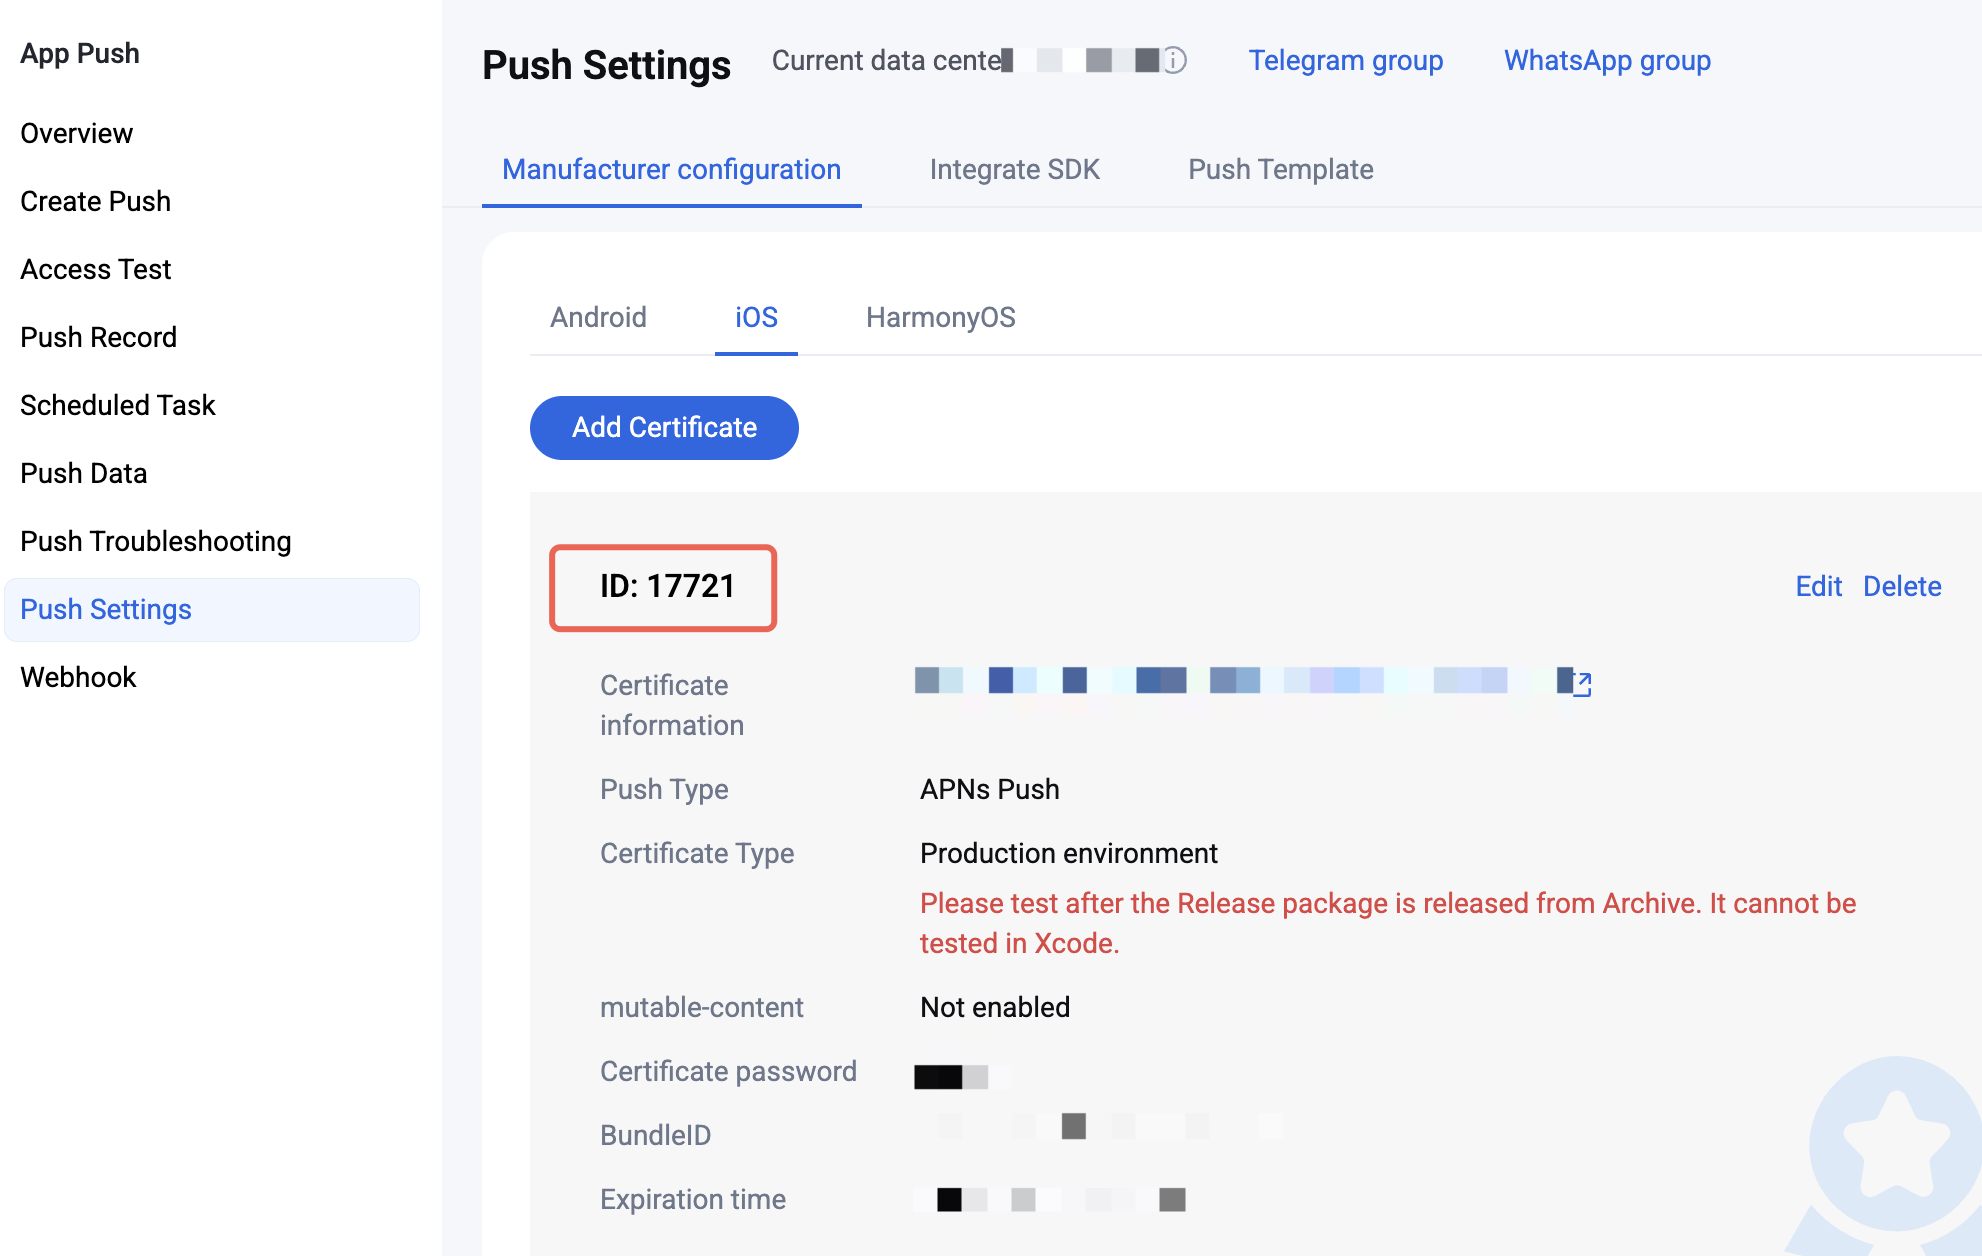
Create
UnityIMPush.mm under Assets/Plugins/iOS (create the directory manually if it does not exist), and implement the businessID protocol method to return the certificate ID. You can refer to the following implementation:#import "TPush/TPush.h"#import "UnityAppController.h"@interface UnityAppController (ThirdPartyExtension) <TIMPushDelegate>- (int)businessID;- (NSString *)applicationGroupID;@end@implementation UnityAppController (ThirdPartyExtension)#pragma mark - TIMPush- (int)businessID {// Certificate ID from the Console in the previous step, for example 1234567int kBusinessID = 1234567;return kBusinessID;}- (NSString *)applicationGroupID {//AppGroup IDreturn "AppGroup ID";}- (BOOL)onRemoteNotificationReceived:(NSString *)notice {// custom navigatereturn NO;}@end
After completing Manufacturer configuration, download and add the configuration file to the project. Place the downloaded
timpush-configs.json under Assets/Plugins/Android. If the directory does not exist, create it manually.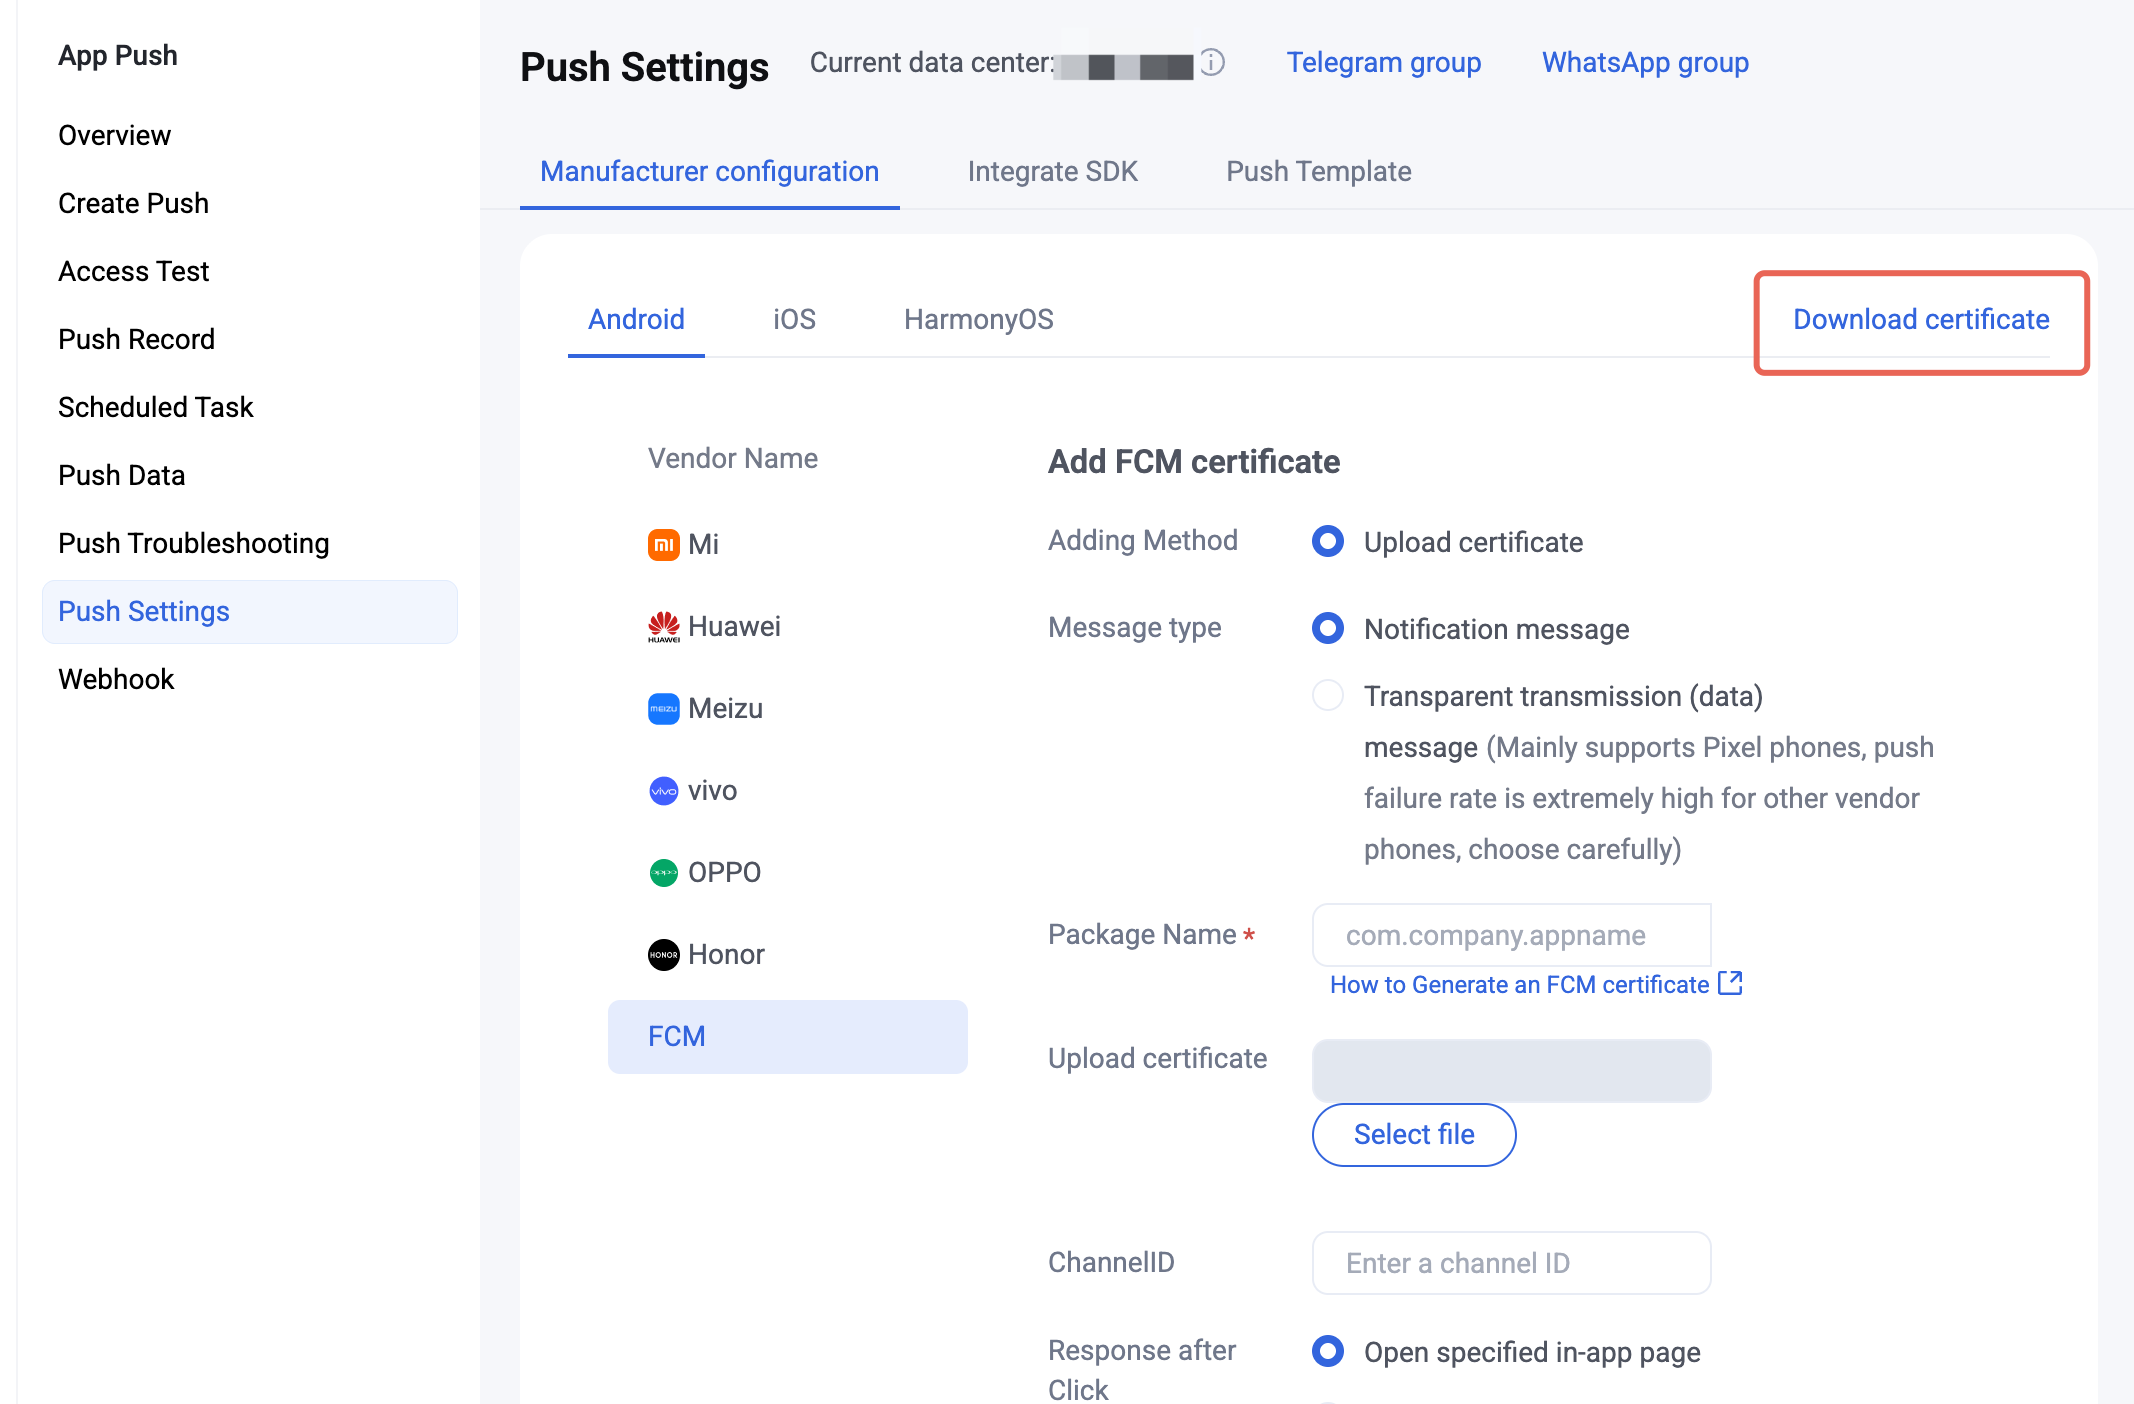
Step 3: Client manufacturer configuration
No action is required on iOS for this step.
Go to File > Build Settings > Player Settings, then under the Android platform settings open Publishing Settings > Build, and select the three options shown below:
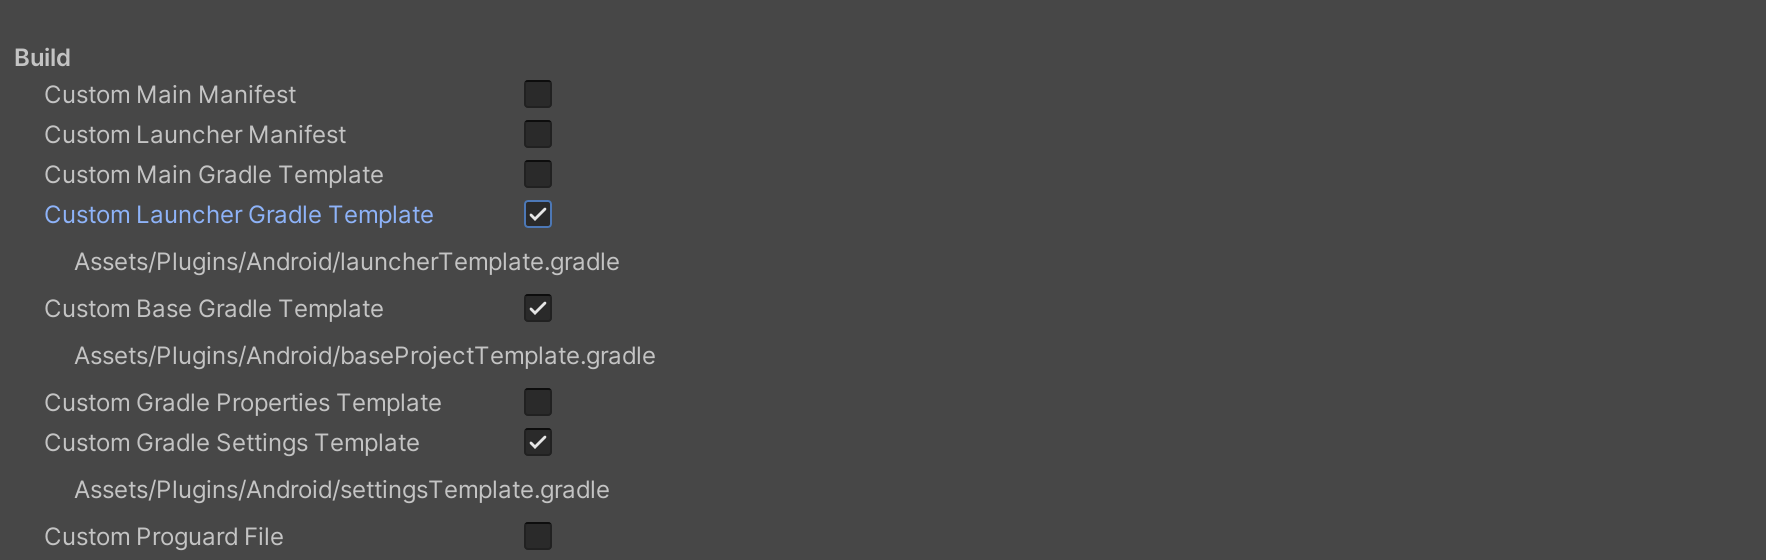
Open Assets/Plugins/Android/launcherTemplate.gradle, add a
dependencies block at the end of the file, and include all or some of the manufacturer push packages as needed. Native push for a manufacturer is enabled only after you add the corresponding package.dependencies {// Replace VERSION with the version from Release Notes.// The main push package is requiredimplementation 'com.tencent.timpush:tpush:VERSION'// Other dependenciesimplementation 'androidx.appcompat:appcompat:1.3.0'implementation 'com.google.code.gson:gson:2.10.1'// Add manufacturer packages as neededimplementation 'com.tencent.timpush:fcm:VERSION'}
Google FCM adaptation
Follow the manufacturer instructions to integrate the corresponding plugin and JSON configuration files.
1.1 Download the configuration file and add it under Assets/Plugins/Android/JsonConfigs in the project root. Create this directory manually.
Configuration file download location:
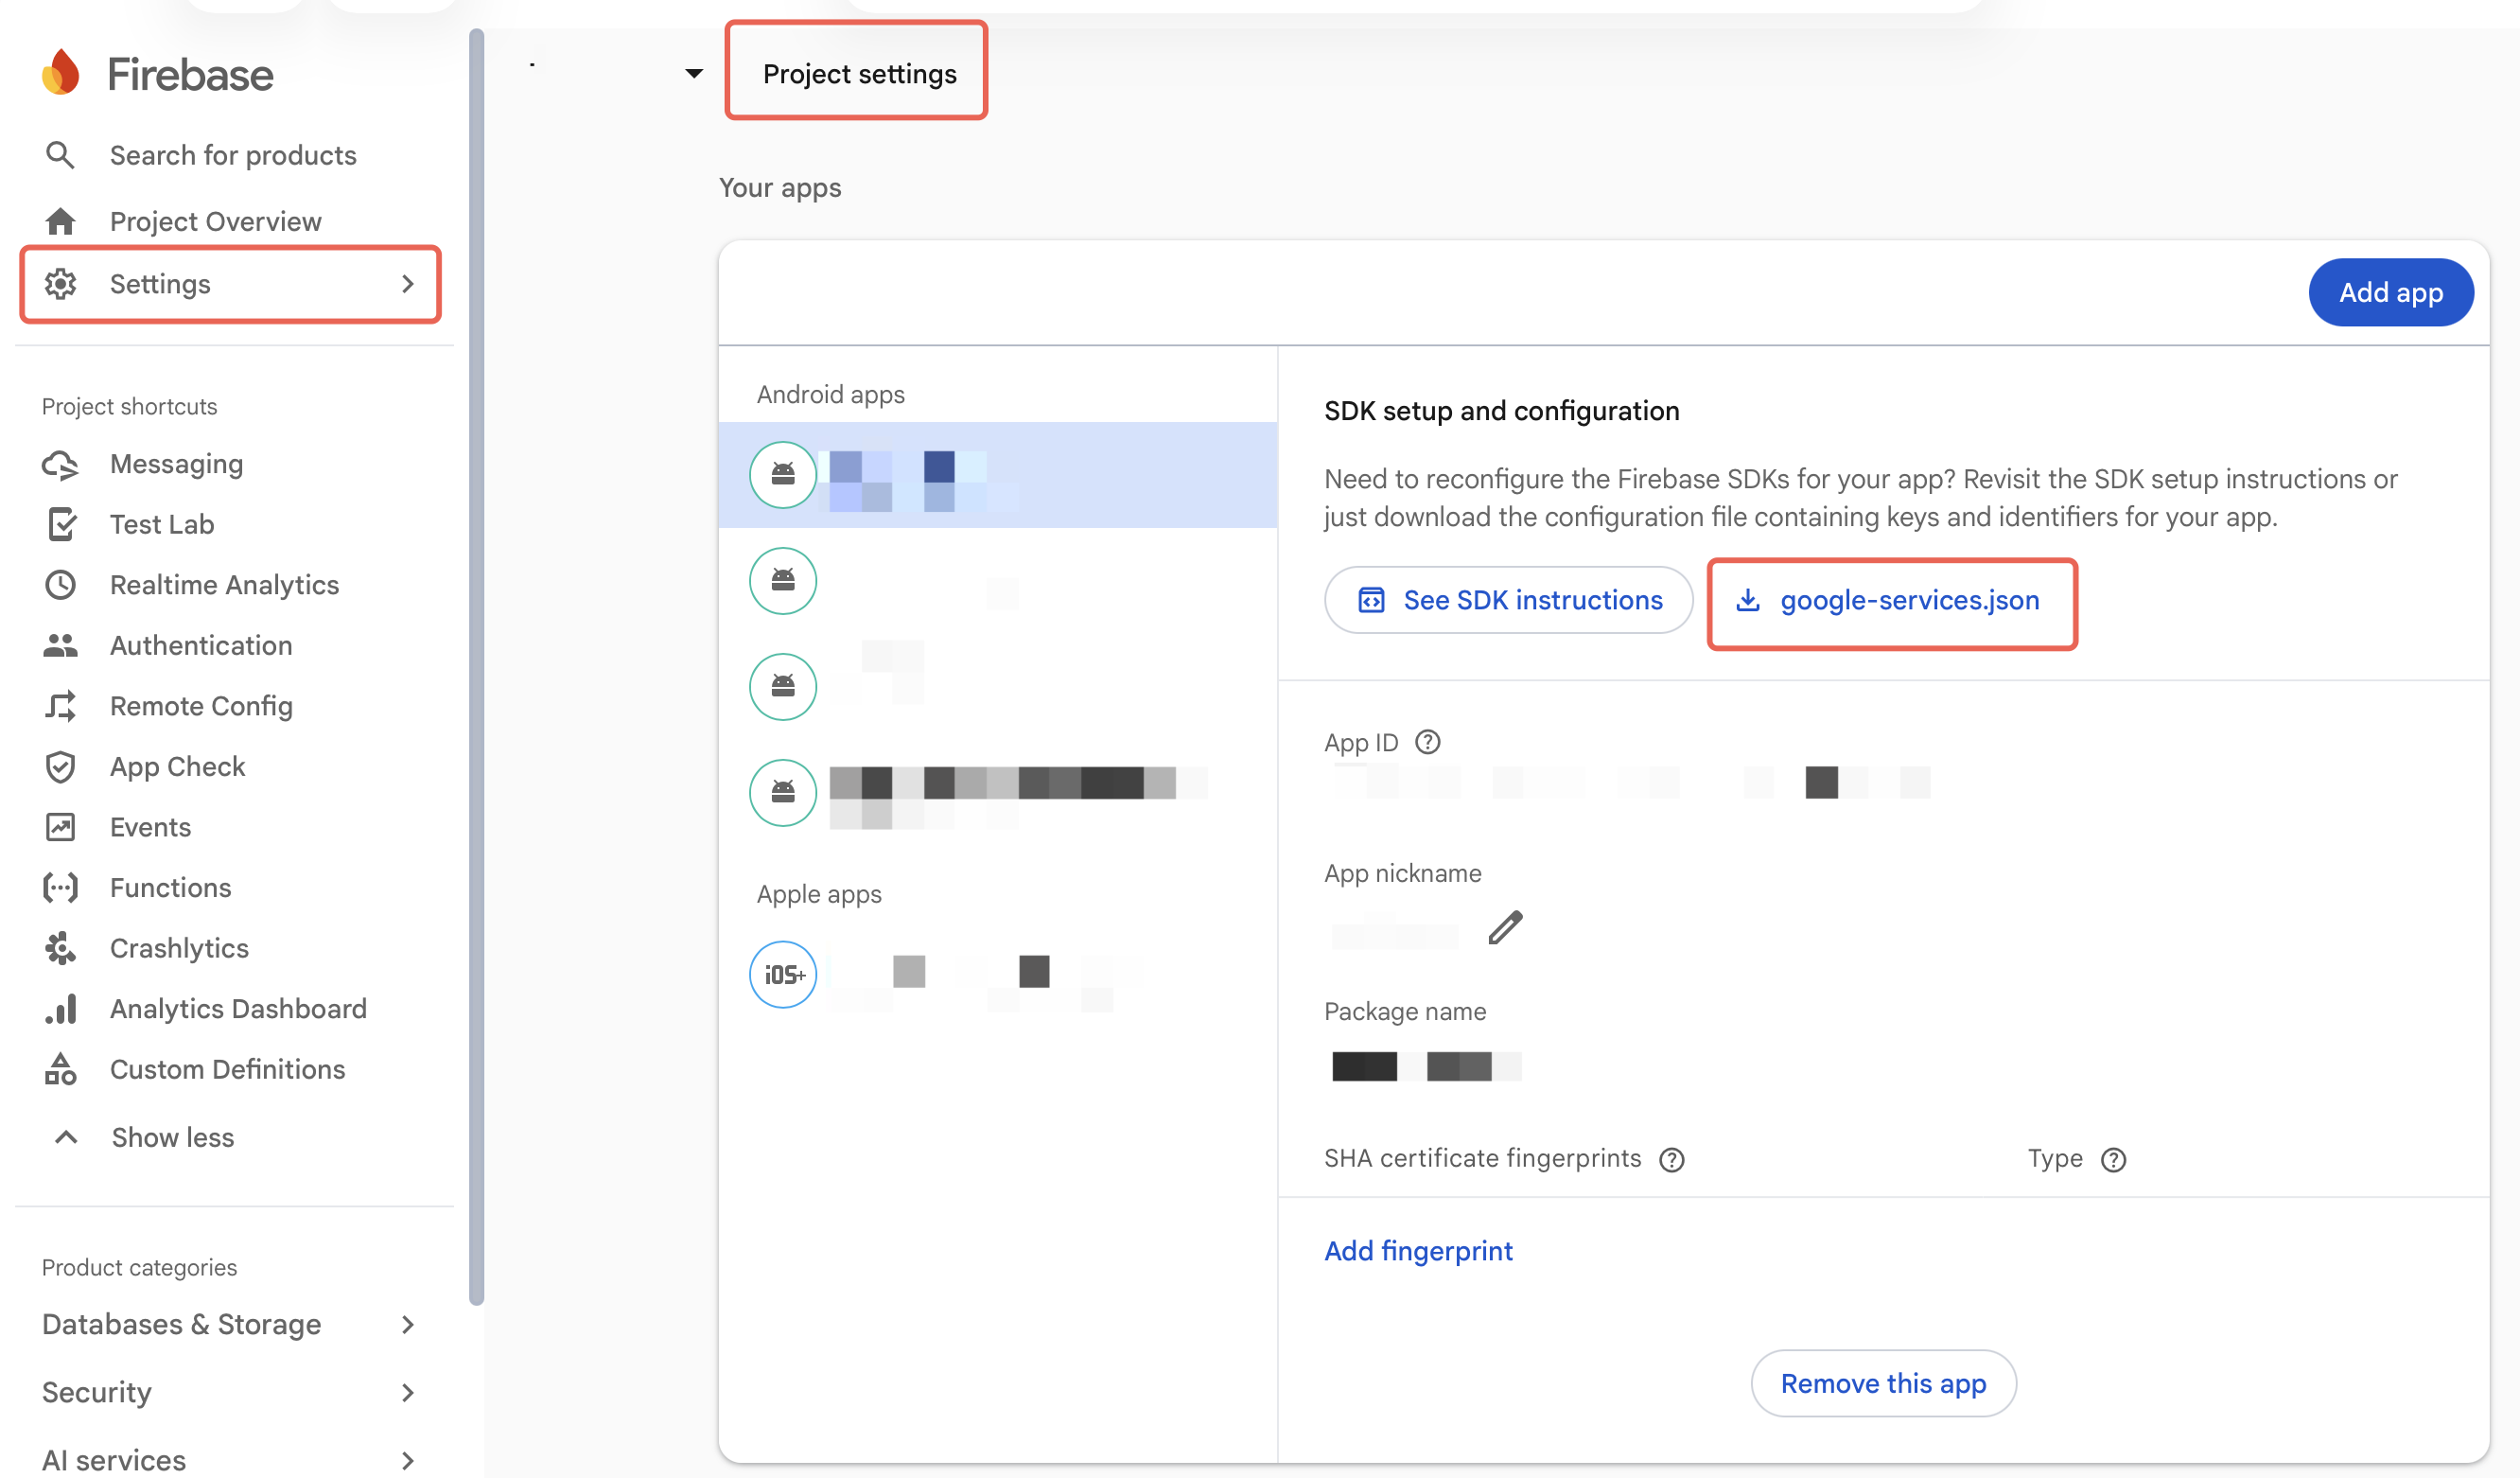
Place the configuration file as shown below:
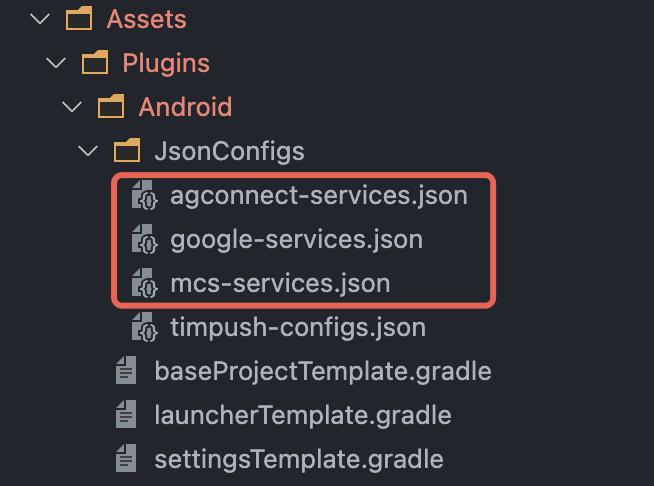
1.2 In Assets/Plugins/Android/baseProjectTemplate.gradle, under buildscript > dependencies, add the following configuration (if you need to add a new
buildscript, place it at the top of the file):In Assets/Plugins/Android/baseProjectTemplate.gradle, under buildscript > dependencies, add:
buildscript {dependencies {...classpath 'com.google.gms:google-services:4.3.15'}}
In Assets/Plugins/Android/settingsTemplate.gradle, under buildscript > repositories and allprojects > repositories, add the following repositories:
pluginManagement {repositories {gradlePluginPortal()mavenCentral()maven { url "https://mirrors.tencent.com/nexus/repository/maven-public/" }}}dependencyResolutionManagement {...repositories {mavenCentral()maven { url "https://mirrors.tencent.com/nexus/repository/maven-public/" }}}
In Assets/Plugins/Android/baseProjectTemplate.gradle, under buildscript, add:
buildscript {repositories {mavenCentral()maven { url "https://mirrors.tencent.com/nexus/repository/maven-public/" }}dependencies {...classpath 'com.google.gms:google-services:4.2.0'}}
In Assets/Plugins/Android/settingsTemplate.gradle, under allprojects > repositories, add:
allprojects {...repositories {mavenCentral()maven { url "https://mirrors.tencent.com/nexus/repository/maven-public/" }}}
In the project-level build.gradle, under
buildscript and allprojects, add:buildscript {repositories {mavenCentral()maven { url "https://mirrors.tencent.com/nexus/repository/maven-public/" }}dependencies {...classpath 'com.google.gms:google-services:4.2.0'}}allprojects {repositories {mavenCentral()maven { url "https://mirrors.tencent.com/nexus/repository/maven-public/" }}}
1.3 In Assets/Plugins/Android/launcherTemplate.gradle, add:
apply plugin: 'com.google.gms.google-services'
Step 4: Handle notification click callbacks and parse parameters
If you need to customize parsing of received remote push notifications, implement it as follows:
Note:
1. Register the callback in the program entry function.
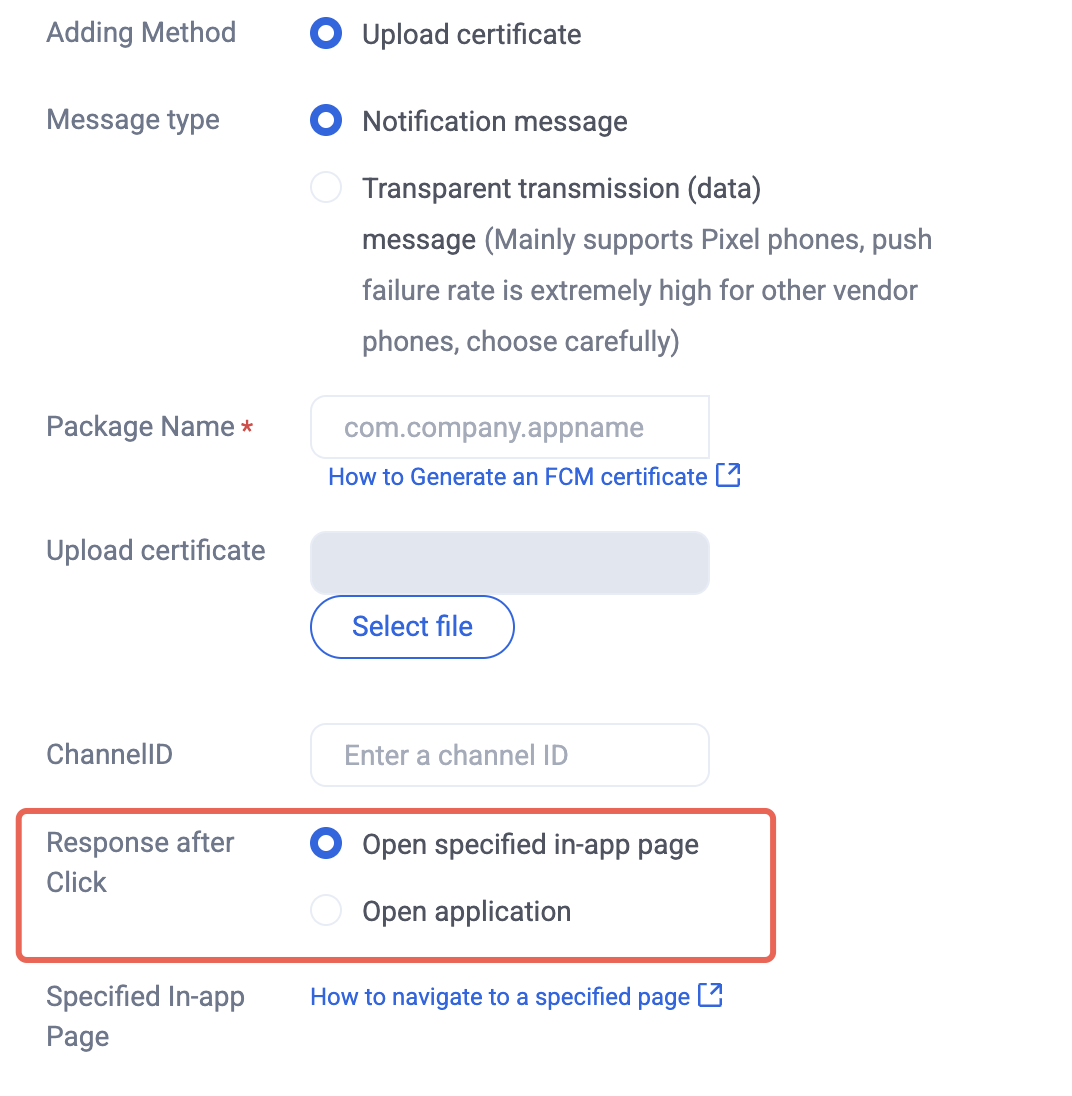
2. For After-click action in the Console, select Open a specified in-app page, and do not change the default value.
PushListener listener = new PushListener(onRecvPushMessage: (message) => {Debug.Log($"Received push message: title:{message.title}, content:{message.desc}, passthrough:{message.ext}, message ID:{message.messageID}");}, onRevokePushMessage: (messageID) => {Debug.Log($"Revoked push message ID: {messageID}");}, onNotificationClicked: (ext) => {Debug.Log($"Notification clicked: {ext}");});PushManager.AddPushListener(listener);
Step 5: Register the push plugin
After
PushManager.RegisterPush succeeds, the app can receive offline push notifications.Note:
If you have already integrated Chat and call this API after Chat login succeeds, set
appKey to null; otherwise the Chat account will be logged out.PushManager.RegisterPush(sdkAppId: YourSdkAppId, appKey: "AppKey", new PushCallback(onSuccess: (data) => {Debug.Log($"Push registration succeeded: {data}");}, onError: (errCode, errMsg, data) => {Debug.Log($"Push registration failed: error code:{errCode}, error message:{errMsg}");}));
Integration troubleshooting
If you still cannot receive push after integration, use Push Troubleshooting to check the cause. If the issue remains, Contact us to submit feedback.
Bantuan dan Dukungan
Apakah halaman ini membantu?
Anda juga dapat Menghubungi Penjualan atau Mengirimkan Tiket untuk meminta bantuan.
masukan