VOD Scenario
ダウンロード
フォーカスモード
フォントサイズ
Target Audience
This document describes some of the proprietary capabilities of Tencent Cloud. Make sure that you have activated the relevant Tencent Cloud services before reading this document. If you don't have an account yet, sign up first.
What You Will Learn
How to integrate the Tencent Cloud Video Cube React Native Player SDK.
How to use the Player SDK for video-on-demand playback.
How to leverage the underlying capabilities of the Player SDK to implement additional features.
Special Notes
The Player SDK does not impose any limits on the sources of playback URLs, meaning you can use it to play content from Tencent Cloud or other providers. However, the Player SDK for React Native only supports video-on-demand URLs in MP4, HLS (m3u8), and FLV formats.
SDK Integration
Step 1: Integrate the SDK Development Package
Step 2: Add the Player View
Use the
SuperPlayerViewComponent as the video rendering container:import { SuperPlayerViewComponent } from 'react-native-superplayer';import { View, StyleSheet, Dimensions } from 'react-native';const { width: SCREEN_WIDTH } = Dimensions.get('window');const VIDEO_HEIGHT = (SCREEN_WIDTH * 9) / 16; // 16:9function PlayerScreen() {const handleViewReady = (viewId: string) => {console.log('playerView ready', viewId);// create player and bind view};return (<View style={styles.container}><SuperPlayerViewComponentviewId="my_player_view"style={styles.player}onReady={handleViewReady}/></View>);}const styles = StyleSheet.create({container: {flex: 1,},player: {width: SCREEN_WIDTH,height: VIDEO_HEIGHT,backgroundColor: '#000',},});
Step 3: Create a Player Instance
In the
onReady callback, create an instance of TXVodPlayer and bind it to the view:import { TXVodPlayer, TXVodConstants } from 'react-native-superplayer';import { useRef, useCallback } from 'react';function PlayerScreen() {const playerRef = useRef<TXVodPlayer | null>(null);const handleViewReady = useCallback((viewId: string) => {// create playerconst player = new TXVodPlayer();// Bind a viewplayer.setPlayerView(viewId);// Set up event listeningplayer.setListener({onPlayEvent: (event, param) => {switch (event) {case TXVodConstants.VOD_PLAY_EVT_PLAY_BEGIN:console.log('play start');break;case TXVodConstants.VOD_PLAY_EVT_PLAY_END:console.log('play end');break;// other event...}},});playerRef.current = player;}, []);// ... other code}
Step 4: Start Playback
The player supports two playback methods: URL Playback and FileId Playback.
TXVodPlayer automatically recognizes the playback protocol internally. You only need to pass your playback URL to the
startPlay function.// play URLplayer.startPlay('https://example.com/video.mp4');
FileId playback is suitable for Tencent Cloud VOD resources, supporting more advanced features (such as anti-leeching, resolution lists, etc.).
// psign is the player signatureplayer.startPlayWithFileId(1500005830, // appId'387702307091793695', // fileId'your_psign' // sign);
Locate the corresponding video file in Media Management. Below the file name, you can find the FileId. For more information on the signature and how to generate it, see Player Signature.
When playing via the FileId method, the player will request the actual playback URL from the backend. If there is a network issue or the FileId does not exist, you will receive the
VOD_PLAY_ERR_GET_PLAYINFO_FAIL event. Conversely, receiving VOD_PLAY_EVT_VOD_PLAY_PREPARED indicates a successful request.Step 5: End Playback
When the component is unmounted, be sure to destroy the player to release resources:
import { useEffect } from 'react';function PlayerScreen() {const playerRef = useRef<TXVodPlayer | null>(null);useEffect(() => {return () => {// destroy playerif (playerRef.current) {playerRef.current.destroy();playerRef.current = null;}};}, []);// ... other code}
When playback ends, remember to call the player's destruction method, especially before the next
startPlay, to avoid potential memory leaks and screen flickering issues.Stop Playback:
// stop playplayer.stop(true);
Basic Function Usage
1. Playback Control
Pause Playback
player.pause();
Resume Playback
player.resume();
Stop Playback
player.stop(true);
Seek
When users drag the progress bar, they can invoke the seek function to start playback from a specified position. The player SDK supports precise seeking.
// Jump to a specified time point (in seconds)// The second parameter, accurateSeek: true = precise seek (more time-consuming), false = quick seekplayer.seek(30, true); // Accurately skip to 30 seconds.player.seek(60, false); // Accurately skip to 60 seconds.
Playback from a Specified Time
Before the first call to
startPlay, playback from a specified time is supported.// Set the start playback time (must be called before startPlay)player.setStartTime(10); // Start playback from the 10th secondplayer.startPlay(url);
2. Variable Speed Playback
The VOD player supports variable speed playback, which is achieved by setting the playback rate through the
setRate interface. It allows for both fast and slow playback, such as 0.5X, 1.0X, 1.2X, 2X, and more.// Set playback speed to 1.2xplayer.setRate(1.2);
3. Loop Playback
// Configure loop playback settingsplayer.setLoop(true);// Retrieve the current loop playback statusconst isLooping = player.isLoop();
4. Mute and Volume Control
// Set mute, true to enable mute, false to disable muteplayer.setMute(true);// Set volume (0-100)player.setVolume(50);
5. Hardware Acceleration
For Blu-ray quality (1080p) video, relying solely on software decoding often fails to deliver a smooth playback experience. Therefore, if your scenario primarily involves game streaming, it is generally recommended to enable hardware acceleration.
When switching between software decoding and hardware decoding, it is essential to stop playback before making the switch, and then startPlay again afterward. Failure to do so may result in severe screen distortion issues.
player.stop(true);player.enableHardwareDecode(true);player.startPlay(url);
6. Clarity Settings
The SDK supports the multi-bitrate format of HLS, allowing users to switch between different bitrate streams to achieve playback at varying levels of clarity. The clarity can be configured using the following methods.
// The value will only be returned when getSupportedBitrates is called after receiving the player VOD_PLAY_EVT_VOD_PLAY_PREPARED event.const bitrateList = player.getSupportedBitrates();// Return BitrateItem[]// [{ index: 0, width: 1920, height: 1080, bitrate: 2000000 }, ...]const index = bitrateList[0].index; // Specify the bitrate index to be played.player.setBitrateIndex(index); // Switch the bitrate to the desired resolution.// Retrieve the current resolution index.const currentIndex = player.getBitrateIndex();
During playback, you can switch the bitrate at any time using `setBitrateIndex(index)`. When switching, the SDK will fetch data from another stream. The SDK is optimized for Tencent Cloud's multi-bitrate files, ensuring a seamless transition without any stuttering.
If you are aware of the video stream's resolution information in advance, you can specify the preferred video resolution before playback begins, thereby avoiding the need to switch streams after playback has started.
Setting Adaptive Maximum Bitrate
// Limit the maximum bitrate for adaptive playback (unit: Kbps)player.setAutoMaxBitrate(2000);
7. Adaptive Bitrate Streaming
The SDK supports adaptive bitrate streaming for HLS. Once enabled, the player can dynamically select the most suitable bitrate for playback based on the current network bandwidth. Adaptive bitrate streaming can be enabled using the following method.
player.setBitrateIndex(-1); // Pass -1 as the index parameter
During playback, you can switch to other bitrates at any time using `setBitrateIndex(index)`. After switching, the adaptive bitrate streaming feature will also be disabled.
8. Enable Smooth Bitrate Switching
By enabling smooth bitrate switching before starting playback, you can seamlessly transition between different resolutions during playback. Compared to disabling smooth bitrate switching, this process is more fluid and provides a better user experience. You can configure this setting according to your needs.
const config: TXVodPlayConfig = {smoothSwitchBitrate: true,};player.setConfig(config);
9. Playback Progress Monitoring
In video-on-demand playback, progress information is categorized into two types: Loading Progress and Playback Progress. The SDK currently notifies these two progress updates in real-time through event notifications.
Monitor player events via the
setListener interface. Progress notifications will be delivered to your application through the VOD_PLAY_EVT_PLAY_PROGRESS event callback.player.setListener({onPlayEvent: (event, param) => {if (event === TXVodConstants.VOD_PLAY_EVT_PLAY_PROGRESS) {// Current playback progress (in milliseconds)const currentMs = param[TXVodConstants.EVT_PLAY_PROGRESS_MS] ?? 0;// Total video duration (in milliseconds)const durationMs = param[TXVodConstants.EVT_PLAY_DURATION_MS] ?? 0;// Playable duration (in milliseconds), i.e., loading progressconst playableMs = param[TXVodConstants.EVT_PLAYABLE_DURATION_MS] ?? 0;console.log(`progress: ${currentMs / 1000}s / ${durationMs / 1000}s`);}},});
10. Network Speed Monitoring for Playback
Monitor the network status of the player through the
onNetStatus callback of the setListener interface.player.setListener({onNetStatus: (param) => {const speed = param.NET_SPEED; // Network Speed (kbps)const vBitrate = param.VIDEO_BITRATE; // Video Bitrateconst aBitrate = param.AUDIO_BITRATE; // Audio Bitrateconst fps = param.VIDEO_FPS; // Frame Rate},// ...});
11. Obtaining Video Resolution
The Player SDK plays videos via URL strings, which inherently do not contain video information. To retrieve relevant details, it is necessary to access cloud servers to load the associated video information. Consequently, the SDK can only transmit video information to your application through event notifications.
You can obtain resolution information using the following two methods:
Method 1: Retrieve the video's width and height via
VIDEO_WIDTH and VIDEO_HEIGHT in onNetStatus.Method 2: After receiving the
VOD_PLAY_EVT_VOD_PLAY_PREPARED event callback from the player, directly call getWidth() and getHeight() to obtain the current width and height.player.setListener({onNetStatus: (param) => {const w = param.VIDEO_WIDTH;const h = param.VIDEO_HEIGHT;},// ...});// To obtain the video width and height, the return value is only available after receiving the VOD_PLAY_EVT_VOD_PLAY_PREPARED event callback from the player.const width = player.getWidth();const height = player.getHeight();
12. Obtaining Video Information
// Current playback time (seconds)const currentTime = player.getCurrentPlaybackTime();// Total video duration (seconds)const duration = player.getDuration();// Playable duration (seconds, buffered portion)const playableDuration = player.getPlayableDuration();// Buffering duration (seconds)const bufferDuration = player.getBufferDuration();// Video widthconst width = player.getWidth();// Video Heightconst height = player.getHeight();// Is currently playingconst isPlaying = player.isPlaying();
13. Playback Buffer Size
Controls the maximum amount of data to be pre-buffered from the network during normal video playback. If not configured, the player's default buffering strategy will be applied to ensure smooth playback.
const config: TXVodPlayConfig = {maxBufferSize: 10, // Maximum buffer size during playback. Unit: MB};player.setConfig(config);
14. Video Local Caching
In short video playback scenarios, local caching of video files is a highly essential feature. For general users, when rewatching a video they have already viewed, it should not consume additional data traffic.
Format Support: The SDK supports caching for two common on-demand video formats: HLS (m3u8) and MP4.
When to Enable: The SDK does not enable caching by default. For scenarios where users have a low rate of rewatching videos, it is not recommended to enable this feature.
How to Enable: The caching feature applies globally and should be enabled before using the player. Enabling this feature requires configuring two parameters: the local cache directory and the cache size.
import { RNTXPlayerGlobalSetting } from 'react-native-superplayer';// Set the global cache directory for the playback engineRNTXPlayerGlobalSetting.setCacheFolderPath('txcache');// Set the maximum cache size (MB)RNTXPlayerGlobalSetting.setMaxCacheSize(200);
15. Screenshot
// Capture the current frame, return the local image pathconst imagePath = await player.snapshot();console.log('Screenshot saved to:', imagePath);// Can also be obtained via callbackplayer.setListener({onSnapshot: (path) => {console.log('Screenshot path:', path);},// ...});
16. Screen Adjustment
Render Mode:
import { TXVodConstants } from 'react-native-superplayer';// Full-fill mode (crops the picture, no black bars)player.setRenderMode(TXVodConstants.RENDER_MODE_FULL_FILL_SCREEN);// Adjust mode (scales proportionally, may have black bars)player.setRenderMode(TXVodConstants.RENDER_MODE_ADJUST_RESOLUTION);
Screen Rotation:
// Set the screen rotation angle (0, 90, 180, 270)player.setRenderRotation(90);
Mirror Playback:
// Enable/disable mirroringplayer.setMirror(true);
17. External Subtitles
Attention:
This feature requires the Player Advanced Edition License.
The Player SDK supports adding and switching external subtitles, and currently supports subtitles in both SRT and VTT formats.
Best practice: it is recommended to add subtitles before
startPlay, and call selectTrack to select the subtitle after receiving the VOD_PLAY_EVT_VOD_PLAY_PREPARED event. The subtitle text content will be delivered via the onSubtitleData event callback; rendering the subtitles on screen must be handled by your own application.Step 1: Add External Subtitle
import { SubtitleMimeType } from 'react-native-superplayer';// [Important] Must be called before startPlayplayer.addSubtitleSource('https://example.com/subtitle_cn.srt', // Subtitle URL'Chinese', // Subtitle name (must be unique across multiple subtitles)SubtitleMimeType.SRT // Subtitle format: 0=SRT, 1=VTT);player.addSubtitleSource('https://example.com/subtitle_en.vtt','English',SubtitleMimeType.VTT);// Then start playbackplayer.startPlay(videoUrl);
Step 2: Enable Subtitle Text Callback
// [Important] Must set extInfoMap['450'] = 0 to receive the onSubtitleData callbackplayer.setConfig({extInfoMap: {'450': 0, // Enable subtitle text callback},});player.setListener({onSubtitleData: (data) => {// data.subtitleData: subtitle text (empty string means clear screen)// data.trackIndex: current subtitle track indexconsole.log('Subtitle:', data.subtitleData);},// ...});
Step 3: Switch Subtitles During Playback
// Get the subtitle track listconst subtitleTracks = player.getSubtitleTrackInfo();// Select the specified subtitle trackplayer.selectTrack(subtitleTracks[0].trackIndex);// Deselect (turn off subtitles)player.deselectTrack(subtitleTracks[0].trackIndex);
18. Multi-Audio-Track Switching
Attention:
This feature requires the Player Advanced Edition License.
The Player SDK supports switching between multiple audio tracks built into the video. See the usage example below:
// Get the audio track listconst audioTracks = player.getAudioTrackInfo();// Switch audio trackplayer.selectTrack(audioTracks[1].trackIndex);// TXTrackInfo structureinterface TXTrackInfo {trackIndex: number; // Track indextrackType: number; // Track type: 1=video, 2=audio, 3=subtitlename: string; // Track nameisSelected: boolean; // Whether selectedisExclusive: boolean; // Whether mutually exclusiveisInternal: boolean; // Whether embedded (false = external)}
19. Picture-in-Picture
Attention:
This feature requires the Player Advanced Edition License.
Currently, Picture-in-Picture is supported on both platforms:
Android: Implemented based on the system overlay window (SYSTEM_ALERT_WINDOW). The UI is entirely rendered by the SDK, supporting controls such as dragging, play/pause, fast forward/rewind, close, and restore App. Requires the user to grant the overlay window permission.
iOS: Uses the system PiP directly (based on AVPictureInPictureController). The UI is taken over by the system, supporting both in-app PiP and out-of-app PiP.
iOS Integration Steps
Note:
No additional configuration is needed on Android after integrating the SDK; the following three steps are required only for iOS when integrating Picture-in-Picture.
Step 1: Import the PiP Bundle Resource
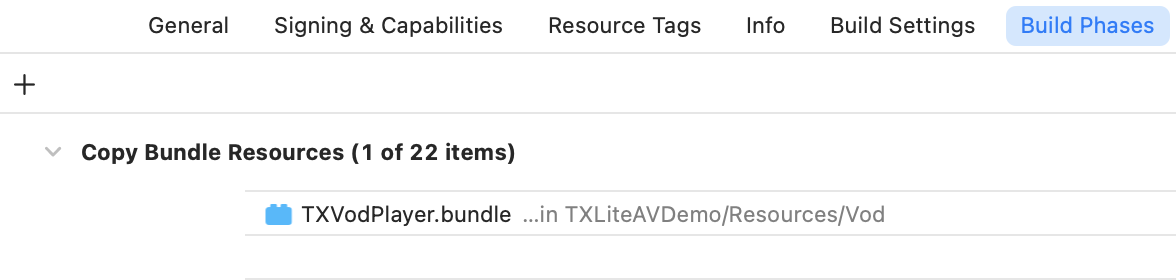
The PiP module in the SDK depends on the built-in resources in
TXVodPlayer.bundle, which must be manually added to the Xcode project before compiling. Do not change the bundle name or any resource name inside it, otherwise seamless switching to Picture-in-Picture will fail.Resource download link: TXVodPlayer.bundle.zip
Operation illustration:
Step 2: Enable Background Mode
On iOS, whether it's in-app or out-of-app PiP, the App must declare the audio/PiP background capability:
In Xcode, select the corresponding Target → Signing & Capabilities → Background Modes, and check Audio, AirPlay, and Picture in Picture.

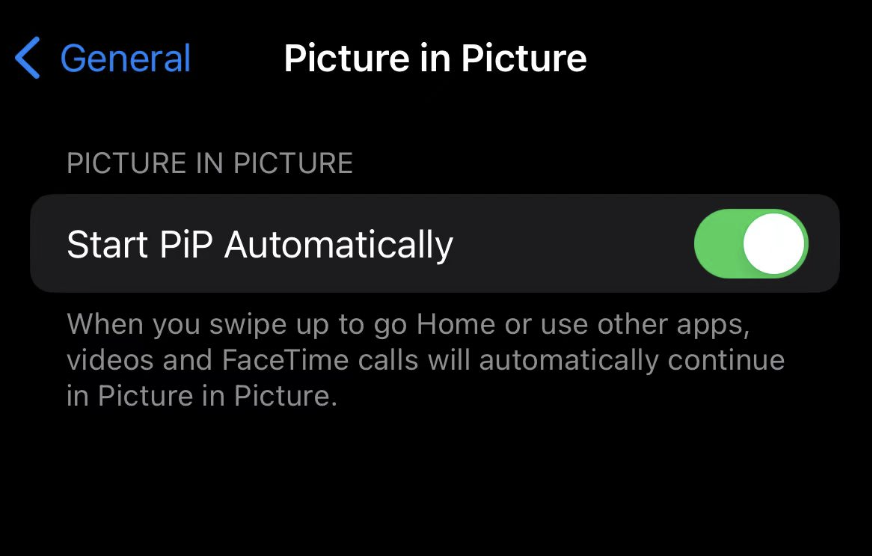
Step 3: Enable Auto Picture-in-Picture in System Settings (required only for the auto PiP feature)
Only when using
setAutoPictureInPictureEnabled(true) for auto PiP does the user need to enable this in advance in system settings:iPhone / iPad → Settings → General → Picture in Picture → Automatically Start PiP.
Prerequisites
Android:
The
SYSTEM_ALERT_WINDOW permission is declared in the AndroidManifest.xml of the App containing the player (already declared by the SDK itself; no additional configuration is needed after including the SDK).Before first use, the user needs to grant the overlay window permission.
iOS:
System version: iPhone iOS 14+, iPad iOS 9+.
Steps 1 and 2 of the iOS Integration Steps above have been completed (bundle resource + Background Modes).
For auto PiP, the user needs to enable "Automatically Start PiP" in system settings.
Detect Device Support
import { TXVodPlayer } from 'react-native-superplayer';const code = TXVodPlayer.isDeviceSupportPip();// Return value:// 0 = Supported (Android includes granted permission)// -101 = Android has no overlay window permission// -201 = iOS device or system version not supported// Other = platform-specific error code, see the error code table for details
Request Overlay Window Permission (Android only)
// Navigate to the system authorization page, letting the user manually enable the overlay window permissionTXVodPlayer.requestOverlayPermission();
Enter / Exit Picture-in-Picture
// Enter Picture-in-Pictureplayer.enterPictureInPictureMode();// Exit Picture-in-Pictureplayer.exitPictureInPictureMode();
Typical Button Integration:
import { Platform } from 'react-native';import { TXVodPlayer } from 'react-native-superplayer';const handleEnterPip = () => {const player = playerRef.current;if (!player) return;if (Platform.OS === 'android') {const code = TXVodPlayer.isDeviceSupportPip();if (code !== 0) {TXVodPlayer.requestOverlayPermission();return;}}player.enterPictureInPictureMode();};
Auto Picture-in-Picture (automatically enters when app goes to background)
// After enabling:// - iOS: just call it; the system automatically enters PiP when the App goes to the background// - Android: the SDK does not listen to the App lifecycle; the business side needs to use AppState to listen on its ownplayer.setAutoPictureInPictureEnabled(true);
Android: Implementing Auto Picture-in-Picture via AppState on the Business Side:
import { useEffect } from 'react';import { AppState, Platform } from 'react-native';useEffect(() => {if (Platform.OS !== 'android' || !autoPipEnabled) return;const sub = AppState.addEventListener('change', (next) => {const player = playerRef.current;if (!player) return;if (next === 'background' && player.isPlaying()) {player.enterPictureInPictureMode();} else if (next === 'active') {player.exitPictureInPictureMode();}});return () => sub.remove();}, [autoPipEnabled]);
Listen for Picture-in-Picture Events
import type { TXPipListener } from 'react-native-superplayer';player.setPipListener({onPipStart: () => {console.log('Picture-in-Picture started');},onPipStop: () => {console.log('Picture-in-Picture stopped');},onPipRestore: () => {// User tapped the restore button inside the overlay windowconsole.log('User tapped the restore button');},onPipError: (code, message) => {console.warn(`Picture-in-Picture error code=${code} msg=${message ?? ''}`);},});// Remove the listenerplayer.setPipListener(null);
Picture-in-Picture Error Codes
Error codes are segmented by platform:
Range | Platform |
0 | General, no error. |
-1xx | Android-specific (overlay window implementation). |
-2xx | iOS-specific (system PiP implementation). |
Android (-1xx):
Error Code | Meaning | SDK Behavior | Business Recommendation |
-101 | Missing overlay window permission. | Automatically navigates to the system authorization page. | Guide the user to grant the permission, then call enterPictureInPictureMode() again after returning. |
-102 | Cannot find the player instance corresponding to the playerId. | Returns directly. | Check whether the player was destroyed too early. |
-103 | WindowManager.addView failed. | Automatically cleans up resources. | Report the log + prompt the user to retry. |
iOS (-2xx):
Error Code | Meaning | Trigger Scenario |
-201 | Device or system version does not support PiP. | Used for synchronous pre-check by isDeviceSupportPip(). |
-206 | Cannot find the player instance corresponding to the playerId. | RN-layer validation, triggered when the business destroys the player too early. |
-200 | PiP error from the SDK (unified code). | All errors thrown by AVPictureInPictureController; the specific error type is passed through via message. |
Lifecycle Considerations
Important: While the player instance is in Picture-in-Picture mode, do not proactively call its `destroy()` method, otherwise the overlay window will close simultaneously.
Advanced Feature Usage
1. Video Preloading
Without creating a player instance, part of the video content can be downloaded in advance. This speeds up video startup and provides a better playback experience when the player is used.
Attention:
Video preloading will consume download bandwidth and thread resources. It is recommended to control the queue and keep the number of concurrent tasks under 3.
Usage example:
import {RNTXPlayerGlobalSetting,TXVodPreloadManager,type TXPlayInfoParams,} from 'react-native-superplayer';// [Important] The cache directory and size must be set first; a global setting is only needed onceRNTXPlayerGlobalSetting.setCacheFolderPath('txcache');RNTXPlayerGlobalSetting.setMaxCacheSize(500); // 500MB// Add callback listenerconst removeComplete = TXVodPreloadManager.addCompleteListener((event) => {console.log('Preload complete:', event.taskId, event.url);});const removeError = TXVodPreloadManager.addErrorListener((event) => {console.error('Preload failed:', event.code, event.message);});// Start preloadingconst params: TXPlayInfoParams = {url: 'https://example.com/video.mp4',};const taskId = await TXVodPreloadManager.startPreload(params, // Preload parameters10, // Preload size (MB)921600 // Expected resolution (1280×720 = 921600); pass -1 if not specified);// Stop preloadingTXVodPreloadManager.stopPreload(taskId);// Remove the listeners when no longer neededremoveComplete();removeError();
const removeStart = TXVodPreloadManager.addStartListener((event) => {console.log('Preload started:', event.taskId);console.log('Actual playback URL:', event.url); // URL after FileId link resolution});const params: TXPlayInfoParams = {appId: 1500005830,fileId: '387702307091793695',pSign: 'your_psign',};const taskId = await TXVodPreloadManager.startPreload(params, 10, 921600);
2. Video Download
Video download allows users to download videos while connected to the network and watch them later without a network connection. In addition, the Player SDK provides local encryption capabilities: the downloaded local video remains encrypted and can only be decrypted and played by the designated player, effectively preventing illegal distribution of downloaded videos and protecting video security.
Since HLS streaming media cannot be saved directly to local storage, it is not possible to play a locally downloaded HLS file simply by playing a local file. To address this, you can implement offline playback of HLS by using the video download solution based on
TXVodDownloadManager.Note:
Video download supports downloading MP4 and HLS videos.
Step 1: Preparation
import {RNTXPlayerGlobalSetting,TXVodDownloadManager,} from 'react-native-superplayer';// Set the download directory; a global setting is only needed onceRNTXPlayerGlobalSetting.setCacheFolderPath('txcache');
Step 2: Start Downloading
There are two ways to start a download: FileId and URL, as detailed below:
FileId download requires at least AppID, FileId, and quality to be passed in. For signed videos, pSign must also be passed. If no specific value is provided for userName, it defaults to "default".
Attention:
Encrypted videos can only be downloaded via FileId, and the psign parameter must be provided.
const TXVodQuality = {'240P': 240,'360P': 360,'480P': 480,'540P': 540,'720P': 720,'1080P': 1080,};const mediaInfo = await TXVodDownloadManager.startDownload({appId: 1500005830,fileId: '387702307091793695',quality: TXVodQuality['720P'], // Download resolutionpSign: 'your_psign',userName: 'default',});
At least the download URL must be provided. Nested HLS format is not supported; only single-bitrate HLS downloads are supported. If no specific value is provided for userName, it defaults to "default".
const mediaInfo = await TXVodDownloadManager.startDownloadUrl('https://example.com/video.mp4',921600, // Expected resolution'default' // User identifier);
Step 3: Task Information and Listeners
// Add progress listenerconst removeProgress = TXVodDownloadManager.addProgressListener((event) => {const { progress, speed } = event.mediaInfo;console.log(`Download progress: ${(progress * 100).toFixed(1)}%, speed: ${speed}KB/s`);});// Add completion listenerconst removeFinish = TXVodDownloadManager.addFinishListener((event) => {console.log('Download complete:', event.mediaInfo.playPath);// Use playPath to play the offline videoplayer.startPlay(event.mediaInfo.playPath);});// Add error listenerconst removeError = TXVodDownloadManager.addErrorListener((event) => {console.error('Download error:', event.errorCode, event.errorMsg);});
Possible task events you may receive:
Event | Description |
DownloadState.START | Task started, indicating the SDK has begun downloading. |
DownloadState.FINISH | Download complete; receiving this callback indicates the entire file has been downloaded. The downloaded file can now be played by TXVodPlayer. |
DownloadState.STOP | Task stopped; when you call stopDownload to stop the download, receiving this message indicates the stop was successful. |
DownloadState.ERROR | Download error; this callback is triggered if the network disconnects during the download, and the download task stops at the same time. |
Step 4: Interrupt Download
To stop a download, call the
stopDownload() method with the mediaInfo object returned when the download was started as the parameter. The SDK supports resumable downloads: as long as the download directory has not changed, the next time you download the same file it will resume from where it last stopped.TXVodDownloadManager.stopDownload(mediaInfo);
Step 5: Manage Downloads
// Get all download tasksconst list = await TXVodDownloadManager.getDownloadMediaInfoList();// Get download info by URLconst info = await TXVodDownloadManager.getDownloadMediaInfo(url);// Delete the download (including the local file)const success = TXVodDownloadManager.deleteDownloadMediaInfo(mediaInfo);
Step 6: Play Offline Video
If the downloadState of the mediaInfo obtained through the above steps is
DownloadState.FINISH, and the playPath of the mediaInfo has a value, this indicates that the video caching is complete and it can be passed directly to the player for playback:const cacheVideoUrl = cacheMediaInfo.playPath;player.startPlay(cacheVideoUrl);
3. Encrypted Playback
The video encryption scheme is mainly used in scenarios such as online education that require copyright protection for videos. To apply encryption protection to your video resources, you not only need to make changes on the player side, but also need to encrypt and transcode the video source itself, which requires the participation of both your backend and client-side development engineers. You can find all the details in Video Encryption Solution.
After obtaining the appId, the fileId of the encrypted video, and the psign from the Tencent Cloud Console, you can play the video in the following way:
// psign is the player signatureplayer.startPlayWithFileId(1500005830, // appId'387702307091793695', // fileId'your_psign' // Playback signature);
4. HEVC Adaptive Fallback Playback
The player supports passing in both HEVC and other video encoding formats at the same time. For example, an H.264 playback link, when the playback device does not support the HEVC format, playback will automatically fall back to the configured alternative encoding format (such as H.264).
Attention:
This feature requires the Player Advanced Edition License.
import { TXVodConstants } from 'react-native-superplayer';// Set the HEVC fallback configurationplayer.setExtendedOption({// Specify the original video encoding type as HEVC[TXVodConstants.VOD_KEY_VIDEO_CODEC_TYPE]: TXVodConstants.VIDEO_CODEC_HEVC,// Set the fallback playback link in H.264 format[TXVodConstants.VOD_KEY_BACKUP_URL]: 'https://example.com/video_h264.mp4',// Optional: set the media type of the fallback resource[TXVodConstants.VOD_KEY_BACKUP_URL_MEDIA_TYPE]: TXVodConstants.MEDIA_TYPE_AUTO,});// Play the HEVC video; if not supported, the SDK will automatically fall back to the backup URLplayer.startPlay('https://example.com/video_hevc.mp4');
5. Player Configuration
Before calling
startPlay, you can configure the player's parameters via setConfig, such as setting the connection timeout, the progress callback interval, the number of cache files, and so on.import type { TXVodPlayConfig } from 'react-native-superplayer';const config: TXVodPlayConfig = {// Network configurationconnectRetryCount: 3, // Number of reconnection retriesconnectRetryInterval: 3, // Reconnection interval (seconds)timeout: 10, // Connection timeout (seconds)// Seek configurationenableAccurateSeek: true, // Enable accurate seek// Progress callbackprogressInterval: 500, // Progress callback interval (milliseconds)// Buffering configurationmaxBufferSize: 50, // Maximum playback buffer (MB)maxPreloadSize: 10, // Preload buffer (MB)// Resolution configurationpreferredResolution: 921600, // Preferred resolution for HLS startup playback (1280×720)// Subtitle callbackextInfoMap: {'450': 0, // Enable subtitle text callback},// Custom HTTP Headerheaders: {'User-Agent': 'MyApp/1.0',},};player.setConfig(config);
Full Configuration Reference:
Parameter | Type | Default | Description |
connectRetryCount | number | 3 | Number of reconnection retries. |
connectRetryInterval | number | 3 | Reconnection interval (seconds, range 3-30). |
timeout | number | 10 | Connection timeout (seconds). |
enableAccurateSeek | boolean | true | Whether to enable accurate seek. |
autoRotate | boolean | true | Whether MP4 auto-rotates. |
smoothSwitchBitrate | boolean | false | Whether to smoothly switch bitrate. |
progressInterval | number | 500 | Progress callback interval (milliseconds). |
maxBufferSize | number | - | Maximum playback buffer (MB). |
maxPreloadSize | number | - | Preload buffer (MB). |
preferredResolution | number | - | Preferred resolution for HLS startup playback. |
headers | object | - | Custom HTTP Header. |
preferredAudioTrack | string | - | Preferred audio track name at startup. |
playerType | number | 1 | Player type (0: system player; 1: self-developed player). |
mediaType | number | 0 | Media type (0: automatic). |
extInfoMap | object | - | Extended configuration. |
Specify Resolution Before Startup
When playing a multi-bitrate HLS video source, if you know the resolution information of the video stream in advance, you can specify the preferred playback resolution before startup. The player will look for a stream with a resolution less than or equal to the preferred resolution to start playback; after startup, there is no need to switch to the desired stream via
setBitrateIndex.const config: TXVodPlayConfig = {// The parameter passed in is the product of the video width and height (width × height); you can pass in a custom valuepreferredResolution: 720 * 1280,};player.setConfig(config);
Specify Media Type Before Startup
When the media type to be played is known in advance, you can configure
mediaType to reduce internal playback type detection by the Player SDK, thereby improving startup speed.const config: TXVodPlayConfig = {mediaType: TXVodConstants.MEDIA_TYPE_FILE_VOD, // Used to improve MP4 startup speed// ormediaType: TXVodConstants.MEDIA_TYPE_HLS_VOD, // Used to improve HLS startup speed};player.setConfig(config);
6. Global Cache Configuration
Global cache configuration affects all player instances. It is recommended to set it once when the App starts:
import { RNTXPlayerGlobalSetting } from 'react-native-superplayer';// Set the cache directory (use a relative path)// Android: sdcard/Android/data/{package name}/files/txcache// iOS: Documents/txcacheRNTXPlayerGlobalSetting.setCacheFolderPath('txcache');// Set the maximum cache size (MB)RNTXPlayerGlobalSetting.setMaxCacheSize(500);// Get the current cache directoryconst cachePath = RNTXPlayerGlobalSetting.getCacheFolderPath();// Get the current maximum cache sizeconst maxSize = RNTXPlayerGlobalSetting.getMaxCacheSize();// Enable flexible License validation (used when there isn't enough time to validate on first startup)RNTXPlayerGlobalSetting.setLicenseFlexibleValid(true);
Player Event Listening
You can use the
setListener of TXVodPlayer to listen to the player's playback events and synchronize information to your application.Playback Event Notifications (onPlayEvent)
Event ID | Value | Description |
VOD_PLAY_EVT_PLAY_BEGIN | 2004 | Video playback started. |
VOD_PLAY_EVT_PLAY_PROGRESS | 2005 | Video playback progress; notifies the current playback progress, loading progress, and total duration. |
VOD_PLAY_EVT_PLAY_LOADING | 2007 | Video playback loading; if it can recover, a VOD_PLAY_EVT_VOD_LOADING_END event will follow. |
VOD_PLAY_EVT_VOD_LOADING_END | 2014 | Video playback loading ended; video playback continues. |
VOD_PLAY_EVT_SEEK_COMPLETE | 2019 | Seek complete. |
End Events
Event ID | Value | Description |
VOD_PLAY_EVT_PLAY_END | 2006 | Video playback ended. |
VOD_PLAY_ERR_NET_DISCONNECT | -2301 | Network disconnected, and could not recover after multiple reconnection attempts; for further retries, please restart playback yourself. |
VOD_PLAY_ERR_FILE_NOT_FOUND | -2303 | File does not exist. |
VOD_PLAY_ERR_HLS_KEY | -2305 | Failed to obtain the HLS decryption key. |
Warning Events
You don't need to worry about the following events; they are just used to inform you of some internal SDK events.
Event ID | Value | Description |
VOD_PLAY_ERR_HEVC_DECODE_FAIL | -2304 | H.265 decoding failed. |
VOD_PLAY_ERR_GET_PLAYINFO_FAIL | -2306 | Failed to obtain VOD playback information. |
VOD_PLAY_ERR_INVALID_LICENCE | -5 | Invalid License. |
Connection Events
Events related to connecting to the server, mainly used for measuring and tracking server connection time:
Event ID | Value | Description |
VOD_PLAY_EVT_VOD_PLAY_PREPARED | 2013 | The player is ready and can start playback. After setting autoPlay to false, you need to call resume after receiving this event for playback to begin. |
VOD_PLAY_EVT_RCV_FIRST_I_FRAME | 2003 | The network received the first renderable video packet (IDR). |
VOD_PLAY_EVT_HIT_CACHE | 2002 | Hit the local cache. |
Screen Events
The following events are used to obtain information about screen changes:
Event ID | Value | Description |
VOD_PLAY_EVT_CHANGE_RESOLUTION | 2009 | Video resolution changed. |
Track Events
Event ID | Value | Description |
VOD_PLAY_EVT_SELECT_TRACK_COMPLETE | 2020 | Track switching complete. |
VOD_PLAY_EVT_LOOP_ONCE_COMPLETE | 6001 | One loop of playback has ended. |
Example of obtaining video playback progress information via
setListener:player.setListener({onPlayEvent: (event, param) => {switch (event) {case TXVodConstants.VOD_PLAY_EVT_VOD_PLAY_PREPARED:console.log('Preparation complete');break;case TXVodConstants.VOD_PLAY_EVT_PLAY_BEGIN:console.log('Playback started');break;case TXVodConstants.VOD_PLAY_EVT_PLAY_PROGRESS:const current = param[TXVodConstants.EVT_PLAY_PROGRESS_MS] / 1000;const duration = param[TXVodConstants.EVT_PLAY_DURATION_MS] / 1000;console.log(`Progress: ${current}s / ${duration}s`);break;case TXVodConstants.VOD_PLAY_EVT_PLAY_END:console.log('Playback ended');break;case TXVodConstants.VOD_PLAY_EVT_CHANGE_RESOLUTION:const width = param[TXVodConstants.EVT_PARAM1];const height = param[TXVodConstants.EVT_PARAM2];console.log(`Resolution changed: ${width}x${height}`);break;default:if (event < 0) {const msg = param[TXVodConstants.EVT_DESCRIPTION];console.error(`Playback error [${event}]: ${msg}`);}}},});
Playback Status Feedback (onNetStatus)
Status feedback is triggered every 0.5 seconds, aiming to provide real-time feedback on the current player status. It is like a car's dashboard, informing you of some specific internal conditions of the SDK so that you can understand the current video playback status and more.
Metric | Description |
NET_SPEED | Current network data receiving speed, in Kbps. |
VIDEO_FPS | Current frame rate of the streaming video. |
VIDEO_BITRATE | Current video bitrate of the streaming media, in Kbps. |
AUDIO_BITRATE | Current audio bitrate of the streaming media, in Kbps. |
VIDEO_CACHE | Buffer (jitter buffer) size; if the current buffer length is 0, it indicates that stuttering is imminent. |
VIDEO_WIDTH | Video resolution - width. |
VIDEO_HEIGHT | Video resolution - height. |
Example of obtaining video playback progress information via
onNetStatus:player.setListener({onNetStatus: (param) => {const speed = param.NET_SPEED;const videoWidth = param.VIDEO_WIDTH;const videoHeight = param.VIDEO_HEIGHT;},// ...});
Subtitle Data Callback (onSubtitleData)
player.setListener({onSubtitleData: (data) => {// data.subtitleData: subtitle text (empty string means clear screen)// data.trackIndex: subtitle track indexif (data.subtitleData) {setSubtitleText(data.subtitleData);} else {setSubtitleText(''); // Clear screen}},// ...});
フィードバック