This document describes how to upload audio/video files from local storage or a URL in the VOD console.
Note:
Formats including WMV, RM, MOV, MPEG, MP4, 3GP, FLV, AVI, and RMVB are supported.
During upload, you can visit other pages of the VOD console, but do not close the browser or access the console of another product. Doing so will interrupt the upload.
Web upload supports checkpoint restart and upload queues. We recommend you use Chrome. If you use Internet Explorer, make sure the version is 10 or later.
Upload from Local Storage
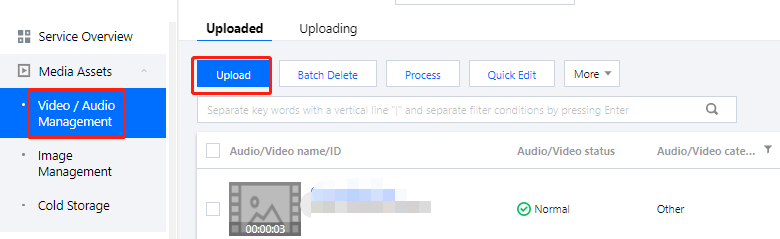
1. Log in to the VOD console and select Application Management on the left sidebar.
2. Select the target application.
3. Go to Media Assets > Video/Audio Management > Uploaded.
4. Click Upload.
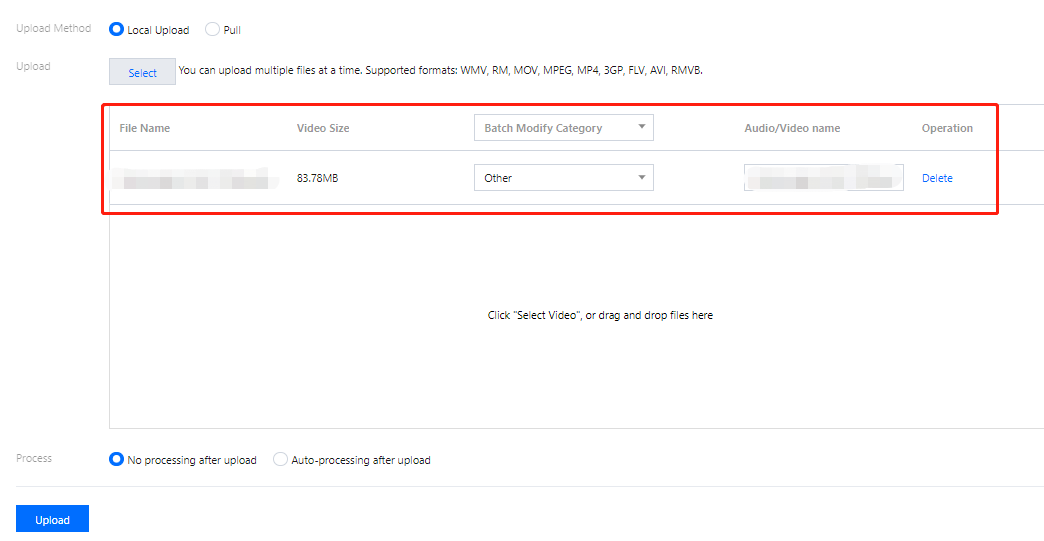
5. Select Local Upload and then click Select to select a local file or drag and drop the file to the empty space.
6. In the upload list, you can check the names and sizes of files to be uploaded, change their names and categories, or remove them from the list.
7. You can choose whether to process the audio/video files upon upload.
If you don’t want to process the files upon upload, select No processing after upload.
If you want to process the files upon load, select Auto-processing after upload and set the processing parameters.
Processing Type
Transcoding/Moderation/Task Flow Template
Watermark Template
Thumbnail
Transcoding
If the processing type is
Transcoding, this will be Transcoding Template.
Click Transcoding Template to select an existing template.
or click Common Template to select a frequently used template.
No watermark
Default watermark
Select watermark
If you select this, the first frame will be used as the thumbnail.
Moderation
If the processing type is Moderation, this will be Moderation Template. Select a moderation template from the drop-down list.
-
-
Task Flow
If the processing type is Task Flow, this will be Task Flow Template. Select a task flow template from the drop-down list.
-
-
8. Click Upload.
Pull from URLs
Pulling by row
1. Log in to the VOD console and select Media Assets > Video/Audio Management on the left sidebar.
2. Click Upload. The pull method supports file formats including WMV, RM, MOV, MPEG, MP4, 3GP, FLV, AVI, RMVB, and HLS.
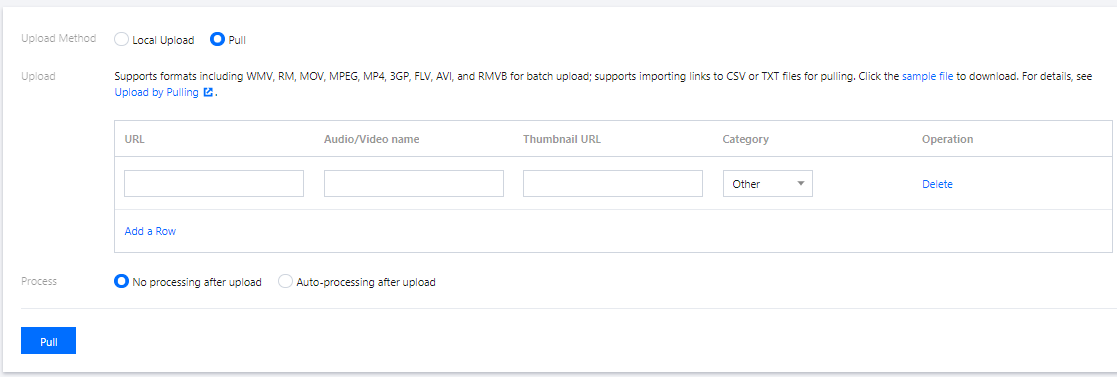
3. Select Pull (this allows you to upload videos to the console from URLs) and click Add a Row in the upload list.
4. Enter the information of the file to upload. You can add multiple files by clicking Add a Row, one row for each file.
URL: Enter the URL of the file to upload.
Audio/Video name: Enter the name of the file.
Thumbnail URL: Enter the URL of the thumbnail.
Category: Select a category for the file.
5. Click Pull.
Note:
The upload process may take several minutes. You can view the progress of videos being uploaded in Video/Audio Management > Uploading. Uploaded videos can be found in Video/Audio Management > Uploaded.
Pulling in batches
You can upload a TXT or CSV file that contains the information of the files to upload. VOD will parse the TXT or CSV file and automatically fill the upload information in the upload list.
The content of the TXT or CSV file must meet certain format requirements. You can download a sample file to view the details.
Column 1
Column 2
Column 3
Source URL
Name
Thumbnail URL
TXT file: Separate columns with commas.
CSV file: Separate columns with commas (You can also fill in the table in the sample file).
Note:
Make sure you enter the information in the specified order, that is, source URL, name, and thumbnail URL.
After the file is parsed, check for errors before upload.
Please refer to the sample files for format requirements.