Connecting to Tencent Cloud DLC in Power BI Desktop
Download
Focus Mode
Font Size
This document is a connection guide for Tencent Cloud DLC and Power BI Desktop. It covers environment preparation, account authentication configuration, data loading modes (which support writing SQL to retrieve data), and common issue troubleshooting, helping you quickly integrate with Power BI for data visualization analysis.
Note:
The initial configuration is expected to take 5 minutes. After completing the initial configuration, you can start creating new reports directly from connecting to the DLC data source.
Preparations
The following steps are required only during the initial configuration (estimated to take 5 minutes). After completing the initial configuration, you can start creating new reports directly from connecting to DLC.
Before you begin, obtain the following two core files from the DLC team.
dlc-spark-odbc-1.0.0-win64.msi ODBC Driver (System-level Installer)DlcODBCNative.mez Power BI Custom Connector
Installing the ODBC Driver
1. Double-click to open "dlc-spark-odbc-1.0.0-win64.msi".
2. In the User Account Control (UAC) prompt that appears, click Yes.
3. Follow the installation wizard instructions and click Next sequentially until the installation is complete.
Silent Installation (for IT batch deployment):
msiexec /i "dlc-spark-odbc-1.0.0-win64.msi" /qn /norestart /l*v install.log
Note:
This driver is a background system component. After installation, no desktop shortcuts or Start menu icons will be created.
You do not need to create an ODBC data source (DSN). The connector directly calls by the driver name.
To uninstall, choose Control Panel > Programs and Features, find DLC Spark ODBC Driver, and then uninstall it.
Verification (Optional)
After installation, run the following command in PowerShell to verify whether the driver is registered successfully.
Get-ItemProperty "HKLM:\\SOFTWARE\\ODBC\\ODBCINST.INI\\DLC Spark ODBC Driver"
If the Driver field in the returned result points to
C:\\Program Files\\Tencent\\DLC Spark ODBC Driver\\dlcodbc64.dll, the driver is installed successfully.Deploying the Power BI Connector
The ODBC driver communicates with the DLC server, while the custom connector (.mez file) displays DLC in the data source list of Power BI Desktop. Both must be used together.
1. Copy DlcODBCNative.mez to the following directory (create it manually if it does not exist):
%USERPROFILE%\\Documents\\Power BI Desktop\\Custom Connectors\\Complete sample path:
C:\\Users\\<YourUserName>\\Documents\\Power BI Desktop\\Custom Connectors\\DlcODBCNative.mezNote:
This step does not require administrator privileges and is a user-level deployment.
Enabling Custom Connector Loading
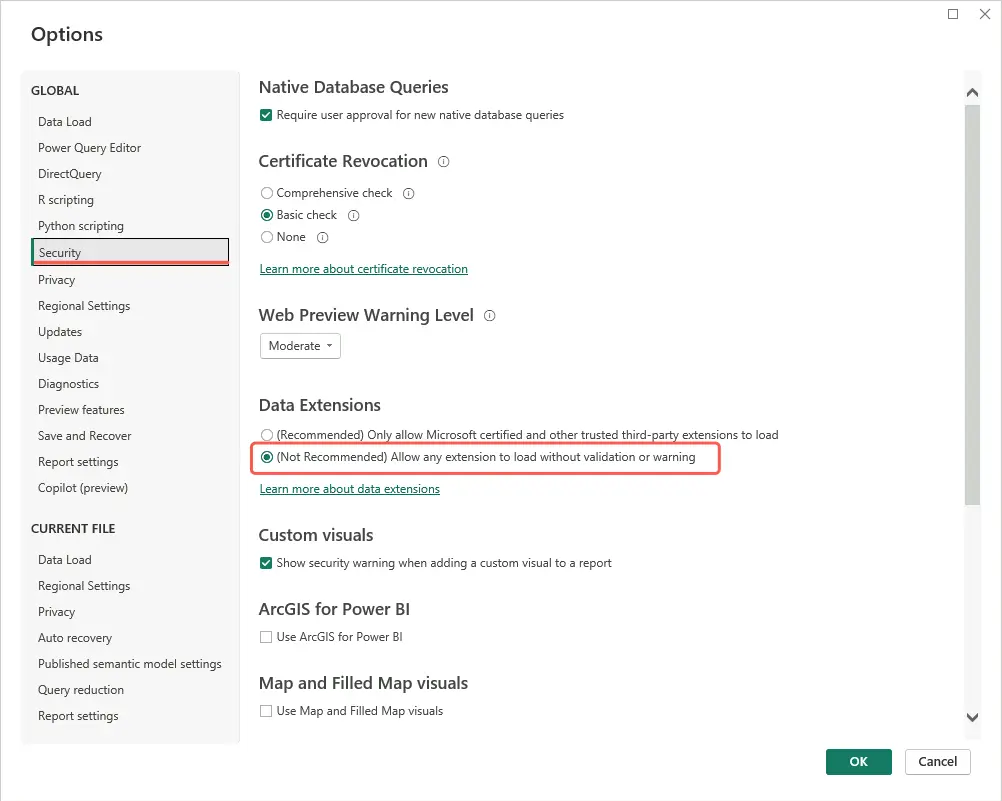
1. Open Power BI Desktop. Click File > Options and Settings > Options in the menu bar.
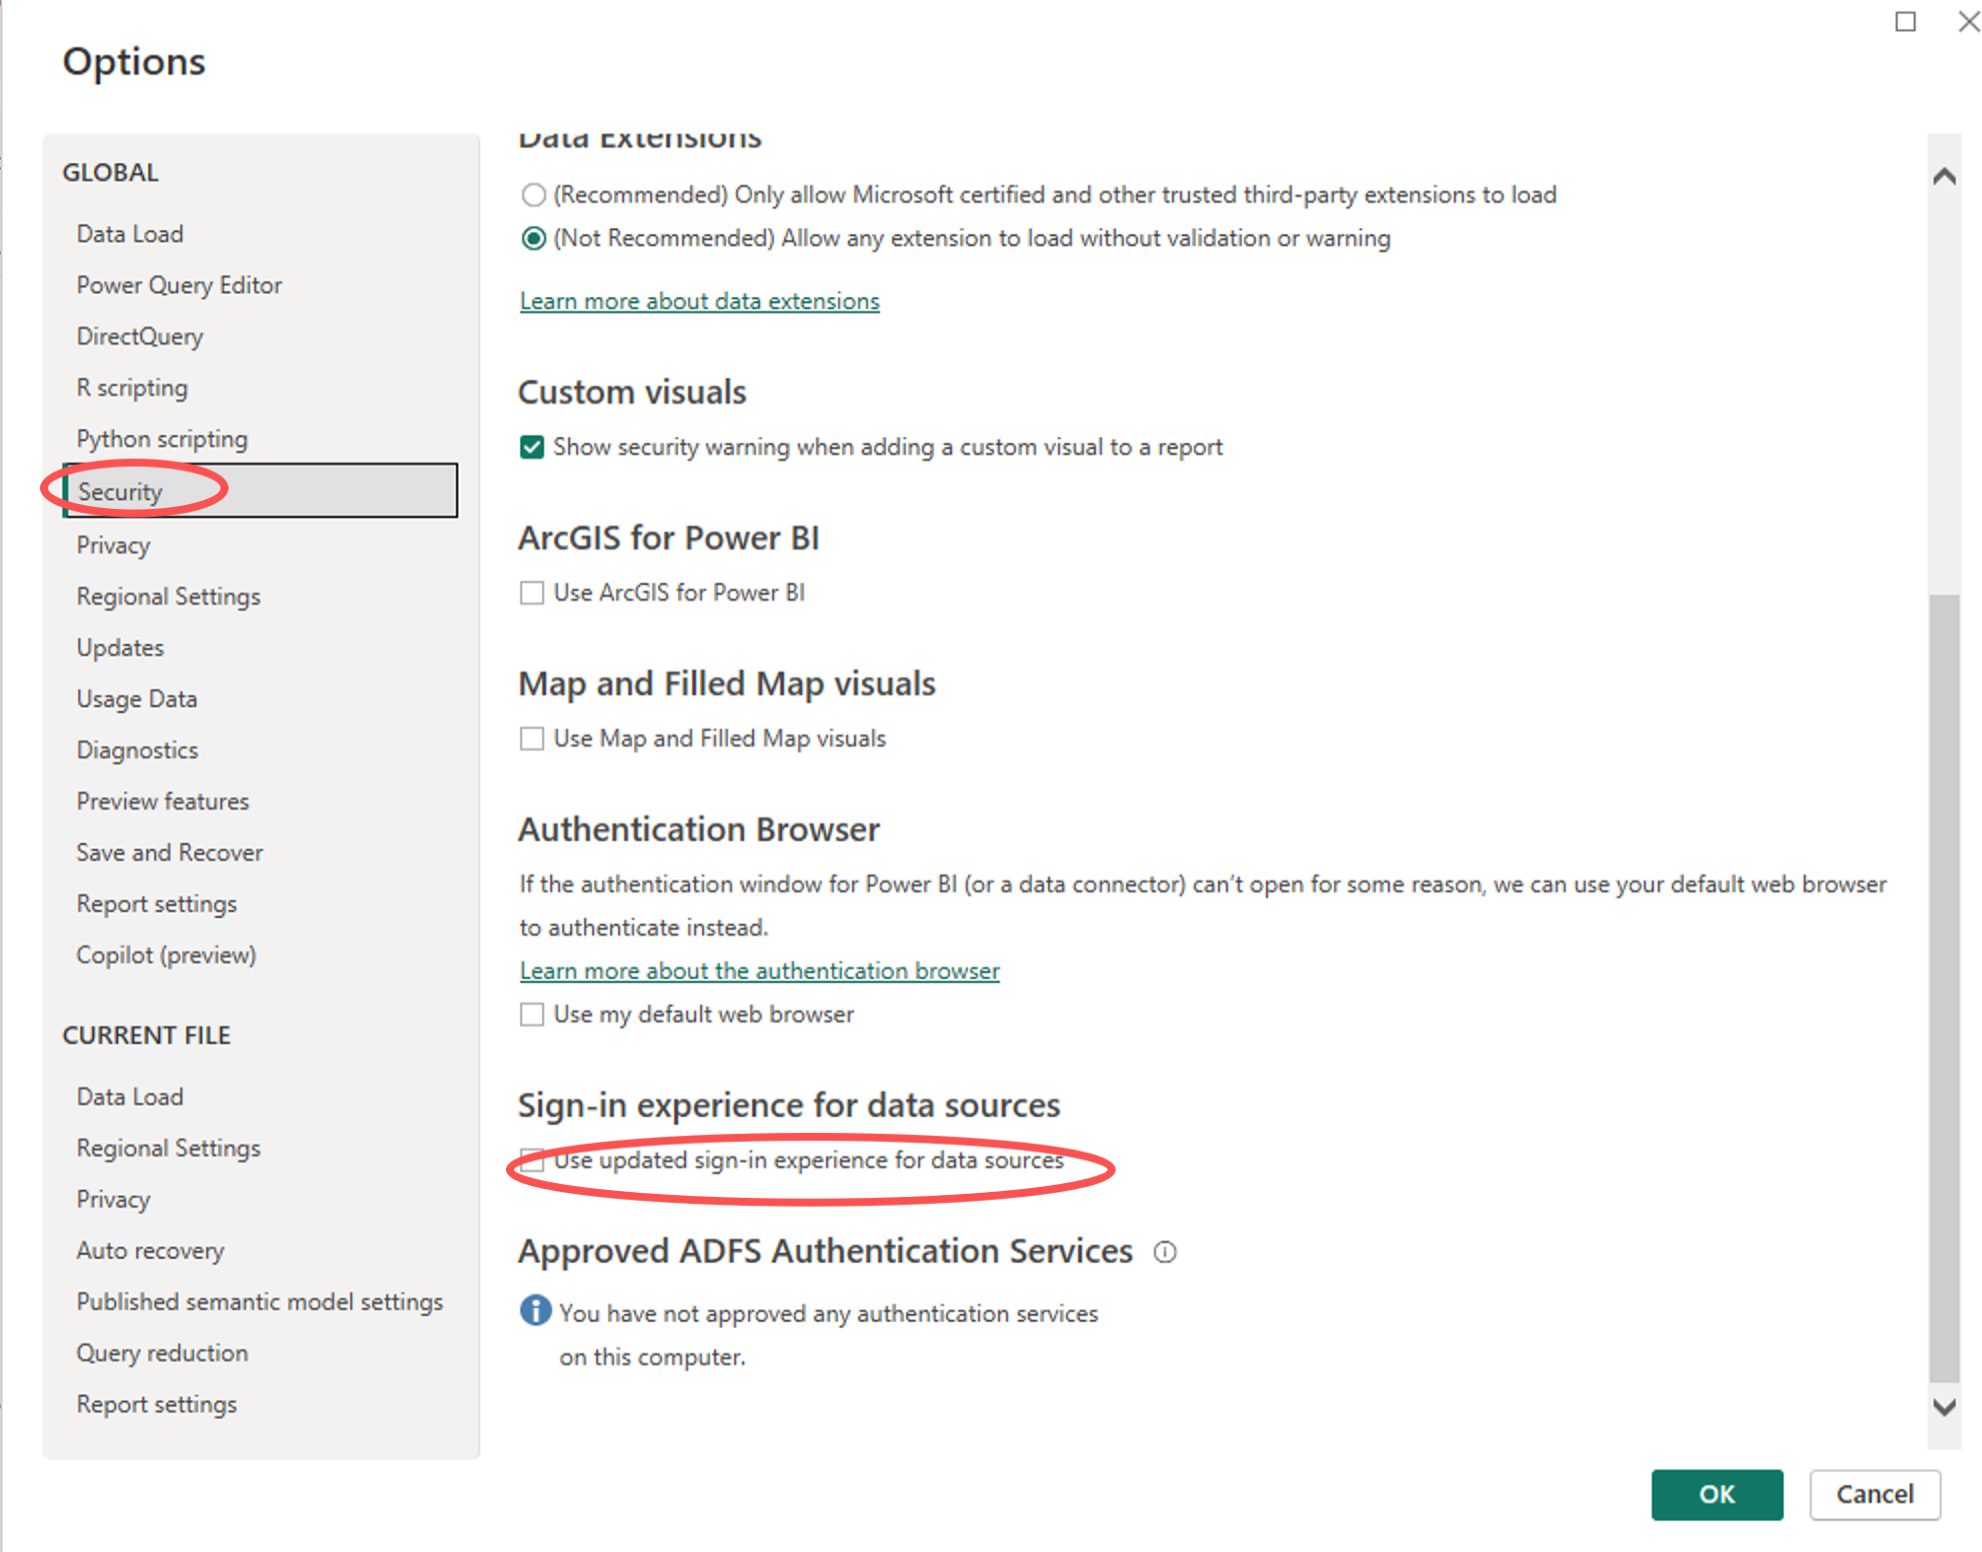
2. On the left, choose GLOBAL > Security.
3. Locate the "Data Extensions" area and select (Not Recommended) Allow any extension to load without validation or warning.
4. Click OK.
5. Completely close and reopen Power BI Desktop for the connector to take effect.
Note:
This option is required for Power BI Desktop to load custom connectors. If it is not enabled, the DLC data source will not appear in the data source list.
Connecting to DLC
Configuring the Identity Provider and Role
This step configures the Provider ID and Role ARN required for OIDC single sign-on.
Provider ID
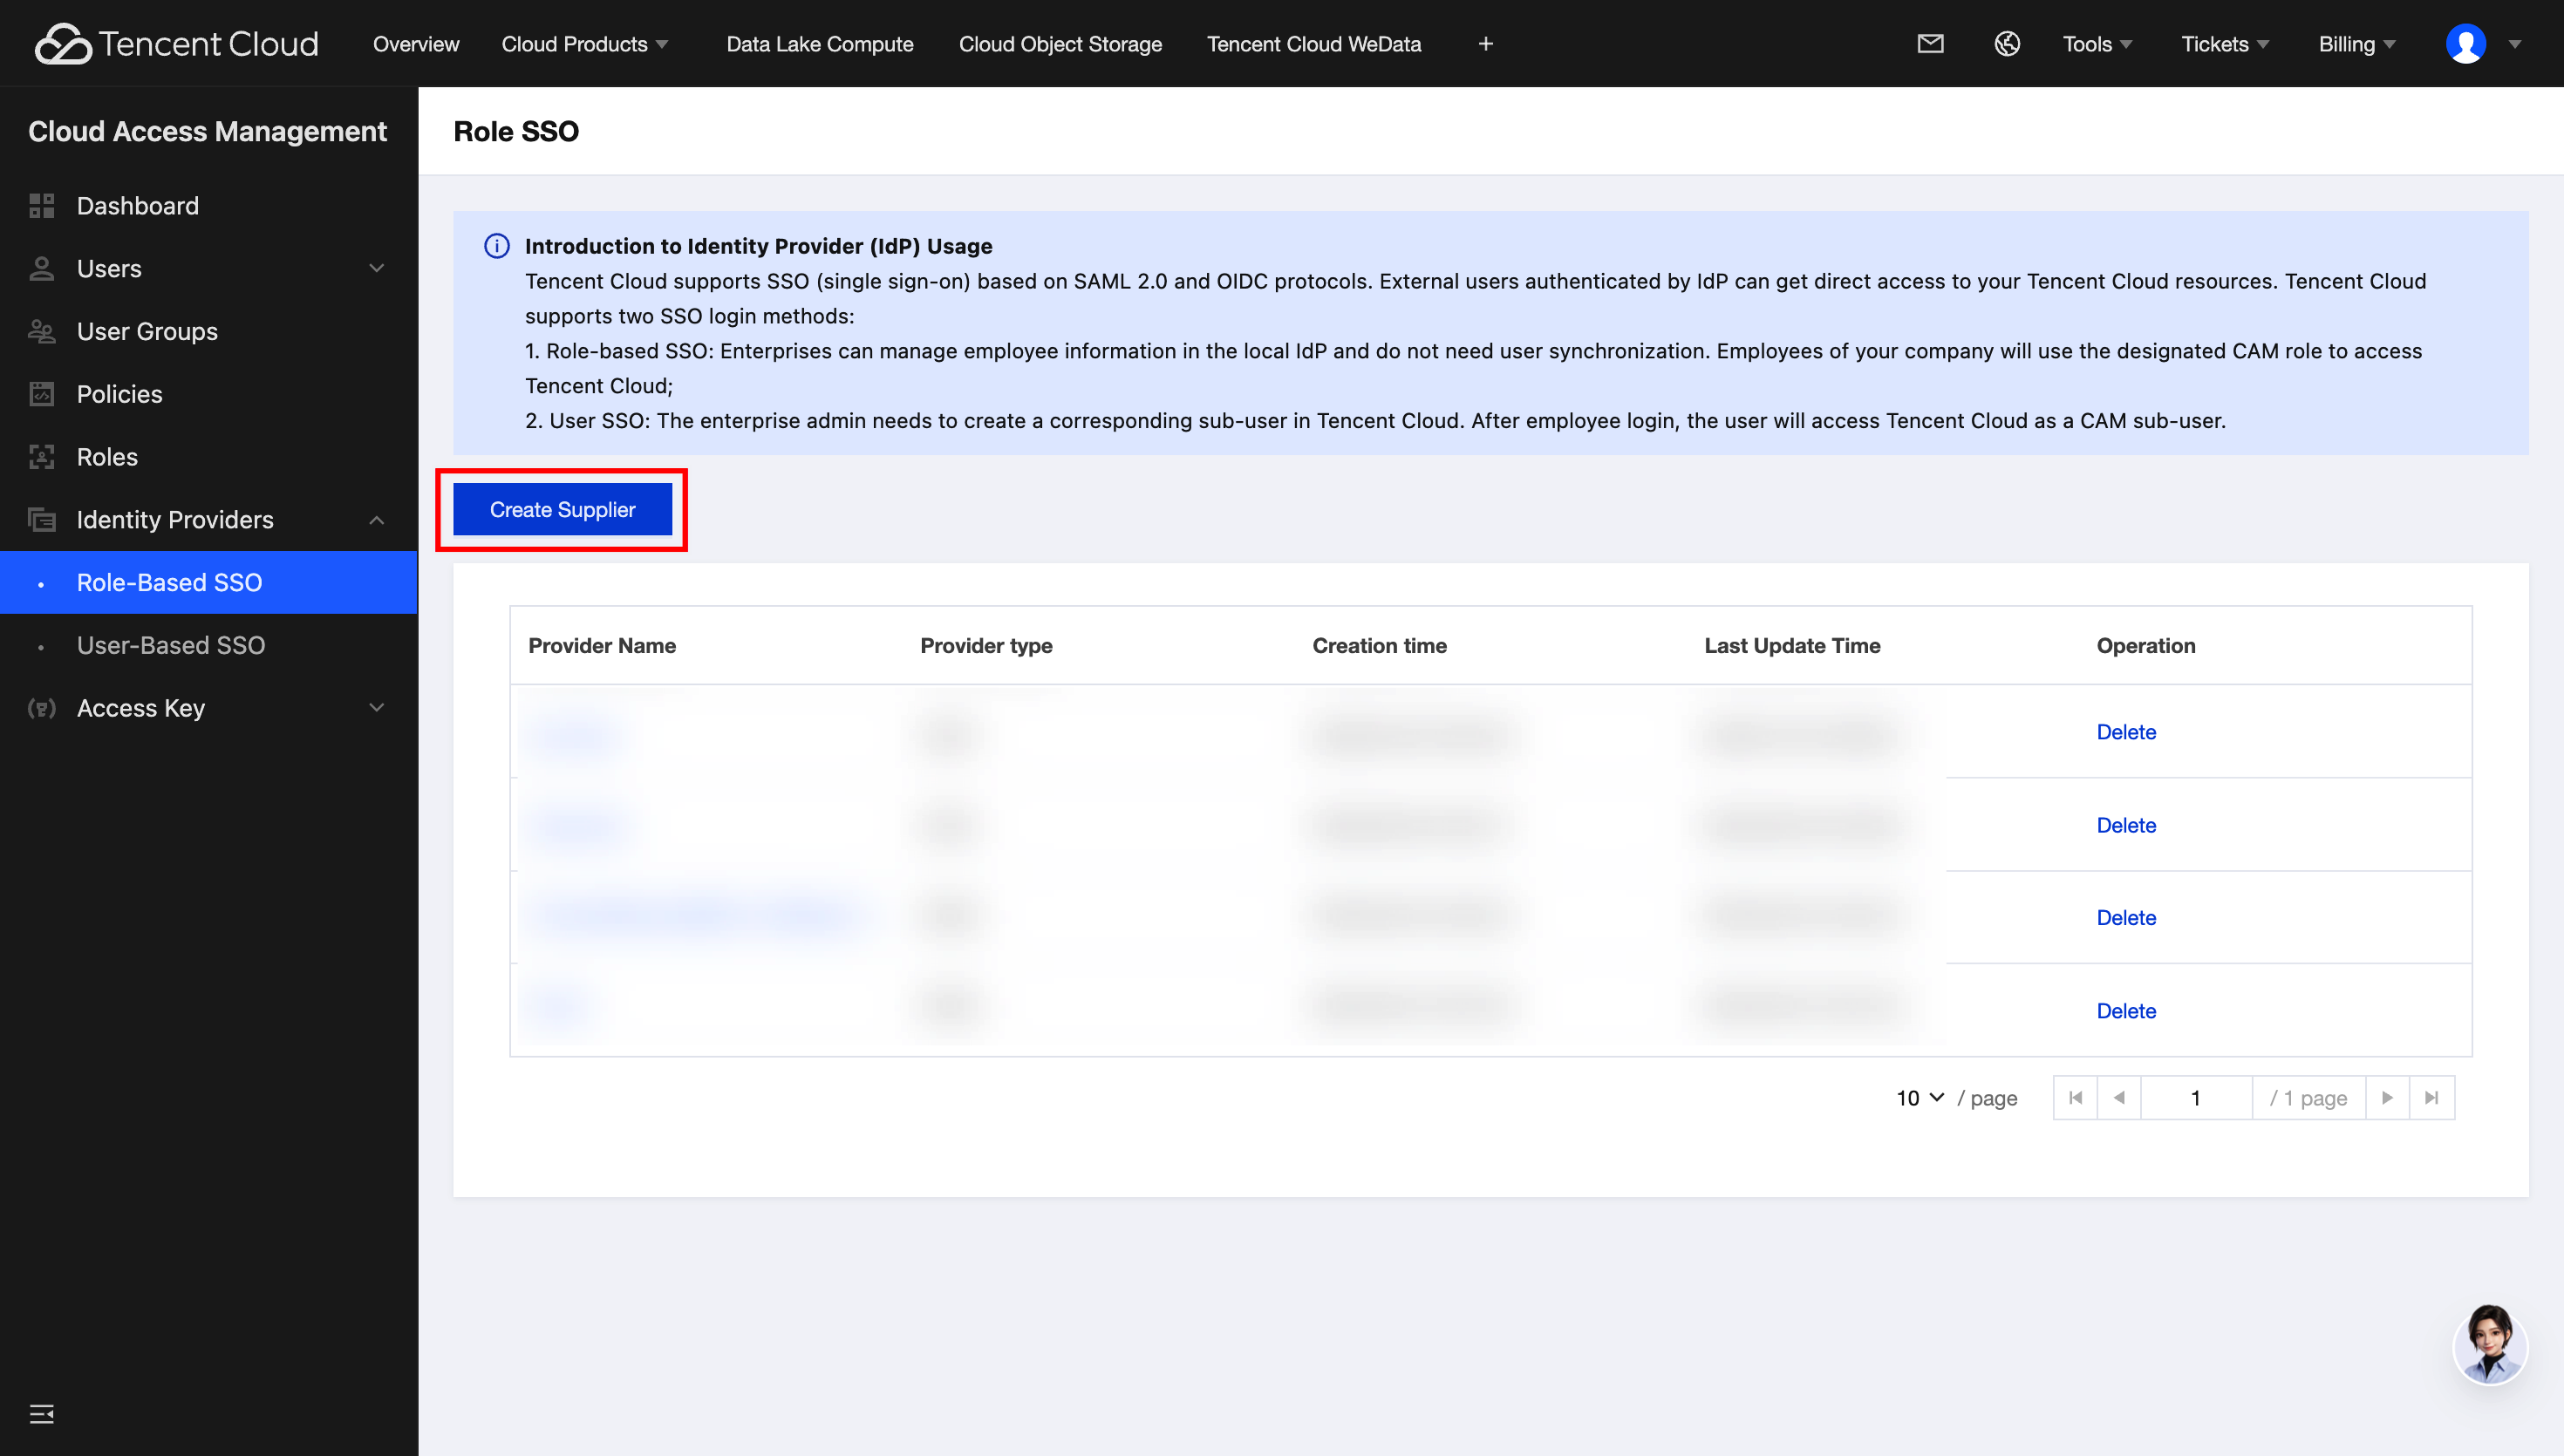
1. Log in to Tencent Cloud Access Management, choose Roles > Role SSO in the left sidebar, and click Create Provider.
2. After selecting OIDC as the provider type, fill in the following fields as required:
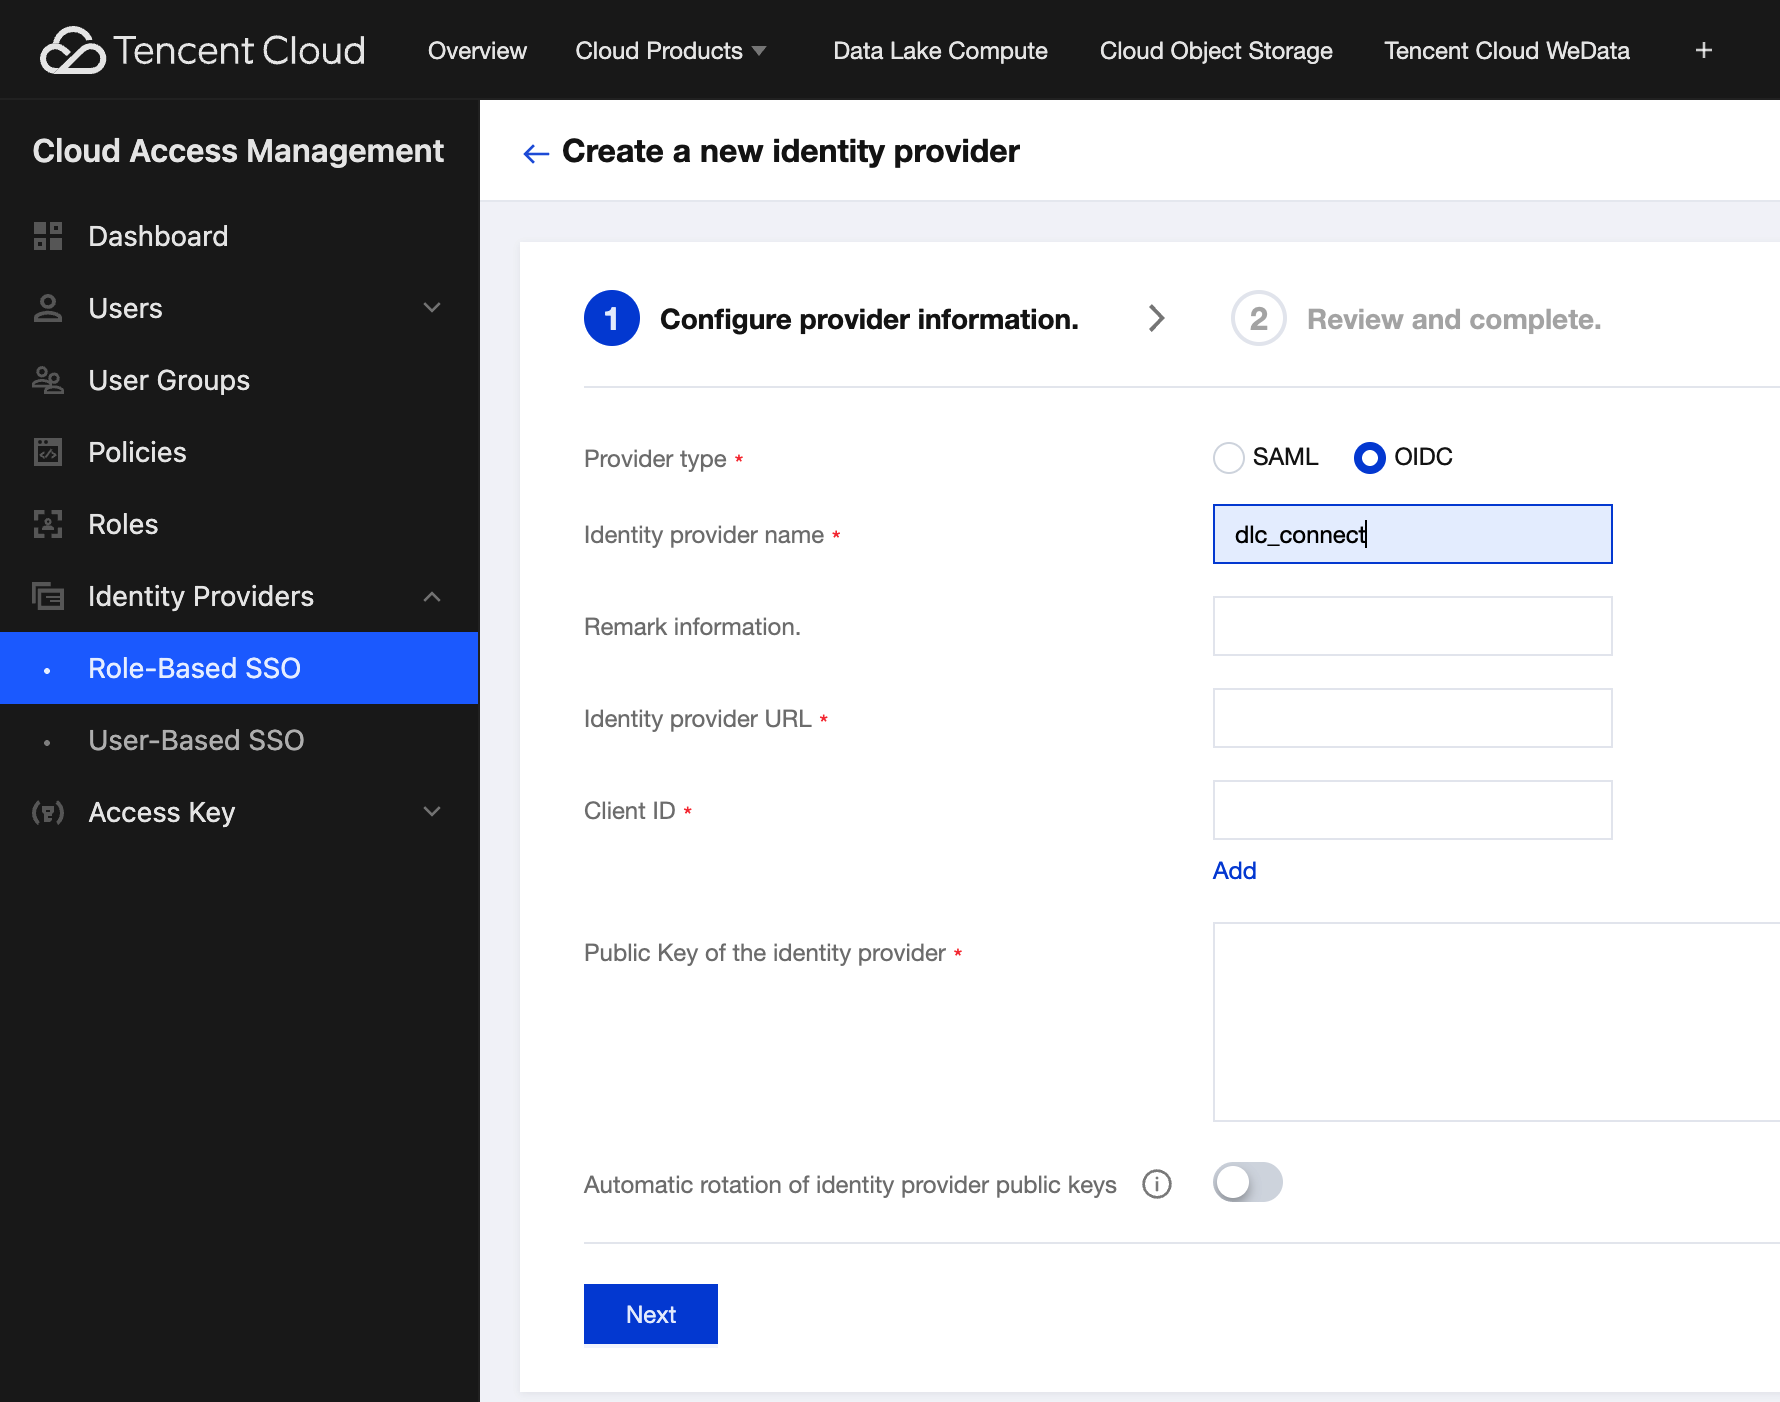
Identity provider name: Use a custom name, for example, dlc_connect.
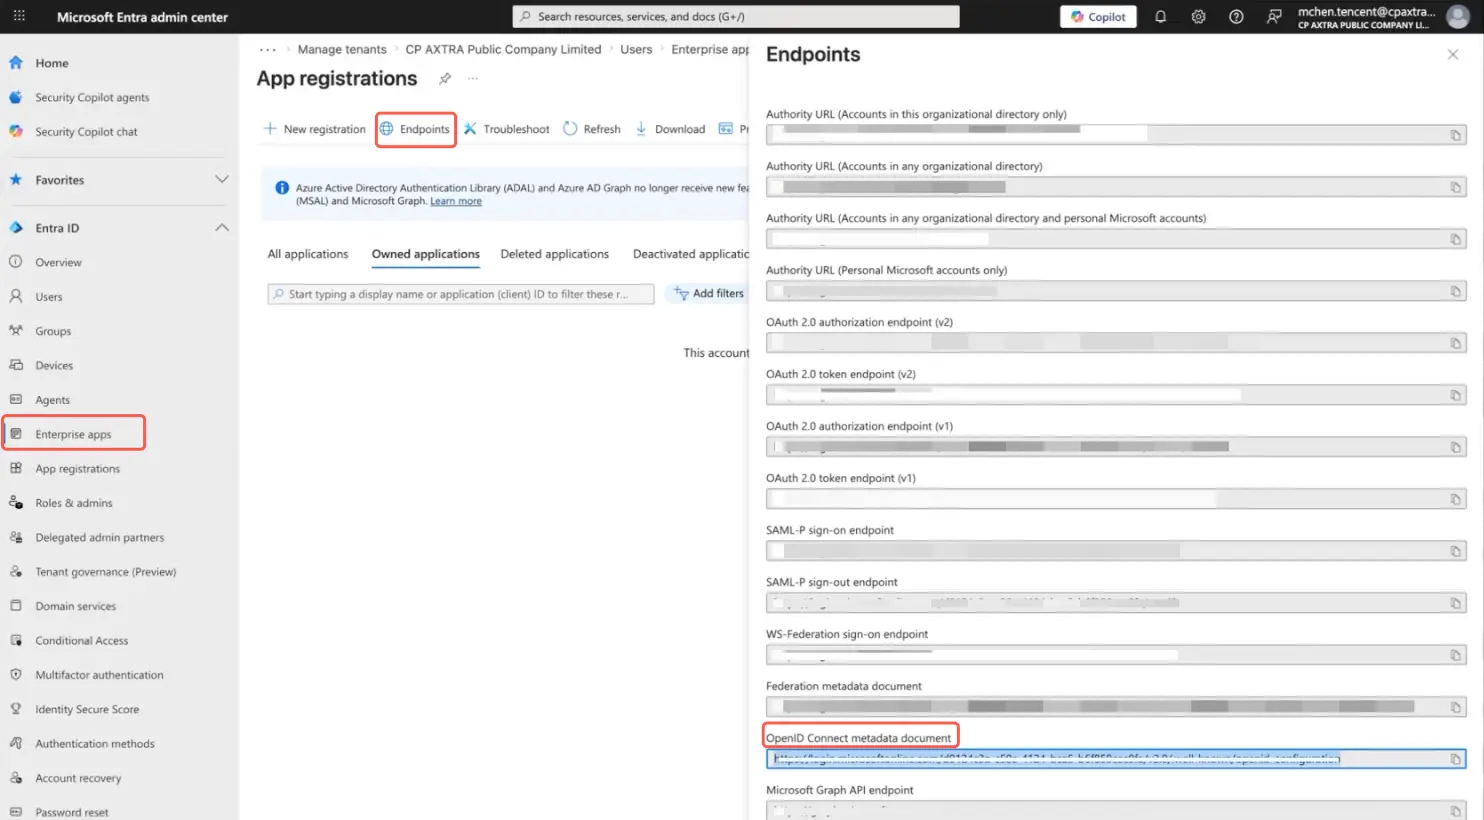
Identity provider URL: In the Microsoft Entra admin center, expand Entra ID, click Enterprise apps > Endpoints, and copy the OpenID Connect metadata document link from the right-side panel. Open the link in a browser, search for "issuer", and enter the corresponding URL here.

Client ID: Enter the application client ID provided by the DLC team, for example, 49cf9f95-f2a1-49c5-889f-f138e3077c96.
Identity provider public key: On the OpenID Connect metadata document page opened in the previous step, copy the link corresponding to jwks_uri and open it in a browser, then copy all content on the page and paste it here.

3. Click Next, and after confirming that the information is correct, click Finish.
After successful creation, the new provider appears in the identity provider list, and its name is the Provider ID to be entered when you establish the connection.
Role ARN
1. In the CAM console, select Roles in the left sidebar, click Create Role, and select the identity provider.
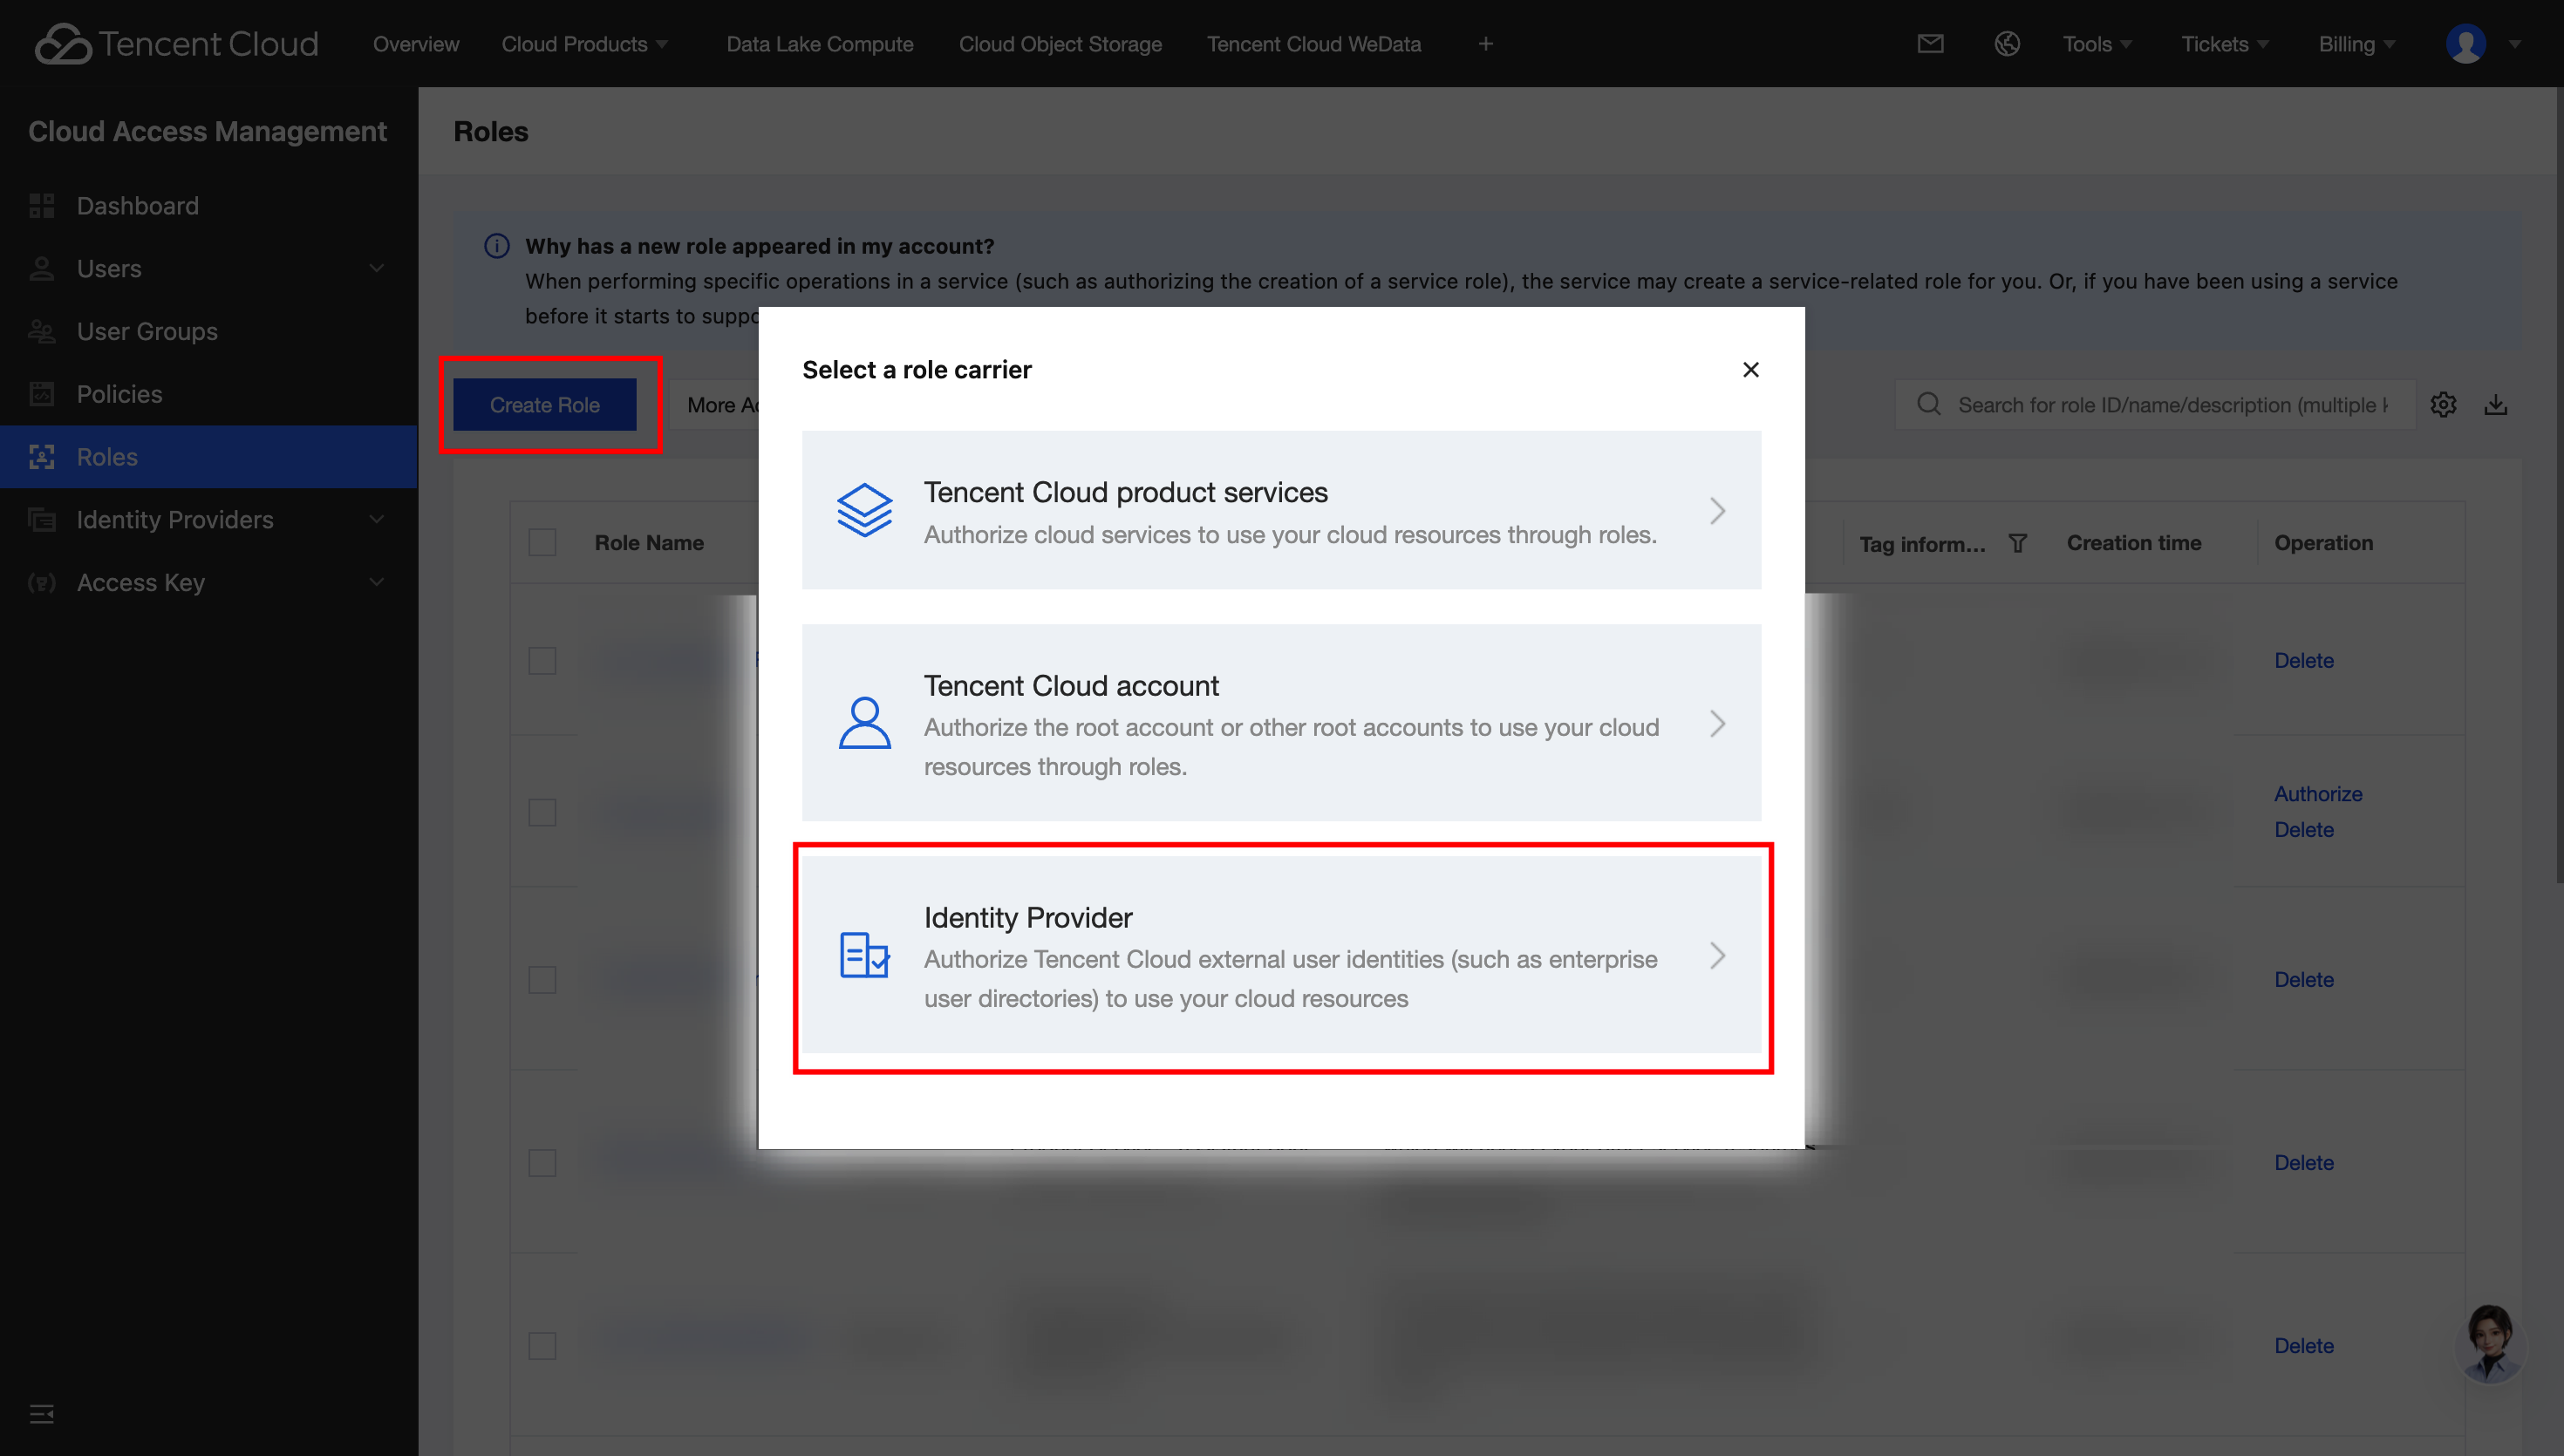
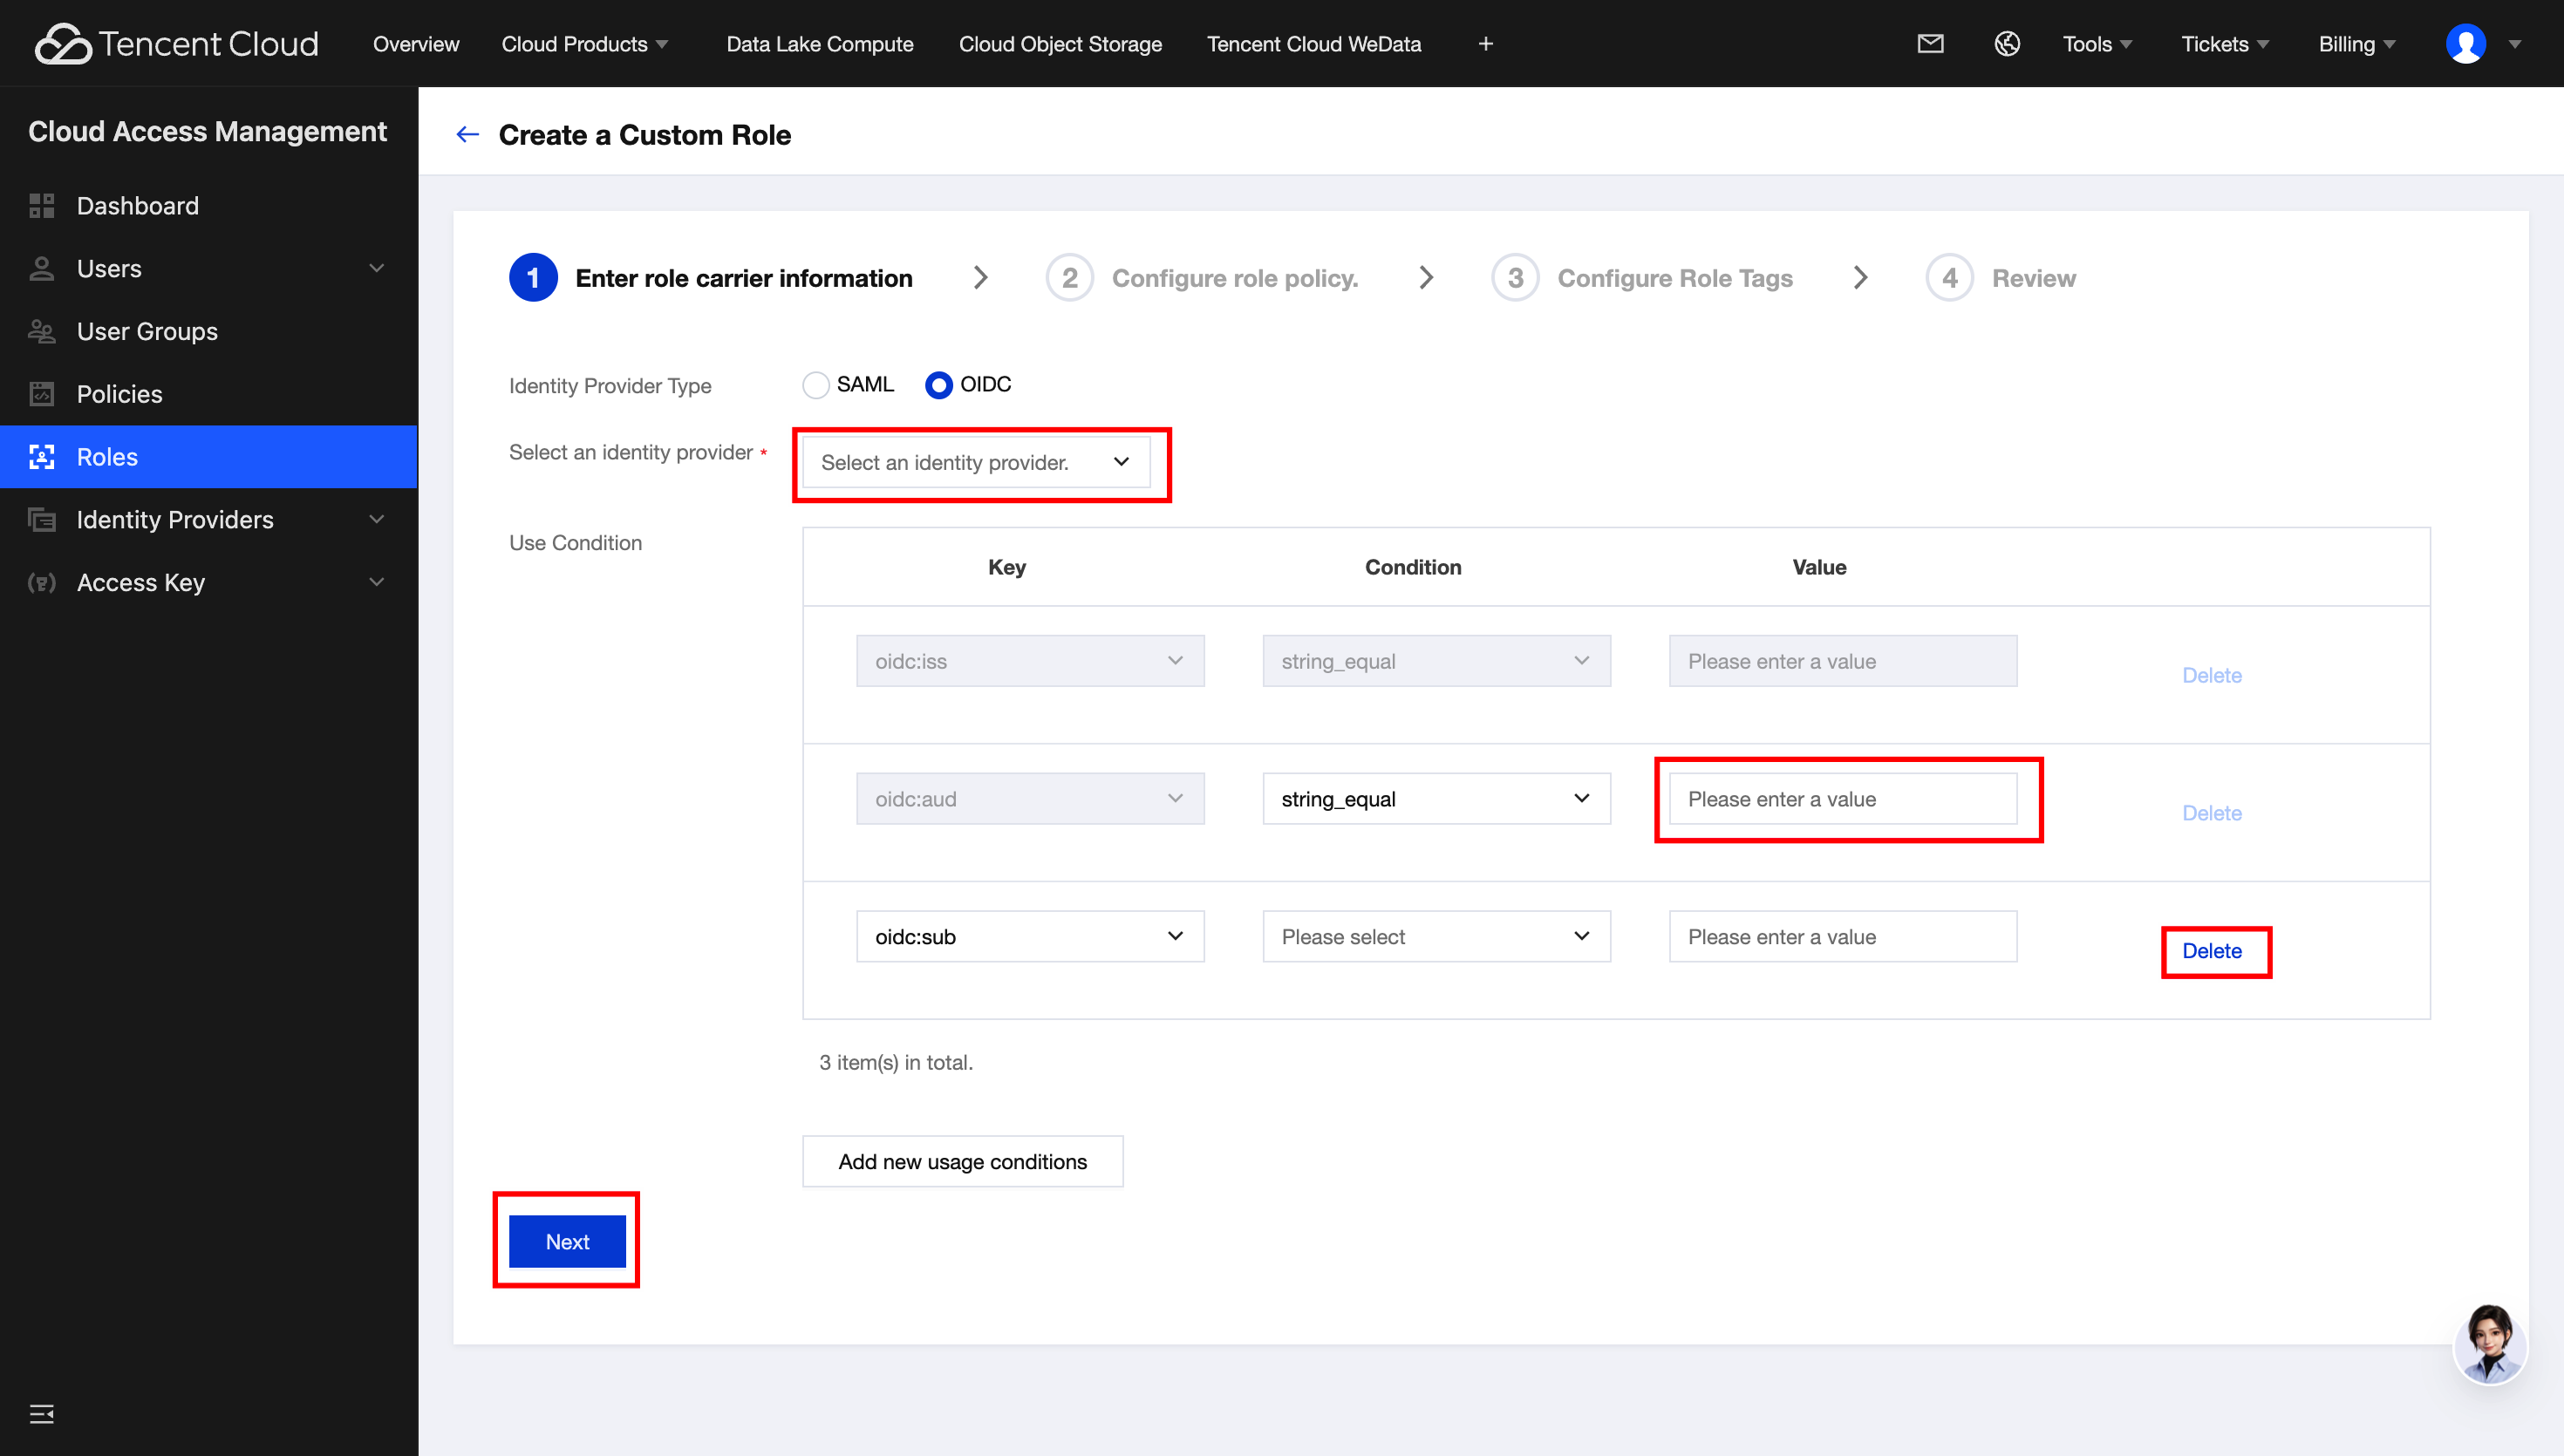
2. On the Enter Role Carrier Information page, complete the following configurations and click Next.
Identity provider type: Select OIDC.
Identity provider: Select the identity provider created in the previous step, for example, dlc_connect.
Set the usage condition: set the Key to oidc:aud and the Value to the corresponding client ID (49cf9f95-f2a1-49c5-889f-f138e3077c96). Also remove the default or existing oidc:sub condition.
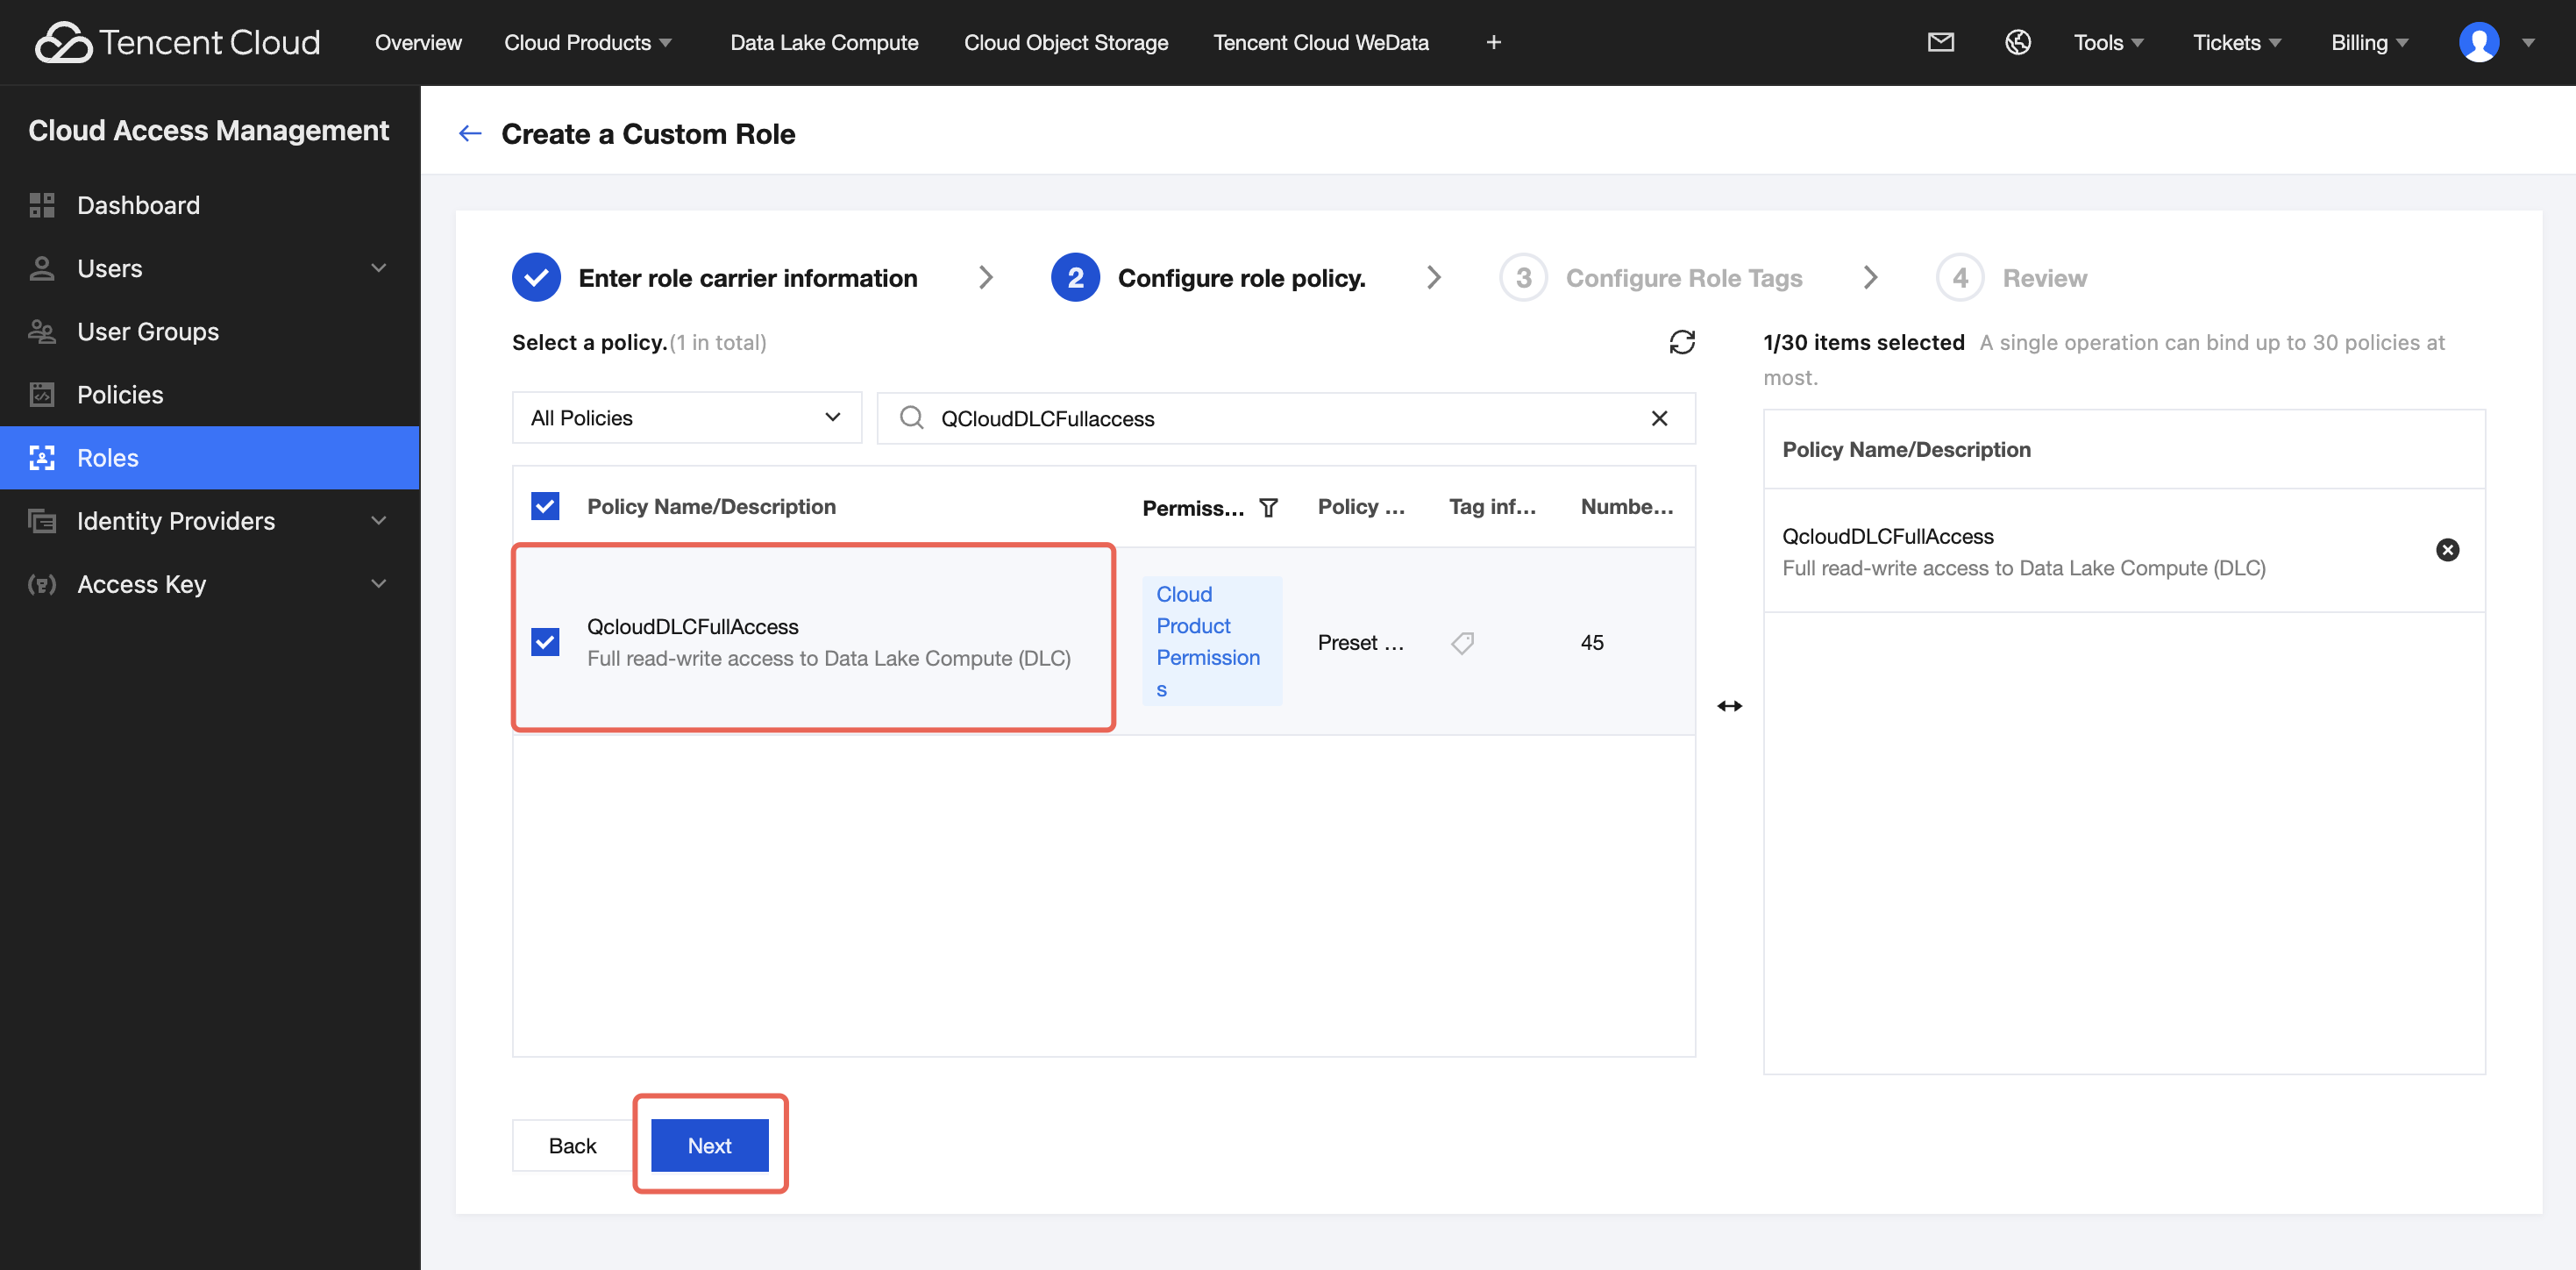
3. Configure role policy: Search for and select the QCloudDLCFullaccess policy in the search box. After selecting it, click Next.
4. Configure role tags: This is optional (not mandatory). Enter the corresponding role name and click Next.
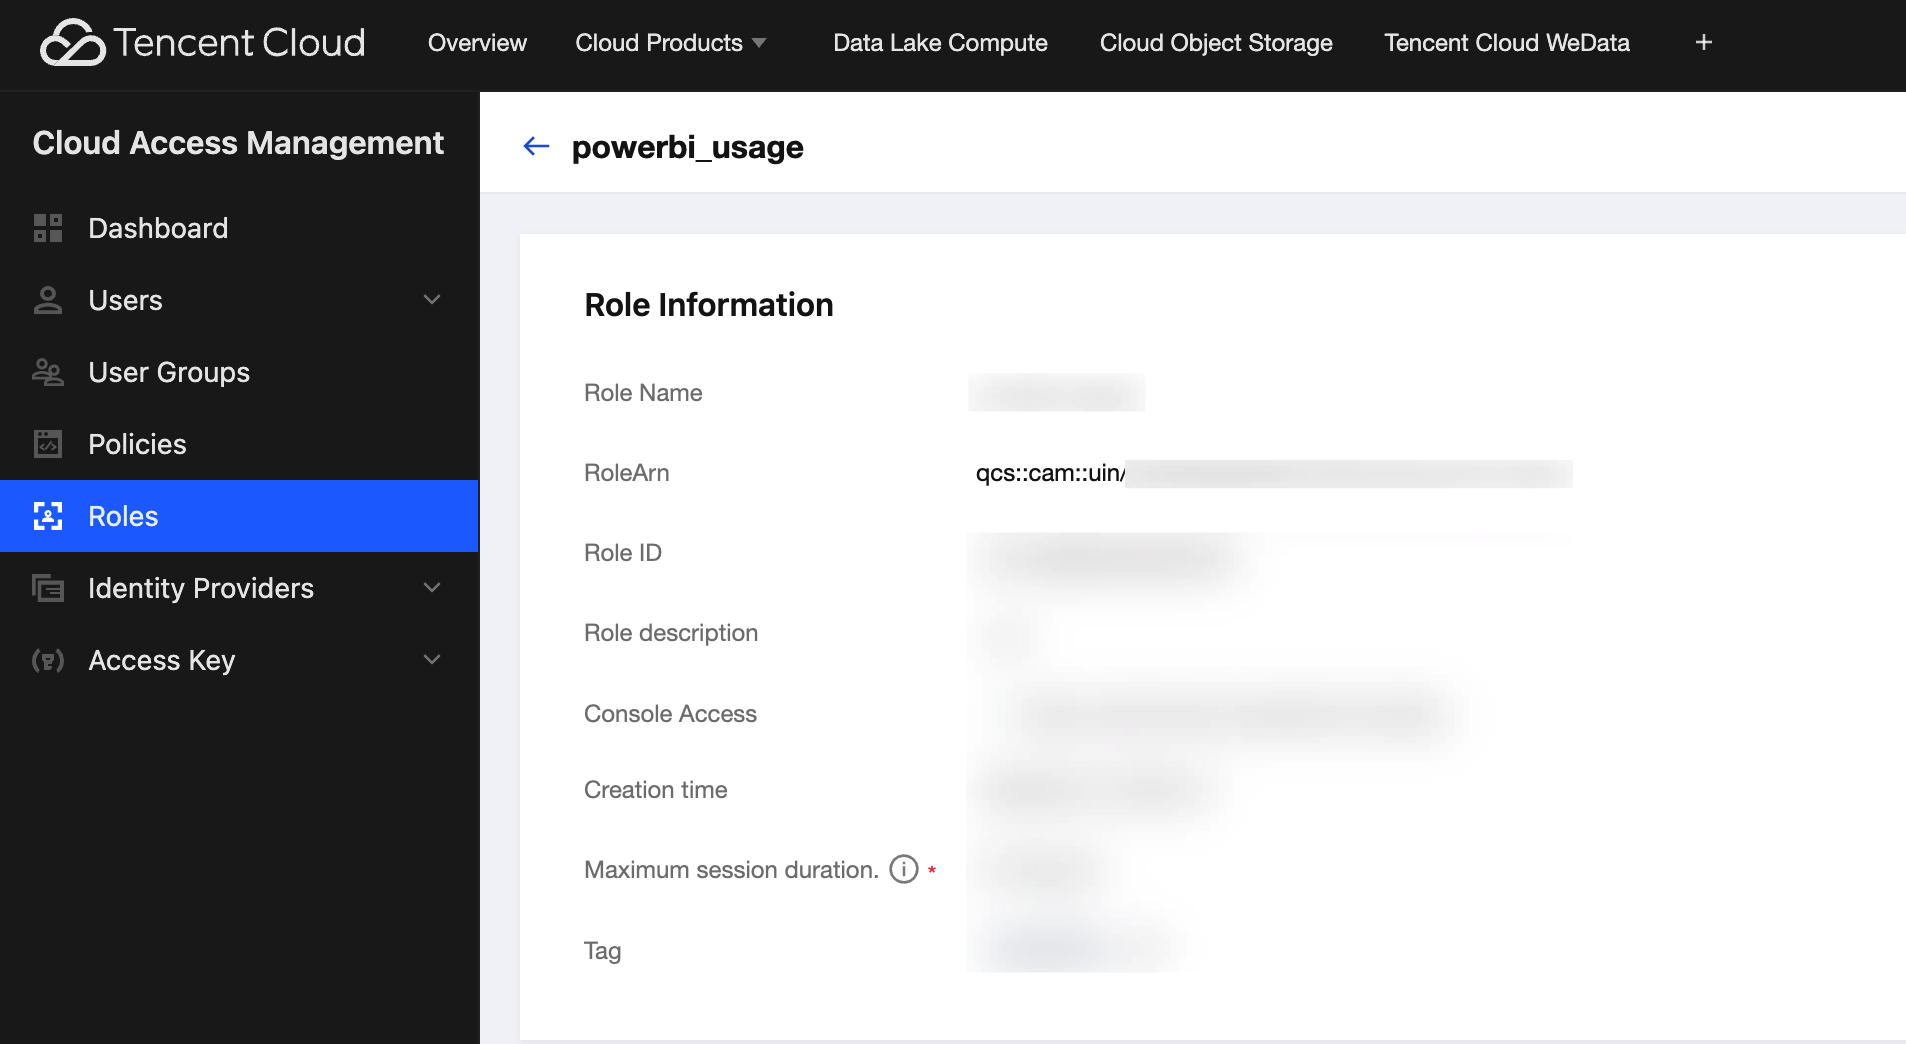
5. Review: In the Role Name field, enter the corresponding name (for example, powerbi_usage). After confirming that the configuration information is correct, click Finish to create the role.
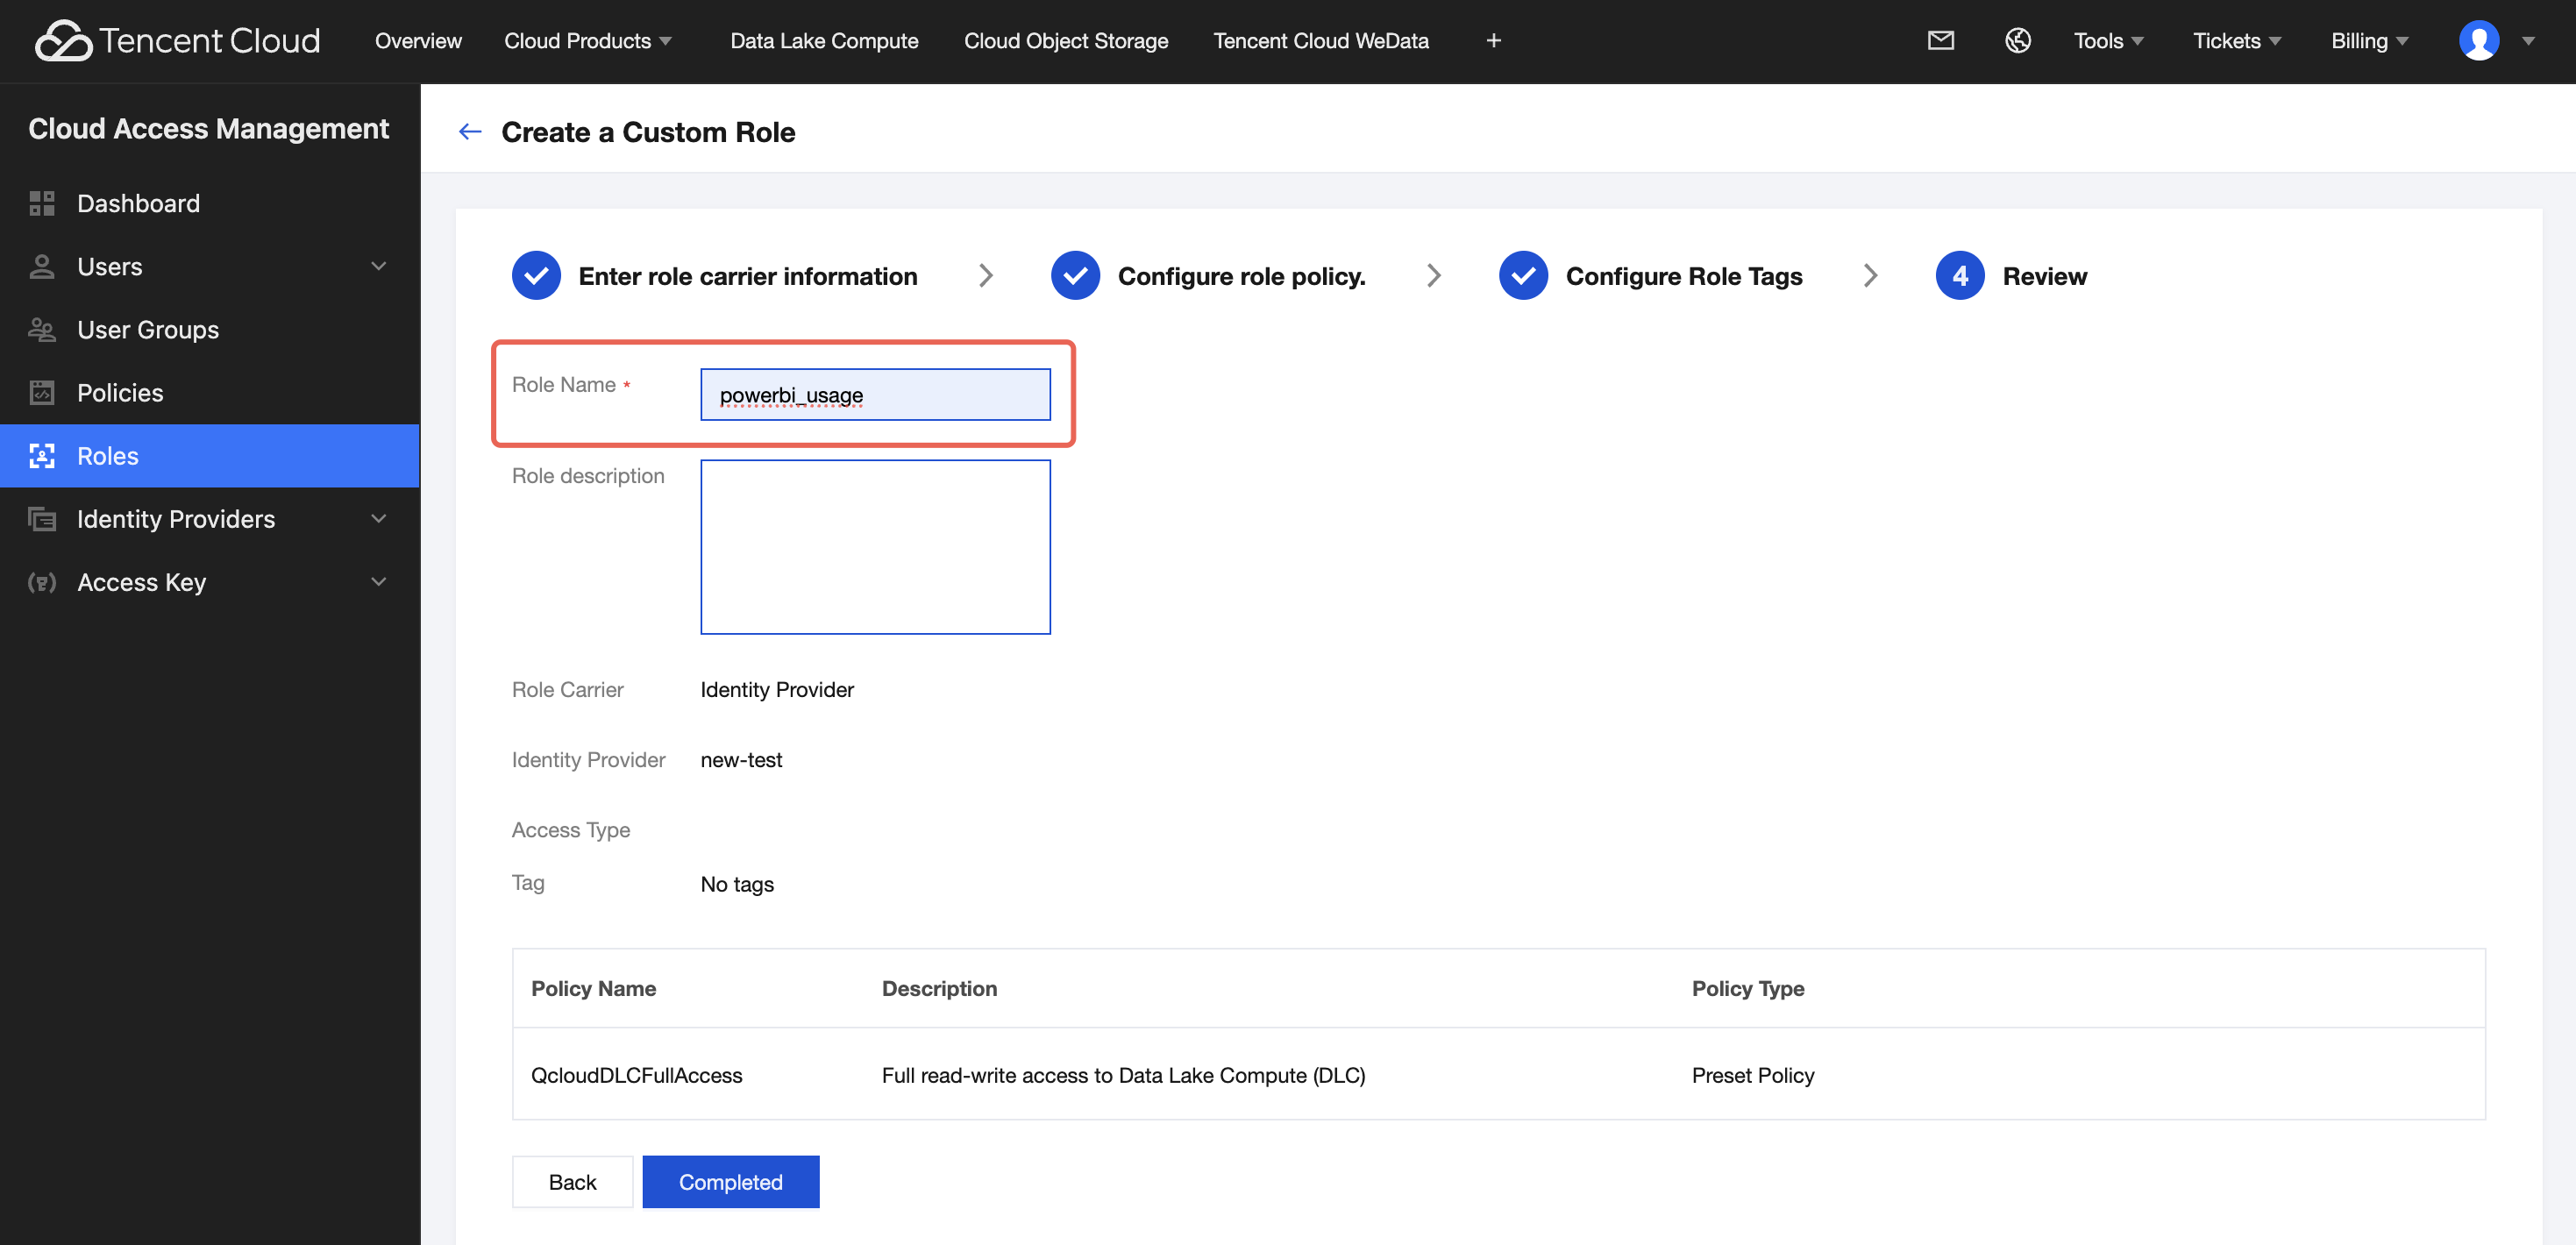
After successful creation, return to the role list page and click the role to go to its details page. Copy the RoleArn for use in subsequent steps.
Connecting to a DLC Data Source
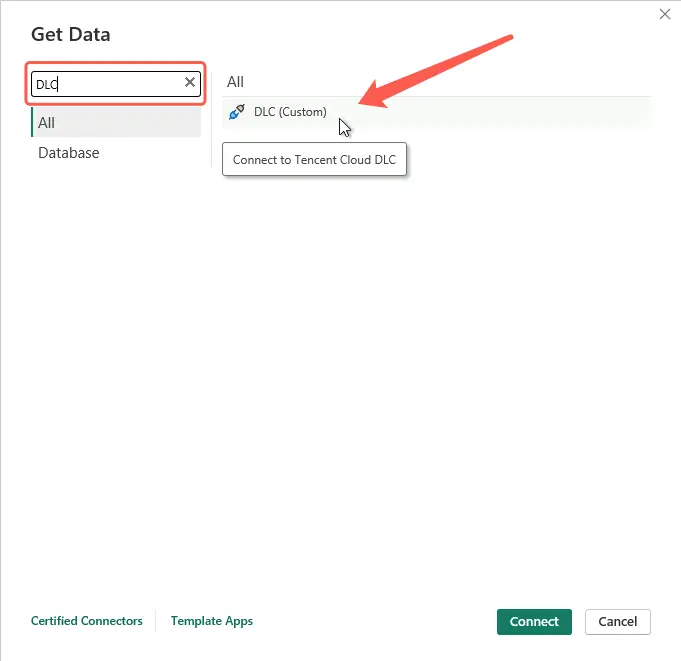
1. On the main page of Power BI Desktop, click Get Data > More.
2. In the search box, enter DLC, select the DLC data source, and click Connect.
Note:
If DLC is not found, go back to Preparation to confirm that all four steps are completed, and restart Power BI Desktop.
Filling in Connection Information
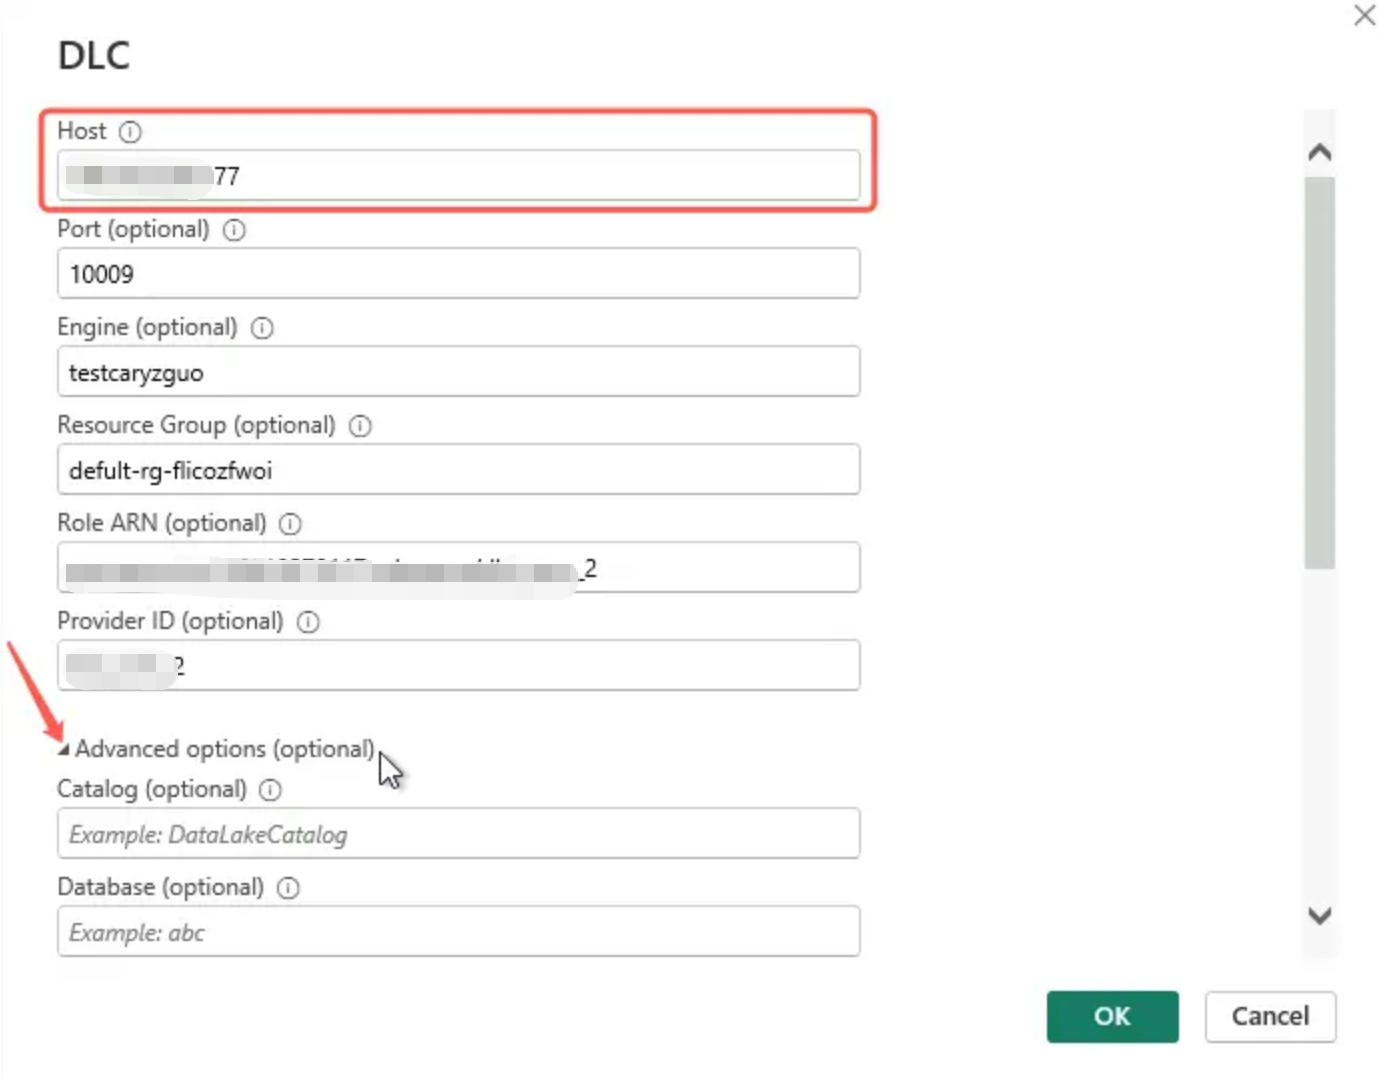
The following fields need to be filled in the dialog box that appears. Fields marked with "Yes" are required, while others can be left empty to use their default values.
Field | Required | What to Fill In | Where to Find | Example |
Host | Yes | IP address or domain name of the DLC server | DLC console > Data Engine > Connection Information | 193.***.***.*** |
Port | Yes | Port number. Leave blank to use the default. | Same as above. | 10009 |
Engine | Yes | Name of the compute engine to use | DLC console > Data Engine list | testcaryzguo |
Resource Group | Yes | Resource group name | DLC console > Resource Group | default-rg-flicozfwoi |
Role ARN | No | CAM role resource identifier | Contact the IT administrator to obtain it. | qcs::cam::uin/***:roleName/dlc_conn_2 |
Provider ID | No | CAM identity provider ID | Contact the IT administrator to obtain it. | dlc_conn_*** |
Advanced Options (Optional)
Expand Advanced Options to reveal two more fields:
Field | What to Fill In | Default Value |
Catalog | DLC catalog name | Leave blank = DataLakeCatalog |
Database | Default database (database name) | Leave blank = Display all databases under the Catalog |
Recommendation: For the first connection, leave Catalog and Database empty. Open the Navigator to view the directory structure accessible to the current account, and then decide whether to enter specific values next time to narrow down the scope.
After completing the fields, click OK.
Choose a Sign-in Method
During the first connection, a login page is displayed, providing two methods:
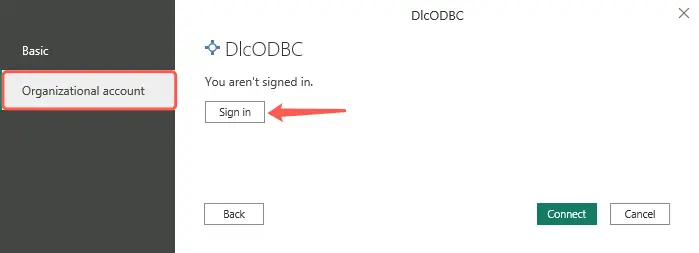
Method A: Sign in with an organizational account (Recommended)
This method applies to scenarios where you can sign in directly with a corporate email account without maintaining keys.
1. On the left side of the login page, select the organizational account and click Sign In.
2. In the browser pop-up window, enter your corporate email and password to complete multi-factor authentication (MFA).
3. Return to Power BI Desktop and click Connect.
If you do not have DLC access permissions yet, an error such as AADSTS50105 will be reported after browser sign-in. Contact your IT administrator to add the corresponding account to the DLC application authorization list. When using Method A, clear Use updated sign-in experience for data sources.
Method B: Sign in with a service account key
This method applies to scenarios where you use a dedicated service account, require unattended scheduled refresh after report publishing, or cannot sign in with an organizational account.
1. On the left side of the login page, select Basic.
2. For Username, enter a string composed of the engine name and the resource group name in the format {Engine}&{ResourceGroup}, for example, testengine&default-rg-xxxxxxxx.
{Engine} & {ResourceGroup}
3. For Password, enter the SecretId and SecretKey of the DLC access key.
4. Click Connect.
Note:
The separator in the username must be a half-width ampersand (&). Do not use spaces or the full-width ampersand (&).
Loading Data into Reports
After successful sign-in, you will enter the Navigator. Data is organized in a three-level hierarchy: Catalog > Database > Table.
Catalog└── Database└── Table
1. On the left, expand the target Catalog, for example, DataLakeCatalog.
2. Expand the target Database.
3. Select the desired Tables. Multiple selection is supported. A data preview is displayed on the right.
4. After confirming that the information is correct, click the button below to complete the loading.
Load: directly import data into the report.
Transform Data: Go to Power Query Editor, clean the data, and then load it.
You can preview table data normally in the Navigator, and the corresponding fields appear in the report field list, indicating a successful connection.
Writing Custom SQL (Optional)
If you do not need to select tables through the Navigator and want to use SQL statements to extract data directly, you can use either of the following methods.
Method 1: Writing SQL in Power Query Editor
1. In the Navigator, click Transform Data to go to Power Query Editor.
2. In the top bar of Power Query Editor, click Advanced Editor.
3. Modify the code as follows, and replace it with the actual connection parameters.
letSource = DLC.Query("193.112.237.177", // Host"10009", // Port"testcaryzguo", // Engine"default-rg-flicozfwoi", // Resource Group"qcs::cam::uin/100018379117:roleName/dlc_conn_2","dlc_conn_2",[Catalog = "DataLakeCatalog"]),Result = Source("SELECT * FROM your_db.your_table LIMIT 100")inResult
Method 2: Entering Native SQL Directly When Creating a Connection
When establishing a connection in Power BI Desktop through Get Data > DLC, you can select Use Native Query in advanced options and enter the SQL statement directly.
Note:
The SQL syntax is compatible with Apache Spark and Apache Kyuubi, and supports LIMIT n, SELECT ... FROM catalog.database.table, and standard aggregate functions.
Selecting a Data Connection Mode
The DLC connector supports two core data connection modes of Power BI, which can be flexibly selected based on business scenarios:
Dimension | Import Mode | DirectQuery Mode |
Working Mode | Data is loaded from DLC once and saved in a local .pbix file. | A query is sent to DLC in real time each time a report is viewed or operated. |
Performance | Report interactions respond quickly. | Response speed depends on the computing power and load of the DLC engine. |
Data Freshness | Data can be updated only after a manual or scheduled refresh. | Data is synchronized in real time and always remains up to date. |
File Size | Larger | Smaller |
Scenario | Small data volume (within 10 million rows) and high requirements for interactive response speed. | Large data volume, requiring real-time access to the latest data. |
Note:
The connector uses Import mode by default. To switch to DirectQuery mode, select the corresponding option during the data loading phase in the Navigator.
FAQs
Q1: What Should I Do If I Cannot Find a DLC Data Source in Data Retrieval?
Check the following items in order:
1. Install ODBC Driver Was the MSI installation successful? You should see DLC Spark ODBC Driver in Control Panel → Programs and Features.
2. Deploy Power BI Connector Has the .mez file been copied to %USERPROFILE%\\Documents\\Power BI Desktop\\Custom Connectors\\?
3. Allow Power BI to load custom connectors Is the security setting (Data Extensions > Allow any extension to load) selected?
4. Have you fully restarted Power BI Desktop (not just minimized it)?
5. Are you using the 64-bit Power BI Desktop?
# Is the ODBC driver registered?Get-ItemProperty "HKLM:\\SOFTWARE\\ODBC\\ODBCINST.INI\\DLC Spark ODBC Driver"# Is the .mez file in place?Test-Path "$env:USERPROFILE\\Documents\\Power BI Desktop\\Custom Connectors\\DlcODBCNative.mez"
The first line should list key values such as Driver/Setup (pointing to dlcodbc64.dll), and the second line should return True. If either condition is not met, go back to Install ODBC Driver or Deploy Power BI Connector and redo the corresponding steps.
Q2: What Should I Do If Nothing Happens After "Connect" Is Clicked?
The DLC engine requires time for a cold start, and the initial connection may take 1 to 3 minutes. If there is still no response after more than 5 minutes:
In the DLC console, confirm that the engine is in the "Running" state.
Check whether the local network can access Host:Port (using the command Test-NetConnection 193.***.***.*** -Port 10009).
Q3: What Should I Do If an Error Occurs After I Log In to the Browser with an Organization Account?
Error Code | Description | Action |
AADSTS50105 | Account is not authorized to access the DLC application. | Contact the IT administrator to be added to the authorization list. |
AADSTS65001 | User has not consented to the permissions. | Have the administrator grant tenant-level consent. |
AADSTS50011 | Redirect URI mismatch. | Report to the DLC team. |
Q4: What Should I Do If "Token Expired" or Scheduled Refresh Failure Occurs?
The access_token has a short validity period by default. For reports that require long-term, scheduled refreshes, it is recommended to switch to the "Basic" login method described in Section 2.3, using a long-term valid DLC service account key as the password.
Q5: What Should I Do If Queries Are Slow / Memory Overflows?
Add a LIMIT n or WHERE clause to the SQL to reduce the number of returned rows.
Use SELECT col1, col2 to retrieve only the required columns and avoid SELECT *.
When the data volume exceeds ten million rows, prioritize DirectQuery mode.
Q6: What Should I Do If Chinese Characters Display Incorrectly?
Confirm that Power BI Desktop is the 64-bit version. If the issue persists, contact the DLC support team and provide the following information:
Field names with garbled characters + one example row
A screenshot of the actual content of this field in the DLC console
Q7: What Should I Do If the Date and Time Field Is Off by 8 Hours?
DLC stores time in UTC by default. In Power Query Editor, right-click the column and choose Transform > Time Zone > Convert to Local Time.
Q8: How Do I Publish a Report to Power BI Service and Schedule Refresh?
Q9: What Should I Do If I Cannot See Data Tables in Navigation?
Symptom | Reason | Resolution |
The navigator appears blank. | The Catalog name entered in the advanced options is incorrect. | Disconnect and exit the current connection, leave the Catalog field empty, and try connecting again. |
Only one or two tables are visible. | The Database entered in the advanced options limits the query scope. | Leave the Database field blank to load all database and table views. |
Error message: "Key does not match any row in the table." | The specified Catalog or Database name does not exist. | Log in to the DLC console and verify the actual Catalog and Database names. Pay special attention to case sensitivity. |
Help and Support
Was this page helpful?
You can also Contact sales or Submit a Ticket for help.
Help us improve! Rate your documentation experience in 5 mins.
Feedback