Guide to Accessing DLC Data with Power BI
Baixar
Modo Foco
Tamanho da Fonte
This document describes how to use Power BI Desktop and Power BI Service to connect to Tencent Cloud Data Lake Compute (DLC) for data analysis, and how to use Power BI Gateway to refresh reports on the web.
Note:
Prerequisites
Before the configuration is started, make sure that the following conditions are met:
1. Permission preparation:
You have signed up with a Tencent Cloud account and activated the DLC service.
You have created the necessary OpenID Connect (OIDC) identity provider (IdP) and roles in Cloud Access Management (CAM).
2. Software environment:
If you need to use the desktop version, make sure that Microsoft Power BI Desktop is installed.
If you need to use Power BI Service, install an on-premises data gateway.
Install Spark ODBC Driver.
3. Connector file:
Download the dedicated connector file DlcODBC.mez for Tencent Cloud DLC.
Operation Process
Configuring Identities and Permissions
Before connecting to DLC, you need to configure the authentication mechanism so that Power BI can access Tencent Cloud resources with OIDC.
Creating an IdP
1. Log in to the Tencent Cloud CAM console.
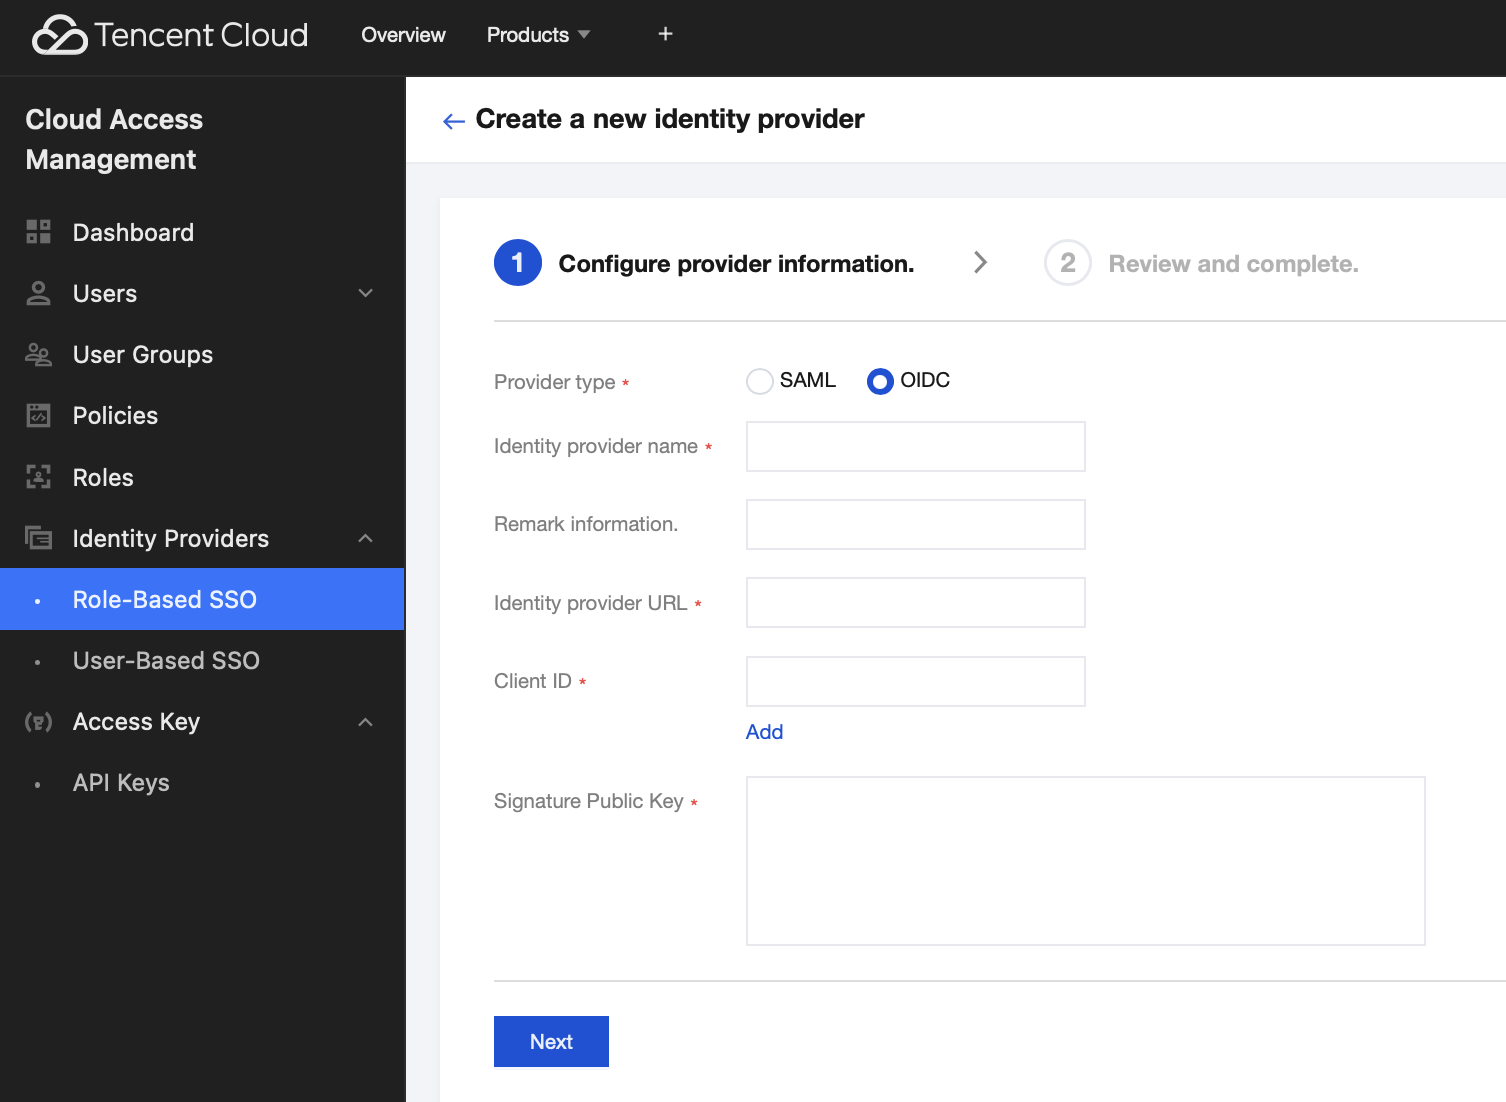
2. In the left sidebar, choose Identity Provider > Role-based SSO, and click Create IdP.
3. Configure the following information:
Provider Type: Select OIDC.
Name: Enter a custom name (for subsequent configurations).
For IdP URL, Client ID, and Public Key parameters, obtain their values from the OIDC configuration of your Microsoft Entra (formerly Azure AD) or Power BI. For specific steps, see Creating an OIDC Identity Provider.
Creating an Identity and Access Management (IAM) Role
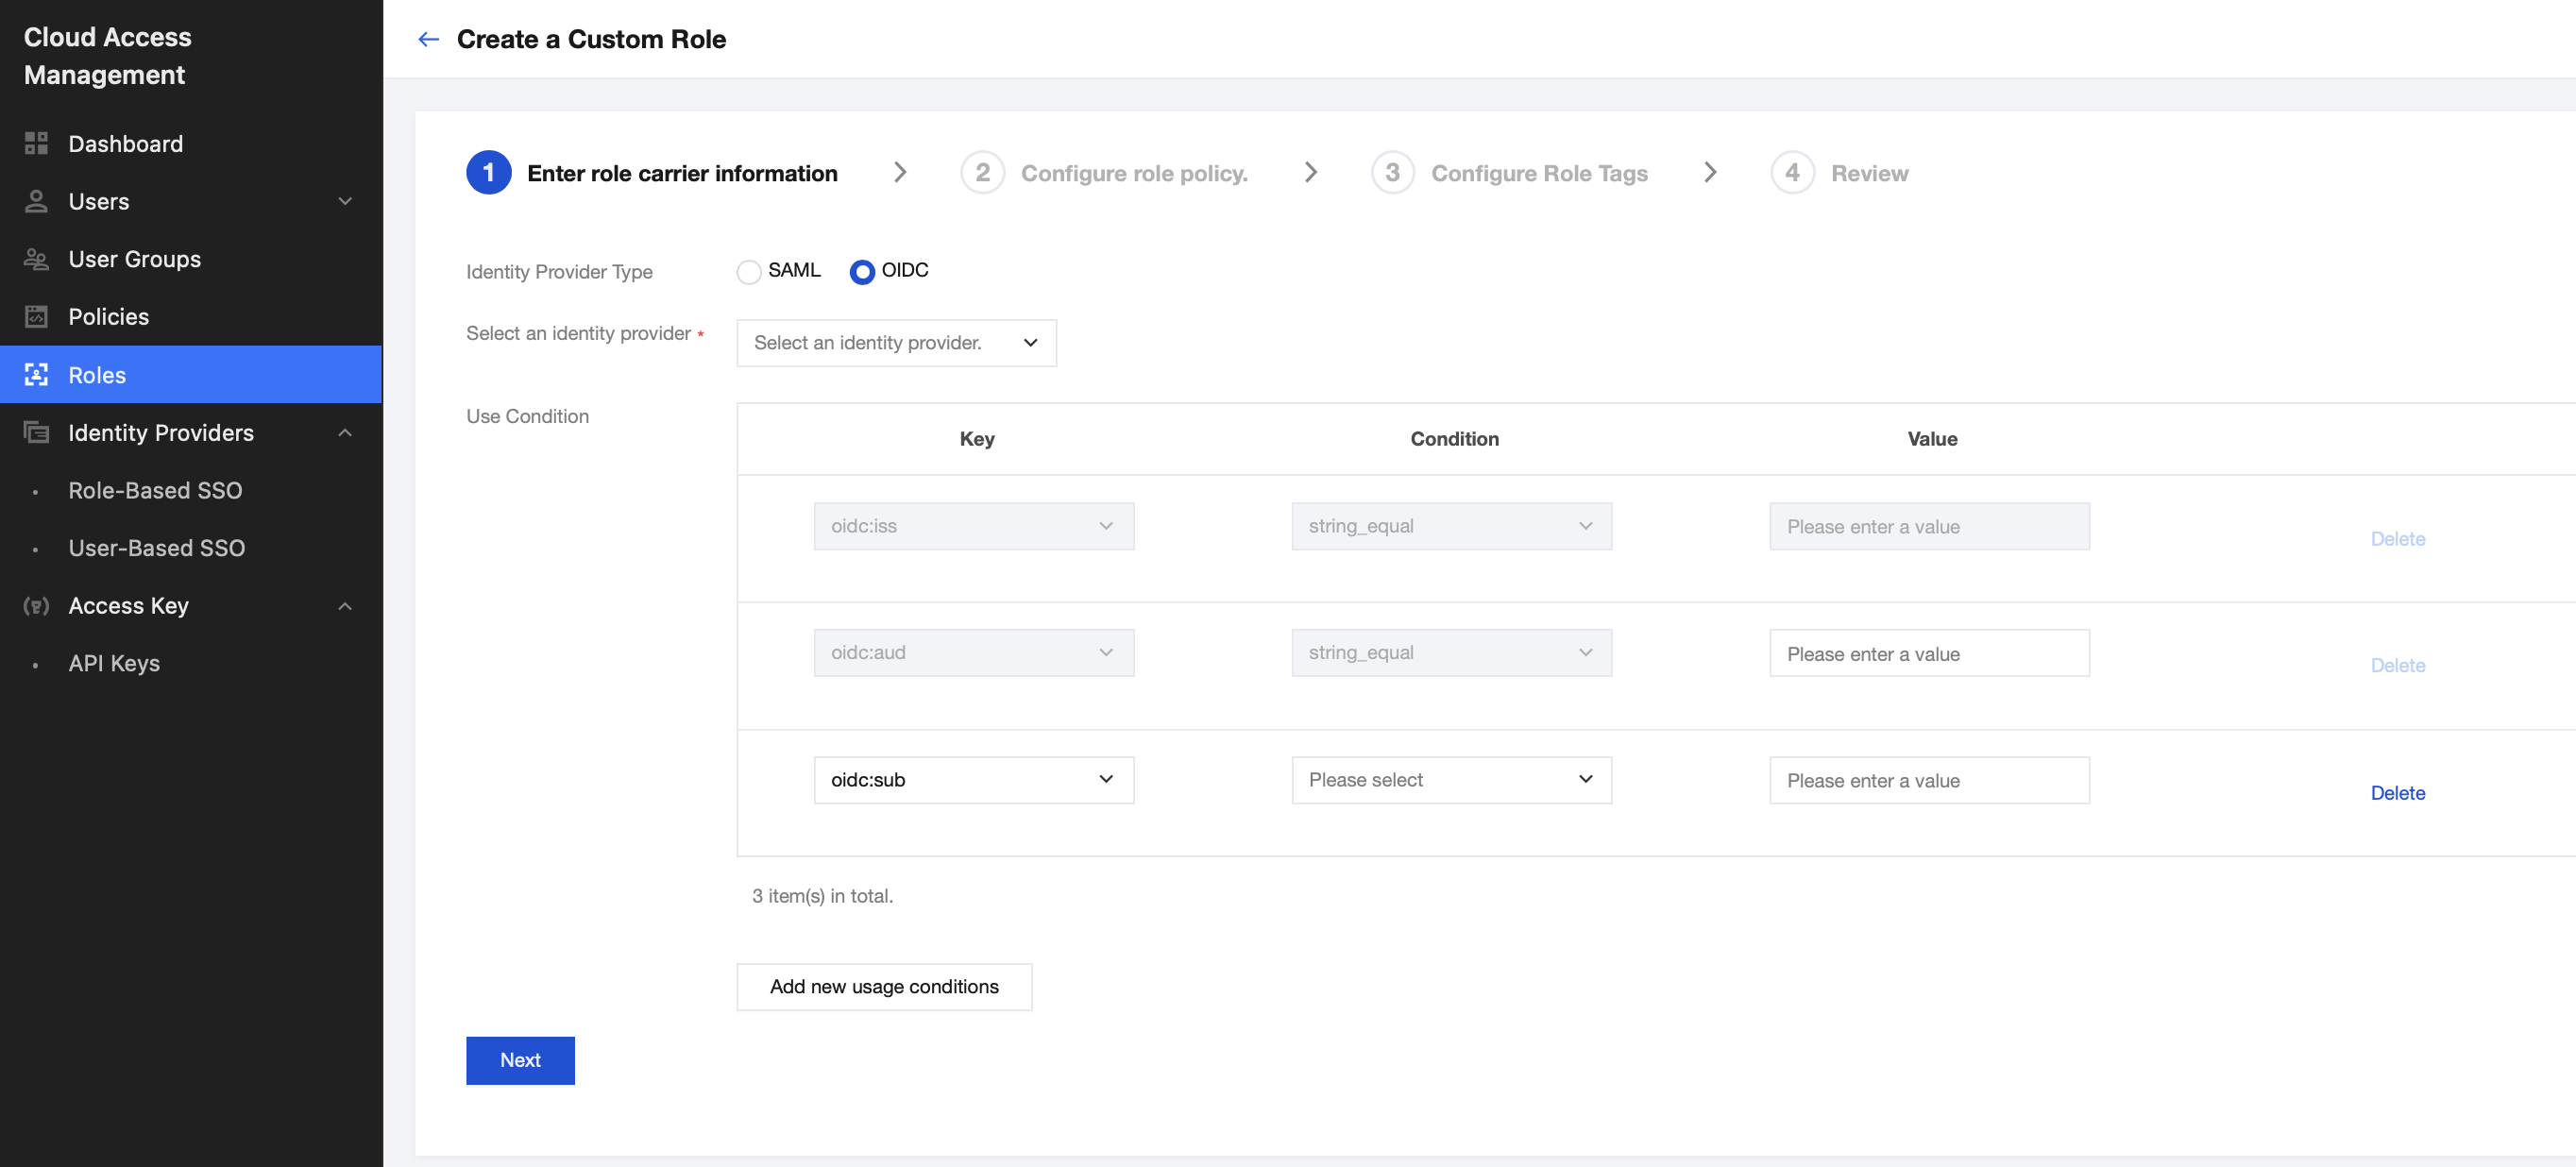
1. Create a new role in the CAM console and select the OIDC IdP you just created as the trusted entity. For specific steps, see Creating Role.
2. Record the role ID.
Note: You need to obtain oidc:aud (corresponding to Issue Address) and oidc:sub (corresponding to Client ID) from the OpenID Connect Metadata document of Power BI to complete the trust policy configuration.
Configuring Power BI Desktop
Installing the DLC ODBC Connector
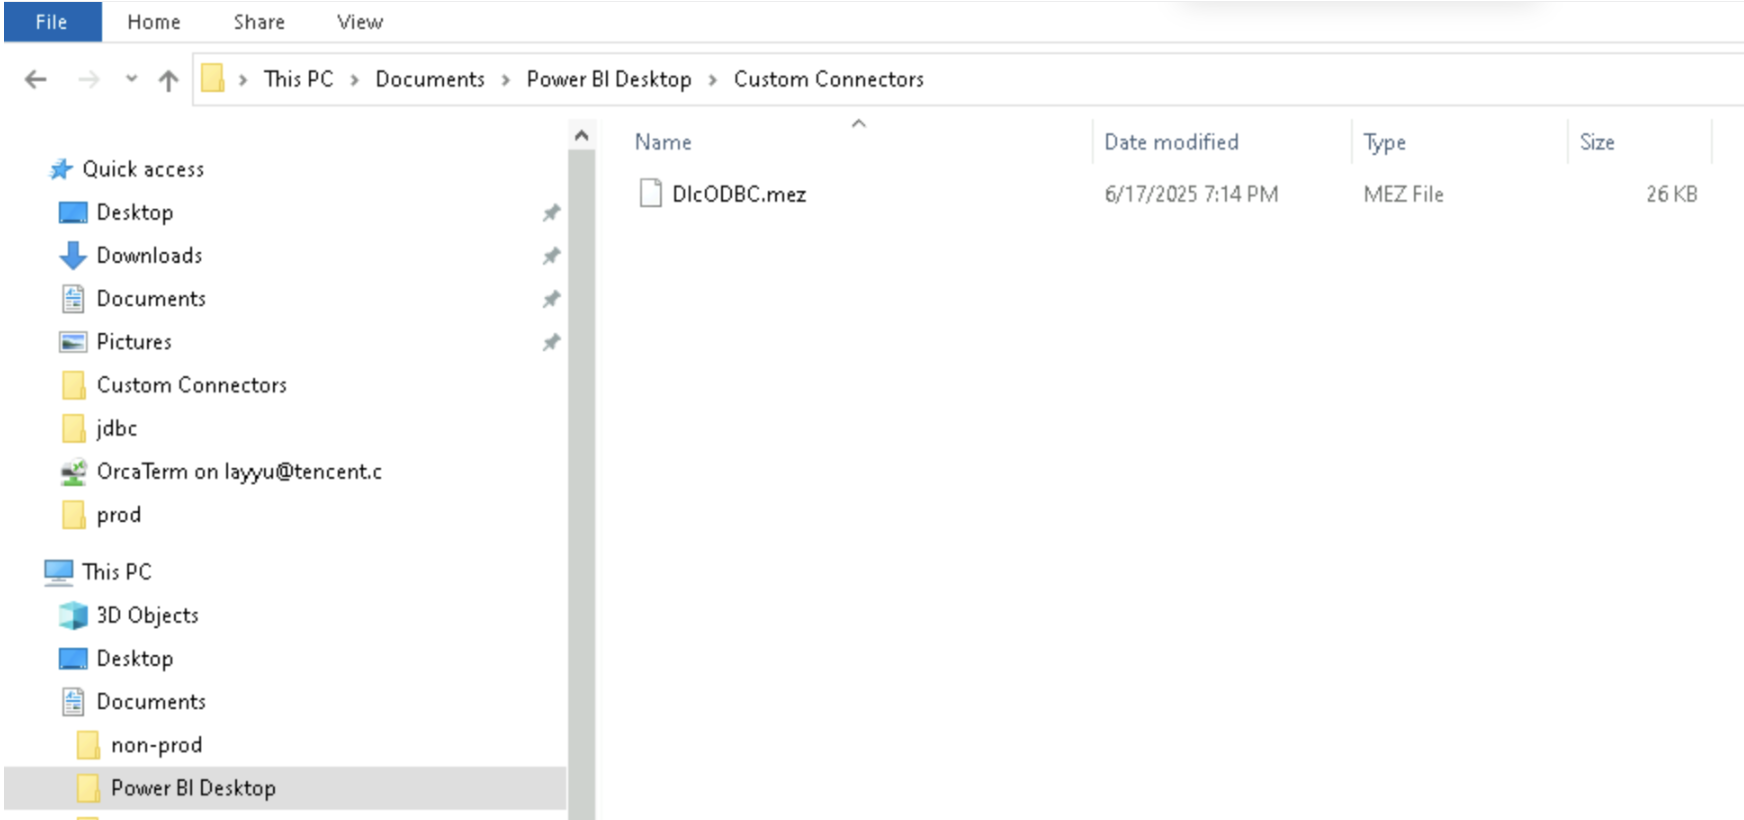
1. Locate the downloaded DlcODBC.mez file.
2. Copy it to the local path C:\\Users\\{username}\\Documents\\Power BI Desktop\\Custom Connectors\\.
If the Custom Connectors folder does not exist, create it manually.
Adjusting Security Settings
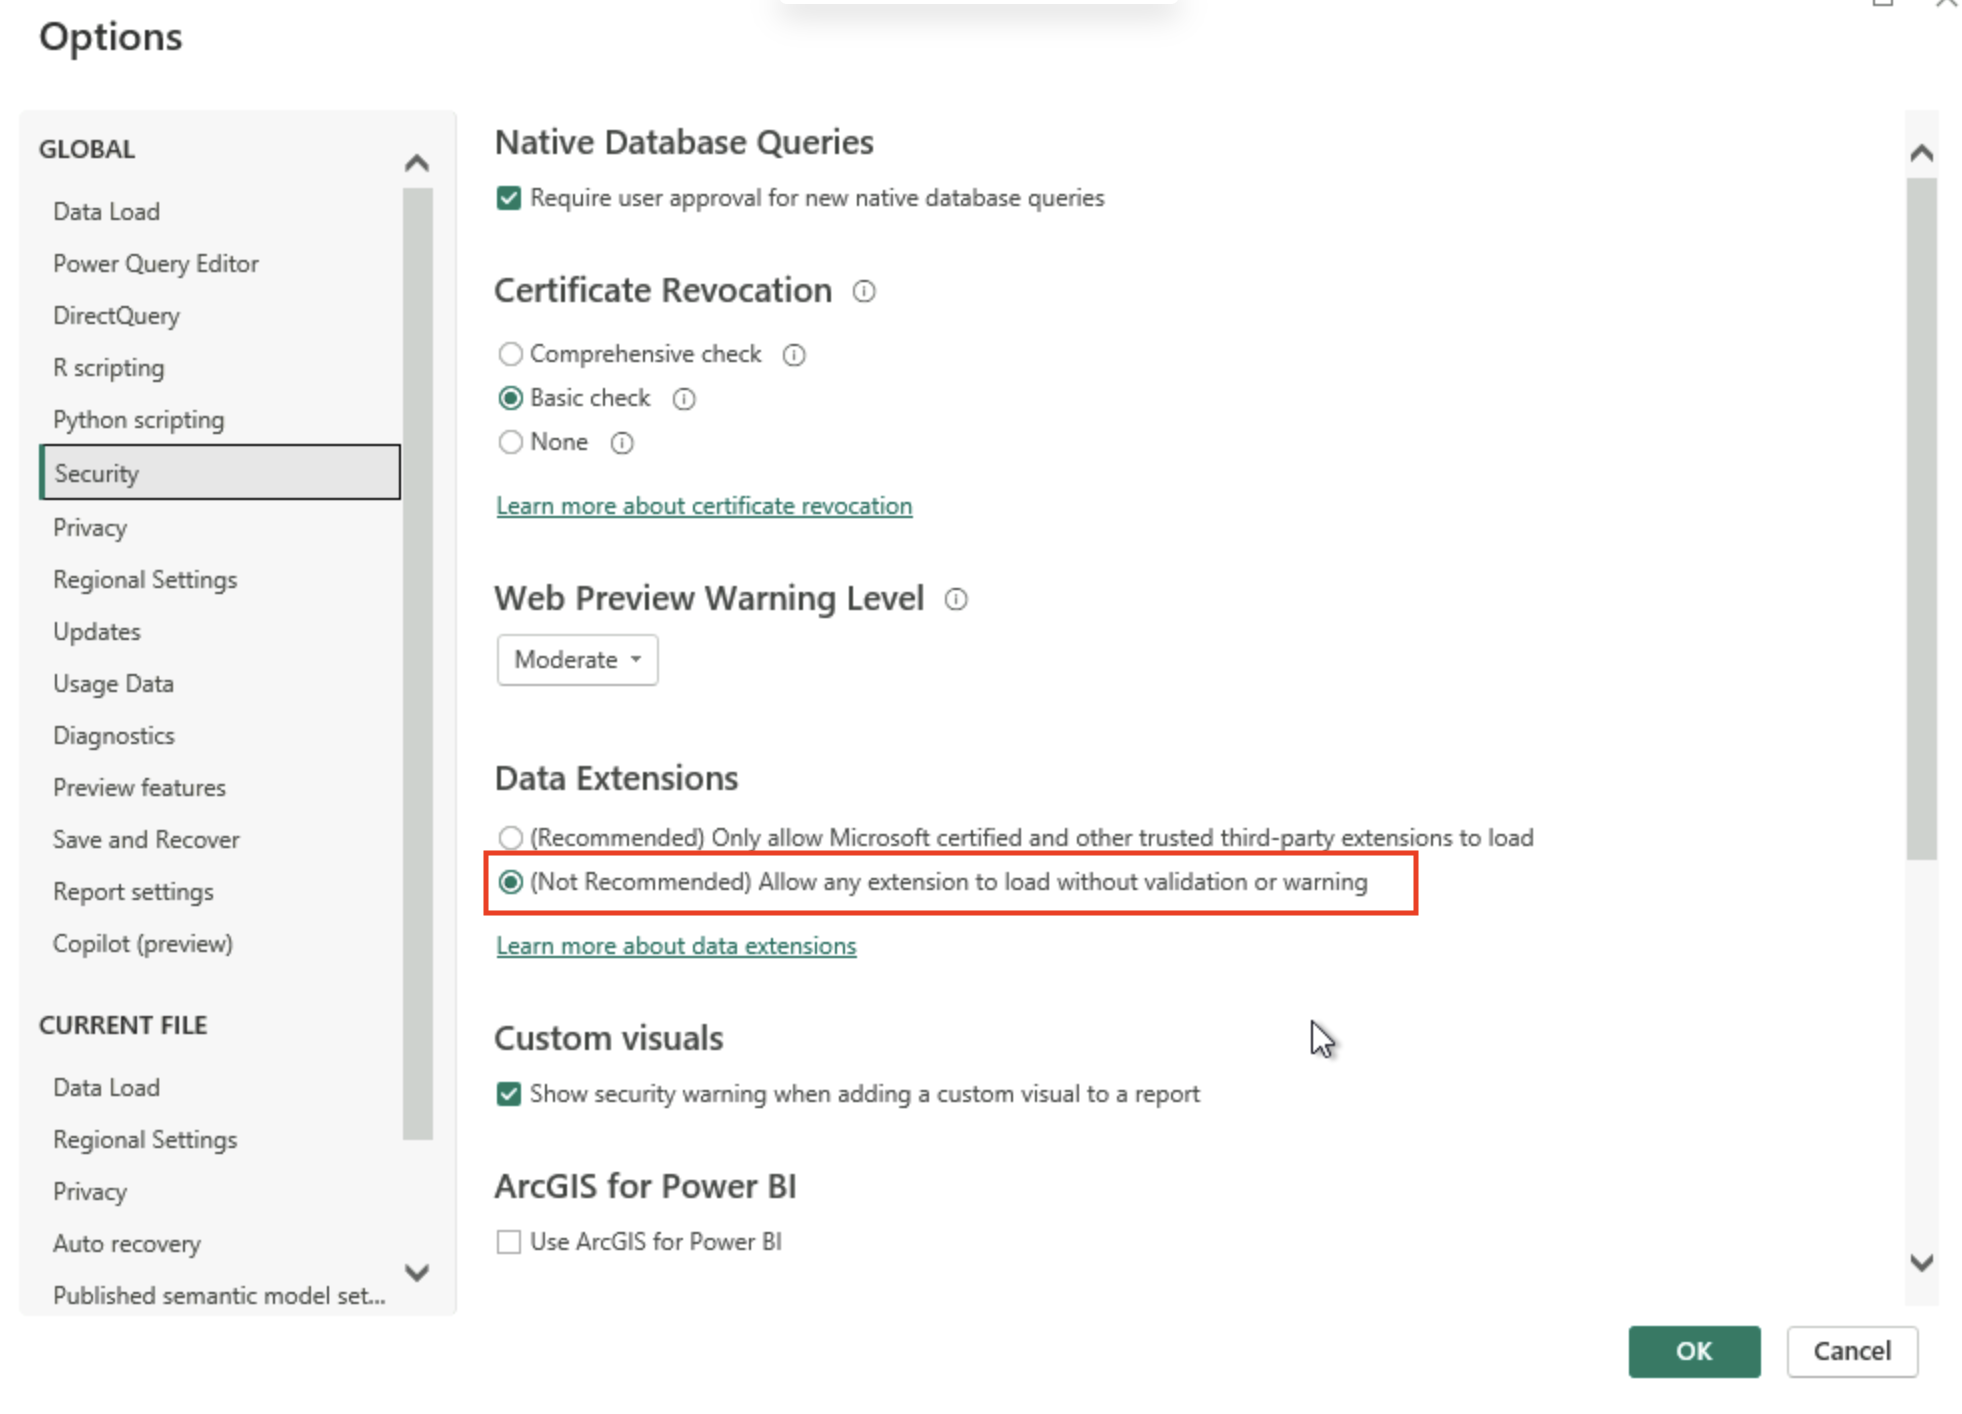
As a custom connector is used, you need to adjust the Power BI security policy:
1. Open Power BI Desktop.
2. Choose File > Options and settings > Options > Security.
3. In the Data Extensions area, select the following option:
(Not Recommended) Allow any extension to load without validation or warning
4. Click OK and restart Power BI Desktop.
Configuring the ODBC Data Source
1. Open the ODBC Data Sources (64-bit) manager in the Windows system.
2. Select the System DSN tab and click Add.
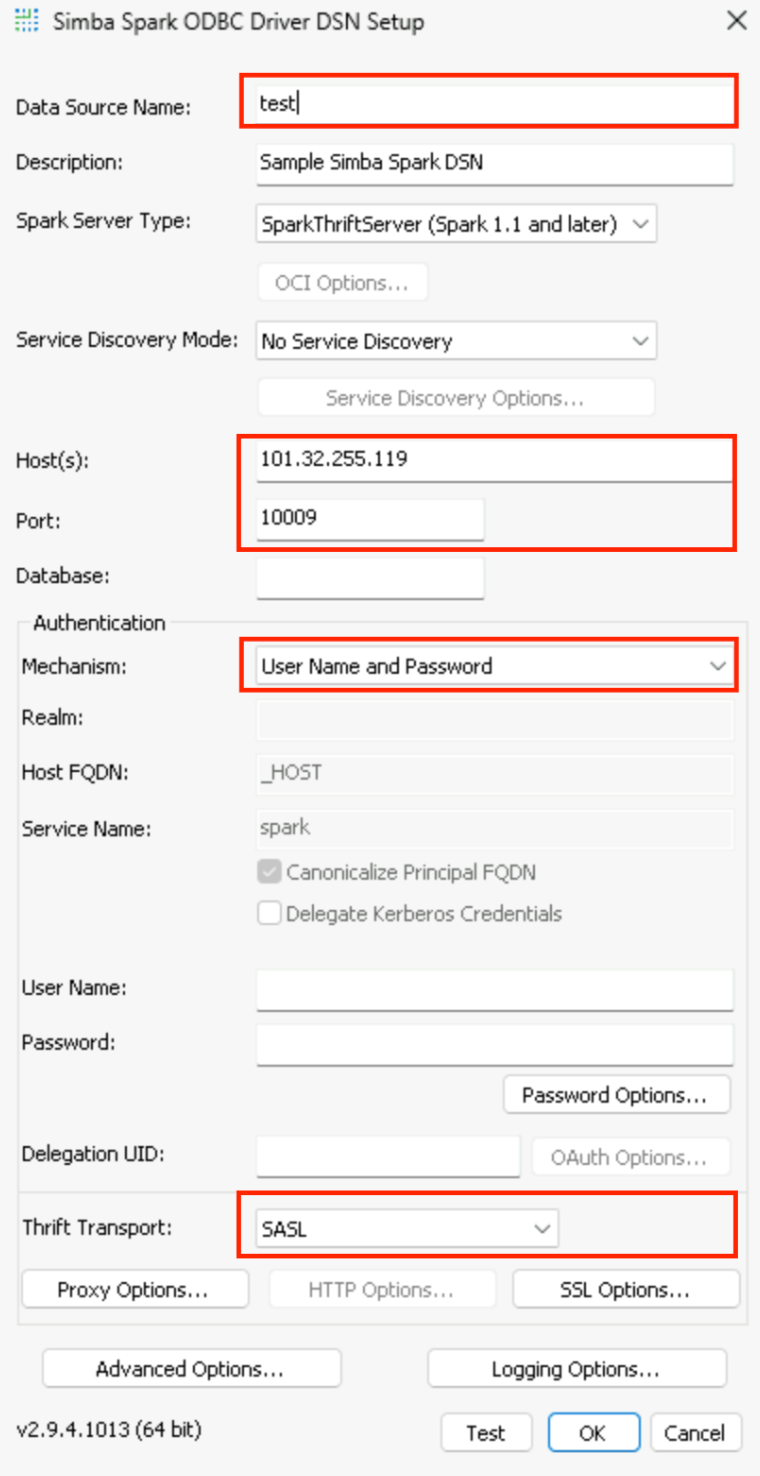
3. Select Simba Spark ODBC Driver and click Finish to go to the configuration page.
Data Source Name: Enter a custom name, for example, DLC_Spark.
Spark Server Type: Select SparkThriftServer (Spark 1.1 and later).
Host: Enter the access address IP address of the DLC engine. Select one of the following methods to obtain the IP address based on your network environment:
(Recommended) Private network access: If a gateway or server is located in a Tencent Cloud Virtual Private Cloud (VPC), create a [Private Link] for the engine in the DLC console and enter the value specified by Private Network VIP.
Public network access: If your local computer accesses the engine directly over the Internet, enable public network access for the engine in the DLC console and enter the value specified by Public Network IP.
For specific network configuration and IP retrieval procedure, refer to DLC Engine Network Configuration Guide.
Port: Enter the port number (usually 10009).
Authentication Mechanism: Select User Name and Password.
Thrift Transport: Select SASL.
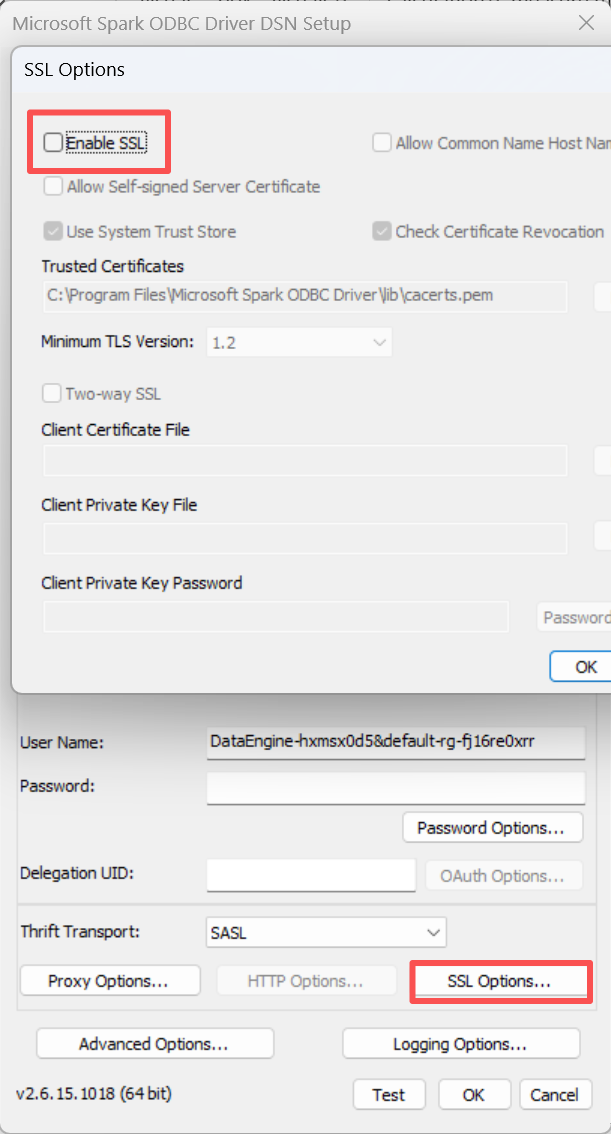
4. Click SSL Options.
Deselect Enable SSL. (Based on the actual DLC network environment configuration, private network or VPC access is disabled in most cases, while the public network is enabled. The actual allowlist instructions take precedence.)
5. Click OK to save the configuration.
Obtaining Data
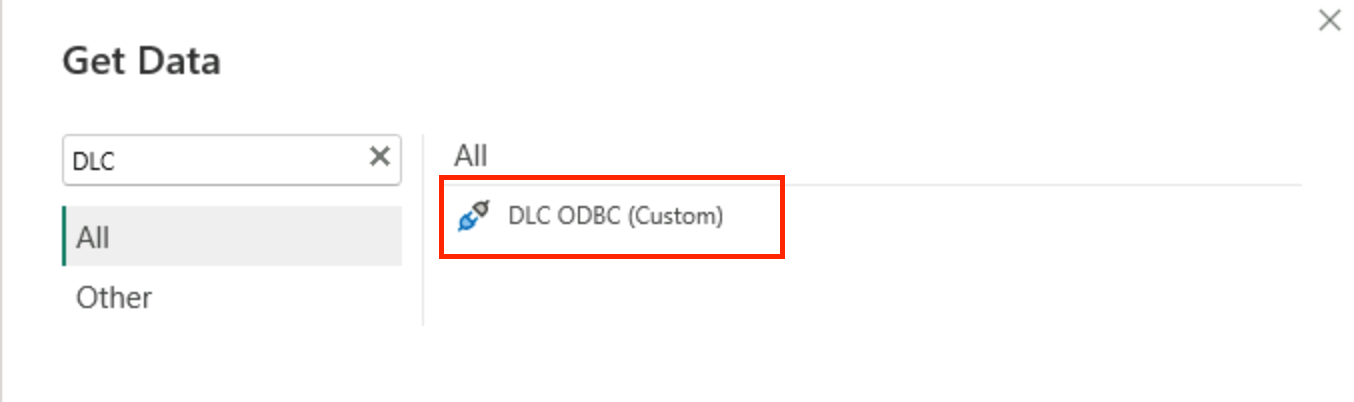
1. On the Power BI Desktop homepage, click Get Data.
2. Search for DLC, select DlcODBC (Custom), and click Connect.
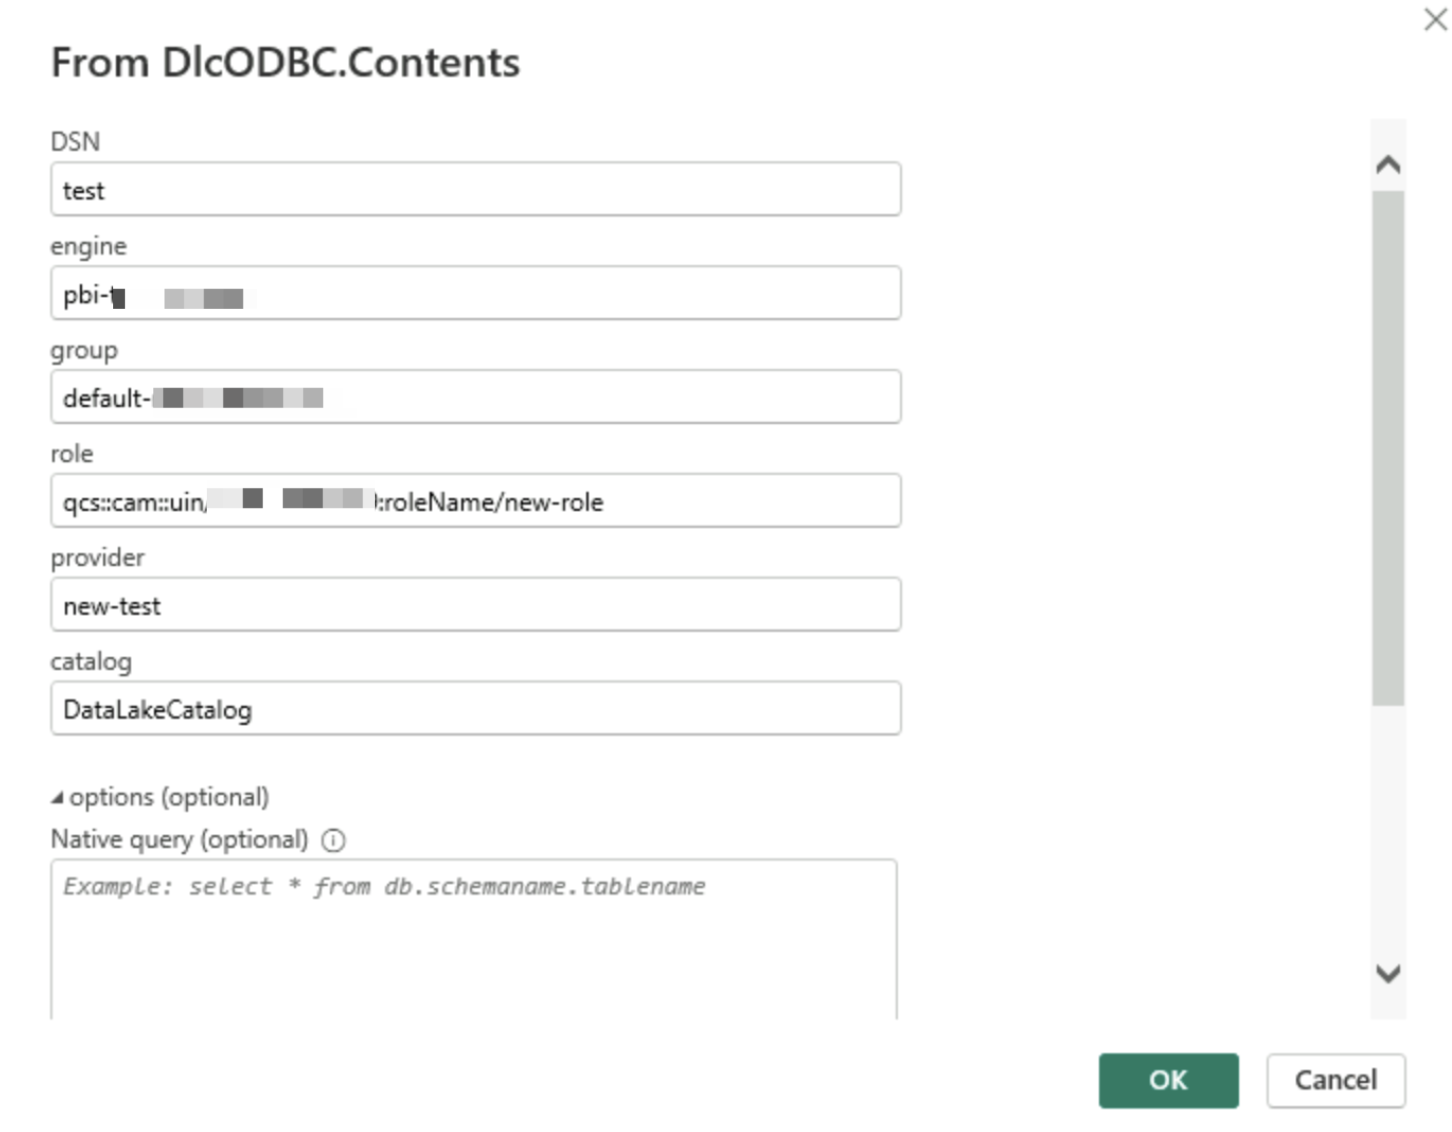
3. In the pop-up configuration window, specify the following parameters:
DSN Name: name configured in step 3, for example, test.
Engine Name: DLC compute engine name.
Resource Group: resource group name.
Tencent Cloud Role ID: role ID obtained in step 2.
Identity Provider Name: provider name created in step 2.
Data Catalog Name: data catalog name.
4. Select Import or DirectQuery as the data transfer mode and click OK.
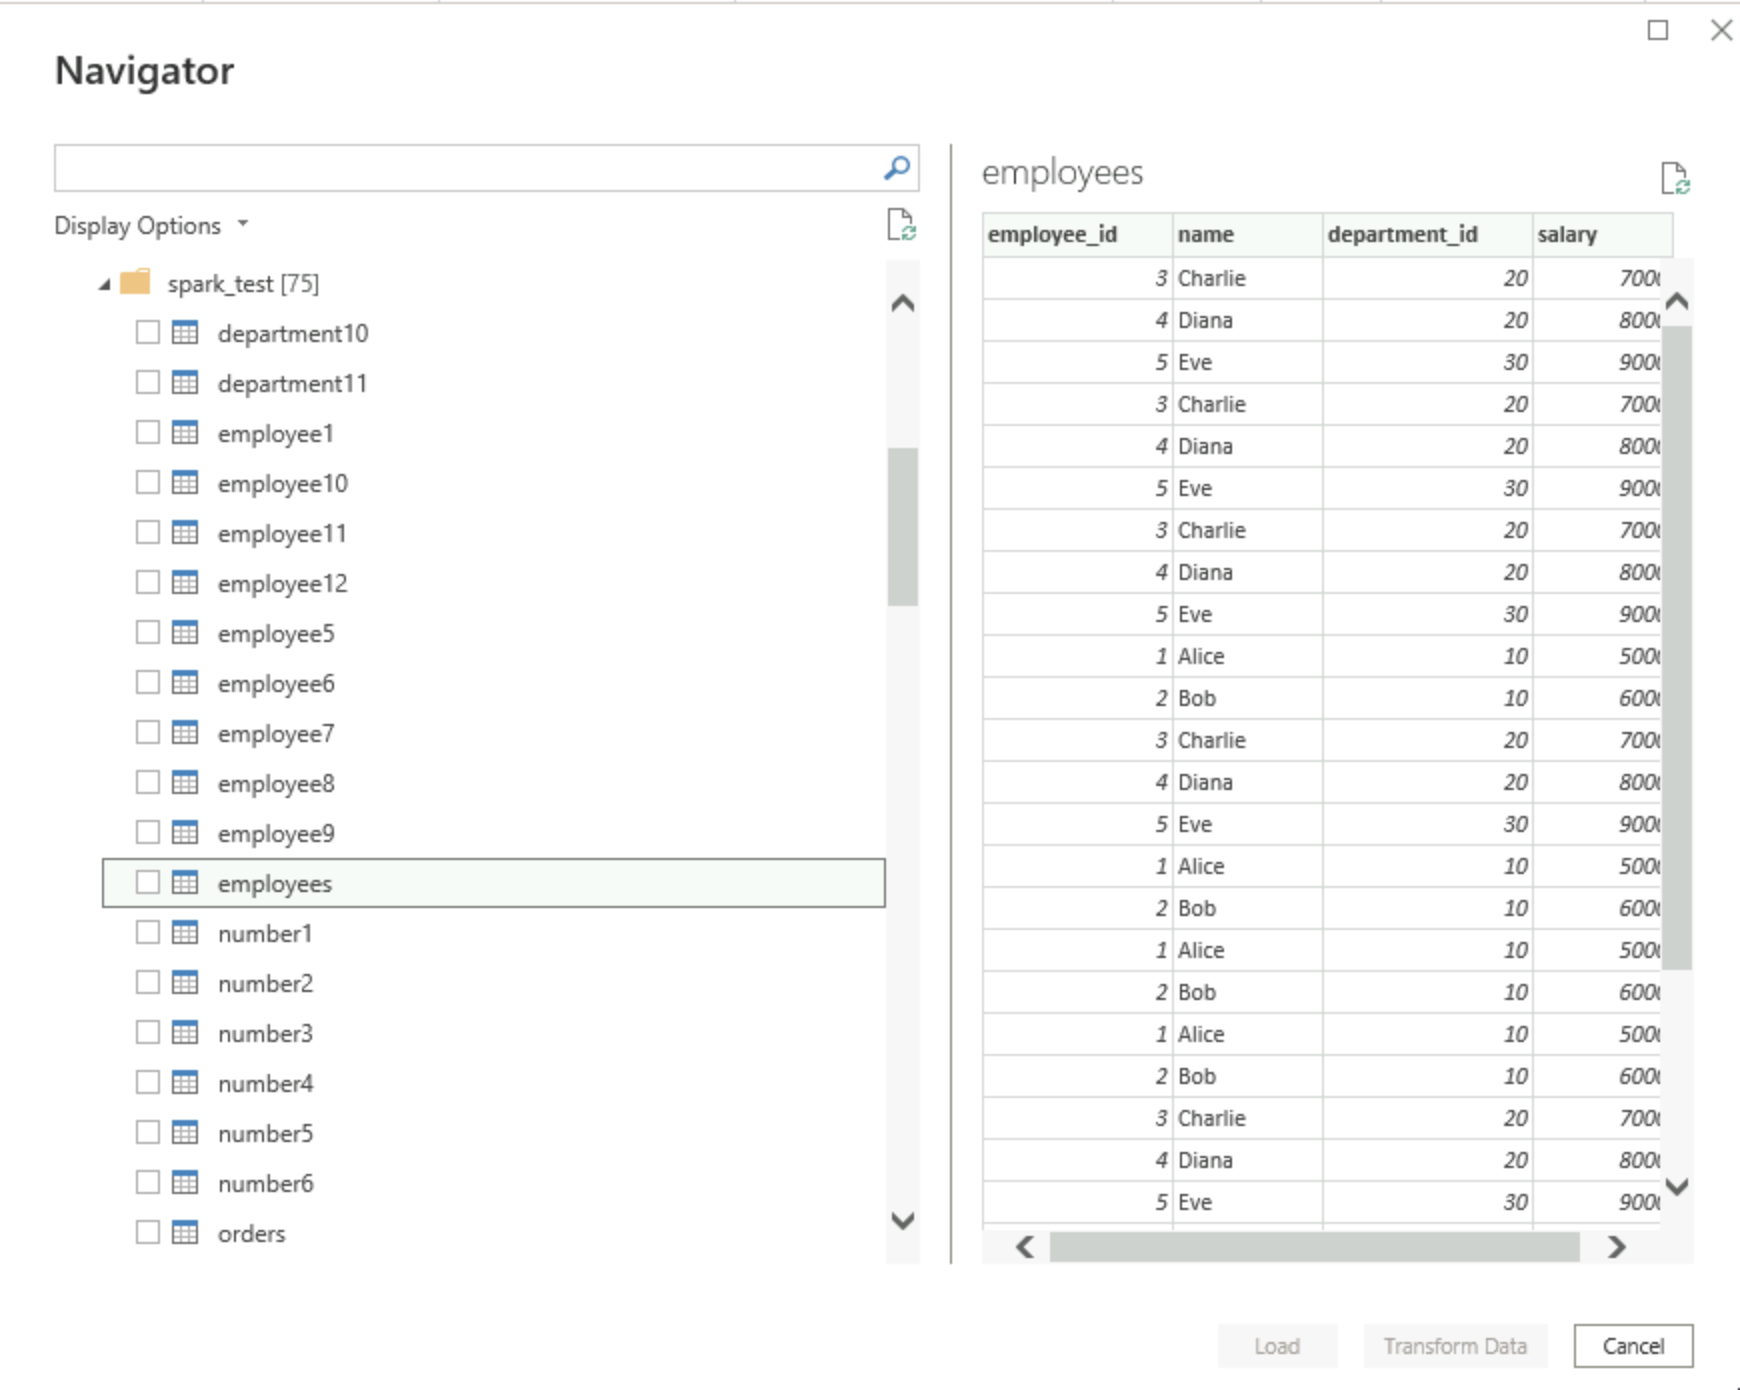
5. Preview and select a data table in the navigator, and click Load.
Report Publishing and Gateway Configuration (Live Production Environment)
If you need to publish reports to Power BI Service (on the web) and set up automatic refresh, configure the on-premises data gateway.
Installing a Gateway Server Environment
Perform the following operations on the server where the gateway is installed:
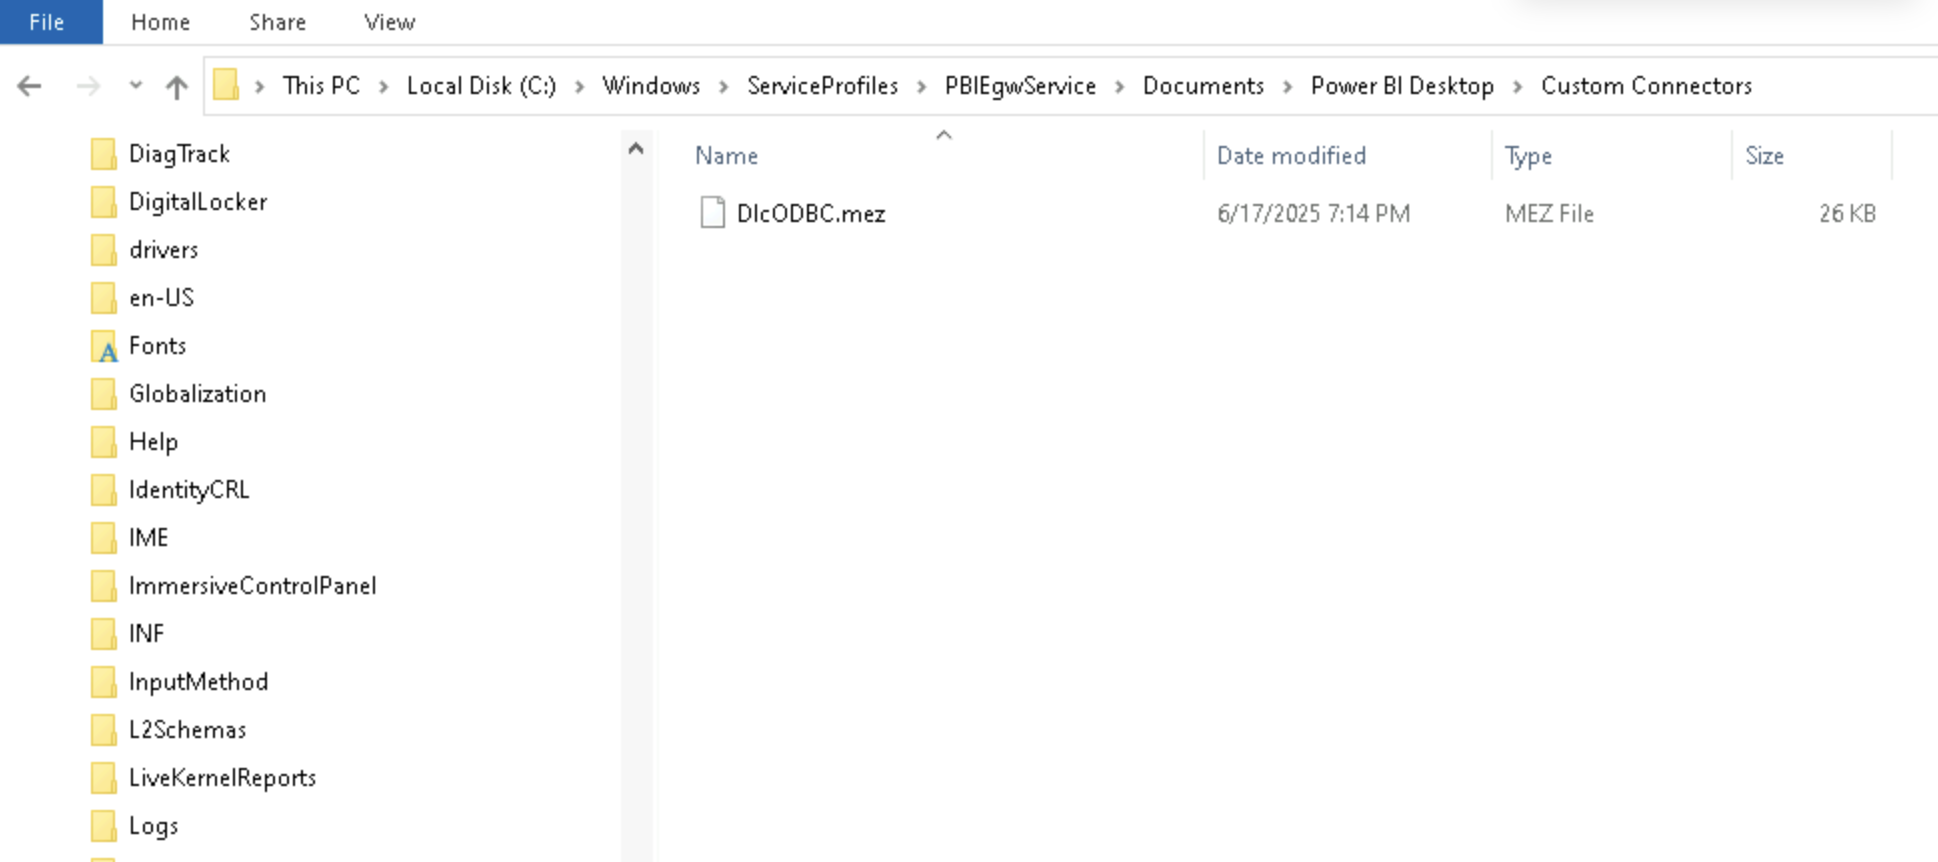
1. Install the connector.
Copy the DlcODBC.mez file to the system path of the gateway service:
C:\\Windows\\ServiceProfiles\\PBIEgwService\\Documents\\Power BI Desktop\\Custom Connectors\\
If the folder does not exist, create it manually.
2. Configure the gateway.
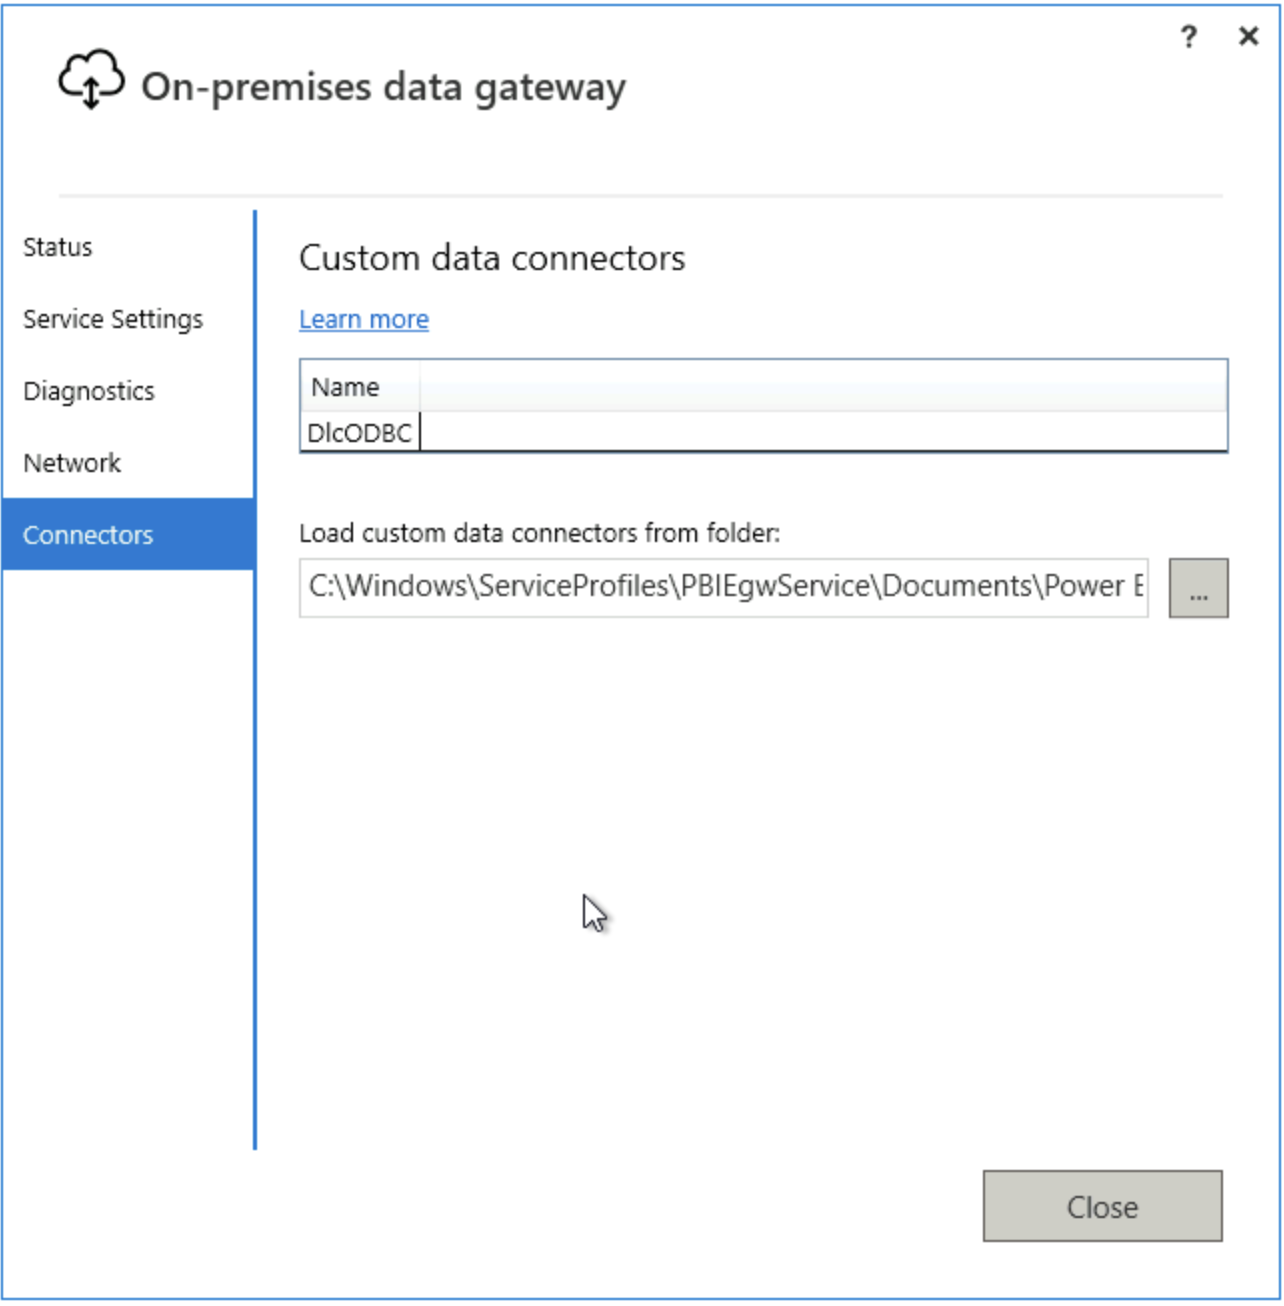
Open the On-premises data gateway application.
Click Connectors and set the load path to the folder path in the previous step.
Restart the gateway service.
3. Configure ODBC.
Repeat the operations in step 3 in section "Configuring Power BI Desktop" on the server to add an identical system data source name (DSN).
Configuring the Power BI Service
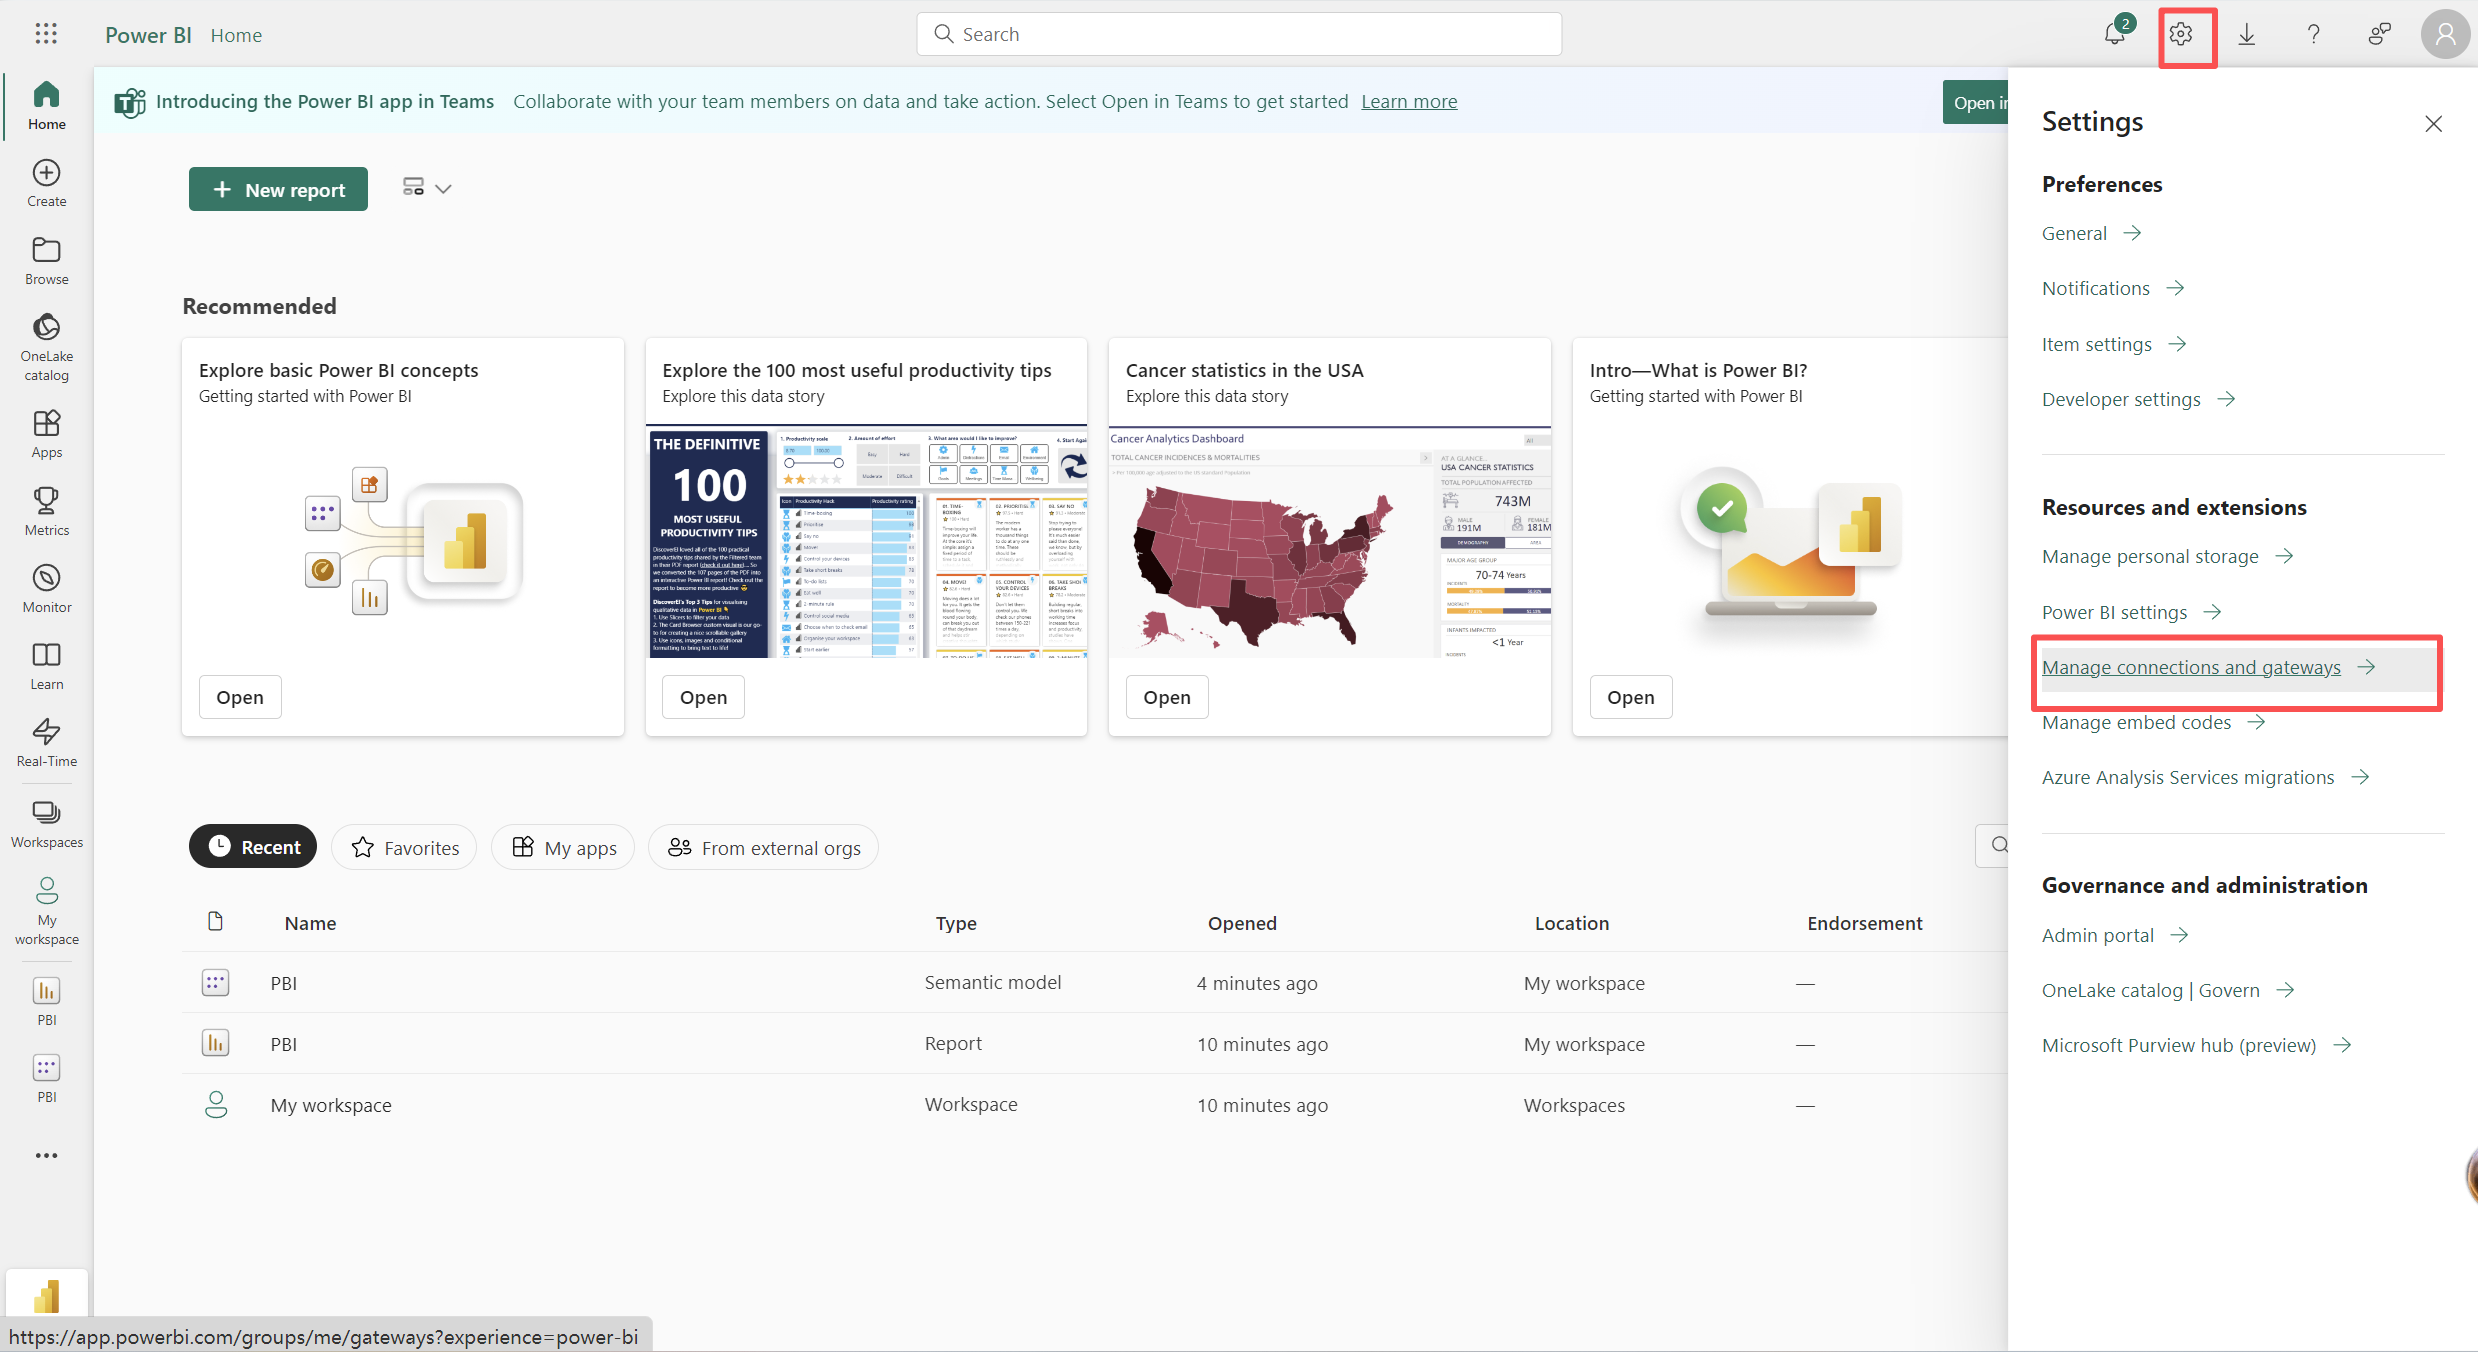
1. Log in to the Power BI web version.
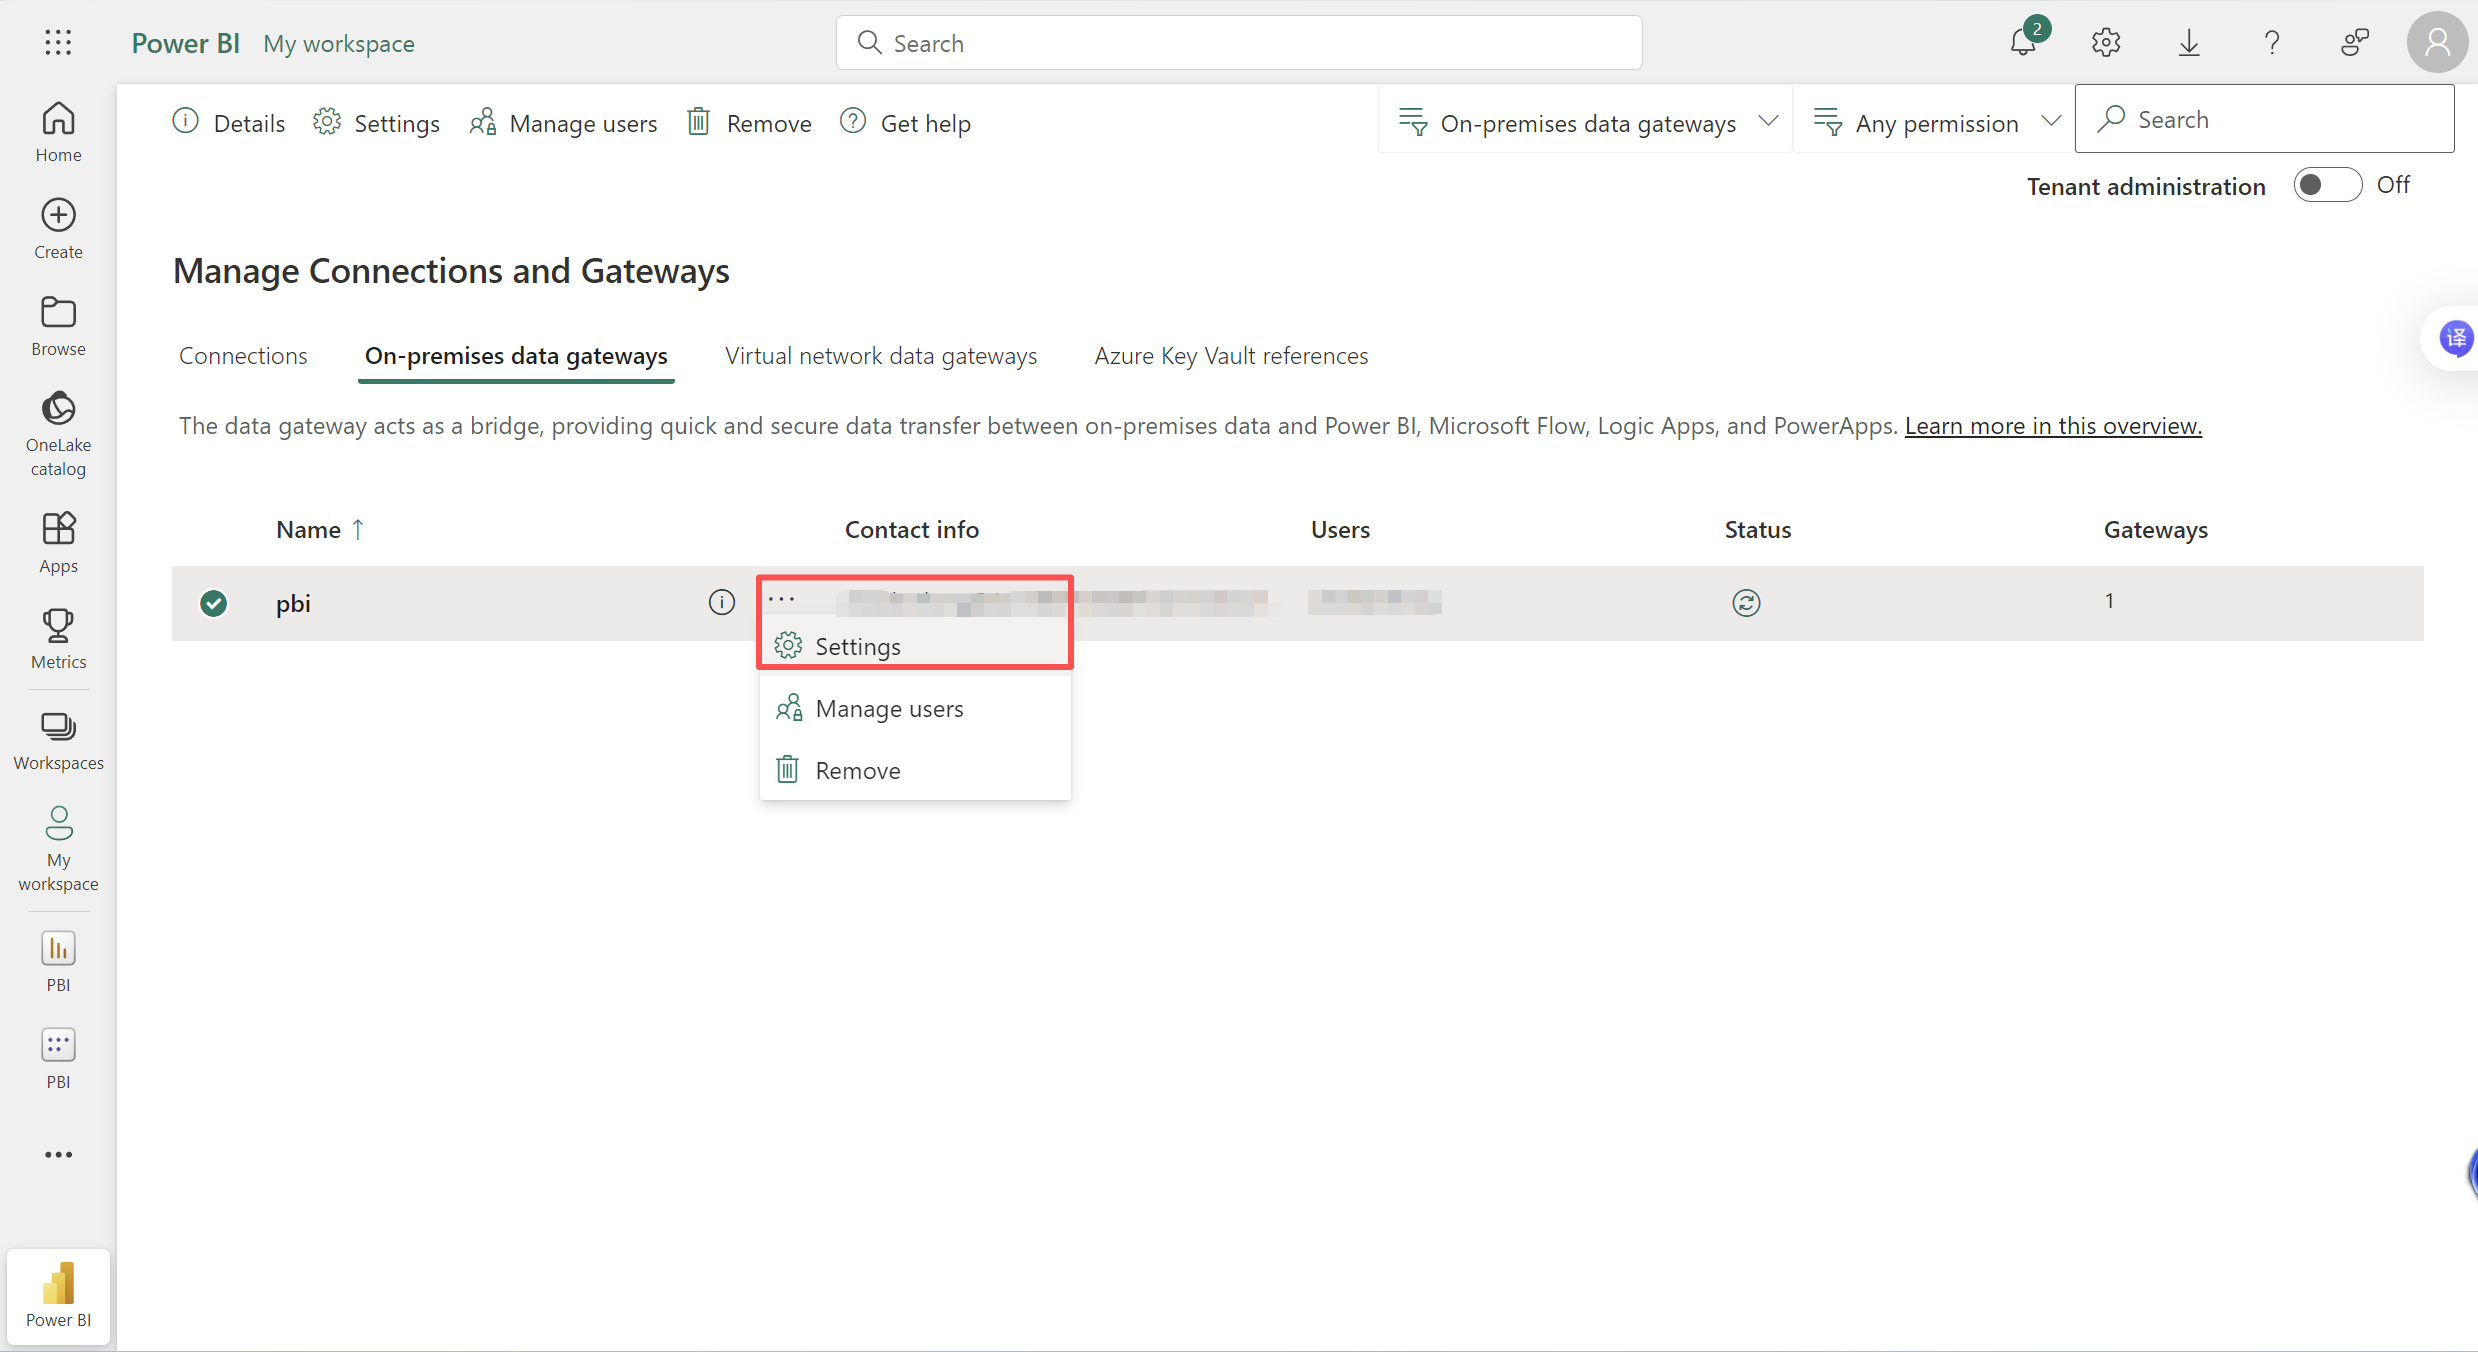
2. Click the gear icon in the upper right corner and select Manage connections and gateways.
3. Configure gateway permissions.
Switch to the On-premises data gateways tab page.
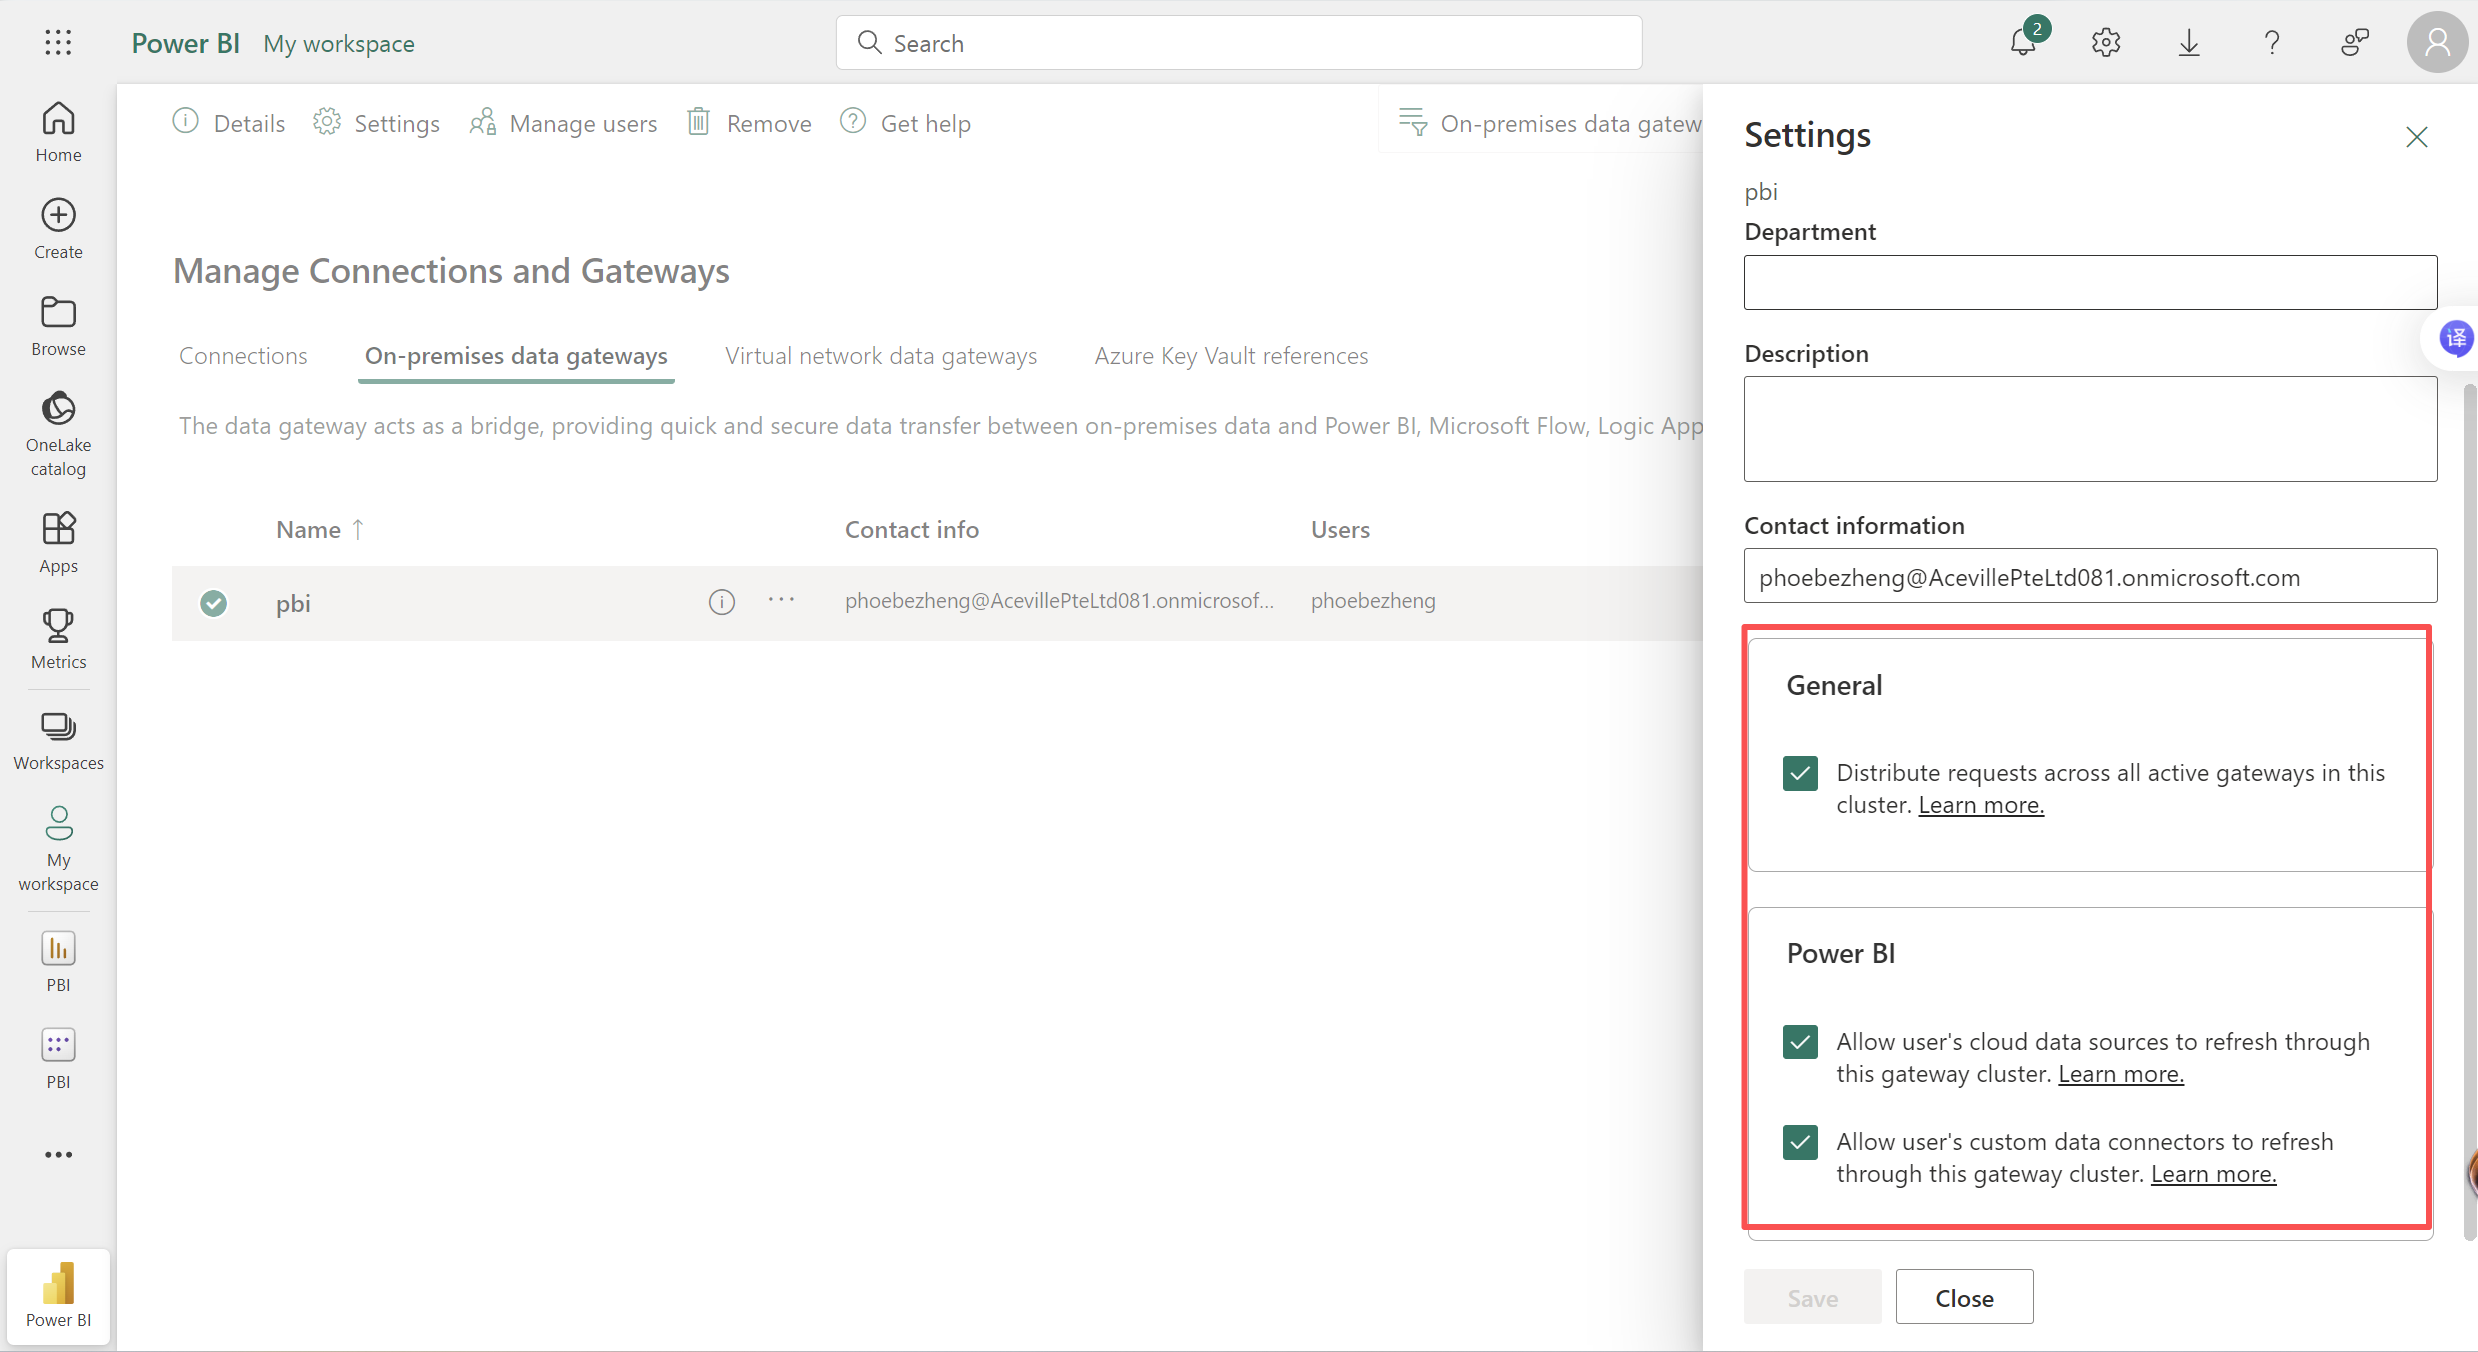
Click the ellipsis (...) next to the target gateway and then Settings.
Select the following option to allow custom connectors:
Allow user's custom data connectors to refresh through this gateway cluster.
4. Create a data source connection.
Click New in the upper-left corner.
Gateway cluster name: Select your gateway.
Connection type: Select DlcODBC.
Authentication method: Select Basic.
Parameter configuration: Fill in information consistent with the Desktop client, such as the DSN, engine name, resource group, and role ID.
Click Create (you are advised to select Skip test connection to prevent timeout).

Binding and Refreshing a Report
1. To publish a report, click Publish in Power BI Desktop.
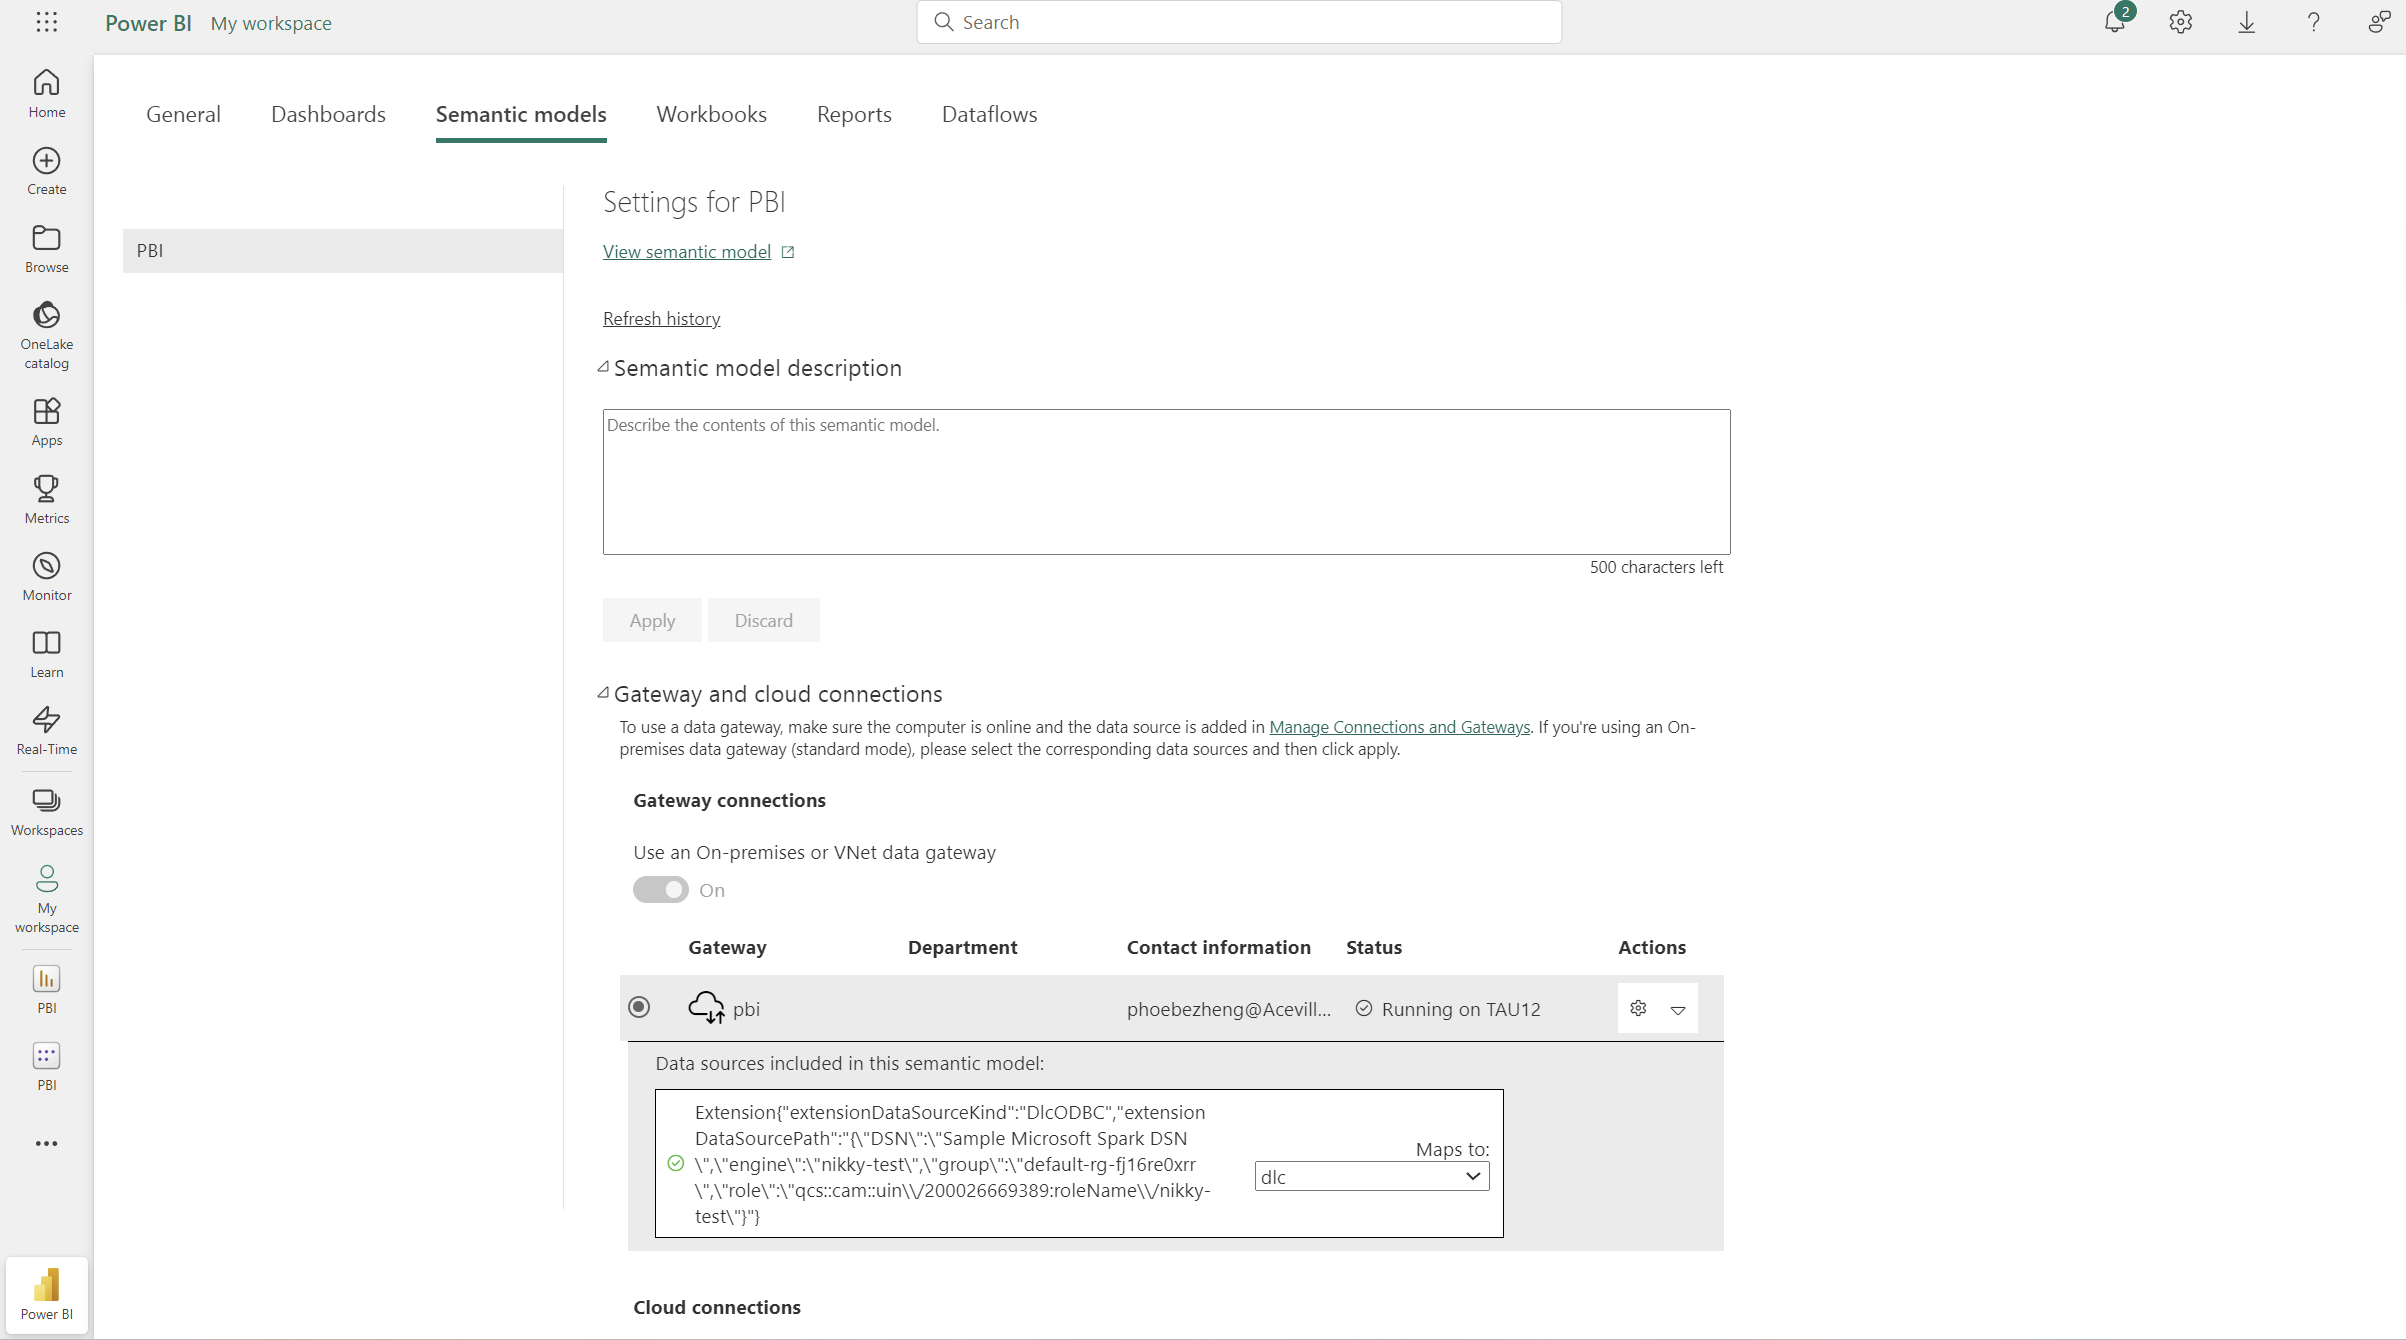
2. Locate the semantic model for this report in Power BI Service.
3. Choose Settings > Gateway and cloud connections.
4. In the Maps to section, map the cloud dataset to the newly created gateway data source.
5. Click Apply to refresh the report manually or on a schedule.
FAQs
Q: What Can I Do If I Cannot Find the Custom Connectors Folder?
A: The folder does not exist by default. You need to manually create it under Documents\\Power BI Desktop\\. Take note of the distinction between the current user path (for Power BI Desktop) and the system service path (for on-premises gateways).
Q: What Can I Do If a Connection Test Fails?
A: Check whether the specified host and port in the ODBC configuration can be connected from the current network. Alternatively, check whether the CAM role has the permission to access the corresponding DLC engine.
Ajuda e Suporte
Esta página foi útil?
Você também pode entrar em contato com a Equipe de vendas ou Enviar um tíquete em caso de ajuda.
comentários