This document describes how to create a Node.js service, Hello World, in a container cluster. For more information on how to build a Docker image, see How to Build a Docker Image.
1. Run the following commands in sequence to create and go to the hellonode directory:
mkdir hellonode
cd hellonode/
2. Run the following command to create and open the server.js file:
vim server.js
3. Press i to switch to the editing mode, and enter the following content in server.js:
var http =require('http');
varhandleRequest=function(request, response){
console.log('Received request for URL: '+ request.url);
response.writeHead(200);
response.end('Hello World!');
};
var www = http.createServer(handleRequest);
www.listen(80);
Press Esc and enter :wq to save the file and return.
4. Run the following command to execute the server.js file:
node server.js
5. Test the Hello World program.
Method 1. Log in to the node again and run the following command:
curl127.0.0.1:80
If the following information appears, the Hello World program is running successfully.
Method 2. Open a local browser and access the program via “[CVM public IP]:[Port]”. Only port 80 is supported.
If the following information appears, the Hello World program is running successfully.
Creating a Docker image
1. Run the following commands in sequence to create a Dockerfile file in the hellonode directory:
cd hellonode
vim Dockerfile
2. Press i to switch to the editing mode, and enter the following content in the Dockerfile file:
FROM node:4.4
EXPOSE 80
COPY server.js .
CMD node server.js
Press Esc and enter :wq to save the file and return.
3. Install and start Docker on the node.
yum install -y docker
systemctl start docker
4. Run the following command to build an image:
docker build -t hello-node:v1 .
5.
Run the following command
to check the built hello-node image:
docker images
If the following information appears, the hello-node image is successfully built. Take note of the IMAGE ID. See the figure below.
Uploading the image to Tencent Cloud image registry
Run the following commands in sequence to upload the image to the Tencent Cloud image registry.
docker tag IMAGEID ccr.ccs.tencentyun.com/Namespace/hello-node:v1
Replace the image ID in the command with the image ID noted down in Step 4.
Replace the namespace in the command with the namespace that you create. If you haven't created a namespace, create one first by referring to Step 4: Creating a Namespace.
If the following information appears, the image is successfully uploaded.
Creating the Hello World service using the image
Note
Before creating and using the Hello World service, you must have a cluster. If you do not have a cluster, create one by referring to Creating a Cluster.
1. Log in to the TKE console and select Cluster in the left sidebar.
2. On the Cluster Management page, click the ID of the target cluster to go to the cluster details page.
3. Select Workload > Deployment. On the Deployment page, click Create.
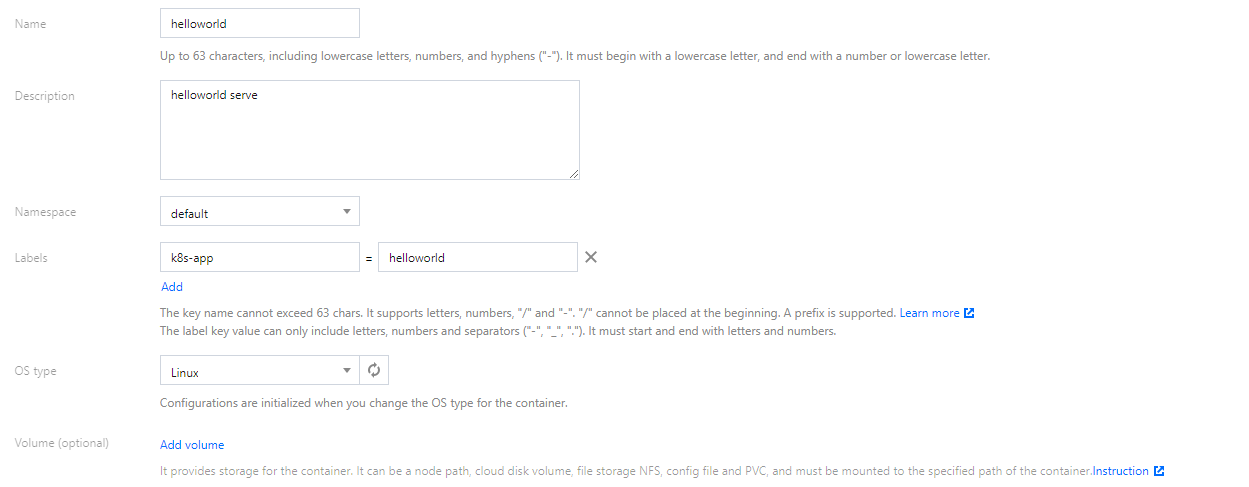
4. On the Create Deployment page, specify basic information of the workload as instructed in the figure below.
Workload Name: Enter the name of the workload to create. In this example, helloworld is used.
Description: Specify related workload information.
Namespace: Select a namespace based on your requirements.
Tag: Specify the key-value pair. The default value is k8s-app = helloworld here.
Type: Select a type as required. Linux is selected in this example.
Volume: Set up the workload volumes mounted based on your requirements. For more details, see Volume Management.
5. Configure Containers in Pod as instructed.
5.1 Enter the name of the container. In this example, helloworld is used.
5.2 Click Select an image, and click My Images in the dialog box that appears. Use the search box to find the helloworld image, and then click OK.
The main parameters are described as follows:
Image Tag: Use the default value latest.
Image Pull Policy: Choose from Always, IfNotPresent and Never as needed. In this document, we use the default policy.
6. In the Number of Pods section, set the number of pods for the service as instructed. See the figure below.
Manual adjustment: Set the number of pods. The number of pods in this example is set to 1. You can click "+" or "-" to change the number of pods.
Auto adjustment: The system automatically adjusts the number of pods if any specified condition is met. For more information, see Automatic Scaling Basic Operations.
7. Configure Access Settings (Service) for the workload as instructed below.
Service: Select Enable.
Service Access: Select LoadBalancer (public network).
Load Balancer: Select according to your requirements.
Port Mapping: Select TCP, and set both the container port and service port to 80.
Note
The node network, container network, and ports 30000 to 32768 need to be opened to the internet for the security group of the cluster to which the service belongs. Otherwise, the TKE may be unavailable. For more information, see TKE Security Group Settings.
8. Click Create Deployment to create the Hello World service.
Accessing the Hello World service
The HelloWorld service can be accessed in either of the following ways.
Access using the CLB IP address
1. Log in to the TKE console and select Cluster in the left sidebar.
2. On the Cluster Management page, click the ID of the cluster to which the Hello World service belongs to go to the cluster details page.
3. Select Service and route > Service to go to the Service page.
4. On the service management page, copy the CLB IP address of the Hello World service, as shown in the following figure:
5. Paste the CLB IP address for the Hello World service in your browser.
Access using the service name
Other services or containers in the cluster can access the WordPress service using the service name.
Verifying the Hello World service
If the following information appears when you access the service, the Hello World service is successfully created.
If the container cannot be created, see Event FAQs for a solution.