The EIP direct connection feature is suitable for scenarios where you need to view the public IP addresses in the CVM. For example, you want to forward private network traffic and public network traffic to different IP addresses respectively. This document describes how to configure the EIP direct connection on both Linux and Windows CVMs.
Note:
The EIP direct connection process will cause a network interruption. Confirm that a short interruption to your business is allowed.
Scenarios
When users access the public network via an EIP, they can choose the NAT mode or the public IP address direct connection mode. The current default mode is the NAT mode.
In the NAT mode, EIPs are invisible on the local machine. You need to manually add an EIP address each time during configuration.
In the direct connection mode, EIPs are visible on the local machine. You do not need to manually add an EIP address each time during configuration, which can reduce development costs.
Use Limits
Direct connection is a beta-testing feature and currently only supports VPCs. If you need to use it, submit a ticket application.
If a CVM configured with EIP direct connection is switched to a VPC, you need to reconfigure the EIP direct connection.
The EIP direct connection cannot be configured for a Tencent Cloud Lighthouse (Lighthouse) for now.
On a CVM, the EIP direct connection feature cannot be used with a NAT Gateway at the same time. If the route table for the subnet where your CVM resides is configured with a routing policy of accessing the public network via the NAT Gateway, the direct connection feature cannot be implemented for the EIP on the CVM. You can allow the CVM to access the public network via its EIP instead of the NAT Gateway by adjusting the priorities of NAT Gateways and EIPs. In this case, the EIP direct connection feature can be implemented.
Directions
Note:
After downloading the EIP direct connection script to your CVM, you need to enable the direct connection feature in the public IP address console first, and then run the EIP direct connection script. Otherwise, the EIP direct connection might fail or malfunction.
Tencent Cloud provides an EIP direct connection script for IP address configuration, which allows private network traffic to flow via private IP addresses and public network traffic to flow via public IP addresses. If you have other business scenarios, configure the routing according to your specific business scenarios.
Configuring the EIP Direct Connection on a Linux CVM
Configuring the EIP Direct Connection on a Windows CVM
The script for Linux is applicable to the following scenarios: Both the private and public IP addresses are on the primary ENI (eth0), the public network address is accessed via the public IP address, and the private network address is accessed via the private IP address.
Note:
The script for Linux supports CentOS 6 and later versions, as well as Ubuntu.
Step 1: Downloading the Script for EIP Direct Connection
Since the EIP direct connection process will cause a network interruption, you need to obtain the script for EIP direct connection first and upload it to the CVM. You can choose one of the following methods to obtain the script:
Downloading manually
Click Download Script for Linux to download the configuration script for EIP direct connection to the local machine, and then upload it to the CVM you want to perform the EIP direct connection on.
Downloading via the wget command
Go to the CVM console, log in to the CVM you want to perform the EIP direct connection on and execute the following command on the CVM to download the script:
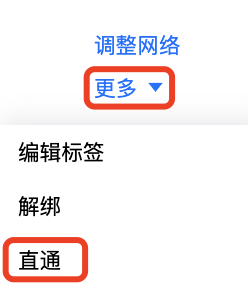
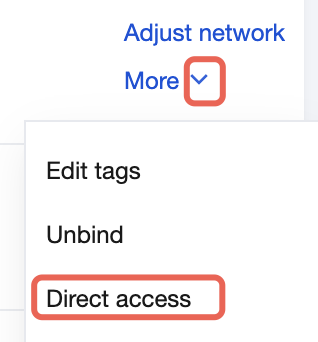
2. Select the region of the EIP bound to the primary ENI on the CVM, and find the EIP instance for which you want to enable the direct connection feature. In the operation column on the rightmost side of the list page, click More > Direct access.
3. In the pop-up EIP Direct Access dialog box, click OK.
Step 3: Running the Script for EIP Direct Connection
After configuring the EIP direct connection for the primary ENI, you need to log in to the CVM and run the script for EIP direct connection.
1. Log in to the CVM console, select the region of the CVM on which you want to enable the EIP direct connection, and log in to this CVM.
2. Run the EIP direct connection script. Specific method:
2.1 Execute the following command to add execute permissions to the configuration script.
chmod +x eip_direct.sh
2.2 Execute ip addr to view the name of the ENI for which you want to enable the direct connection.
[root@VM-31-11-centos ~]# ip addr
1: lo: <LOOPBACK,UP,LOWER_UP> mtu 65536 qdisc noqueue state UNKNOWN group default qlen 1000
inet 172.16.31.10/24 brd 172.16.31.255 scope global noprefixroute eth0
valid_lft forever preferred_lft forever
inet 172.16.31.20/24 brd 172.16.31.255 scope global secondary noprefixroute eth0:0
valid_lft forever preferred_lft forever
inet6 fe80::5054:ff:feaa:a2bd/64 scope link
valid_lft forever preferred_lft forever
[root@VM-31-11-centos ~]#
2.3 Refer to the following commands to execute the configuration script.
An ENI supports assignment with multiple private IP addresses and allows binding with an EIP. You can configure the EIP direct connection for the primary or secondary IP address of the ENI as needed. The description of the related command lines is as follows.
When configuring a direct connection for the primary IP address of the ENI, you can configure the path of the script on the CVM by executing ./eip_direct.sh install ethx XX.XX.XX.XX. Here, ethx is the name of the ENI you want to configure the direct connection for, and XX.XX.XX.XX is the EIP address (optional).
When configuring direct connection for the secondary IP address of the ENI, you can configure the path of the script on the CVM by executing ./eip_direct.sh install ethx XX.XX.XX.XX. Here, ethx is the name of the ENI you want to configure the direct connection for, and XX.XX.XX.XX is the EIP address (required).
2.4. Execute the ip addr command to check whether the configuration has taken effect.
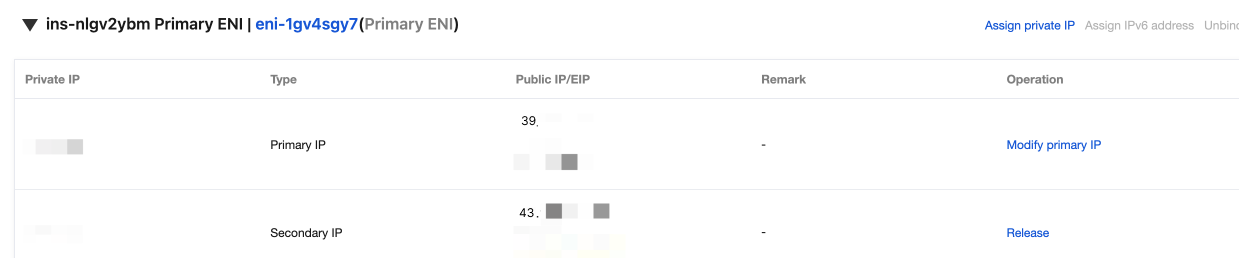
After the command is executed, the system will display the detailed configuration of the ENI. If the script for direct connection in step 2.3 has been executed successfully, the EIP address (the public IPv4 address) will be displayed here.
[root@VM-31-11-centos ~]# ip addr
1: lo: <LOOPBACK,UP,LOWER_UP> mtu 65536 qdisc noqueue state UNKNOWN group default qlen 1000
inet 172.16.31.10/24 brd 172.16.31.255 scope global noprefixroute eth0
valid_lft forever preferred_lft forever
inet 39.XX.XX.XX/32 scope global eth0
valid_lft forever preferred_lft forever
inet 43.XX.XX.XX/32 scope global eth0
valid_lft forever preferred_lft forever
inet 172.16.31.20/24 brd 172.16.31.255 scope global secondary noprefixroute eth0:0
valid_lft forever preferred_lft forever
inet6 fe80::5054:ff:feaa:a2bd/64 scope link
valid_lft forever preferred_lft forever
[root@VM-31-11-centos ~]#
The script for Windows is applicable to the following scenarios: The primary ENI handles public network traffic, and the secondary ENI handles private network traffic.
Note:
For the EIP direct connection in a Windows system, the private IP address and the public IP address each needs an ENI. The public IP address should be on the primary ENI, and the secondary ENI only needs a private IP address.
After the EIP direct connection is configured on the primary ENI of a Windows system, the public IP address cannot be bound to a CLB. If this is required, bind the private IP address of the CVM's secondary ENI to the CLB.
When you set the direct connection for Windows, the public network will be interrupted. Therefore, it is recommended that you do it by logging in to a Windows instance via VNC.
This document uses Windows Server 2025 as an example.
Step 1: Downloading the Script for EIP Direct Connection
Since the EIP direct connection process will cause a network interruption, you need to download the script for EIP direct connection to the CVM first.
Since the script for Windows is designed for scenarios where the secondary ENI handles private network traffic, you need to configure a secondary ENI for the CVM.
2. In the CVM list, select the region of the CVM to be configured, click the CVM ID, and go to the details page.
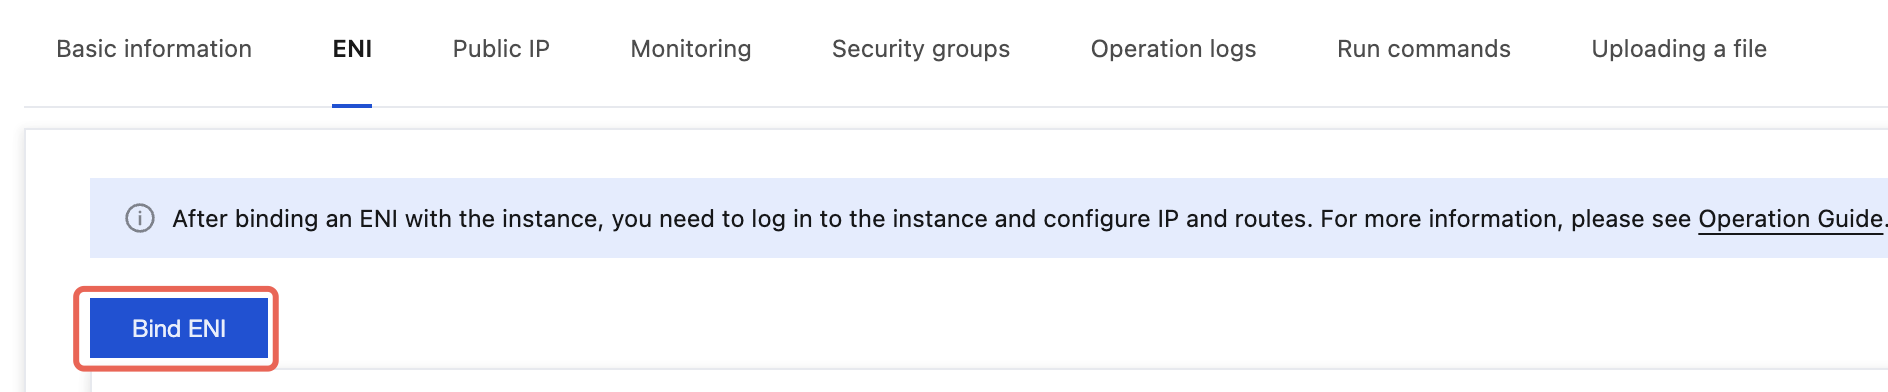
3. Select the ENI tab, click Bind ENI, and create a secondary ENI in the same subnet as the primary ENI.
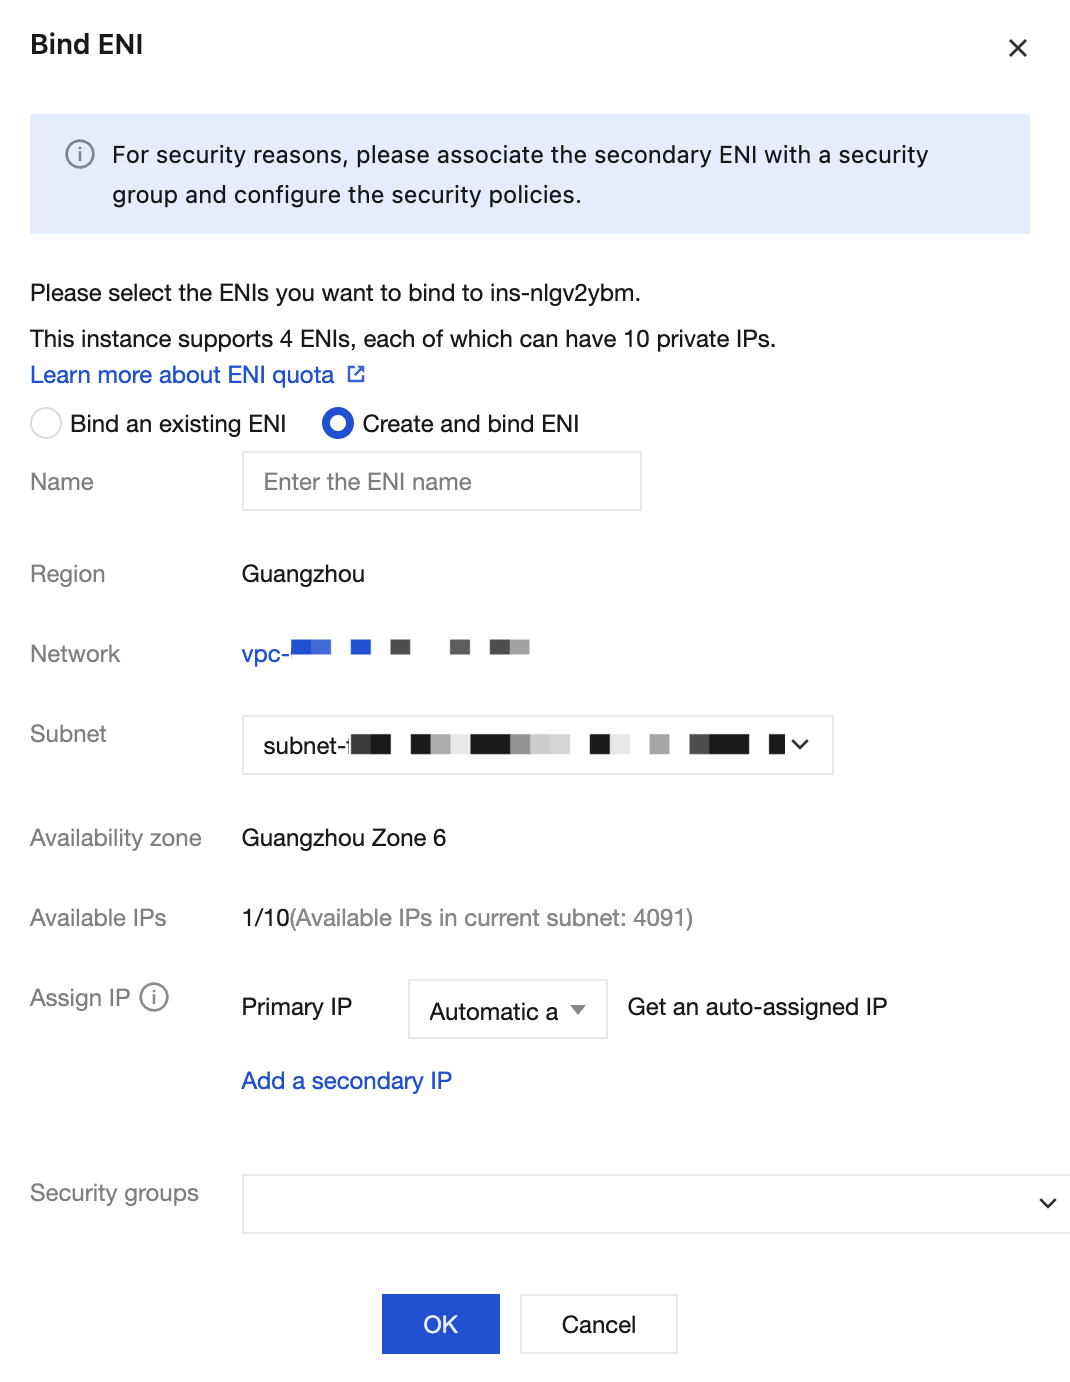
4. In the pop-up Bind ENI window, select Create and Bind ENI, fill in the information, and click Confirm.
Subnet: Select the subnet to which the CVM instance belongs.
Assign IP address: You can select automatic assignment or fill in the IP address manually.
5. In the pop-up prompt box, you need to log in to the instance to configure the IP address and route as prompted. Follow the prompted steps to perform the operations, and then click Confirm.
Step 3: Configuring the EIP Direct Connection for the Primary ENI
After completing the configuration of the secondary ENI, configure the EIP direct connection for the primary ENI in the EIP console.
2. Select the region of the EIP bound to the primary ENI of the CVM. In the operation column on the right of the corresponding EIP, select More > Direct access.
3. In the pop-up EIP Direct Access dialog box, click OK.
Step 4: Configuring the EIP on the CVM
After configuring the EIP direct connection for the primary ENI in the EIP console, you need to log in to the CVM to configure the EIP.
to open the Windows PowerShell window. Enter firewall.cpl and press Enter to open the Windows Firewall page.
3. Click Enable or Disable Windows Defender Firewall and go to the Customize Settings page.
4. Select Turn off Windows Defender Firewall in both the Private Network Settings and Public Network Settings panes, and click OK.
5. In the operating system, double-click the script downloaded in step 1 to execute it. Enter the EIP address (you can view it in the public IP address console) configured with the direct connection in step 3, and press Enter twice to confirm.
6. In the Windows PowerShell window, enter ipconfig and press Enter. You can see that the IPv4 address on the primary ENI has changed to the EIP address, while the default gateway remains unchanged.
Note:
After successfully enabling the direct connection, do not configure a private IP address on the primary ENI. Otherwise, the CVM cannot access the public network.
If the default gateway configuration fails, you can complete automatic configuration by restarting the network service or rebooting the host.