Testing AI Agent Conversation Performance
Baixar
Modo Foco
Tamanho da Fonte
Overview
After you build a dialog flow, you can perform an end-to-end test on it in the console without answering any real calls. This test verifies that intents, branches, API calls, and responses all function correctly as configured. The test panel provides two test modes:
Mode | Function | Applicable Scenarios |
Run your flow in a real voice conversation mode. Includes two sub-modes: Web Voice (converse with the AI Agent via the browser microphone) and Phone Call (the platform initiates a real call to the number you specify). | Verify intent recognition on ASR, TTS, and real speech, as well as end-to-end audio quality. | |
Run your flow in a text chat mode. You input user utterances, the AI Agent replies with text, and the canvas highlights each matched node. | Quickly check process logic, branches, prompts, slot filling, and API responses without requiring audio. |
The test panel displays the Voice Test tab by default when it opens. If there are unsaved changes, the Test button is disabled. Save the flow first, and then proceed with the test.
Guide
1. Log in to the Tencent Cloud Contact Center (TCCC) management panel.
2. In the left sidebar, select AI Agent. Then, go to the dialog flow you want to test.
3. In the upper-right corner of the canvas, click Test.
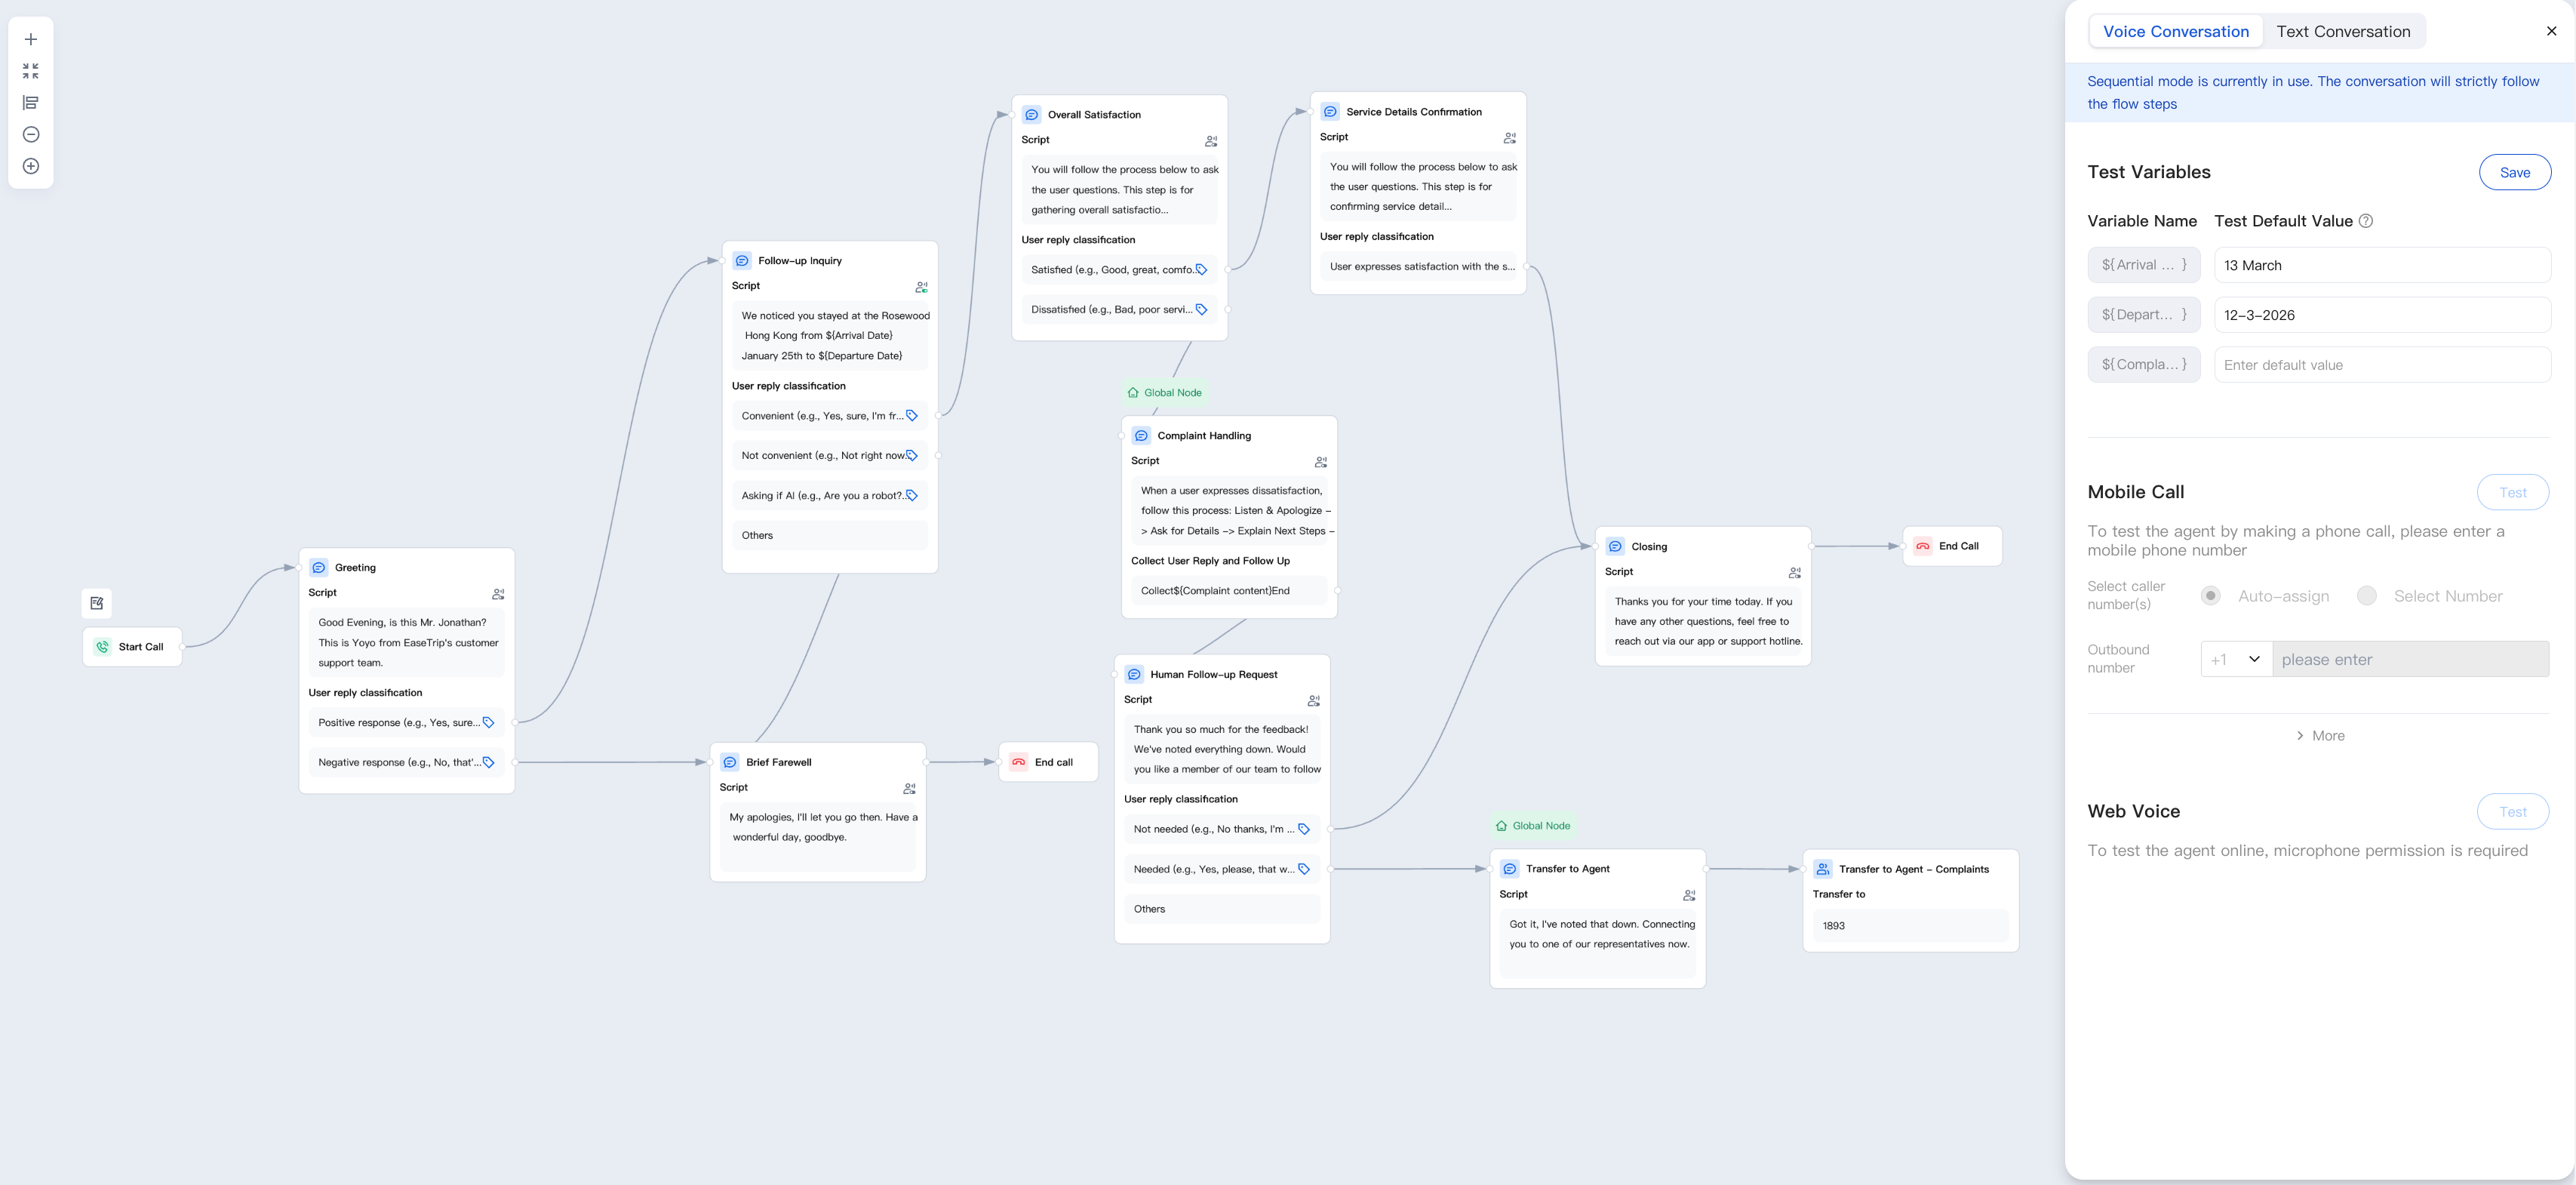
Voice Conversation Test
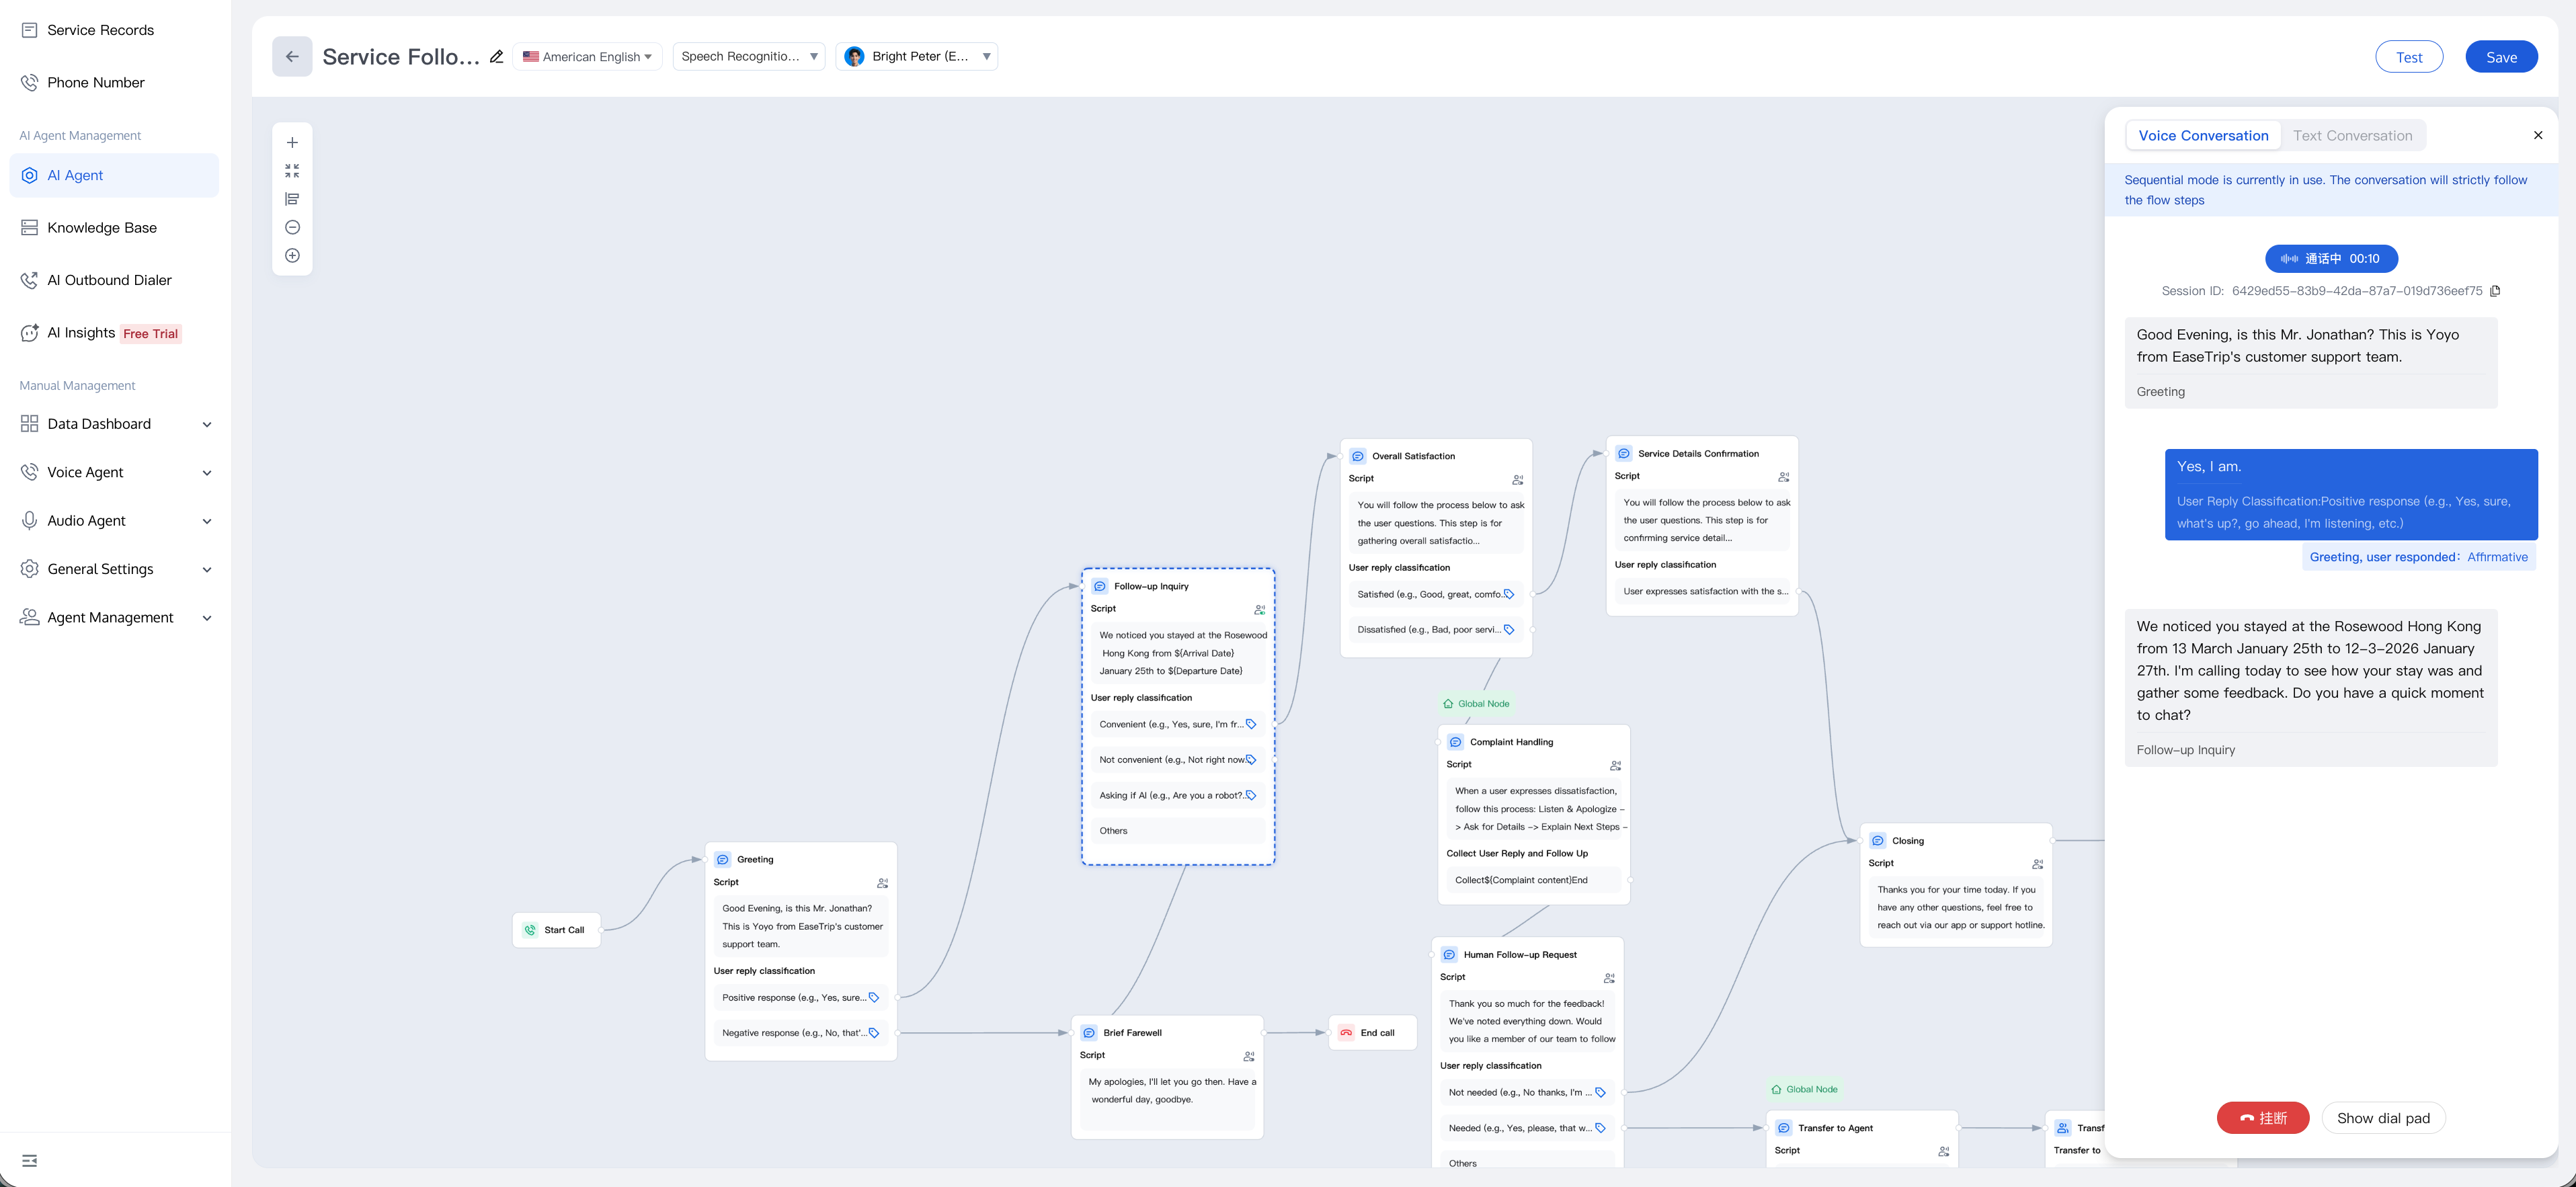
Web Voice (Conversation via Browser)
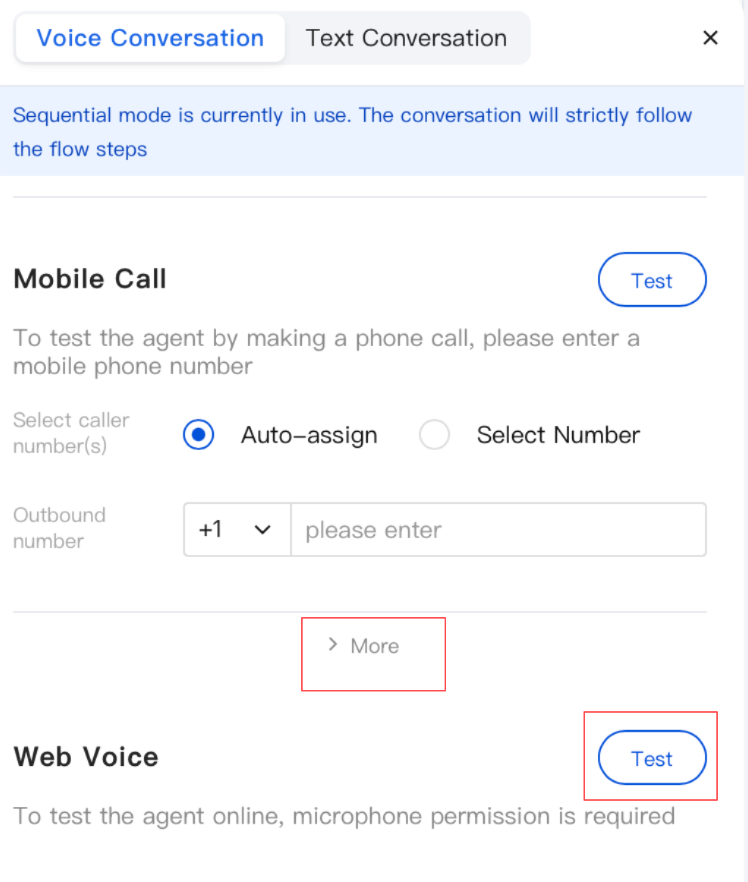
1. In the test panel, keep Voice Conversation selected.
2. Under Web Voice, click Test. During the first test, the browser requests microphone permission. Select Allow this site to use. If you previously blocked the microphone by mistake, go to your browser's site settings to grant the permission again, and then retry.
3. Converse naturally with the AI Agent. The canvas is highlighted when each node is triggered, and the right panel records:
Call start and end events.
The current node's name, category, and any Tags that are hit.
Whether each branch is successfully matched or falls into the no-match path.
4. To end the test, click the red End Call button. This button changes to Restart and retains your conversation log, allowing you to review the process that just occurred. Clicking Restart clears the session and returns you to the initial test page.
Note:
Web Voice does not occupy agent seats and is not billed as real calls. When iterating prompts, you can use it as the default test cycle.
Mobile Call (Real Outbound Call)
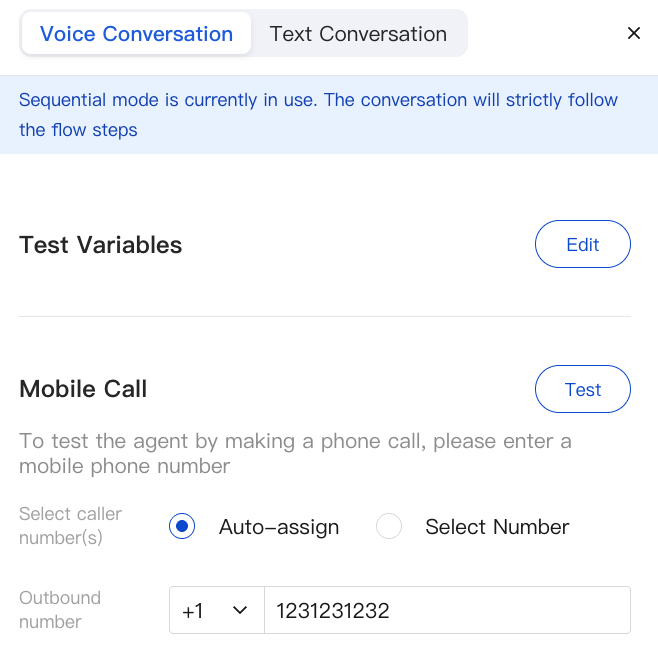
Use this mode when you want to verify the experience over an actual phone line, for example, caller ID display, carrier audio quality, hold music, and transfer-to-Agent paths.
1. In the test panel, switch to Phone Call.
2. Select a Caller ID type:
Auto-assign: The platform selects an available outbound number for you.
Select Number: Select a number from the drop-down menu. The called party will see this caller ID.
3. Enter the target number (including the country code, for example,
+86 18*********).4. Click Test. The platform initiates a real call. If the call cannot be connected, the panel displays the failure reason (callee-side question or caller-side question).
5. During the call, the canvas highlights nodes, the conversation log is updated in real time, and the behavior is completely consistent with the Web Voice mode.
Caution:
Phone Call Test occupies one agent seat during the call and is billed at the same rate as a regular outbound call. The recording is saved to Service Record for you to replay after you hang up.
Refreshing the Browser During Testing
If you refresh the page while a Voice Test is running, a confirmation dialog pops up: "A voice test is in progress. Refreshing will clear the test record. Continue?" Click Cancel to keep the session, or click OK to refresh and discard the log.
Text Testing
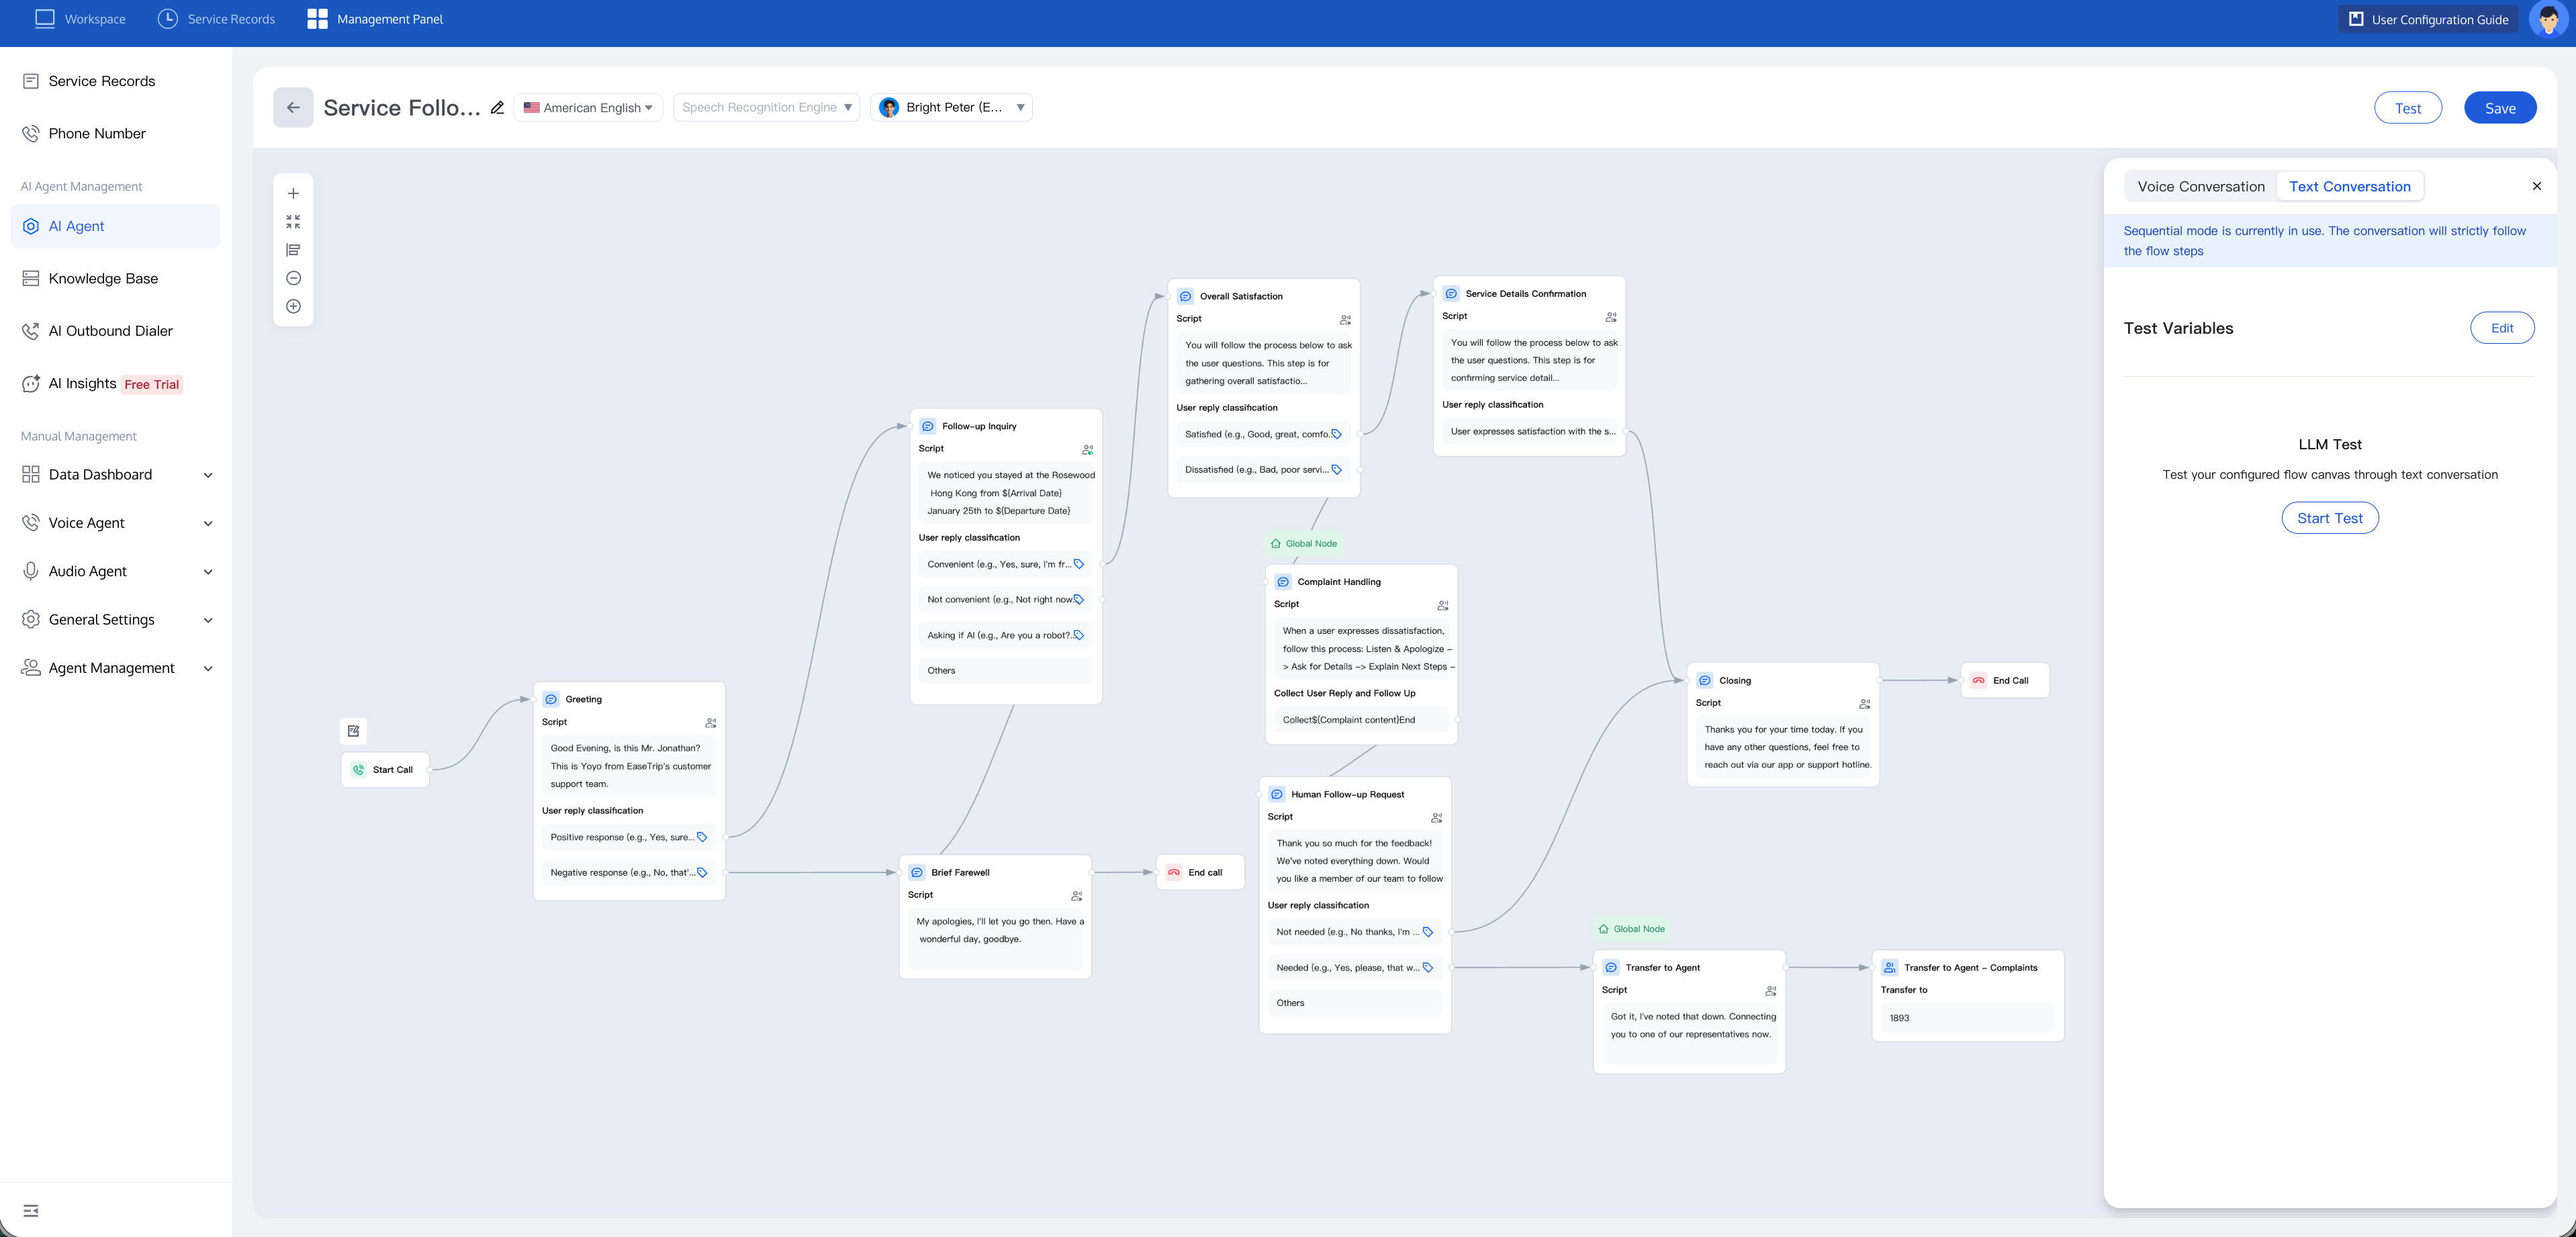
1. In the test panel, switch to Text Conversation, and then click Start Test.
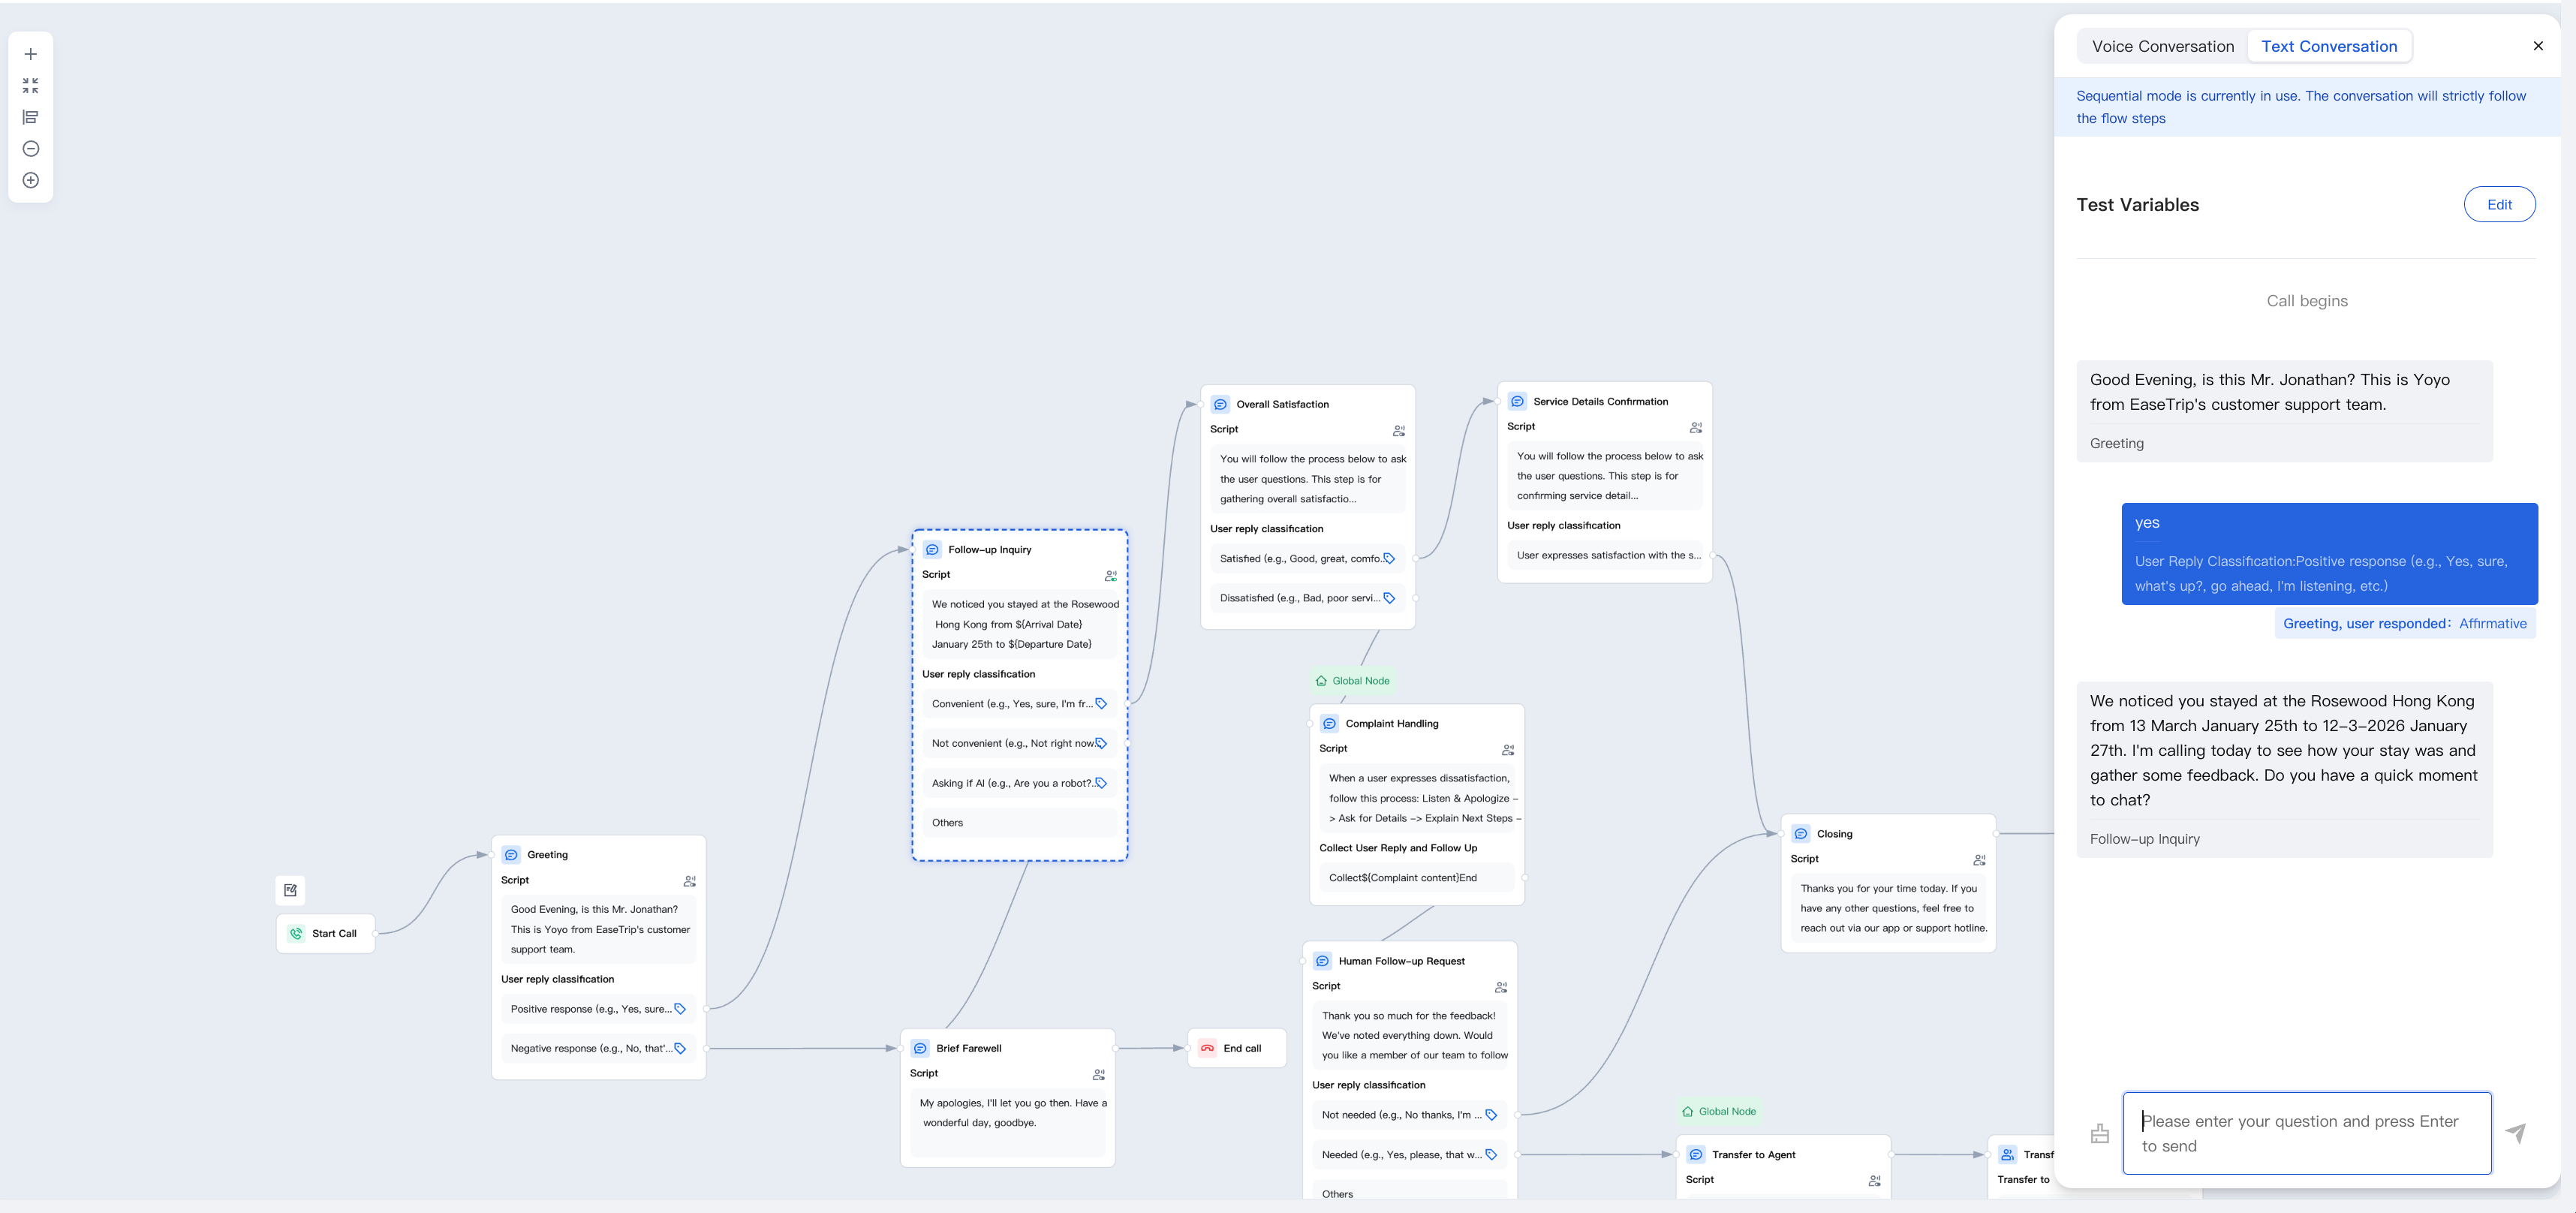
2. Enter the user utterance you want to simulate and press Enter. The AI Agent replies with text, and the system displays the conversation path, including intent recognition results and any node jumps (for example: "If the user replies 'yes', then jump to the satisfaction survey node"), allowing you to clearly track the operational logic of each step.
3. Use the Clear button next to the input box to reset the test at any time.
Configuring Variables (Simulating API Call Output)
If your flow contains an API Call node (see Building a Dialog Workflow), downstream branches depend on the values returned by these APIs at runtime. To test these branches without accessing the real backend, you can inject mock values:
1. In the test panel (for either Voice Test or Text Test), click Configure Variables in the upper-right corner of the panel.
This button shows whether all variables have been filled. If any output parameter in your API call node lacks a mock value, it displays Incomplete; otherwise (or when the canvas contains no API call output variables), it displays Completed.
2. The dialog lists every output parameter declared on each API call node in the canvas. For each item, enter the value you want to use for testing.
3. Click Save. Mock values are saved along with the canvas, so you do not need to re-enter them for the next test.
The test then runs as if your API had returned these exact values. The system does not enforce validation. You can leave some variables blank and still run the test, but any branch that depends on an unfilled variable will follow its unmatched path.
Content to Verify Before Publishing
Before publishing your conversation flow, walk through each branch at least once:
Normal Path: The user responds as expected, every node is hit, and the call ends at the End Call node.
No Match Path: The user provides an unexpected reply. Verify whether the LLM fallback/rewritten reply behaves correctly and whether the number of retries reaches the configured limit.
API Failure Path: Use configuration variables to leave key variables blank, confirming that the flow can gracefully degrade (for example, transfer to a human agent or play an apology prompt).
Transfer to Agent: Confirm that the pre-transfer prompt is played, the call is routed to the correct skill group, and the fallback branch is triggered when no agents are available.
Business Hours Judgment: Test both within-business-hours and outside-business-hours scenarios by temporarily adjusting the node's settings (or using a custom date range that includes "current time"). Confirm that both the matched and unmatched branches function correctly.
When everything looks good, close the test panel and click Publish on the canvas to officially launch the flow.
Related Guides
Select the corresponding path based on your deployment method:
First time user? Deploy a functional AI Agent in just five minutes create a conversation flow or integrate an external model.
Want to learn about our conversation flow nodes? Go to Conversation Nodes.
Want to build a knowledge base for your dialogue flow? Go to Build Your Knowledge Base.
How to test your model? Refer to Test Dialogue Workflow.
Configure a voice AI Agent with your own model? Go to Integrate External Model, Edit Conversation Content, Configure Voice Interaction, and Add Call Control.
Want to view application scenarios? Try Voice Notification, Lead Mining, Feedback Collection, or Customer Support.
How to make outbound and inbound calls with an AI Agent? Refer to AI Agent Outbound Calls or AI Agent Inbound Calls.
View data logs? Refer to Call Records, Call Recordings, Latency.
How to create and view post-call tags? Refer to Post-call Tags (Created via Conversation Flow) or Post-call Tags (Created via External LLM).
Ajuda e Suporte
Esta página foi útil?
Você também pode entrar em contato com a Equipe de vendas ou Enviar um tíquete em caso de ajuda.
comentários