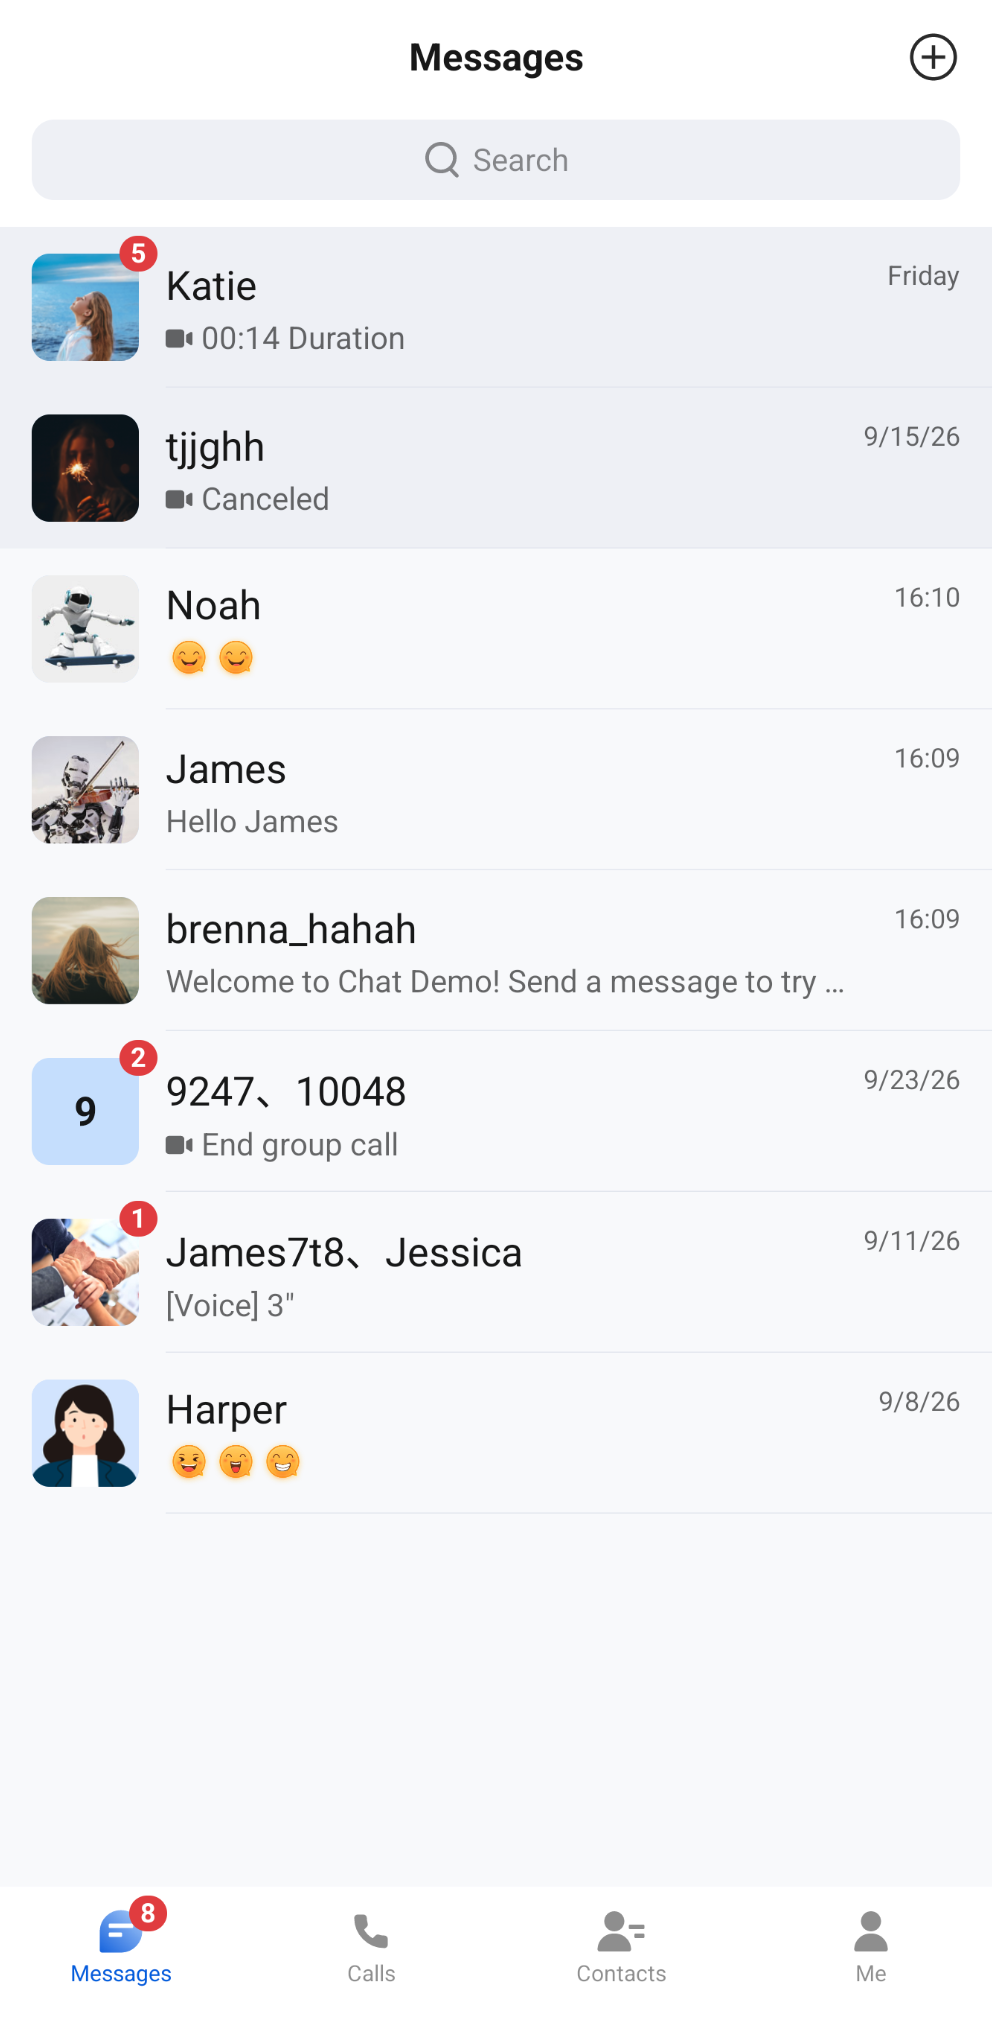
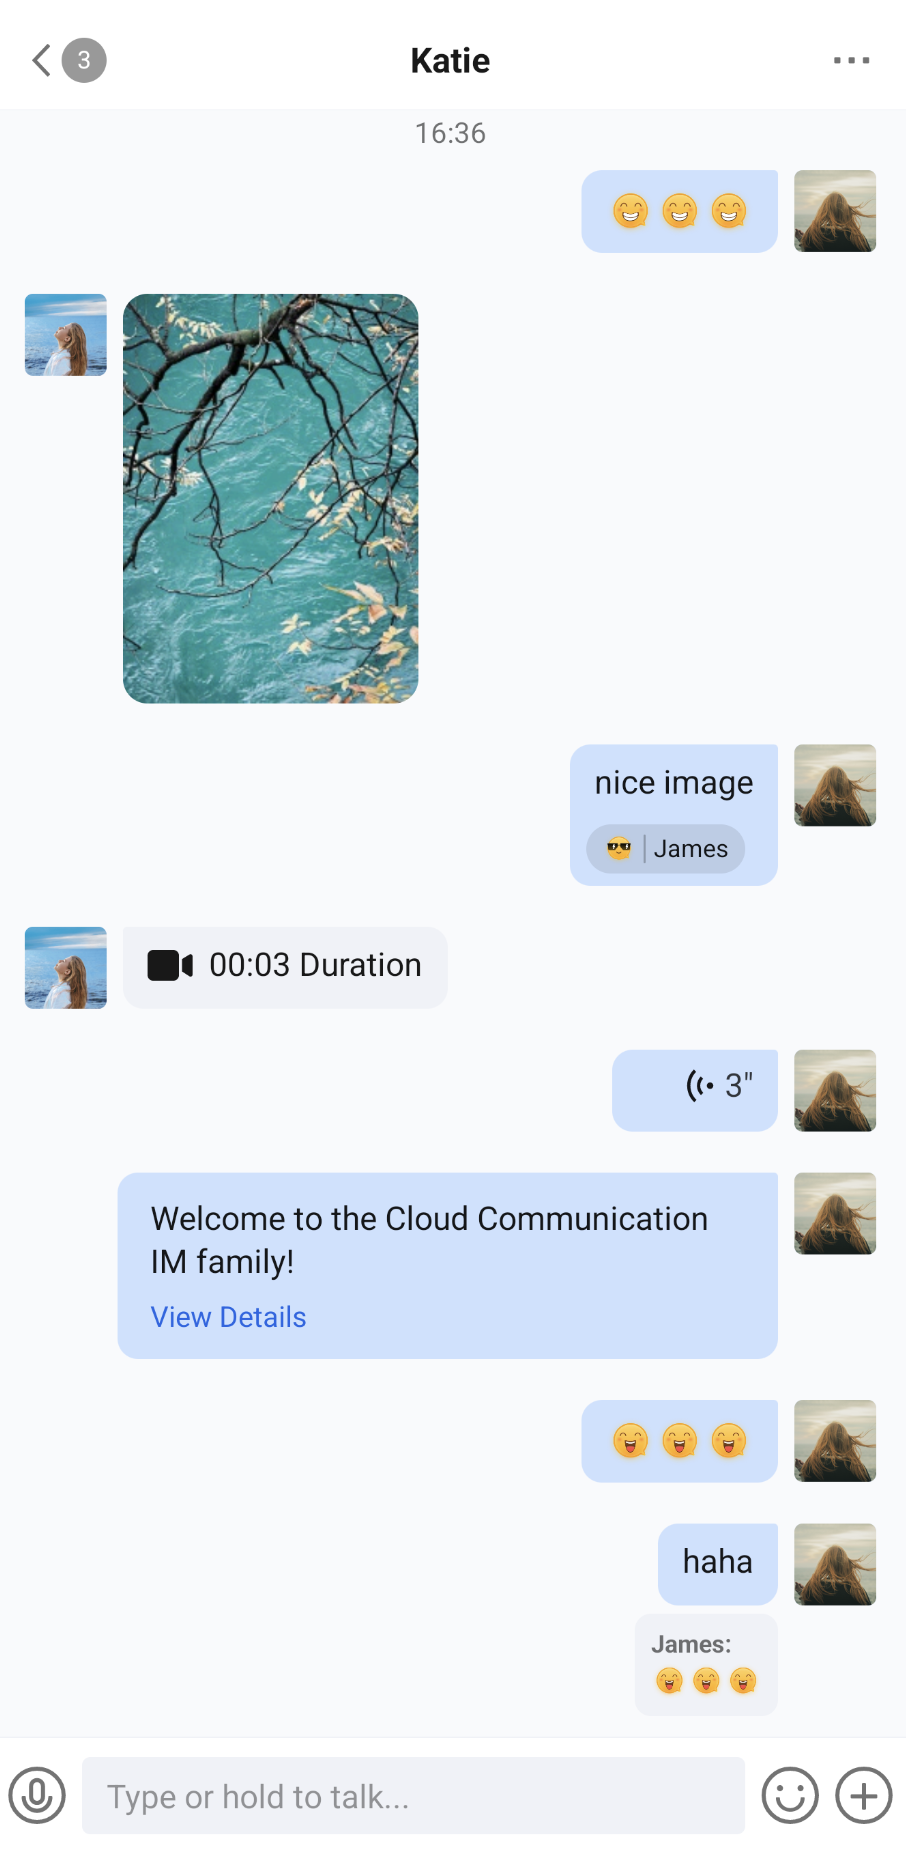
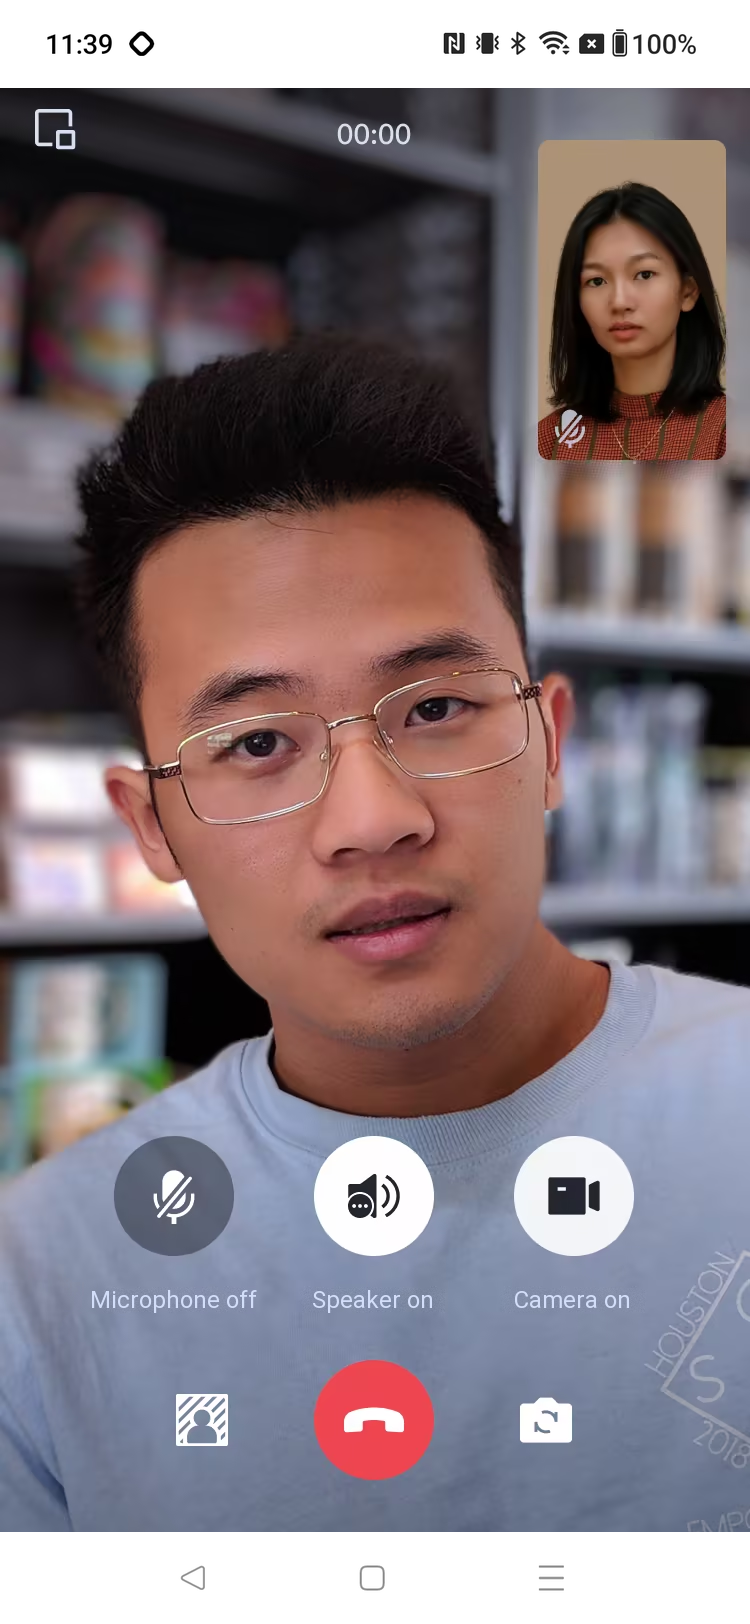
TUIKit SwiftUI is a declarative UI component library built on the Chat SDK. It lets you quickly implement chat, conversation list, contacts, search, groups, and more. This document describes how to integrate the components and implement the core features. The TUIKit UI is shown below:
Conversation List
Chat
Audio/Video Call
Integrate TUIKit SwiftUI
The components manage data through AtomicXCore and provide SwiftUI pages through TUIChatKit_Swift. You can directly use ConversationsPage, ChatPage, and ContactsPage without assembling the chat UI yourself.
Prerequisites
Xcode 16 or later, with the Swift 5 language mode.
A physical device or simulator running iOS 15.0 or later. Set the app target's iOS Deployment Target to 15.0 or later, and keep it consistent with platform :ios in the Podfile.
CocoaPods (1.16.x recommended).
An activated Chat application and its SDKAppID, UserID, and UserSig. See Activate the Service.
Copy the entire chat folder from the repository root to your project root directory. The directory structure after copying is as follows:
YourApplication/
├── source/ # Your project code
├── chat/ # Chat source code
│ ├── demo/ # Demo project
│ ├── demo_mini/ # Minimal demo project
│ └── uikit/ # TUIChatKit component library
│ ├── TUIChatKit_Swift.podspec
│ ├── components/ # UI components
│ ├── page/ # Complete pages
│ └── resources/ # Images and localization resources
├── Podfile # Dependency configuration file
├── YourApplication.xcworkspace # Your project file
Note:
TUIKit_iOS_SwiftUI is an open-source repository containing multiple products. The Chat UI source code is located in the chat/ directory (chat/uikit is the SwiftUI component library, and chat/demo is the demo project). Module directories can be placed anywhere in your project; just set the correct relative paths in the Podfile. When integrating into your own project, delete the demo and demo_mini directories.
Integrate Components
1. Add the dependencies to your Podfile, adjusting the relative paths based on where the source code is located. The following assumes that the entire chat folder has been copied to the project root directory and that the Podfile is in the same project root directory.
platform :ios,'15.0'
# Replace YourApplication with your app target name. The dependency version range matches the current chat demo.
target 'YourApplication'do
use_frameworks!:linkage=>:static
pod 'TUIChatKit_Swift',:path=>'./chat/uikit/TUIChatKit_Swift.podspec'
pod 'AtomicXCore','>= 4.3.10','< 5.0'
# Add this when you need audio/video calls
# pod 'TUICallKit_Swift'
end
2. After modifying the Podfile, run the following command to install the TUIKit components.
pod install
# If the latest TUIKit version cannot be installed, run the following commands to update the local CocoaPods repository list.
# pod repo update
# pod update
Implementation Steps
After completing the integration above, follow these steps to quickly build core UIs such as the conversation list, chat, and contacts with only a few lines of code.
Note:
For code integration, see the demo_mini project. It uses concise examples to show how to integrate the main Chat modules. Compared with the full demo, its code is clearer and easier to read. Most of the sample code below also comes from this project.
Step 1: Configure User Authentication
During development and verification, obtain a test UserSig based on the UserID in Console > Development Tools > UserSig Tools. The UserSig is used for login authentication.
Warning:
In a production environment, generate the UserSig on your server and have your app request it from your business server. Do not write the SDKSecretKey into the client. For details, see Generating UserSig on the Server.
Step 2: User Login
You must log in before using component features. Call the login API of LoginStore and pass in the sdkAppID, userID, and userSig obtained above for login authentication. The code is as follows:
importAtomicXCore
// let yourSdkAppID: Int32 = 10_000_000_00 Replace with your actual SDKAppID
// let testUserID = "testUserID" Replace with your test user ID
// let userSig = "xxxxxxx" The UserSig of this user, obtained from the console in Step 1
LoginStore.shared.login(sdkAppID: yourSdkAppID, userID: testUserID, userSig: userSig){ result in
After login succeeds (Step 2), use ConversationsPage to display the conversation list. When the user taps a conversation, onConversationClick returns a NavigationInfo, and you open the chat page in the callback:
config:nil,// Conversation action configuration; nil uses the default configuration
onConversationClick:{ info in// Callback for opening a conversation; returns the conversation and an optional message to locate
navigationInfo = info
showChat =true
}
)
.navigationBarHidden(true)
.background(chatNavigationLink)
}
// Respond to onConversationClick to enter the chat page. For the definition of ChatPageDestination, see Step 4: Build the Chat Interface
@ViewBuilder
privatevar chatNavigationLink:someView{
iflet info = navigationInfo {
NavigationLink(
destination:ChatPageDestination(
conversation: info.conversation,
locateMessage: info.locateMessage
),
isActive: $showChat
){EmptyView()}
.hidden()
}
}
}
Step 4: Build the Chat Interface
ChatPage displays, sends, and receives messages. When constructing ChatPage, you must pass in a ConversationInfo to specify the conversation to enter. conversationID and type are required key fields, and title is used as the initial title of the chat page's navigation bar. You can optionally pass in messageListConfig and messageInputConfig to configure the features and styles of the message list and message input modules.
conversation: conversation,// Conversation information
locateMessage: locateMessage,// Message to locate; nil means no message is located
messageListConfig:nil,// Message list configuration; nil uses the default configuration
messageInputConfig:nil,// Input configuration; nil uses the default configuration
isShowMoreButton:false,// Whether to show the More button in the navigation bar
showsNavigationBar:true,// Whether to show the SDK-drawn navigation bar
topBannerView:nil,// Custom top banner; nil means no banner
onBack:{dismiss()},// Back button tap callback
onUserClick:nil,// User tap callback; returns the user ID
onMoreClick:nil// Callback for tapping the navigation bar title or More button
)
.navigationBarHidden(true)
}
}
Note:
To use the photo album, video recording, video calls, and other features in the chat UI, you need to declare the corresponding permissions. Declare the following permissions in your app's Info.plist:
<key>NSCameraUsageDescription</key>
<string>Camera access is required to send photos or videos</string>
<key>NSMicrophoneUsageDescription</key>
<string>Microphone access is required to send voice messages</string>
<key>NSPhotoLibraryAddUsageDescription</key>
<string>Photo library access is required to save photos or videos</string>
<key>NSPhotoLibraryUsageDescription</key>
<string>Photo library access is required to send photos or videos</string>
Step 5: Build the Contacts Interface
ContactsPage displays the current user's friend list (grouped by alphabetical index), the group list entry, and more. The page has a built-in search bar, and the + button in the upper-right corner provides built-in entries for Add Friend and Join Group.
importSwiftUI
importAtomicXCore
importTUIChatKit_Swift
privatestructContactsDestination:View{
var body:someView{
ContactsPage(
config:nil,// Contact list configuration; nil uses the default configuration
onContactClick:{ item in// Contact tap callback; open the contact's information
// openChat(makeC2CConversation(item))
},
onGroupClick:{ item in// Group tap callback; open the group's information
// openChat(makeGroupConversation(item))
}
)
.navigationBarTitleDisplayMode(.inline)
.navigationBarHidden(true)
// .background(chatNavigationLink) // Attach a hidden navigation link used to open the chat page
}
}
Step 6: Audio/Video Call
Audio/video call capabilities are provided by the TUICallKit_Swift component (add pod 'TUICallKit_Swift' to your Podfile).
userIdList:[userID],// List of callee user IDs. Pass one element for a one-to-one call, or multiple elements for a group call
mediaType:.video,// Call type: .video for a video call, .audio for a voice call
params:nil,
completion:nil
)
}
After the call is initiated, TUICallKit automatically displays the full-screen call UI (including call waiting, connection, and hang-up flows), with no need to implement it yourself.
4. How do I remove the audio/video call feature?
ChatPage shows call entries by default. If you don't need the audio/video call feature, you can disable the audio/video call switches in the messageInputConfig parameter in Step 4: Build the Chat Interface. The messageInputConfig configuration that disables audio/video calls is as follows:
importSwiftUI
importAtomicXCore
importTUIChatKit_Swift
// Build a messageInputConfig without audio/video calls. After this config is passed in, the More panel of the input view has no audio/video call entries
For more complete examples, see chat/demo_mini. Page configuration parameters can be omitted or set to nil, in which case the component uses the default configuration. You only need to set the options you want to override.
AI Assistant: Knowledge Q&A and Code Integration
During integration, you can use the AI assistant through MCP to query SDK APIs, troubleshoot errors, or generate integration code. For details, see MCP Configuration. Specify that you are using iOS SwiftUI and TUIChatKit_Swift to avoid mixing in UIKit APIs.
FAQs
Compilation reports "No such module 'ChatUIKit'". What should I do?
The current module name is TUIChatKit_Swift, so your source code should use import TUIChatKit_Swift. Make sure the path in the Podfile is correct, run pod install, and then open the .xcworkspace. The resource bundle ChatUIKitBundle does not need to be renamed.
ThemeState cannot be found, or two navigation bars appear. What should I do?
Following Step 2, inject .environmentObject(ThemeState.shared) into the root view and hide the system navigation bar. ChatPage.onBack is a callback for the back event, and you need to perform the back navigation yourself.
Login failed with a signature error. What should I do?
Check whether the SDKAppID, UserID, and UserSig match and whether the signature has expired. During development, regenerate a test signature. In production, check the parameters your server uses to generate the signature.
TUICallKit conflicts with my existing audio/video library. What should I do?
Avoid integrating different types or versions of Tencent Cloud's underlying audio/video libraries at the same time. Choose dependencies based on the call SDK version your project actually uses. For details, see the integration documentation of the audio/video product.
Contact Us
If you have any questions or suggestions during integration or usage, contact us to submit feedback.