The GooseFS-Lite tool supports mounting COS (Cloud Object Storage) buckets locally, allowing you to directly operate on objects in Tencent Cloud COS as if using a local file system. Compared to the COSFS tool, GooseFS-Lite delivers higher read/write speeds for large files, free from the performance limitations of local disks. GooseFS-Lite supports the main features of a POSIX file system, such as sequential and random file reads, sequential writes, and directory operations.
Use Limits
GooseFS-Lite is only suitable for basic file management after it is mounted and does not support some features and usage patterns of a local file system. Note the following usage limits:
It does not support random writes or truncate operations on files.
When multiple clients mount the same COS bucket, the system relies on users to coordinate the behavior among these clients. For example, users should avoid scenarios such as multiple clients writing to the same file.
The rename operation for files/folders is not atomic.
It does not support reading or renaming files that are currently being written to at the mount point.
Metadata operations, such as listing a directory, have poor performance because they require remote access to the COS server.
It does not support soft/hard links.
Append writes have poor performance because they involve server-side data copying and downloading the file to be appended.
It is not recommended for use in low-memory scenarios, such as when container memory or CVM memory is less than 2 GB.
Currently, the container environment is only supported for use within Tencent Kubernetes Engine (TKE). Non-TKE containers are not supported at this time.
It is not recommended for use in scenarios that involve heavy random reads and have high performance requirements.
Note:
Mounting over the public network and performing append writes to non-STANDARD_IA storage will incur download traffic fees.
Install GooseFS-Lite to the current directory and create a soft link for goosefs-lite to /usr/bin/goosefs-lite to facilitate direct use of the goosefs-lite command later.
In the goosefs-lite-<specific version> directory (for example, version 1.0.6, in the goosefs-lite-1.0.6 directory), use the following command to install KonaJDK to /usr/local/konajdk11:
1. Use the KonaJDK download link.
2. Download the KonaJDK installation package to the specified directory.
Use the following command to install it, which will enable goosefs-lite to automatically use this Java runtime environment.
If you want to install the Java environment more flexibly, you can refer to Manually Installing JDK. Then, modify the environment variables in conf/goosefs-env.sh to make them take effect.
Step 4: Modifying Configuration Files
In the goosefs-lite-<specific version> directory (for example, version 1.0.6, in the goosefs-lite-1.0.6 directory), you can modify the configuration file in two ways:
Use sed to modify the following three parameters: SECRET_ID, SECRET_KEY, and REGION. Fill them in with your actual values.
Set fs.cosn.userinfo.secretKey to your Tencent Cloud secret Key.
Set fs.cosn.userinfo.secretId to your Tencent Cloud secret ID.
Alternatively, you can use vim to edit the conf/core-site.xml file and modify the parameters.
Set fs.cosn.userinfo.secretKey to your Tencent Cloud secret Key.
Set fs.cosn.userinfo.secretId to your Tencent Cloud secret ID.
Set fs.cosn.bucket.region to the bucket region.
Configuration File Description
In the goosefs-lite-<specific version>/conf directory (for example, version 1.0.6, in the goosefs-lite-1.0.6/conf directory), you can see the following files:
acl-site.properties: Specifies permissions, usernames, group names, Linux POSIX-style semantics like 0755, uid, gid, and other attributes for a directory.
Note:
The format for acl-site configuration is path=mode:user_name:group_name. For example, to configure the path /mnt/goosefs-lite/test_dir with 755 mode, root user, and root group, add /mnt/goosefs-lite/test_dir=755:root:root to the configuration file.
To use ACL configuration, you must include the -o default_permissions parameter during mounting. This enables the kernel (VFS) to perform standard Unix permission checks based on the file metadata's mode, uid, and gid. Additionally, before mounting, you need to modify or add the configuration item goosefs.lite.posix.acl.manager.enabled and set it to true in the goosefs-lite.properties configuration file. For example, the command to mount testbucket-1250000000 to /mnt/datadisk0/goosefs-lite-mnt is: ./bin/goosefs-lite mount -o "allow_other,default_permissions" /mnt/datadisk0/goosefs-lite-mnt cosn://testbucket-1250000000/
core-site.xml: The configuration file for Hadoop-COS (Since goosefs-lite's data flow is based on Hadoop-COS, the parameters and configuration files are largely interchangeable).
goosefs-env.sh: Various environment variables, such as JVM parameters.
goosefs-lite.properties: Configuration related to goosefs-lite.
log4j.properties: Log configuration. To enable debug logs, uncomment the last line of this file and remount.
Note:
We recommend that users avoid using permanent keys in configurations. Using sub-account keys or temporary keys helps improve business security. When granting permissions to a sub-account, grant only the necessary operations and resources to prevent unexpected data leaks.
If you must use a permanent key, we recommend limiting its permission scope. You can enhance security by restricting the key's allowable operations, resource scope, and conditions (such as access IP address).
Step 5: Mounting a Bucket to a Local Directory
In the goosefs-lite-<specific version> directory (for example, version 1.0.6, in the goosefs-lite-1.0.6 directory), run the following command to mount the bucket configured in the key file to the specified directory:
<MountPoint> is the local mount directory (for example, /mnt/goosefs-lite-mnt-dir). This directory must be empty; otherwise, the mount will fail.
<BucketName> is the bucket name (for example, examplebucket-1250000000).
Example:
mkdir-p /mnt/goosefs-lite-mnt
./bin/goosefs-lite mount /mnt/goosefs-lite-mnt/ cosn://examplebucket-1250000000/
View the local mount points and their corresponding COS buckets. The output information includes the process ID, local mount point, and COS path in the following order:
If you need to specify multiple mount parameters in the command line, you can separate them with commas. For example, the following command sets the mount point to read-only and allows other users to access it:
-o allow_other: To allow other users to access the mount folder, specify this parameter when running GooseFS-Lite.
-o ro: Sets the mount point to read-only, disallowing write and delete operations.
-o umask=M: Overrides the st_mode permission bits set by the file system. The final effective permissions are obtained by masking the bits specified by umask from the original permissions. M is expressed in octal notation (for example, 022, 077).
-o uid=N: Overrides the st_uid field returned by the file system, causing all files and directories after mounting to appear as owned by the user with UID N (in numeric form).
-o gid=N: Overrides the st_gid field returned by the file system, causing all files and directories after mounting to appear as owned by the group with GID N (in numeric form).
Note:
Specify a single parameter using -o, for example, -o ro. For multiple parameters, separate them with commas, for example, -o "ro,allow_other,uid=1000,gid=1000,umask=077".
Step 6: Unmounting a Mount Point
Note:
Unmounting a GooseFS-Lite mount point immediately interrupts all read and write operations accessing COS through that path. Before performing this operation, verify that no business processes are currently using the mount directory.
In the goosefs-lite-<specific version> directory (for example, in the goosefs-lite-1.0.6 directory for version 1.0.6), run the following command to unmount the mount point:
$ ./bin/goosefs-lite umount /mnt/goosefs-lite-mnt
Unmount fuse at /mnt/goosefs-lite-mnt/ (PID: 17206).
# If the unmounting process is abnormal, you can use the following command to force an unmount.
$ sudoumount-l /mnt/goosefs-lite-mnt
Step 7: Parameter Tuning
GooseFS-Lite contains two configuration files: conf/core-site.xml and conf/goosefs-lite.properties.
You can tune upload and download bandwidth by modifying conf/core-site.xml. Common parameters are listed below. For more parameters, refer to the Hadoop-COS documentation.
Attribute Key
Description
Default Value
Required
fs.cosn.useHttps
Specifies whether to use HTTPS as the transport protocol for communication with the COS backend.
true
No
fs.cosn.upload.part.size
The size of each part for the multipart upload. Since COS supports up to 10,000 parts in the multipart upload, you need to estimate the maximum single file size to be used. For example, if the part size is 8 MB, a single file of up to 78 GB can be uploaded. The maximum supported part size is 2 GB, which allows a maximum single file size of 19 TB.
8388608(8MB)
No
fs.cosn.upload_thread_pool
The number of concurrent threads when files are uploaded to COS through streams.
32
No
fs.cosn.read.ahead.block.size
The size of the pre-read block.
1048576(1MB)
No
fs.cosn.read.ahead.queue.size
The length of the pre-read queue.
6
No
You can adjust the behavior of GooseFS-Lite by modifying conf/goosefs-lite.properties. Common parameters are listed below:
Required
Description
Default Value
Required
goosefs.fuse.list.entries.cache.enabled
Whether to enable the client List cache
true
No
goosefs.fuse.list.entries.cache.max.size
Maximum number of entries cached in the client List, unit: entries
Validity period of the client List cache, unit: ms
15000
No
goosefs.fuse.async.release.max.wait.time
Maximum wait time for write operations to complete when files involved in open or rename operations are being written, unit: ms
5000
No
goosefs.fuse.umount.timeout
Maximum wait time for pending operations when the file system is unmounted, unit: ms
120000
No
When your read and write concurrency is high, you can adjust the maximum JVM runtime memory for GooseFS-Lite to avoid FullGC and OutOfMemoryError. The JVM default value is -Xmx512m -XX:MaxDirectMemorySize=512m -XX:+UseG1GC -XX:G1HeapRegionSize=32m. The adjustment method is as follows:
exportJAVA_OPTS=" -Xms2G -Xmx2G"
./bin/goosefs-lite mount /mnt/goosefs-lite-mnt/ cosn://examplebucket-1250000000/
ps -ef|grep goosefs-lite|grep-vgrep
FAQs
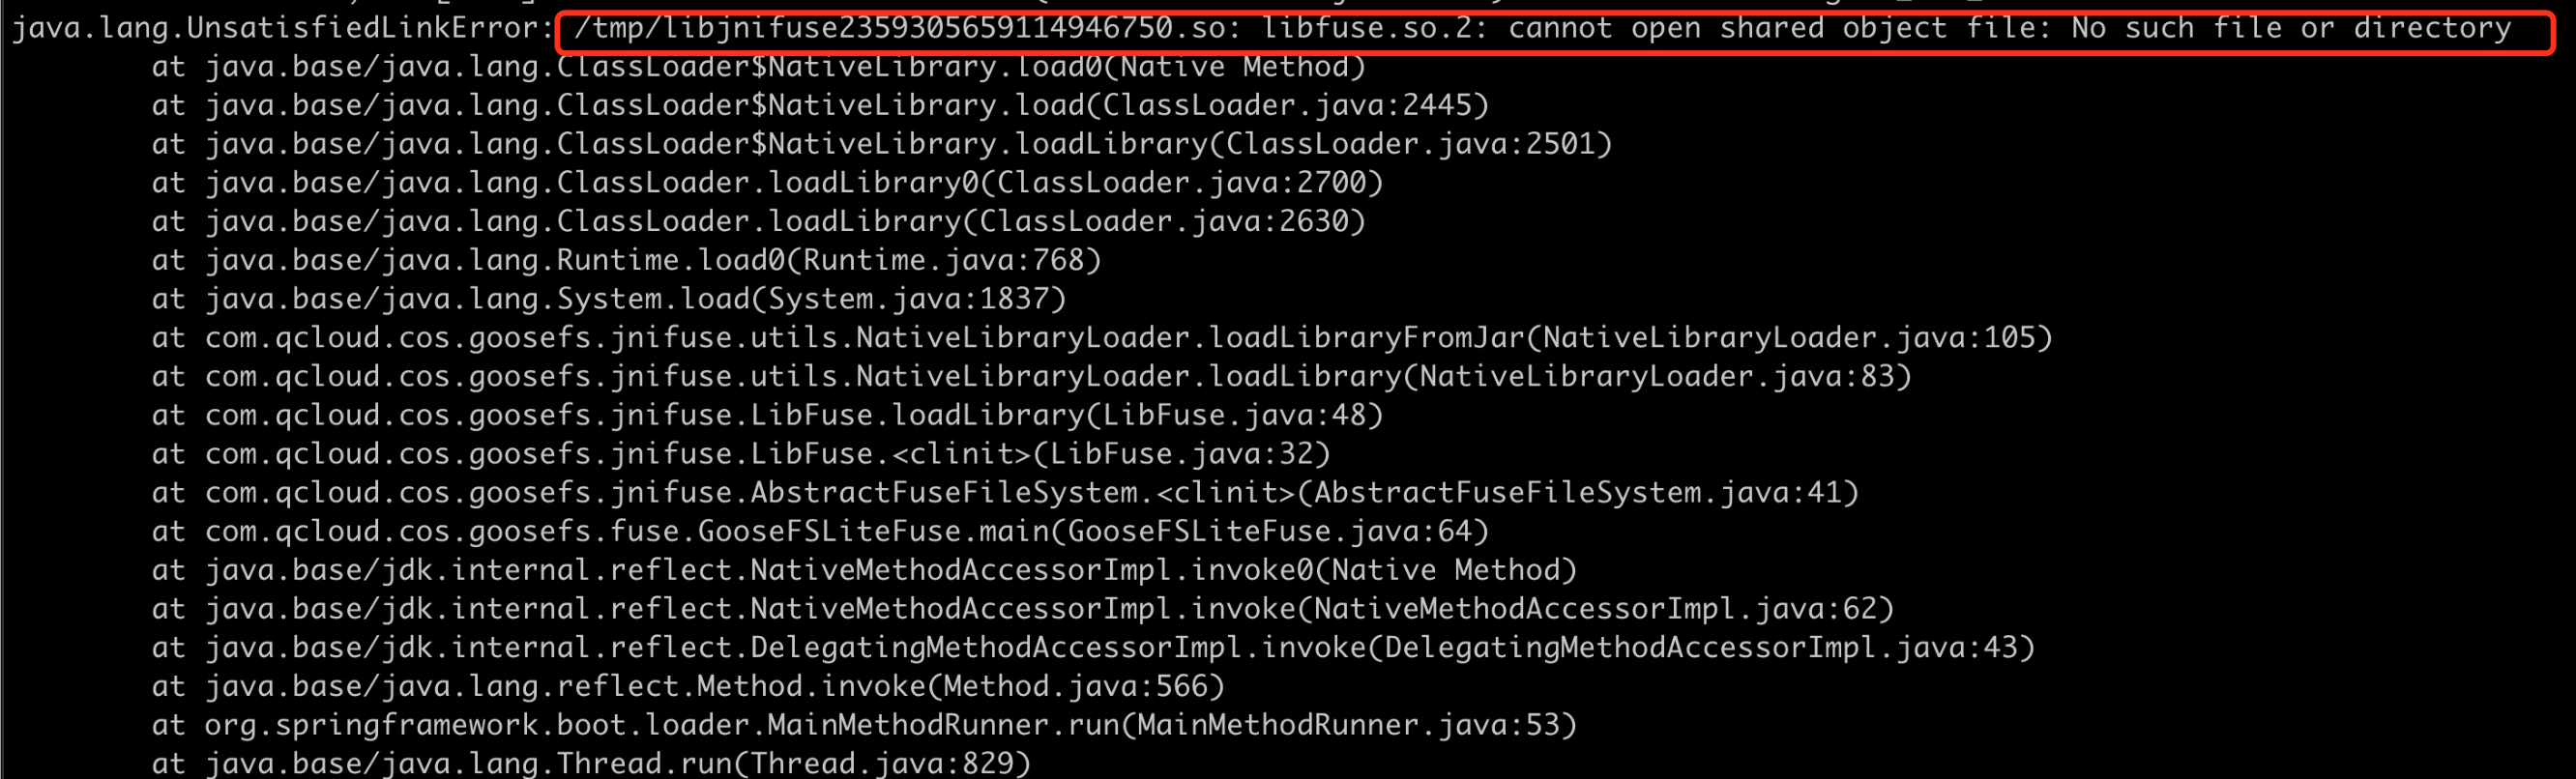
How to Handle Missing libfuse Library Files?
Install libfuse by following the instructions below:
Method 1
1. Run the following command to install fuse-devel.
If the system is CentOS or TencentOS, run the following command:
yum install fuse-devel
If the system is Ubuntu, run the following command:
aptinstall libfuse-dev
2. After the installation is complete, run the following command to check whether the installation was successful.
find / -name libfuse.so*
Method 2
Update the old version libfuse.so.2.9.2 by following the installation steps below:
Note:
libfuse.so.2.9.2 is installed by default on CentOS 7.
1. Download the libfuse source code and compile it to generate libfuse.so.2.9.7.
tar-zxvf fuse-2.9.7.tar.gz
cd fuse-2.9.7/ && ./configure &&make&&makeinstall
echo-e'\\n/usr/local/lib'>> /etc/ld.so.conf
ldconfig
2. After compiling and generating libfuse.so.2.9.7, replace it by following the steps below:
2.1 Run the following command to locate the link for the old version libfuse.so.2.9.2 library.
find / -name libfuse.so*
2.2 Run the following command to copy libfuse.so.2.9.7 to the location of the old version library libfuse.so.2.9.2.
cp /usr/local/lib/libfuse.so.2.9.7 /usr/lib64/
2.3 Run the following command to delete all links to the old version libfuse.so library.
rm-f /usr/lib64/libfuse.so
rm-f /usr/lib64/libfuse.so.2
2.4 Run the following command to create a link for the libfuse.so.2.9.7 library similar to the deleted old version link.
1. Edit the file /usr/lib/systemd/system/goosefs-lite.service and add the following content. You can replace examplebucket-1250000000 with your bucket. Note: The memory values configured for -Xms and -Xmx in the following JAVA_OPTS must not exceed 50% of the physical memory limit of the node. For example, if the node has 16 GB of physical memory, it is recommended to configure at most -Xms8G -Xmx8G.
The following uses goosefs-lite-1.0.6 as an example:
[Unit]
Description=The Tencent Cloud GooseFS Lite for COS
2. Run the following command to execute the mount command and check the status of the background Daemon process.
# Apply the goosefs-lite systemd configuration.
systemctl daemon-reload
# Start the background Fuse process.
systemctl start goosefs-lite
# Check the status of the background Daemon process.
systemctl status goosefs-lite
# View the list of mount points.
/usr/local/goosefs-lite-1.0.6/bin/goosefs-lite stat
# If you modify the systemd configuration, reload and restart it after the modification.
When set to start at boot, it attempts to mount:
systemctl enable goosefs-lite
3. Unmount the mount point, restart the machine, and check the status of the Fuse process.
# Perform the unmount. Note: Do not unmount during data write operations, as this can result in incomplete data.
systemctl stop goosefs-lite
# Restart the operating system. Exercise caution to avoid impacting business operations.
reboot-h now
# Check the status of the background Daemon process.
systemctl status goosefs-lite
# View the list of mount points.
/usr/local/goosefs-lite-1.0.6/bin/goosefs-lite stat
How to Handle High CPU Utilization and Excessive Head/List Requests to COS from GooseFS-Lite During Specific Time Periods?
This is usually caused by scheduled disk scanning tasks on your machine. A common disk scanning program on Linux systems is updatedb. You can add the GooseFS-Lite mount point directory to the PRUNEPATHS configuration item in the updatedb configuration file /etc/updatedb.conf to prevent this program from scanning the disk. Additionally, you can use the Linux tool auditd to find programs that access the GooseFS-Lite mount point.
The operation steps are as follows:
1. Install auditd.
If the system is Ubuntu, run the following command:
apt-getinstall auditd -y
If the system is CentOS, run the following command:
yum install audit audit-libs
2. Start the auditd service.
systemctl start auditd
systemctl enable auditd
3. Monitor the mount directory.
Note:
-w specifies the GooseFS-Lite mount directory, and -k is the key output in the audit log.
4. Determine the accessing program based on the logs.
The audit log directory is /var/log/audit. The query command is as follows:
ausearch -i|grep'goosefs_lite_mnt'
5. Stop the auditd service.
If you need to stop the auditd service, use the following command:
/sbin/service auditd stop
Note:
If the program accessing the mount point is already running, the newly started auditd will not monitor its access behavior. Only the first call to the mount directory from within the program is recorded.
How to Handle the "cannot allocate memory" Error During GooseFS-Lite Installation?
This error primarily occurs due to an abnormal memory allocation during GooseFS-Lite operation. Typically, this happens when the requested memory exceeds the actual available memory.
You can go to the ./bin/goosefs-lite file to modify the JAVA_OPTS parameter and configure it with appropriate memory values. At a minimum, ensure that the requested memory amount is less than the instance's available memory.
How to Check the Latest Package Version?
Run the following command. The return value is the latest version number.
Troubleshooting relies on logs. The following is the location of the relevant logs.
For goosefs-lite version 1.0.3 and later, the default log directory is located under /data/goosefs/logs/fuse.
For example, if the user who mounted goosefs-lite is root and the mount point path is /data1/data2, then the log path is: /data/goosefs/logs/fuse/root/data1/data2.
For goosefs-lite versions 1.0.0-1.0.2, the default log directory is located under /data/goosefs/logs.
Another method to view the log path of a mount point is to first remount it, then run ps aux | grep ${MOUNT_POINT}. From the output, you can see Error_File or goosefs.logs.dir. The parent directory of this path is where all logs for that mount point are located.
System logs: For CentOS or tlinux systems, the path is /var/log/message*. For Ubuntu, the path is /var/log/syslog.
To enable debug logs, go to conf/log4j.properties, comment out the last line, and remount.
Note:
Enabling debug logs impacts performance. Under normal circumstances, you do not need to enable them.
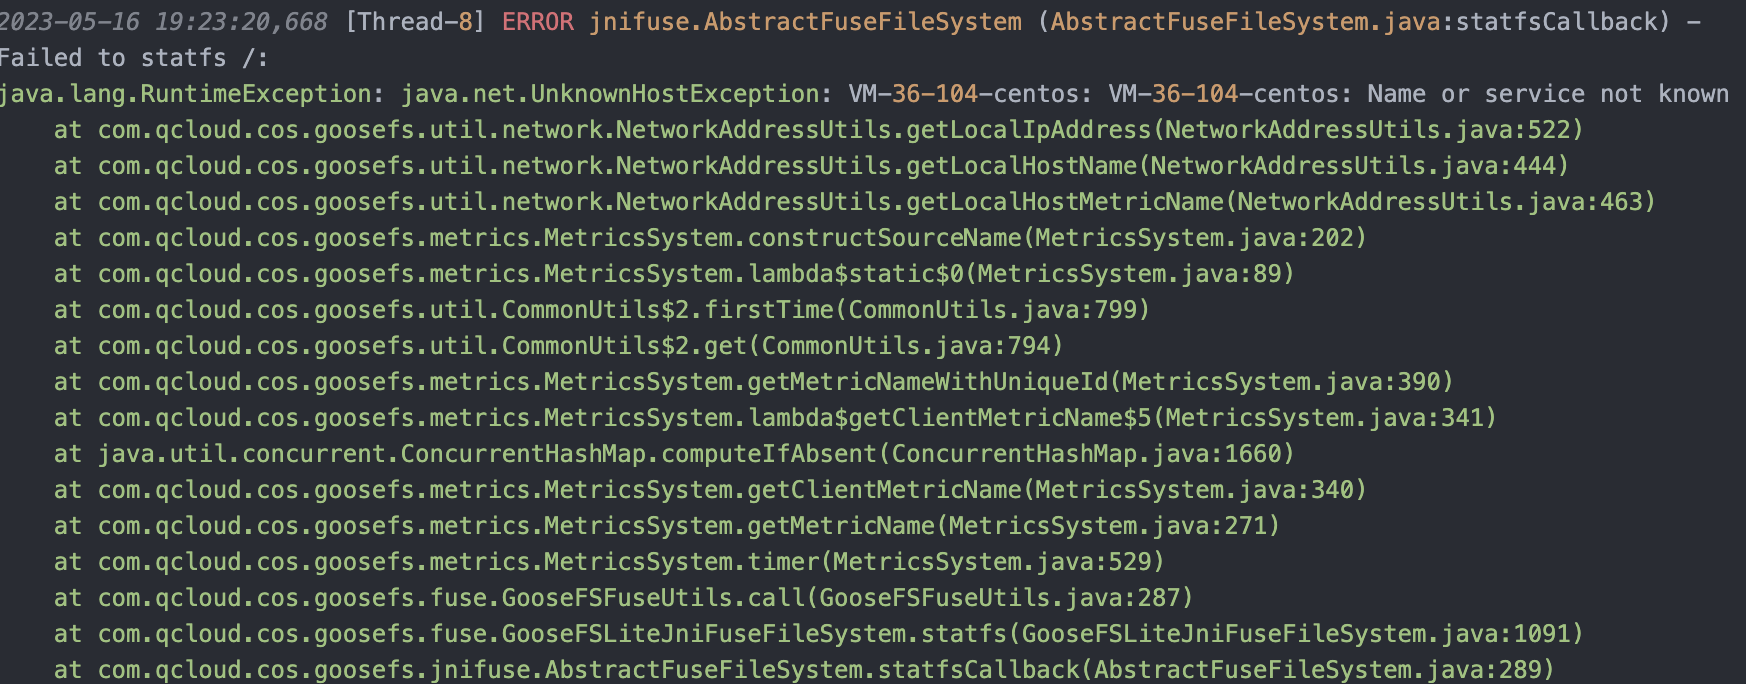
How to Handle the "Name or service not known" Error During Mounting?
This is usually due to an inability to resolve the domain name. You can try pinging the corresponding domain name. For the error shown in the figure above, run the following command:
ping VM-36-104-centos
If the operation also fails, you can configure the corresponding IP address by modifying /etc/hosts. Typically, you can set it to 127.0.0.1.
The operation steps are as follows:
1. Add a line in the /etc/hosts file. Replace the VM-36-104-centos here with your hostname.
127.0.0.1 VM-36-104-centos
2. Afterwards, ping the target again. Once you confirm that it can be resolved normally, remount it.
How to Use GooseFS-Lite When the Default Environment JDK Is Not KonaJDK11?
2. Copy the absolute path of the java binary in konajdk. For example, the extracted jdk is located under /root/konajdk11.
# Determine the java version
/root/konajdk11/bin/java -version
# Modify the JAVA environment variable for the current shell without affecting other shells and processes.
exportJAVA=/root/konajdk11/bin/java
# Mount.
goosefs-lite mount /mnt cosn://bucket-appid
3. Use ps aux | grep goosefs-lite. You will see that the process starts with /root/konajdk11/bin/java, indicating that the specified java version is now in use. The operation is complete.
How to Handle a Mount Point That Suddenly Becomes Unavailable During Use?
Assume that the current problem mount point is /tmp/mount_point.
1. First, use ps aux | grep /tmp/mount_point to check whether any processes are currently using this mount point, including goosefs-lite. If so, use the kill command to terminate the corresponding processes.
2. Use the ls command to attempt to access the mount point. If the output is empty, it indicates that the mount point has been successfully unmounted. Then, remount it.
ls /mount_point
3. If an error such as transport is not connected is thrown, you need to execute umount -l /mount_point to force an unmount. (This command requires root privileges.)
This type of situation is typically caused by a process being terminated with kill -9 or by the system oom-killer. You can find relevant information in the system logs or the goosefs-lite logs.
4. Check whether there are any logs starting with hs_error in the mount point log directory (/data/goosefs/logs/fuse/$USER/$MOUNT_POINT). These files describe the stack trace and cause before the program exited.
How to Handle the "Unsupported or unrecognized SSL message" Exception?
The current environment does not support disabling https mode, and the configuration needs to be modified. To resolve this, add the following content to the core-site.xml configuration file:
<property>
<name>fs.cosn.useHttps</name>
<value>false</value>
</property>
How to Use GooseFS-Lite to Access COS via a Private Network Domain Name?
In the core-site.xml configuration file, remove the fs.cosn.bucket.region property and add the fs.cosn.bucket.endpoint_suffix parameter. (If you are using goosefs-lite version 1.0.12 or later, add the fs.cosn.custom.endpoint_suffix parameter instead.)
To learn about more parameters, you can read the following documentation:
How to Handle 403 Forbidden Errors During Mounting or Usage?
Typically, ERROR-level logs describe what permissions are missing. Add them as needed.
Note: For the head bucket permission, you must configure it at the bucket level, not just the path level. For example, a path like cosn://bucket-appid/path is not effective; it must be cosn://bucket-appid. This permission does not expose which objects are inside the bucket.
How to Handle the "fuse: failed to open /dev/fuse Operation not permitted" Error?
1. Check whether you have root privileges.
2. If you are in a container, check whether the container was started with the --privileged flag. If not, add it.
3. Check whether the fuse kernel module is installed: Run the command lsmod | grep fuse and check for any output. If there is no output, it indicates that the fuse kernel module is missing.
How to Handle the "part num: 10001, the parameter partNumber is not valid" File Write Error?
This situation indicates that the number of parts for multipart upload has exceeded the limit. COS supports a maximum of 10,000 parts per upload. Therefore, goosefs-lite supports files up to 8MB * -10,000 (approximately 78GB) by default. To support larger files, adjust the fs.cosn.upload.part.size parameter. For example, if you change fs.cosn.upload.part.size to 16777216 (that is, 16MB), you can support files up to 16MB * 10,000.