This document describes how to use the historical data moderation feature of Cloud Object Storage (COS) via the console. You can create a historical data moderation task to conduct a batch moderation on your images, videos, audios, texts, and files all at once.
2. Select Bucket List in the left navigation bar to open the bucket management page.
3. Navigate to the target bucket and click on its name to open the bucket configuration page.
4. In the left navigation bar, choose Sensitive Content Moderation > Existing File Moderation to open the historical data moderation page.
5. Click Create Moderation Task.
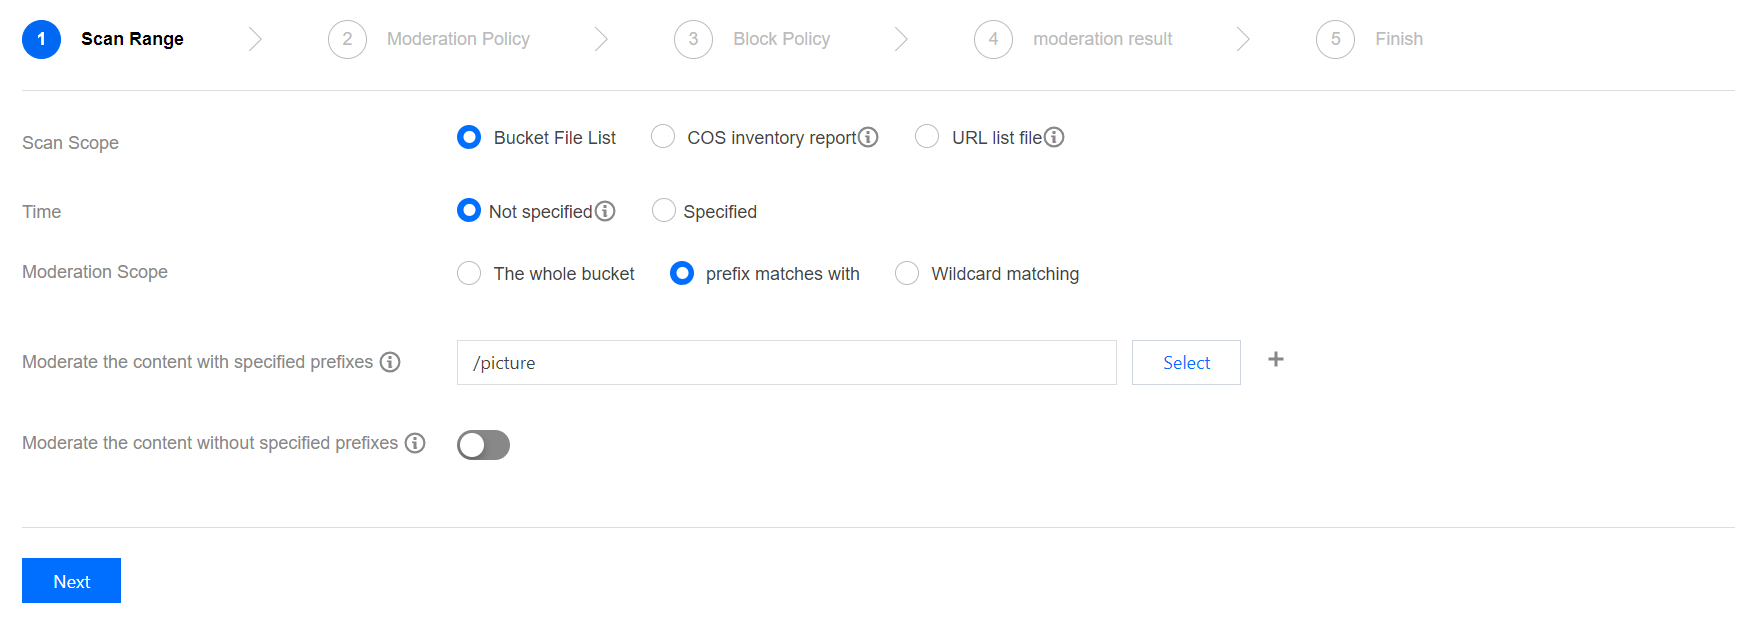
6. In the Scan Range page, you can moderate your files as needed through a specified scan scope:
The scan scope include Bucket File List, COS Inventory Report, and URL List File:
Bucket File List: You can select files within the current bucket for moderation. The scan range can either be the file upload time or prefix.
COS inventory report: You can choose the inventory list generated by the COS Setting Inventory feature to scan, and put the inventory list file in the current bucket.
URL list file: You can choose a designated URL list file to scan. Currently, TXT files with one URL listed per line are supported.
7. Click Next.
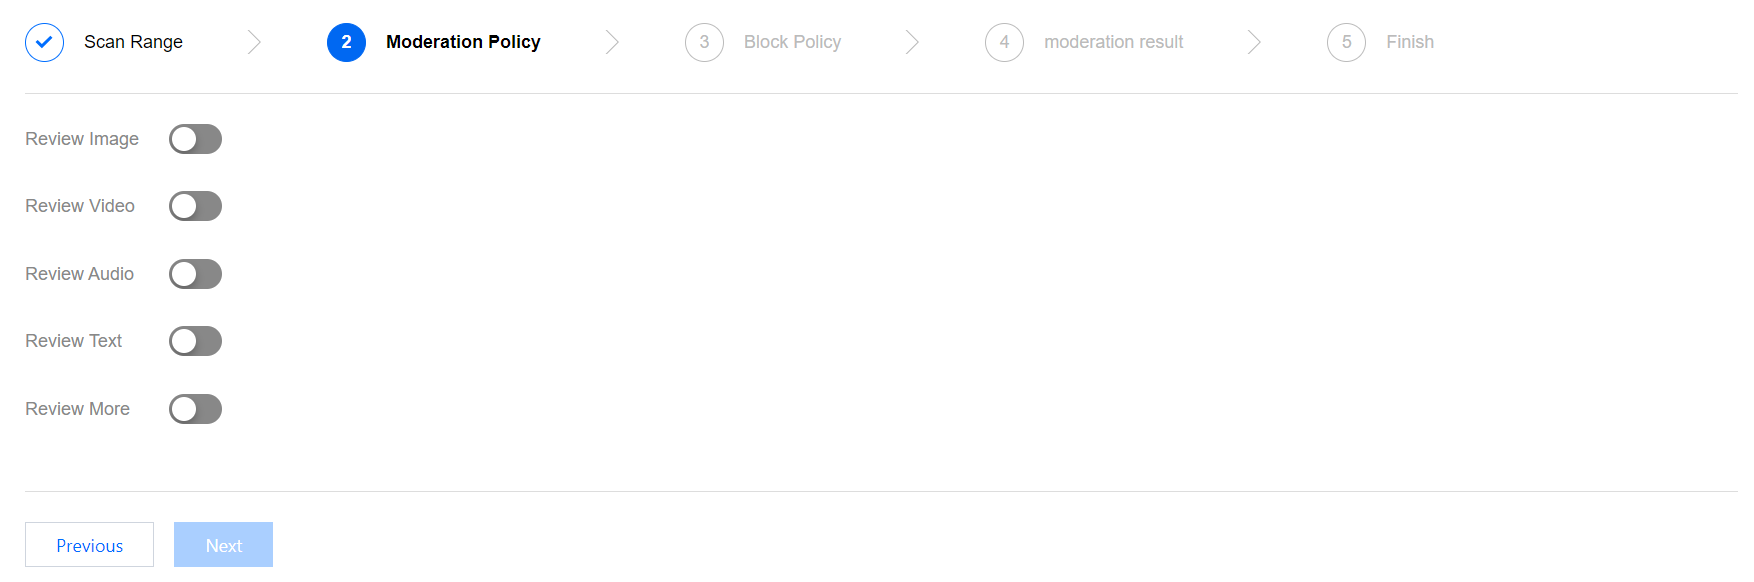
8. On the Moderation Policy page, activate the review policy as needed, configure the corresponding file type for moderation and the review scenario type, and click Next.
Review Image:
Moderation Suffix: Image moderation supports the following formats: JPG, JPEG, PNG, BMP, WEBP, and GIF.
Note:
Intelligent suffix recognition can recognize some special suffixes in addition to the preceding six common suffixes.
Large Image Moderation: Image moderation only supports images up to 5 MB. For images exceeding the size limit, you can enable the large image moderation feature. Then the system compresses the images before the moderation process. This feature can compress images up to 32 MB.
Note:
The large image moderation feature incurs basic image processing fees. For detailed prices, see Basic Image Processing Costs.
Moderation Policy Selection: Please select the moderation policy you have configured (if no policy is configured, the system's default policy can be used). Each moderation policy corresponds to a category, and you can customize moderation scenes through policy customization. Options for moderation include pornographic content, illegal activity or non-compliant behavior, and advertising content, and you can select one or multiple scenes for moderation. For more information on how to configure a moderation policy, see Setting Moderation Policy.
Daily Moderation Limit: You can configure the maximum number of images that can be moderated per day, By default, there is no upper limit.
Moderation Scene: Either the default scenes or those you have configured in your moderation policy are displayed here. You can select the scene categories you wish to moderate.
Review Video:
Moderation Suffix: Video moderation supports the following formats: MP4, AVI, MKV, WMV, RMVB, FLV, M3U8, and so on.
Moderation Policy Selection: Please select the moderation policy you have configured. Each moderation policy corresponds to a category, and you can customize moderation scenes through policy customization. Options for moderation include pornographic content, illegal activity or non-compliant behavior, and advertising content, and you can select one or multiple scenes for moderation. For more information on how to configure a moderation policy, see Setting Moderation Policy.
Daily Moderation Limit: You can configure the maximum number of video files that can be moderated per day. By default, there is no upper limit.
Moderation Scene: Moderation scene options include moderation for pornographic content, illegal, and advertising content. You can select one or multiple moderation scenes.
Moderation Content: Both video images and audio can be moderated.
Frame Capturing Rule: Frame capturing is the basis for video moderation, which is implemented through the moderation of the image captured from the video. Fixed Time, Fixed Frame Rate, and Fixed Quantity are supported for frame capturing moderation.
Fixed Time: Images are captured at fixed intervals for moderation. You can set the time interval and the maximum number of frames captured per video.
Fixed Frame Rate: A fixed number of frames are captured per second for moderation. You can set the frame capture rate per second and the maximum number of frames captured per video.
Fixed Quantity: A predetermined quantity of images are captured from full-length videos, based on an average percentage. You can set the maximum number of frame captured per video.
Note:
The configuration of frame capturing rules will impact the outcome of the moderation.
Review Audio:
Moderation Suffix: Audio moderation supports the following formats: MP3, WAV, AAC, FLAC, AMR, 3GP, M4A, WMA, OGG, and APE.
Moderation Policy Selection: Please select the moderation policy you have configured (if no policy is configured, the system's default policy can be used). Each moderation policy corresponds to a category, and you can customize moderation scenes through policy customization. Options for moderation include pornographic content, illegal activity or non-compliant behavior, and advertising content, and you can select one or multiple scenes for moderation. For more information on how to configure a moderation policy, see Setting Moderation Policy.
Daily Moderation Limit: You can set the maximum quantity of audio files to be moderated per day. By default, there is no upper limit.
Moderation Scene: Moderation categories display the scenes that you configured in the moderation policy, and you can select the desired categories for moderation.
Review Text:
Moderation Suffix: Text files with the suffix TXT or no suffix can be moderated.
Moderation Policy Selection: Please select the moderation policy you have configured (if no policy is configured, the system's default policy can be used). Each moderation policy corresponds to a category, and you can customize moderation scenes through policy customization. Options for moderation include pornographic content, illegal activity or non-compliant behavior, and advertising content, and you can select one or multiple scenes for moderation. For more information on how to configure a moderation policy, see Setting Moderation Policy.
Daily Moderation Limit: You can set the maximum amount of text files moderated per day. By default, there is no upper limit.
Moderation Scene: Moderation categories display the scenes that you configured in the moderation policy, and you can select the desired categories for moderation.
Review More:
Moderation Suffix: The file formats supporting moderation include presentations, text files, spreadsheets, PDFs, among others. You can select multiple formats.
Moderation Policy Selection: Please select the moderation policy you have configured (if no policy is configured, the system's default policy can be used). Each moderation policy corresponds to a category, and you can customize moderation scenes through policy customization. Options for moderation include pornographic content, illegal activity or non-compliant behavior, and advertising content, and you can select one or multiple scenes for moderation. For more information on how to configure a moderation policy, see Setting Moderation Policy.
Daily Moderation Limit: You can configure the maximum number of files that can be moderated per day. By default, there is no upper limit.
Moderation Scene: The scenes you have configured in your selected moderation policy are displayed here. You can select the scenes you want to moderate.
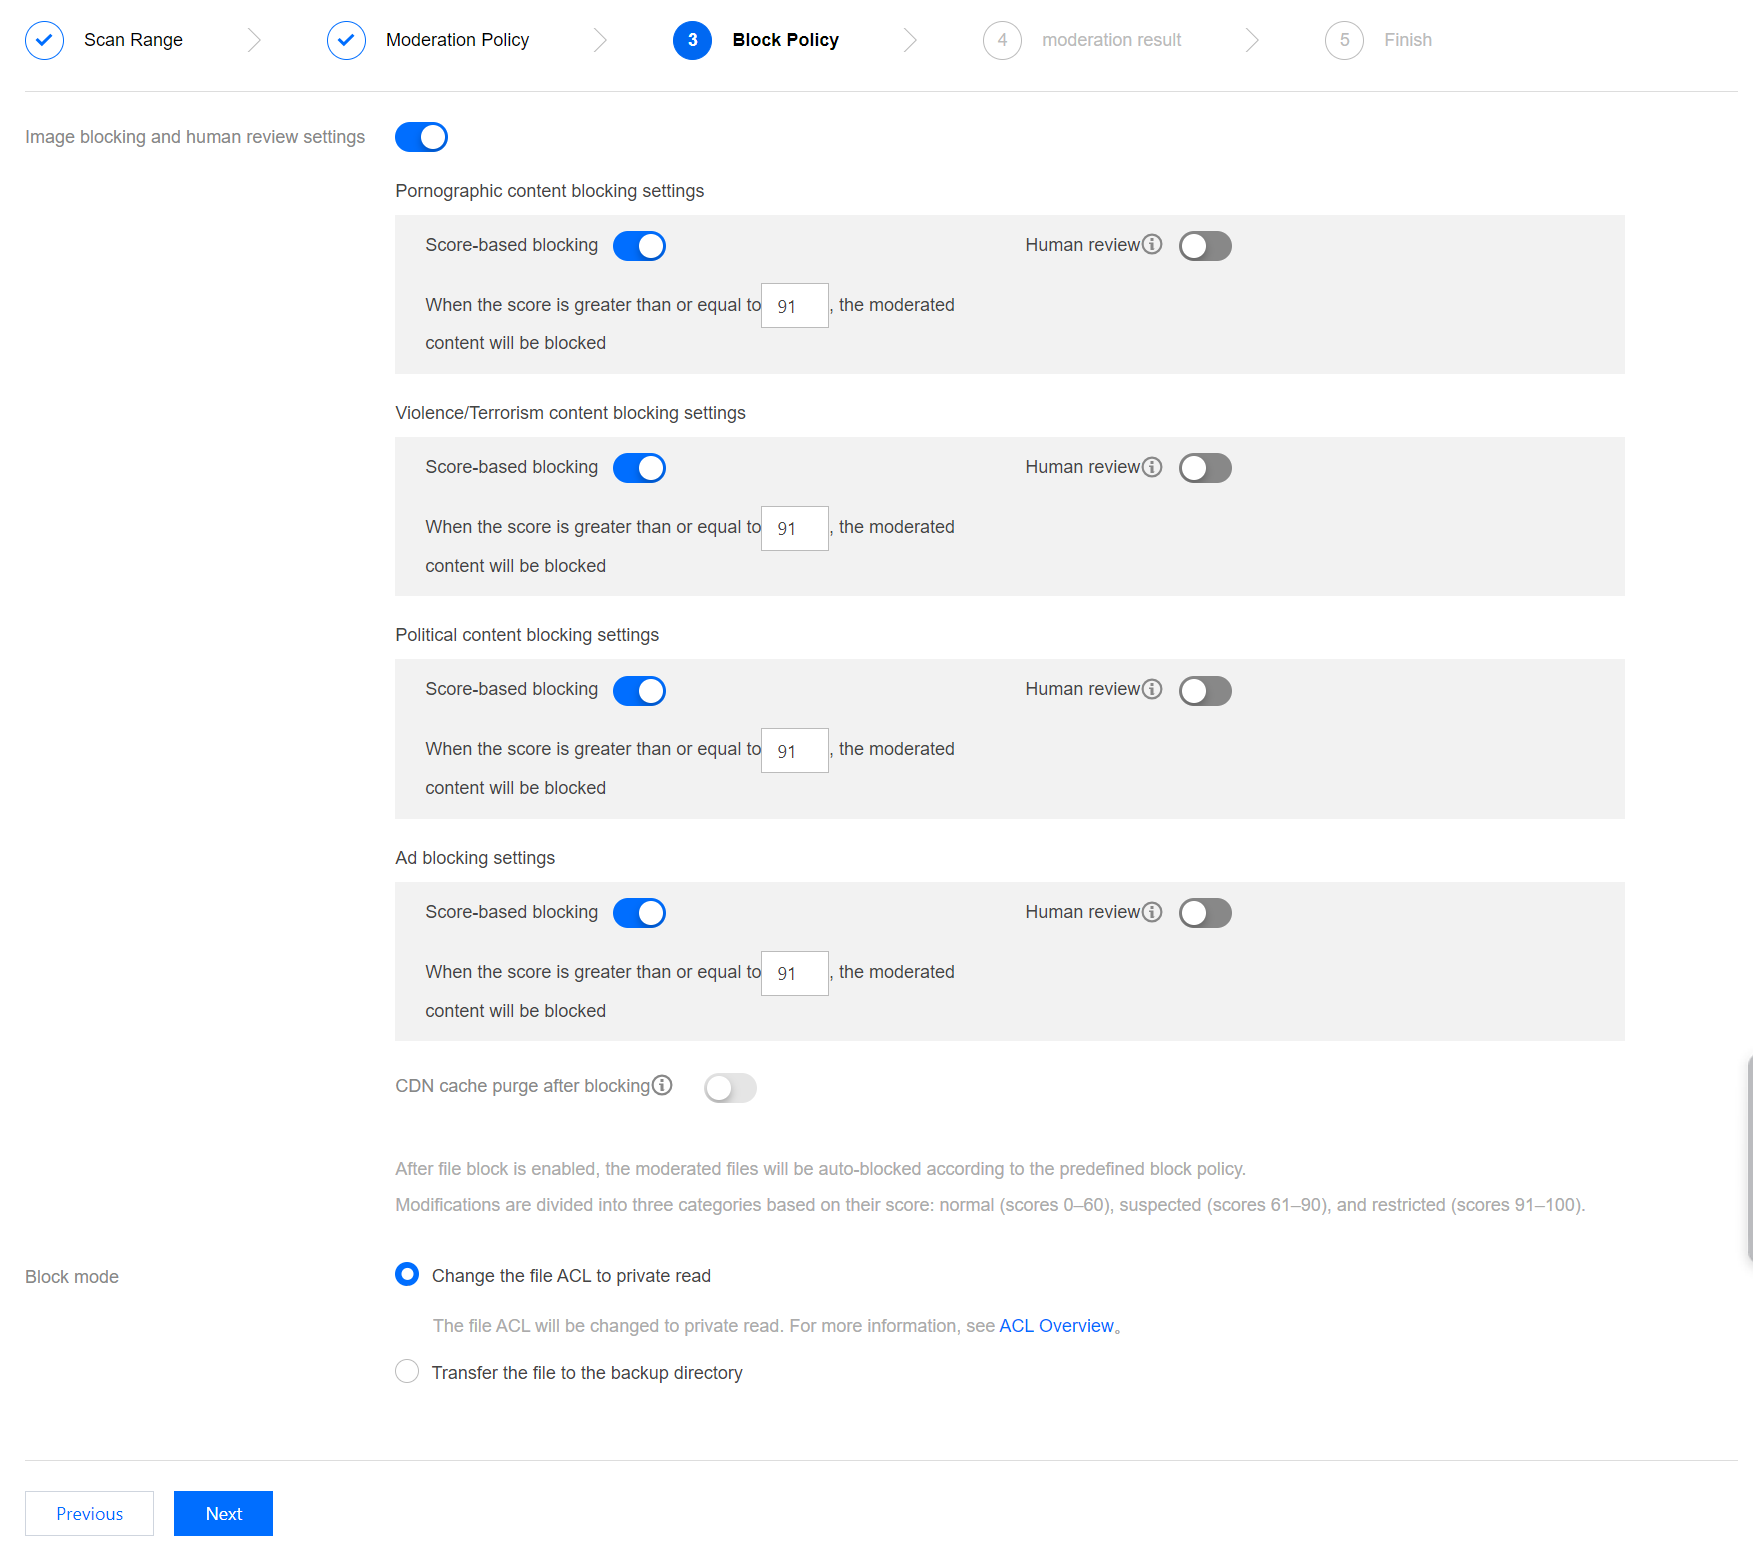
9. In the Block Policy interface, configure the block policy, and then click Next. Enabling the block policy authorizes Cloud Infinite (CI) services to conduct automatic moderation or manual re-moderation on certain types of files, forbidding public read access to any identified non-compliant content.
Image blocking and human review settings: You can set values (that is, integers from 60 to 100) based on different moderation types. The images will be blocked when the set value range is reached. By default, direct blocking is selected. If you select manual re-moderation, a secondary review on the image will be carried out by a professional security team.
Note:
The moderation results are classified into confirmed sensitive, likely sensitive, and normal categories based on the moderation score.
The score range for confirmed sensitive images is ≥ 91.
The score range for potentially sensitive images is from 61 to 90. The system may not accurately identify these images as sensitive, thus it's recommended that users should conduct manual re-moderation to ensure the anti-spam nature of the images.
The score range for normal images is ≤ 60. The system considers these images as normal.
CDN Cache Purge after Blocking: When it is enabled, the corresponding domain's CDN cache data will be purged while the COS origin file is blocked.
Block Mode: The following two blocking modes are supported.
Change the file ACL to private: Files are blocked through the modification of the file's access permission to private read. When this mode is used, a re-attempt to access the file would return a 403 status code, indicating that access to the file is not allowed. For information about file permissions, see ACL.
Transfer the file to the backup directory: Files are block through the move of the file to the backup directory. When this mode is used, a re-attempt to access the file returns a 404 status code, indicating that the file does not exist. The backup directory is automatically generated by the background, located in the path of the current bucket: audit_freeze_backup/increment_audit.
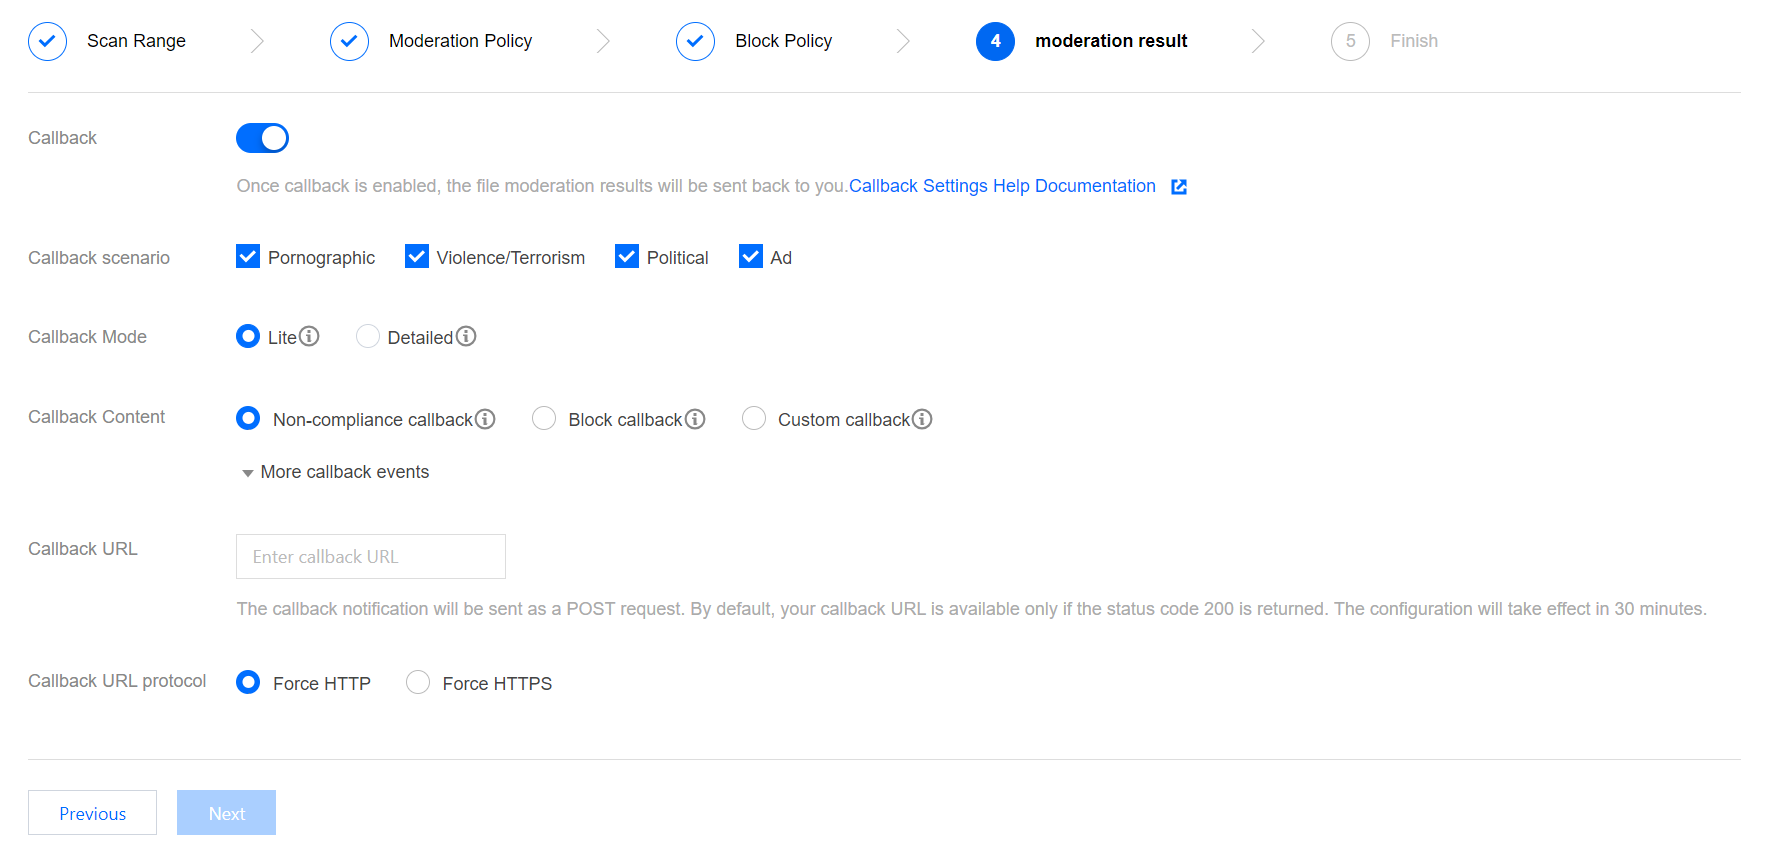
10. On the Moderation Results page, set up the callback for moderation results and click Next.
After enabling callback settings, we will direct the moderation results to your designated callback address. You need to set the callback type, callback content, and callback URL.
Callback Scenario: Based on the moderation policy you have set, options include pornographic content, illegal and non-compliant content, advertisement moderation, illegal content, and verbal abuses.
Callback Mode: You have chosen either Lite or Detailed mode.
Callback Content: Options include callback only for non-compliant files, callback only for blocked files, and callback for all files. Re-moderation is also supported for files that failed the first moderation.
Callback URL: The callback URL must by default return a 200 status code.
Callback URL Protocol: You can choose either enforced HTTP or HTTPS.
11. After checking all task configurations, click Create to complete task creation.
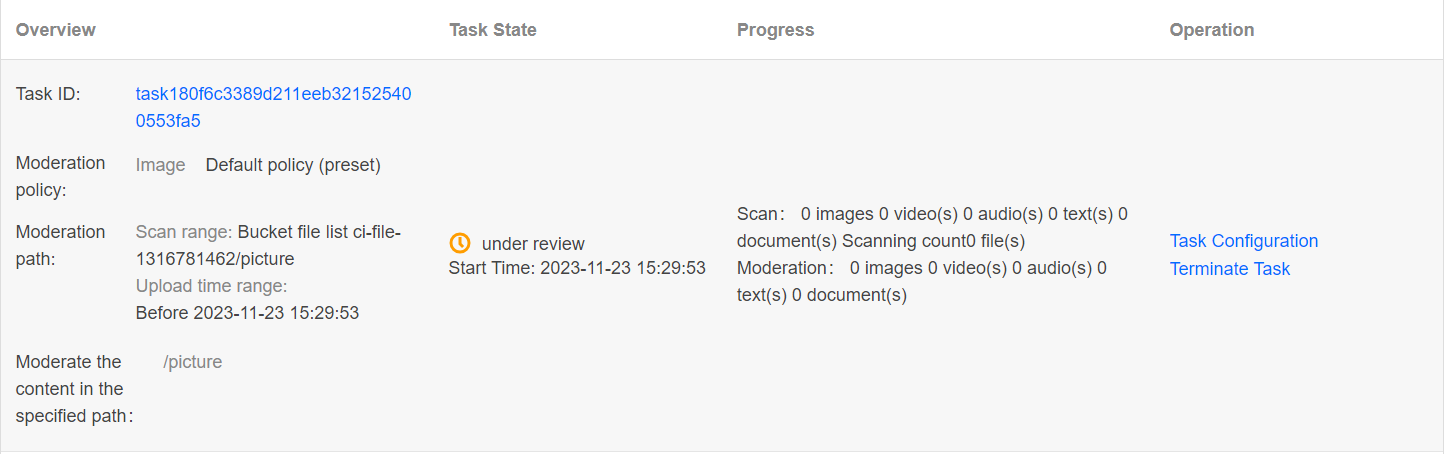
Viewing Task Results
On the Existing File Moderation page, you can perform different operations based on the task status.
When the task status is under review, you can click Task Configuration or Terminate Task.
When the task status is Job completed, you can view Moderation Details or Result Statistics.
Moderation Details: Only moderation details from the past one month can be viewed. After clicking this option, you will be redirected to the moderation page where you can export moderation results, conduct manual moderation, and so on. For specific operation instructions, see Moderation Details.
Result Statistics: This page displays the statistical results of the moderation task. If you have any doubts about the moderation results, you can go to the Moderation Details page on the control panel to view the specific moderation contents.