iOS
下载
聚焦模式
字号
本文将介绍如何在 iOS 工程中集成 TIMPush。
前提条件
方式1:AI 集成
使用 npx 安装 @tencent-rtc/trtc-push-skill 到本地 AI IDE 中,辅助完成 TIMPush 离线推送集成。安装后,你可以直接向 AI 输入“集成 iOS 离线推送”等需求,AI 将根据项目类型引导你完成环境检测、厂商通道配置、凭据填写、代码接入和验证等步骤。详情可参考 AI Coding。
方式2:手动集成
步骤1:集成 TIMPush SDK
在主 App target 中集成 TIMPush
TIMPush 通过 CocoaPods 集成。请在
Podfile 中为主 App target 添加 TIMPush 依赖。Podfile 示例:target 'YourAppName' douse_frameworks!use_modular_headers!pod 'TIMPush', 'VERSION'end
如果您的工程已显式依赖 IMSDK,请保持
TIMPush 与 TXIMSDK_Plus_iOS_XCFramework 版本一致,否则执行 pod install 时可能出现依赖冲突:target 'YourAppName' douse_frameworks!use_modular_headers!pod 'TXIMSDK_Plus_iOS_XCFramework', 'VERSION'pod 'TIMPush', 'VERSION'end
保存
Podfile 后,在工程目录执行:pod install
如果无法安装 TIMPush 最新版本,可先执行
pod repo update 更新本地 CocoaPods 仓库列表后再 pod install。注意:
无论 Swift 还是 Objective-C 项目,都请集成 TXIMSDK_Plus_iOS_XCFramework。
配置推送参数
配置 businessID
businessID 是控制台上传 APNs 证书后生成的证书 ID。TIMPush 通过该 ID 识别当前 App 使用控制台中的哪一份 iOS 推送证书。// 在 AppDelegate.swift 中添加import TIMPush// 注意:Swift 端需要添加 @objc 标注@objc func businessID() -> Int32 {// TODO: Replace <#YOUR_BUSINESS_ID#> with the certificate ID generated in the Tencent Cloud console.return <#YOUR_BUSINESS_ID#>}
// 在 AppDelegate.m 中添加#import <TIMPush/TIMPushManager.h>- (int)businessID {// TODO: Replace <#YOUR_BUSINESS_ID#> with the certificate ID generated in the Tencent Cloud console.return <#YOUR_BUSINESS_ID#>;}
配置 applicationGroupID(可选)
如果您需要统计推送触达率,需要配置 App Group ID 并实现 applicationGroupID() 方法 ,该 ID 应与您在厂商配置阶段准备的 App Group ID 保持一致。如果不需要推送触达统计,可以跳过本节。
// 在 AppDelegate.swift 中添加import TIMPush@objc func applicationGroupID() -> String {// TODO: Replace <#YOUR_APP_GROUP_ID#> with the App Group ID configured in Apple Developer Center / Xcode.return "group.<#YOUR_APP_GROUP_ID#>"}
// 在 AppDelegate.m 中添加#import <TIMPush/TIMPushManager.h>- (NSString *)applicationGroupID {// TODO: Replace <#YOUR_APP_GROUP_ID#> with the App Group ID configured in Apple Developer Center / Xcode.return @"group.<#YOUR_APP_GROUP_ID#>";}
步骤2:注册推送服务
调用 registerPush
registerPush 用于向 TIMPush 注册当前设备的推送 token。注册成功后,TIMPush 会为当前设备建立一个推送目标标识
registrationID;服务端、控制台接入测试和排查工具可以使用该标识向这台设备下发离线推送。若 App 同时接入 Chat 并完成登录,也可以使用 userID 向该用户已建立推送关系的设备下发离线推送。appKey 的取值会影响注册方式和可用的推送标识:appKey = Push Key:注册 TIMPush 独立推送能力。Push Key 为控制台 > Push > 概览中的客户端密钥。appKey = nil:复用 Chat 登录态注册推送,必须在 Chat login 成功后调用。请先根据业务场景确认调用顺序:
场景 | 调用顺序 | 后台可用推送标识 | 说明 |
仅使用 TIMPush | App 每次冷启动后调用 registerPush(appKey = Push Key) | registrationID | 适用于营销 / 活动 / 通知推送,不接入 Chat SDK。 |
Chat SDK + TIMPush 先注册 Push 再登录 | registerPush(appKey = Push Key)→ Chat login | 登录前: registrationID;登录后: registrationID + userID | 适用于希望用户未登录时也能收到营销推送的场景。 |
Chat SDK + TIMPush 先登录再注册 Push | Chat login→ registerPush(appKey = null) | 登录后: userID注册后: userID + registrationID,此时 registrationID = userID | 适用于希望用户登录后能收到 Chat 离线消息和营销推送的场景。 |
注意:
如果用户退出 Chat SDK,同时集成了 Chat SDK + TIMPush 的场景下已建立的
userID 与 registrationID 推送关系都会失效,需要重新完成对应注册。Chat 应用的密钥仅用于 Chat 登录,不能作为
registerPush 的 appKey。App 冷启动、用户同意隐私政策后调用
registerPush(appKey = Push Key)。建议在 registerPush 成功回调里调用 getRegistrationID 打印 registrationID,方便后续根据 registrationID 发送离线推送消息。import TIMPushfunc registerTIMPush() {// TODO: Replace 0 with your SDKAppID.let sdkAppID: Int32 = 0// TODO: Replace "<#YOUR_PUSH_KEY#>" with your Push Key.let appKey = "<#YOUR_PUSH_KEY#>"TIMPushManager.registerPush(sdkAppID, appKey: appKey, succ: { deviceToken inprint(">>>>> TIMPush register success")TIMPushManager.getRegistrationID { registrationID inprint(">>>>> TIMPush registrationID: \\(registrationID)")}}, fail: { code, desc inprint(">>>>> TIMPush register failed, code:\\(code), desc:\\(desc)")})}
#import <TIMPush/TIMPushManager.h>- (void)registerTIMPush {// TODO: Replace 0 with your SDKAppID.int sdkAppID = 0;// TODO: Replace @"<#YOUR_PUSH_KEY#>" with your Push Key.NSString *appKey = @"<#YOUR_PUSH_KEY#>";[TIMPushManager registerPush:sdkAppIDappKey:appKeysucc:^(NSData * _Nonnull deviceToken) {NSLog(@">>>>> TIMPush register success");[TIMPushManager getRegistrationID:^(NSString * _Nonnull registrationID) {NSLog(@">>>>> TIMPush registrationID: %@", registrationID);}];} fail:^(int code, NSString * _Nonnull desc) {NSLog(@">>>>> TIMPush register failed, code:%d, desc:%@", code, desc);}];}
请在 Chat
login 成功回调中调用 registerPush(appKey = nil)。建议在 registerPush 成功回调里调用 getRegistrationID 打印 registrationID,方便后续根据 registrationID 发送离线推送消息。import TIMPushimport ImSDK_Plusfunc loginIMAndRegisterPush() {// TODO: Replace 0 with your SDKAppID.let sdkAppID: Int32 = 0let userID = "<#YOUR_USER_ID#>"let userSig = "<#YOUR_USER_SIG#>"let initSuccess = V2TIMManager.sharedInstance().initSDK(sdkAppID, config: V2TIMSDKConfig())if !initSuccess {print(">>>>> IM SDK init failed")return}V2TIMManager.sharedInstance().login(userID: userID, userSig: userSig) {TIMPushManager.registerPush(sdkAppID, appKey: "", succ: { deviceToken inprint(">>>>> TIMPush register success")TIMPushManager.getRegistrationID { registrationID inprint(">>>>> TIMPush registrationID: \\(registrationID)")}}, fail: { code, desc inprint(">>>>> TIMPush register failed, code:\\(code), desc:\\(desc)")})} fail: { code, msg inprint(">>>>> IM login failed, code:\\(code), msg:\\(msg ?? "")")}}
#import <TIMPush/TIMPushManager.h>#import <ImSDK_Plus/ImSDK_Plus.h>- (void)loginIMAndRegisterPush {// TODO: Replace 0 with your SDKAppID.int sdkAppID = 0;NSString *userID = @"<#YOUR_USER_ID#>";NSString *userSig = @"<#YOUR_USER_SIG#>";V2TIMSDKConfig *config = [[V2TIMSDKConfig alloc] init];BOOL initSuccess = [[V2TIMManager sharedInstance] initSDK:sdkAppID config:config];if (!initSuccess) {NSLog(@">>>>> IM SDK init failed");return;}[[V2TIMManager sharedInstance] login:userID userSig:userSig succ:^{[TIMPushManager registerPush:sdkAppIDappKey:nilsucc:^(NSData * _Nonnull deviceToken) {NSLog(@">>>>> TIMPush register success");[TIMPushManager getRegistrationID:^(NSString * _Nonnull registrationID) {NSLog(@">>>>> TIMPush registrationID: %@", registrationID);}];} fail:^(int code, NSString * _Nonnull desc) {NSLog(@">>>>> TIMPush register failed, code:%d, desc:%@", code, desc);}];} fail:^(int code, NSString *msg) {NSLog(@">>>>> IM login failed, code:%d, msg:%@", code, msg);}];}
警告:
如果你的业务仅使用即时通信 Chat 聊天能力,请勿在 Chat 登录前先调用
registerPush。否则 SDK 可能会按独立推送场景注册 Push 类型账号,并产生对应的 Push DAU。Push DAU 超出套餐额度后,可能会产生额外费用。自定义 registrationID(可选)
注意:
混用场景下,自定义
registrationID 必须与 Chat 登录使用的 userID 完全一致,否则会产生账号互踢导致推送丢失。步骤3:配置消息触达统计(可选)
仅当您需要统计推送触达率时,才需要完成本节配置;如果只需要接收普通离线推送,可跳过本节。
完整流程包含:
1. 在 Xcode 中创建并配置 Notification Service Extension target
2. 确保 APNs payload 开启
mutable-content3. 在 Extension 中调用 TIMPush 处理通知。
创建并配置 Notification Service Extension target
1. 在 Xcode 中选择 File > New > Target。
2. 选择 Notification Service Extension。
3. 输入 Extension 名称。
4. 创建完成后,确认工程中出现新的 Extension target。
5. 在 Extension target 的 Signing & Capabilities 中配置与主 App 相同的 App Groups。
6. 在
Podfile 中为 Extension target 添加 TIMPush 依赖:target 'YourNotificationServiceExtensionTarget' douse_frameworks!use_modular_headers!pod 'TIMPush', 'VERSION'end
7. 执行
pod install。注意:
Extension target 是独立 target,不能复用主 App target 的 Pod 依赖。若未在 Extension target 中添加
TIMPush,在 NotificationService 中 import TIMPush 或 #import <TIMPush/TIMPushManager.h> 会失败。开启 mutable-content
mutable-content 是 APNs payload 字段,由发送方在推送内容中设置。只有 payload 中开启 mutable-content,iOS 10 及以上系统才会在送达前调用 Notification Service Extension,触达统计才能生效。请确保通过以下任一方式开启
mutable-content:控制台推送:在控制台推送测试或发送页面,勾选
mutable-content 相关选项。服务端 REST API:在 APNs payload 中设置
"mutable-content": 1。Chat SDK 发送:以 Chat SDK 离线推送配置文档为准。
在 Extension 中处理通知
请将
group.<#YOUR_APP_GROUP_ID#> 替换为您在 Apple Developer Center 和 Xcode 中配置的 App Group ID。主 App 和 Extension 必须使用同一个 App Group ID。// 在 NotificationService.swift 中添加import UserNotificationsimport TIMPushclass NotificationService: UNNotificationServiceExtension {var contentHandler: ((UNNotificationContent) -> Void)?var bestAttemptContent: UNMutableNotificationContent?override func didReceive(_ request: UNNotificationRequest,withContentHandler contentHandler: @escaping (UNNotificationContent) -> Void) {self.contentHandler = contentHandlerself.bestAttemptContent = request.content.mutableCopy() as? UNMutableNotificationContentlet appGroupID = "group.<#YOUR_APP_GROUP_ID#>"TIMPushManager.handleNotificationServiceRequest(request: request, appGroupID: appGroupID) { [weak self] content inguard let self = self else {contentHandler(content)return}self.bestAttemptContent = content.mutableCopy() as? UNMutableNotificationContentcontentHandler(self.bestAttemptContent ?? content)}}override func serviceExtensionTimeWillExpire() {if let contentHandler = contentHandler, let bestAttemptContent = bestAttemptContent {contentHandler(bestAttemptContent)}}}
// 在 NotificationService.m 中添加#import "NotificationService.h"#import <TIMPush/TIMPushManager.h>@implementation NotificationService- (void)didReceiveNotificationRequest:(UNNotificationRequest *)requestwithContentHandler:(void (^)(UNNotificationContent * _Nonnull))contentHandler {NSString *appGroupID = @"group.<#YOUR_APP_GROUP_ID#>";[TIMPushManager handleNotificationServiceRequest:requestappGroupID:appGroupIDcallback:^(UNNotificationContent *content) {contentHandler(content);}];}@end
步骤4:测试推送链路
完成上述集成步骤后,需要通过发送测试消息验证整体链路是否打通。发送消息前请确认:
1. App 已获得系统通知权限;
2. Xcode 主 App target 已开启 Push Notifications,AppDelegate 已正确返回
businessID;3. App 已置于后台或杀掉进程(前台时离线推送可能不触发)。
发送测试消息可以采用下面几种方法:
仅集成 TIMPush 的用户,建议优先使用控制台接入测试能力验证离线推送。
操作路径:控制台 > Push > App Push > 接入测试。在接入测试页面,可以指定
registrationID 或 userID 发送离线推送测试。如果您的项目已接入 Chat SDK,可在调用 sendMessage 发送消息时,通过
V2TIMOfflinePushInfo 设置离线推送参数,再交由 V2TIMManager 发送消息。具体方法签名以您接入的 IMSDK 版本头文件为准。import ImSDK_Pluslet pushInfo = V2TIMOfflinePushInfo()pushInfo.title = "推送标题"pushInfo.desc = "推送内容"let message = V2TIMManager.sharedInstance().createTextMessage("Hello TIMPush")V2TIMManager.sharedInstance().sendMessage(message: message,receiver: "<#TARGET_USER_ID#>",groupID: nil,priority: V2TIM_PRIORITY_DEFAULT,onlineUserOnly: false,offlinePushInfo: pushInfo,progress: nil,succ: { msg inprint(">>>>> sendMessage success, msgID = \\(msg?.msgID ?? "")")},fail: { code, desc inprint(">>>>> sendMessage failed, code:\\(code), desc:\\(desc ?? "")")})
#import <ImSDK_Plus/ImSDK_Plus.h>V2TIMOfflinePushInfo *pushInfo = [[V2TIMOfflinePushInfo alloc] init];pushInfo.title = @"推送标题";pushInfo.desc = @"推送内容";V2TIMMessage *message = [[V2TIMManager sharedInstance] createTextMessage:@"Hello TIMPush"];[[V2TIMManager sharedInstance] sendMessage:messagereceiver:@"<#TARGET_USER_ID#>"groupID:nilpriority:V2TIM_PRIORITY_DEFAULTonlineUserOnly:NOofflinePushInfo:pushInfoprogress:nilsucc:^{NSLog(@">>>>> sendMessage success");} fail:^(int code, NSString *desc) {NSLog(@">>>>> sendMessage failed, code:%d, desc:%@", code, desc);}];
sendMessage 属于 IMSDK 消息发送能力。仅集成 TIMPush 的用户不需要为了验证离线推送而额外接入完整 Chat 初始化、登录和消息发送流程。步骤5:处理通知点击跳转
通知点击跳转需要三步配合完成:控制台配置点击动作、发送推送时携带跳转参数、客户端注册监听并解析参数。三步缺一则跳转不生效。
配置控制台点击动作
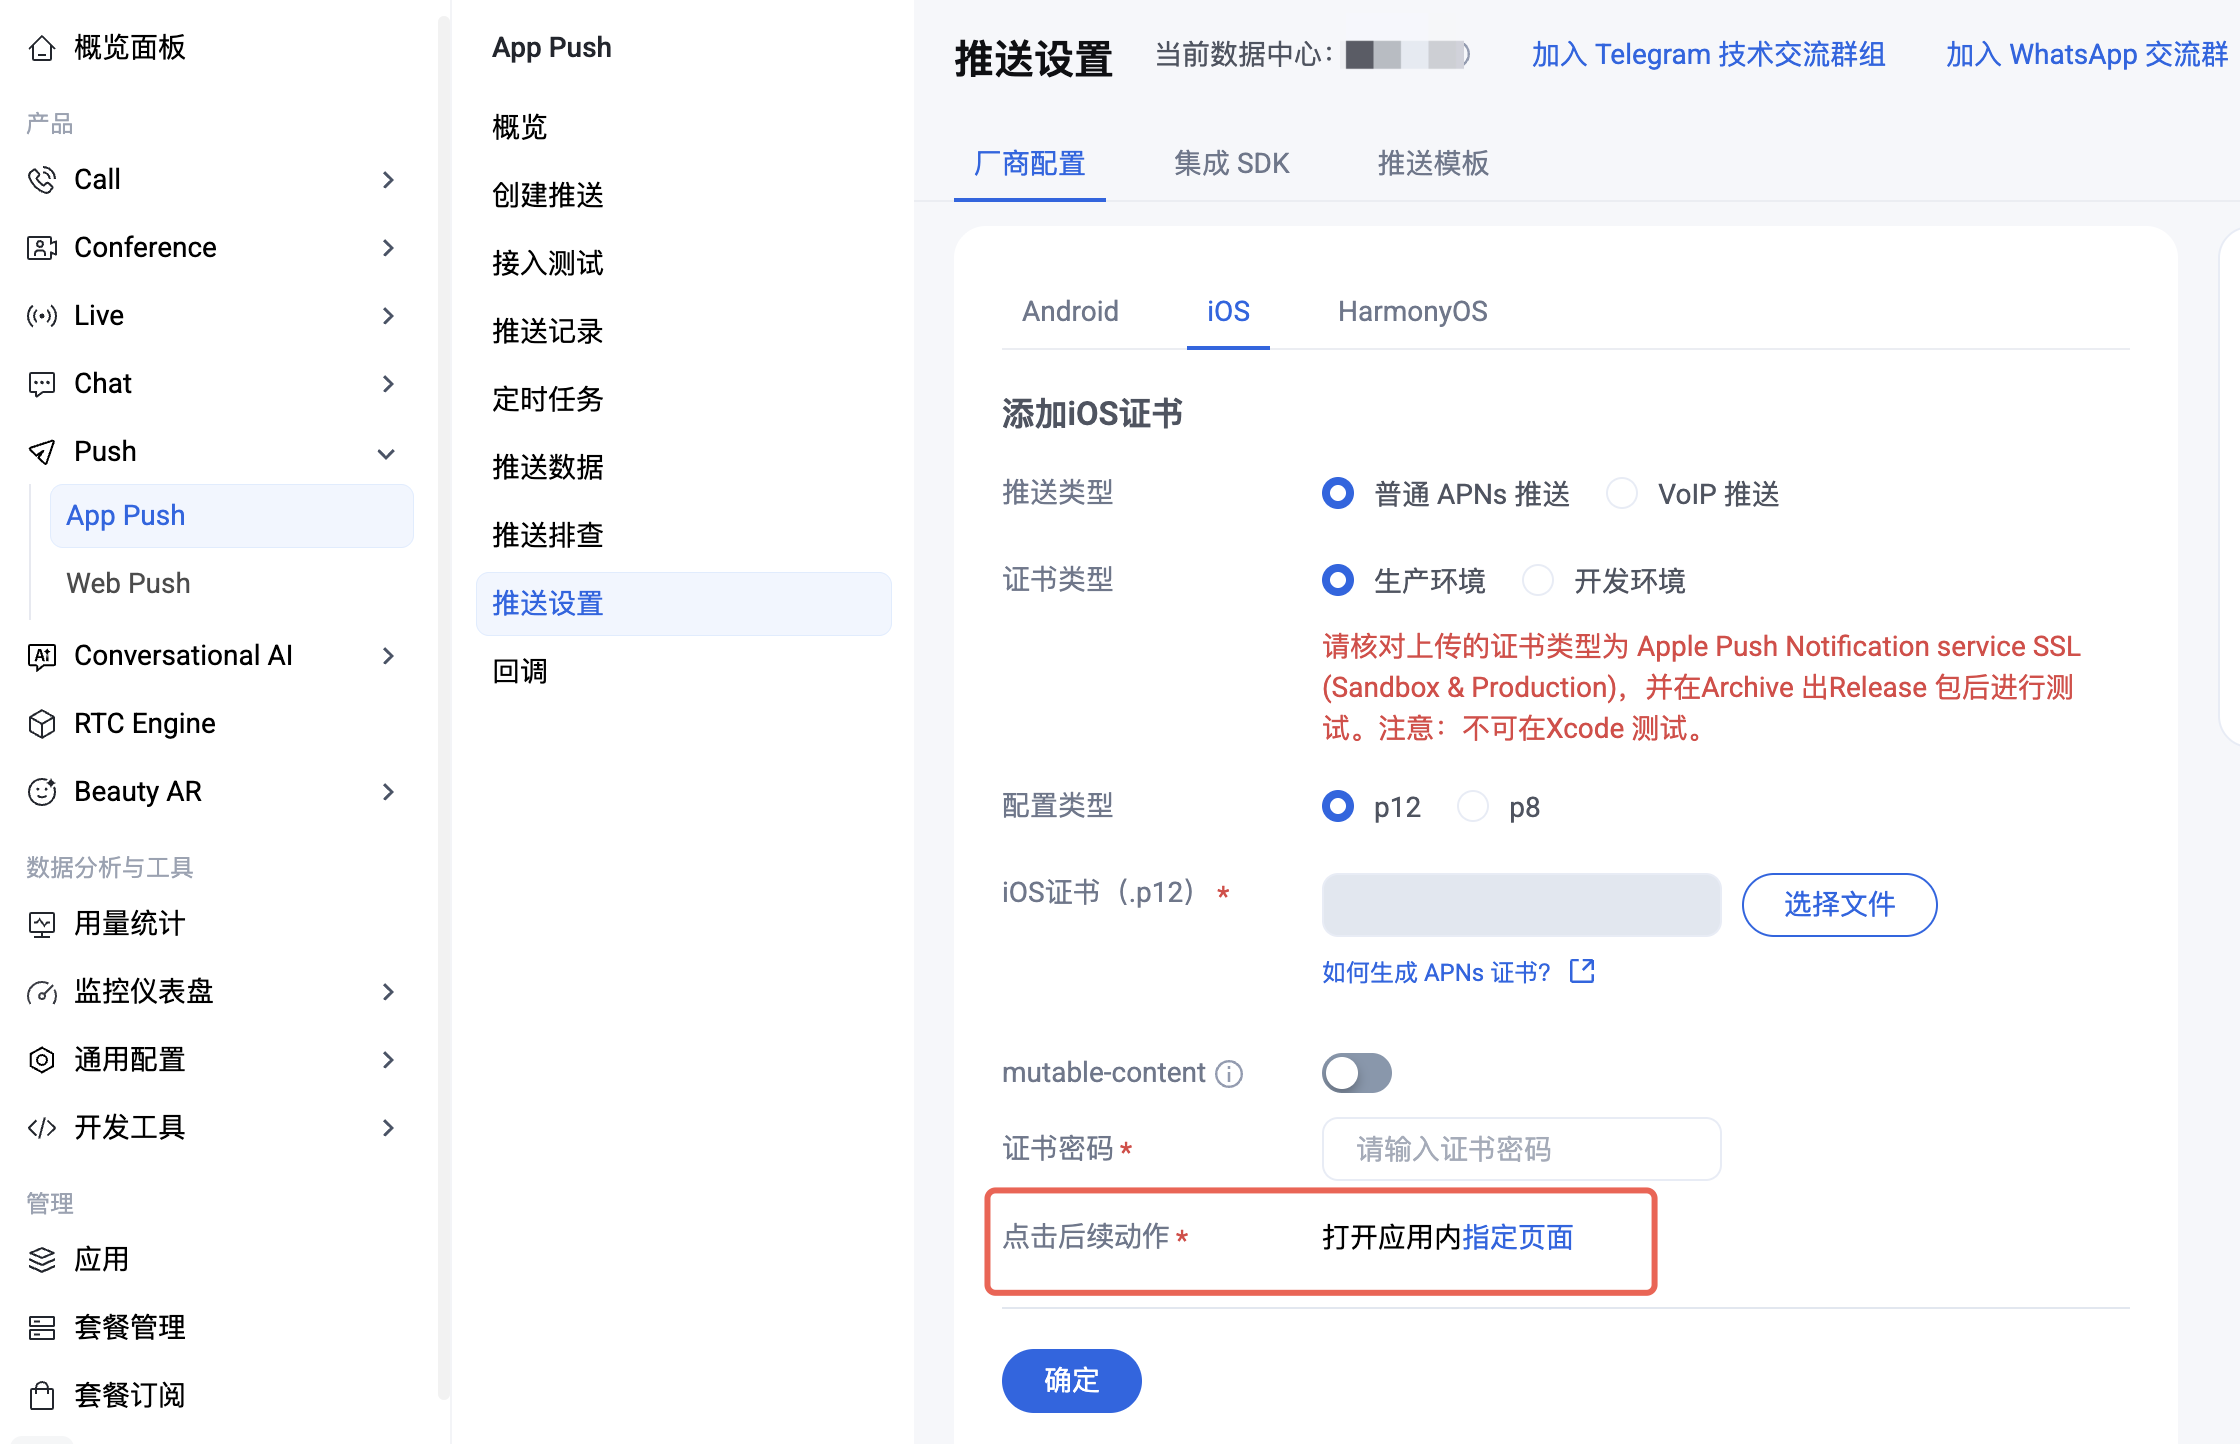
在控制台配置选择打开应用内指定页面。操作路径:控制台 > Push > App Push > 推送设置 > 厂商配置 > iOS > 对应证书 > 编辑 > 点击后续动作 > 打开应用内指定页面。
发送推送时携带跳转参数
发送离线推送时,通过
ext 字段携带跳转所需的业务信息(如目标页面、会话 ID 等)。ext 是一个字符串,结构由业务自定义,推荐使用 JSON 格式便于客户端解析。下文示例统一使用如下结构演示:// conversationType 为 1 表示单聊(conversationID 填消息发送方 userID),为 2 表示群聊(conversationID 填 groupID)。{"conversationID":"user_A","conversationType":1}
通过 REST API 发送推送时,在请求体的
Ext 字段中设置 JSON 字符串:{"MsgBody": [],"OfflinePushInfo": {"PushFlag": 0,"Title": "离线推送标题","Desc": "离线推送内容","Ext": "{\\"conversationID\\":\\"user_A\\",\\"conversationType\\":1}"}}
控制台接入测试页面同样支持设置
Ext 字段,填入 JSON 字符串即可。如果你接入了 TUIKit,TUIKit 内置的消息发送链路会自动用
OfflinePushExtInfo 组装 ext,无需手动设置。下方示例适用于自行调用 Chat SDK 发送消息的场景。import ImSDK_Pluslet pushInfo = V2TIMOfflinePushInfo()pushInfo.title = "推送标题"pushInfo.desc = "推送内容"// TODO: ext 由业务自定义,按需替换为您的目标页面、会话 ID 等参数。pushInfo.ext = "{\\"conversationID\\":\\"user_A\\",\\"conversationType\\":1}"let message = V2TIMManager.sharedInstance().createTextMessage("Hello TIMPush")V2TIMManager.sharedInstance().sendMessage(message: message,receiver: "<#TARGET_USER_ID#>",groupID: nil,priority: V2TIM_PRIORITY_DEFAULT,onlineUserOnly: false,offlinePushInfo: pushInfo,progress: nil,succ: { msg inprint(">>>>> sendMessage success, msgID = \\(msg?.msgID ?? "")")},fail: { code, desc inprint(">>>>> sendMessage failed, code:\\(code), desc:\\(desc ?? "")")})
#import <ImSDK_Plus/ImSDK_Plus.h>V2TIMOfflinePushInfo *pushInfo = [[V2TIMOfflinePushInfo alloc] init];pushInfo.title = @"推送标题";pushInfo.desc = @"推送内容";// TODO: ext 由业务自定义,按需替换为您的目标页面、会话 ID 等参数。pushInfo.ext = @"{\\"conversationID\\":\\"user_A\\",\\"conversationType\\":1}";V2TIMMessage *message = [[V2TIMManager sharedInstance] createTextMessage:@"Hello TIMPush"];[[V2TIMManager sharedInstance] sendMessage:messagereceiver:@"<#TARGET_USER_ID#>"groupID:nilpriority:V2TIM_PRIORITY_DEFAULTonlineUserOnly:NOofflinePushInfo:pushInfoprogress:nilsucc:^(V2TIMMessage *msg) {NSLog(@">>>>> sendMessage success, msgID = %@", msg.msgID);} fail:^(int code, NSString *desc) {NSLog(@">>>>> sendMessage failed, code:%d, desc:%@", code, desc);}];
客户端注册监听并解析跳转参数
请在 AppDelegate 中遵循 TIMPushListener 协议,在
didFinishLaunchingWithOptions 中调用 addPushListener 注册监听器,并在 onNotificationClicked 中解析 ext 后跳转到业务页面。如果您接入了 TUIKit 并使用 OfflinePushExtInfo 组装的 ext,可改为 OfflinePushExtInfo.create(withExtString:) 解析后再跳转。import UIKitimport TIMPush@mainclass AppDelegate: UIResponder, UIApplicationDelegate, TIMPushListener {var window: UIWindow?func application(_ application: UIApplication, didFinishLaunchingWithOptions launchOptions: [UIApplication.LaunchOptionsKey: Any]?) -> Bool {TIMPushManager.addPushListener(listener: self)return true}// MARK: - TIMPushListener@objc func onNotificationClicked(_ ext: String) {print(">>>>> TIMPush notification clicked, ext:\\(ext)")// 1. 解析 ext。JSON 结构由业务自定义,需与发送端约定一致。guard let data = ext.data(using: .utf8),let dict = try? JSONSerialization.jsonObject(with: data) as? [String: Any] else {return}let conversationID = dict["conversationID"] as? String ?? ""let conversationType = dict["conversationType"] as? Int ?? 0// 2. TODO: 根据业务字段跳转到目标页面。// 若使用了 Chat / TUIKit,建议在用户登录成功后再跳转;// 冷启动场景可先把参数缓存起来,登录回调中再跳转。}// 协议要求实现,与点击跳转无关;如需感知收到 / 撤回离线推送,可按需补充。@objc func onRecvPushMessage(_ message: TIMPushMessage) {}@objc func onRevokePushMessage(_ messageID: String) {}}
// AppDelegate.h#import <UIKit/UIKit.h>#import <TIMPush/TIMPushManager.h>@interface AppDelegate : UIResponder <UIApplicationDelegate, TIMPushListener>@property (nonatomic, strong, nullable) UIWindow *window;@end// AppDelegate.m#import "AppDelegate.h"#import <TIMPush/TIMPushManager.h>@implementation AppDelegate- (BOOL)application:(UIApplication *)application didFinishLaunchingWithOptions:(NSDictionary *)launchOptions {[TIMPushManager addPushListener:self];return YES;}#pragma mark - TIMPushListener- (void)onNotificationClicked:(NSString *)ext {NSLog(@">>>>> TIMPush notification clicked, ext:%@", ext);// 1. 解析 ext。JSON 结构由业务自定义,需与发送端约定一致。NSData *data = [ext dataUsingEncoding:NSUTF8StringEncoding];if (data.length == 0) {return;}NSDictionary *dict = [NSJSONSerialization JSONObjectWithData:data options:0 error:nil];if (![dict isKindOfClass:[NSDictionary class]]) {return;}NSString *conversationID = dict[@"conversationID"];NSInteger conversationType = [dict[@"conversationType"] integerValue];// 2. TODO: 根据业务字段跳转到目标页面。// 若使用了 Chat / TUIKit,建议在用户登录成功后再跳转;// 冷启动场景可先把参数缓存起来,登录回调中再跳转。}// 协议要求实现,与点击跳转无关;如需感知收到 / 撤回离线推送,可按需补充。- (void)onRecvPushMessage:(TIMPushMessage *)message {}- (void)onRevokePushMessage:(NSString *)messageID {}@end
接入排查
文档反馈