Step 1: Add Domain
Baixar
Modo Foco
Tamanho da Fonte
Before using Web Application Firewall (WAF) to protect your web services, you must first add the websites to be protected to WAF. Websites that are not added will not be protected by WAF.
This document describes how to add a domain to SaaS WAF.
Prerequisites
You have purchased a SaaS type WAF instance. For details, please go to WAF purchase page.
If the added origin server domains are located in the Chinese mainland, the business content of the origin server must comply with laws and complete MIIT filing. For specific filing requirements, please refer to requirements for domains added to WAF.
Operation Steps
1. Log in to WAF console, and select the region where the instance is located (Chinese mainland/non-Chinese mainland) at the top of the left sidebar.
2. In the left sidebar, choose Connection Management > Domain names.
3. On the Domain Onboarding page, click Add domain to go to the Add domain page.
4. Configure relevant basic parameters on the Add Domain Name page.
Field Description
Instance: Select SaaS type, and then select the required specific instance on the right.
Domain name: In the domain name input box, add the domain to protect.
Note:
Domain name format requirements: Standard domain names (such as
example.com and a.b.example.com) are supported. A single-domain configuration applies only to that domain.Wildcard domain name format requirements: Under the same account, both exact domain names (such as
a.path.example.com) and wildcard domain names (such as *.path.example.com) can be added simultaneously. The system prioritizes matching policies with higher precision. Domains under the same wildcard domain name cannot be added across different accounts.Service Configuration: Select the protocol and port configuration based on your actual situation. For detailed port information, please refer to Ports for Access.
HTTP Protocol: After selecting it, you can choose or enter the corresponding service port. Click Origin Port Settings to expand the configuration for HTTP Origin-pull Method, which supports custom HTTP origin-pull ports. The origin-pull port is consistent with the service port by default, but can also be specified separately based on the actual situation of the origin server.
HTTPS Protocol: After entering the port, you need to configure the associated certificate, HTTPS forced redirect, and HTTPS origin-pull method.
Note:
WAF only forwards traffic on configured ports. Ports that are not configured may be detected as open by public network scanners via TCP probes, but the related requests are not forwarded by WAF, posing no risk of being exploited through the WAF protection chain.
Standard Certificate Configuration: When enabling the HTTPS protocol, you need to configure the SSL certificate associated with the website domain to WAF to listen to and protect the HTTPS traffic of that domain. Click Associate Standard Certificate to choose from the following methods to configure the certificate:
Tencent Cloud Hosted Certificates: Select and associate from the certificates already uploaded to SSL Certificates management. This method is recommended as certificates can be automatically renewed upon expiration.
Uploading Self-Owned Standard Certificate: Supports directly pasting certificate content or uploading certificate files. PEM-encoded certificate and private key files must be prepared before uploading.
Apply for Free Certificate: Free certificates are issued by TrustAsia and Let's Encrypt. They cannot be downloaded and do not come with SLA guarantees. For more reliable certificate guarantees, you can go to Purchase SSL Certificates.
Note:
It is recommended to use Tencent Cloud Certificate Service to manage certificates for centralized management and automatic renewal.
When using third-party issued certificates, you need to monitor the expiration date and update them promptly to avoid service disruptions due to expired certificates.
The number of free certificates is limited by the number of domains that can be added to the SAAS-WAF instance. After the limit is exceeded, please go to Purchase Page to buy a domain extension pack and then reapply.
SM Certificate Configuration: If a website needs to support the SM2 algorithm, you need to upload an SM certificate. SM certificates and regular certificates can be active at the same time. This feature is only supported in the Enterprise edition and above. Click Associate with SM Certificate to choose one of the following two methods to configure the certificate:
Tencent Cloud Hosted SM Certificates: Select and associate from the SM certificates already uploaded to SSL Certificates management. This method is recommended as certificates can be automatically renewed upon expiration.
Uploading Self-Owned SM Certificate: Supports directly pasting certificate content or uploading certificate files. PEM-encoded certificate file, private key file, encryption certificate file, and encryption key must be prepared before uploading.
HTTPS Forced Redirect: To enable HTTPS forced redirect, you must select both the HTTP and HTTPS access protocols.
HTTPS Origin-pull Method: Select the protocol used when WAF pulls content from the origin server. Both HTTP and HTTPS are supported. After selection, you can configure the corresponding origin-pull port.
HTTP Protocol: You can specify the origin-pull port.
HTTPS Protocol: You can specify the origin-pull port.
Origin-pull SNI Switch: After it is enabled, WAF carries SNI information during origin-pull. It also supports configuring the origin-pull host method:
Preserve Source Request host: Use the original host header from the client request for origin-pull.
Correct to Origin Server host: Use the origin server address as the host header for origin-pull.
Custom host: Manually specify the host value for origin-pull.
User proxy: Based on your actual business needs, choose whether to use proxy services such as Anti-DDoS, CDN, or Cloud Acceleration.
Select No: Requests received by WAF come directly from the client. WAF uses the IP address that established the connection with the client as the client IP address.
Select Yes: Requests received by WAF come from other layer-7 proxy services. To obtain the real client IP address for security analysis, configure the client IP address determination method:
First IP in X-Forwarded-For
Network layer remote_ip (prevent XFF forgery)
Obtain the IP address from the specified Header field.
Note:
It is recommended to use a custom Header in your service to store the client IP address and configure the corresponding Header field in WAF. This approach reduces the risk of attackers bypassing WAF protection rules by forging the XFF field, thereby enhancing service security.
Origin-pull Policy: Based on your business requirements, you can choose from the following two origin-pull policies:
Load balancer origin-pull: Configure the relevant protection policies in the CLB origin-pull policy parameters.
Custom traffic diversion origin-pull: This feature supports forwarding different traffic to different origin server addresses. In the configuration fields, you can specify HOST or URL addresses. The matching methods include four logical relationships: Is, Is not, Belong to, and Not belong to. The matching content can be customized. For the origin-pull policy, you can configure either round-robin or IP HASH.
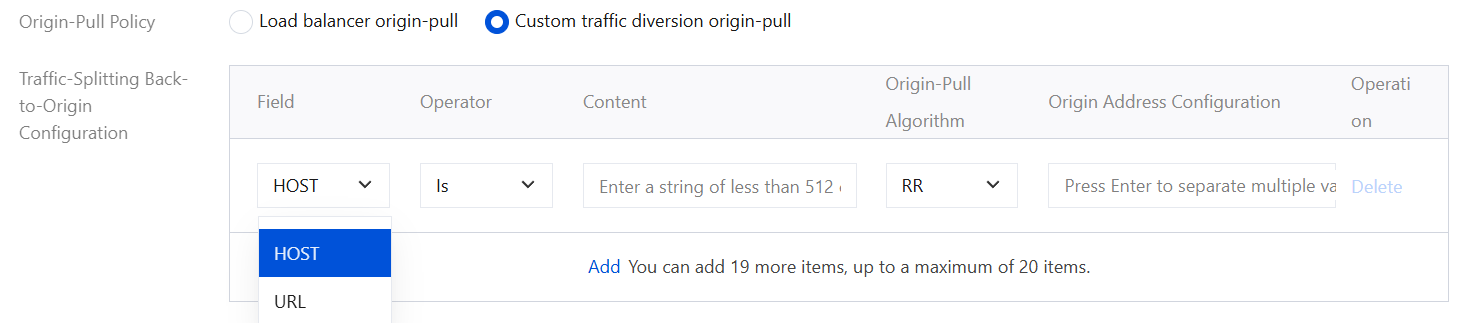
Note:
The Custom traffic diversion origin-pull is currently in a gray release phase. To enable this feature, please submit a ticket or contact your dedicated account manager to inquire about activation.
Origin Address/Traffic-Splitting Back-to-Origin Configuration: Select IP address or domain name based on your actual requirements.
IP: Enter the origin server IPv4 or IPv6 address. Separate multiple addresses with line breaks. A maximum of 50 addresses are supported. When a single address is entered, active health check is automatically disabled.
Domain name: Enter the origin server domain name.
Note:
The origin server domains cannot be the same as the protected domain.
Load balancing policy: This feature supports RR, IP Hash, and Weighted round robin. When two or more origin server IP addresses are configured, you can select the Weighted round robin. The round-robin method is used by default.
Protection Object Group: Select the protection object group bound to the web rule template. The custom web rule template takes effect automatically.
Enable Proxy Caching: After this feature is enabled, WAF can cache some content obtained from the origin server. When the same content is requested again, it is returned directly from the cache, reducing the load on the origin server. If your business relies on SSE, it is recommended to disable the proxy cache to ensure data is updated in real time.
Connection Method: Long connections are used for origin-pull by default. Please confirm whether the origin server supports long connections. If it does not, the system will use short connections even if long connections are configured.
Connection Timeout Duration: This is the timeout period for WAF to establish a connection with the origin server. The default value is 10 seconds, and the valid range is 1 to 120 seconds.
Write Timeout and Read Timeout: These are the customizable timeout periods for WAF to send request data to and wait for responses from the origin server. The default value is 300 seconds, and the valid range is 1 to 3600 seconds.
TLS Version: Multiple TLS versions are supported. By default, WAF blocks access traffic that uses TLS protocol versions or cipher suites outside the specified range. To ensure normal business operation, select with caution.
Cipher Suite Template: This template supports general, secure, and custom templates.
Enable HTTP/2.0: Ensure that the origin server supports and has enabled HTTP/2.0. Otherwise, the connection will be downgraded to HTTP/1.1 even if HTTP/2.0 is configured.
Enable WebSocket: If your website uses WebSocket, it is recommended to enable it.
Enable XFF Reset: This feature supports clearing the value of the X-Forwarded-For field. Ensure that no layer-7 proxy service is deployed before the WAF before enabling this feature.
Origin domain
Preserve origin domain: When traffic is forwarded to the origin server, this feature supports a custom-configured site HOST domain name for accessing the origin server.
Custom origin domain: Enter a custom origin-pull HOST. When traffic is forwarded to the origin server, this feature supports a custom-configured site HOST domain name for accessing the origin server.
Origin Compression: It is recommended to enable this feature. If this feature is disabled, the system cannot support alarms for domain name access line and origin server abnormal stability events.
Origin Server Test Service: This service is used to detect the accessibility of the service IP address on the WAF and the origin server for the domain name. It supports automated Ops alarms and troubleshooting. It is recommended to enable this service.
Remarks: Enter remarks for the domain name (optional) to facilitate subsequent management and identification of the domain's purpose.
Tag: Configure resource tags for access domains. Tags can be assigned based on tag keys and values. After tags are configured, you can search for and filter domains by tag in the domain list. Tags can also be used for billing and permission management.
Click Add Tag to add a new tag key-value pair.
You can use the Key-Value clipboard to batch paste existing tag key-value pairs.
This feature supports quickly selecting previously used tags from the Historical Records.
5. After completing the above configuration, you can view the newly added domain on the Domain names page. At this point, the page will indicate that the CNAME record is not configured. You need to complete the local verification test and then modify the DNS resolution.
Note:
WAF assigns a unique CNAME to each added domain name (including top-level and second-level domains).
Following Steps
After the domain name is added, you can perform the following steps:
Ajuda e Suporte
Esta página foi útil?
Você também pode entrar em contato com a Equipe de vendas ou Enviar um tíquete em caso de ajuda.
comentários