Unity
下载
聚焦模式
字号
Prerequisites
Before you begin, complete the push prerequisite configuration for the corresponding native platforms. See iOS Prerequisites and Android Prerequisites.
Implementation steps
Step 1: Integrate the message push plugin
After completing manufacturer configuration for each native platform, integrate the push plugin by updating
Packages/manifest.json and adding the related dependencies:{"dependencies": {..."com.tencent.timpush.unity": "https://github.com/TencentCloud/TIMSDK.git#push_unity"}}
Step 2: Configure push parameters
Upload the iOS APNs push certificate obtained in Manufacturer configuration to the Tencent Cloud Console. The Console assigns a certificate ID, as shown below:
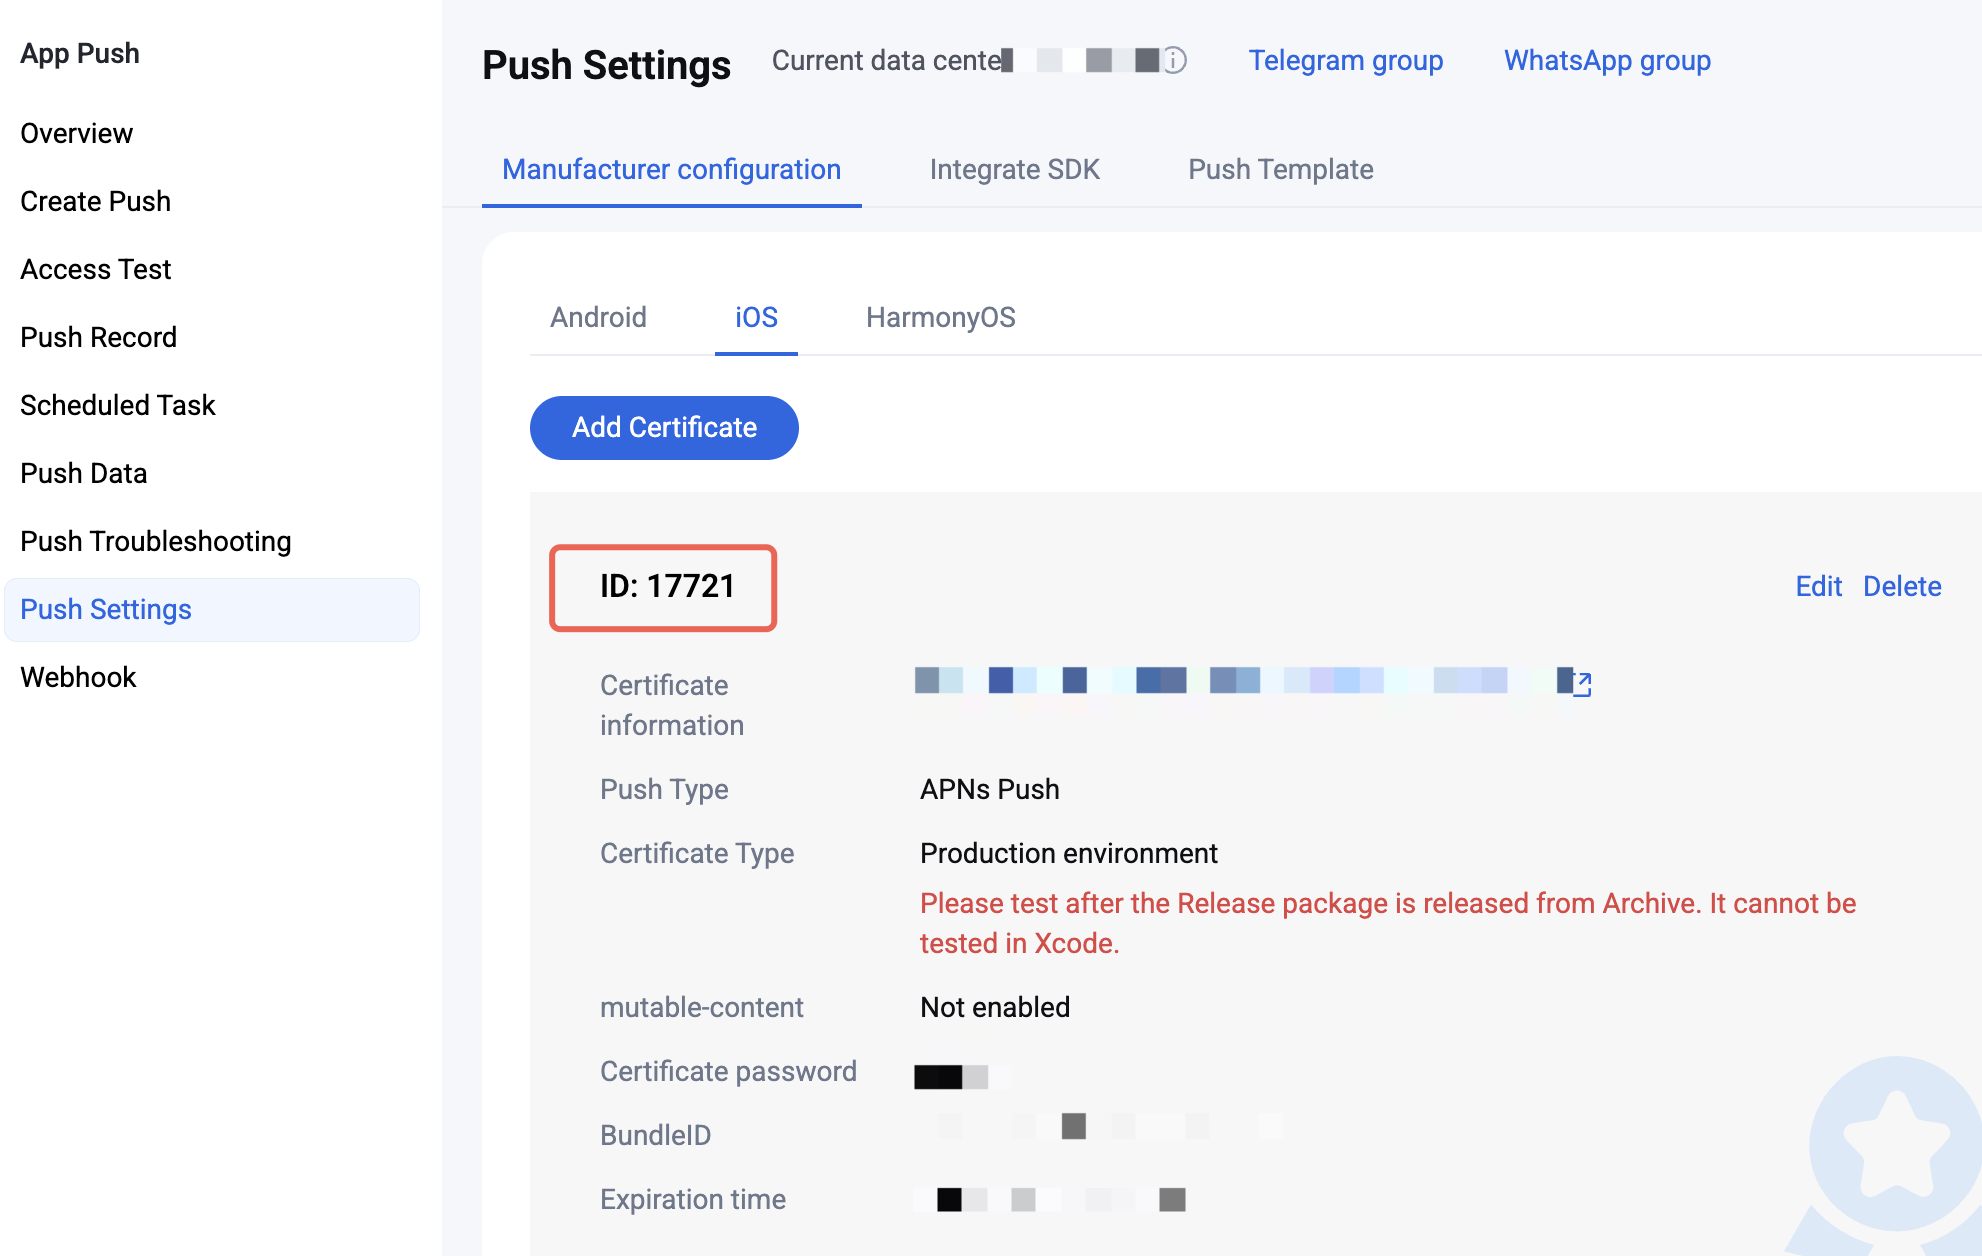
Create
UnityIMPush.mm under Assets/Plugins/iOS (create the directory manually if it does not exist), and implement the businessID protocol method to return the certificate ID. You can refer to the following implementation:#import "TPush/TPush.h"#import "UnityAppController.h"@interface UnityAppController (ThirdPartyExtension) <TIMPushDelegate>- (int)businessID;- (NSString *)applicationGroupID;@end@implementation UnityAppController (ThirdPartyExtension)#pragma mark - TIMPush- (int)businessID {// Certificate ID from the Console in the previous step, for example 1234567int kBusinessID = 1234567;return kBusinessID;}- (NSString *)applicationGroupID {//AppGroup IDreturn "AppGroup ID";}- (BOOL)onRemoteNotificationReceived:(NSString *)notice {// custom navigatereturn NO;}@end
After completing Manufacturer configuration, download and add the configuration file to the project. Place the downloaded
timpush-configs.json under Assets/Plugins/Android. If the directory does not exist, create it manually.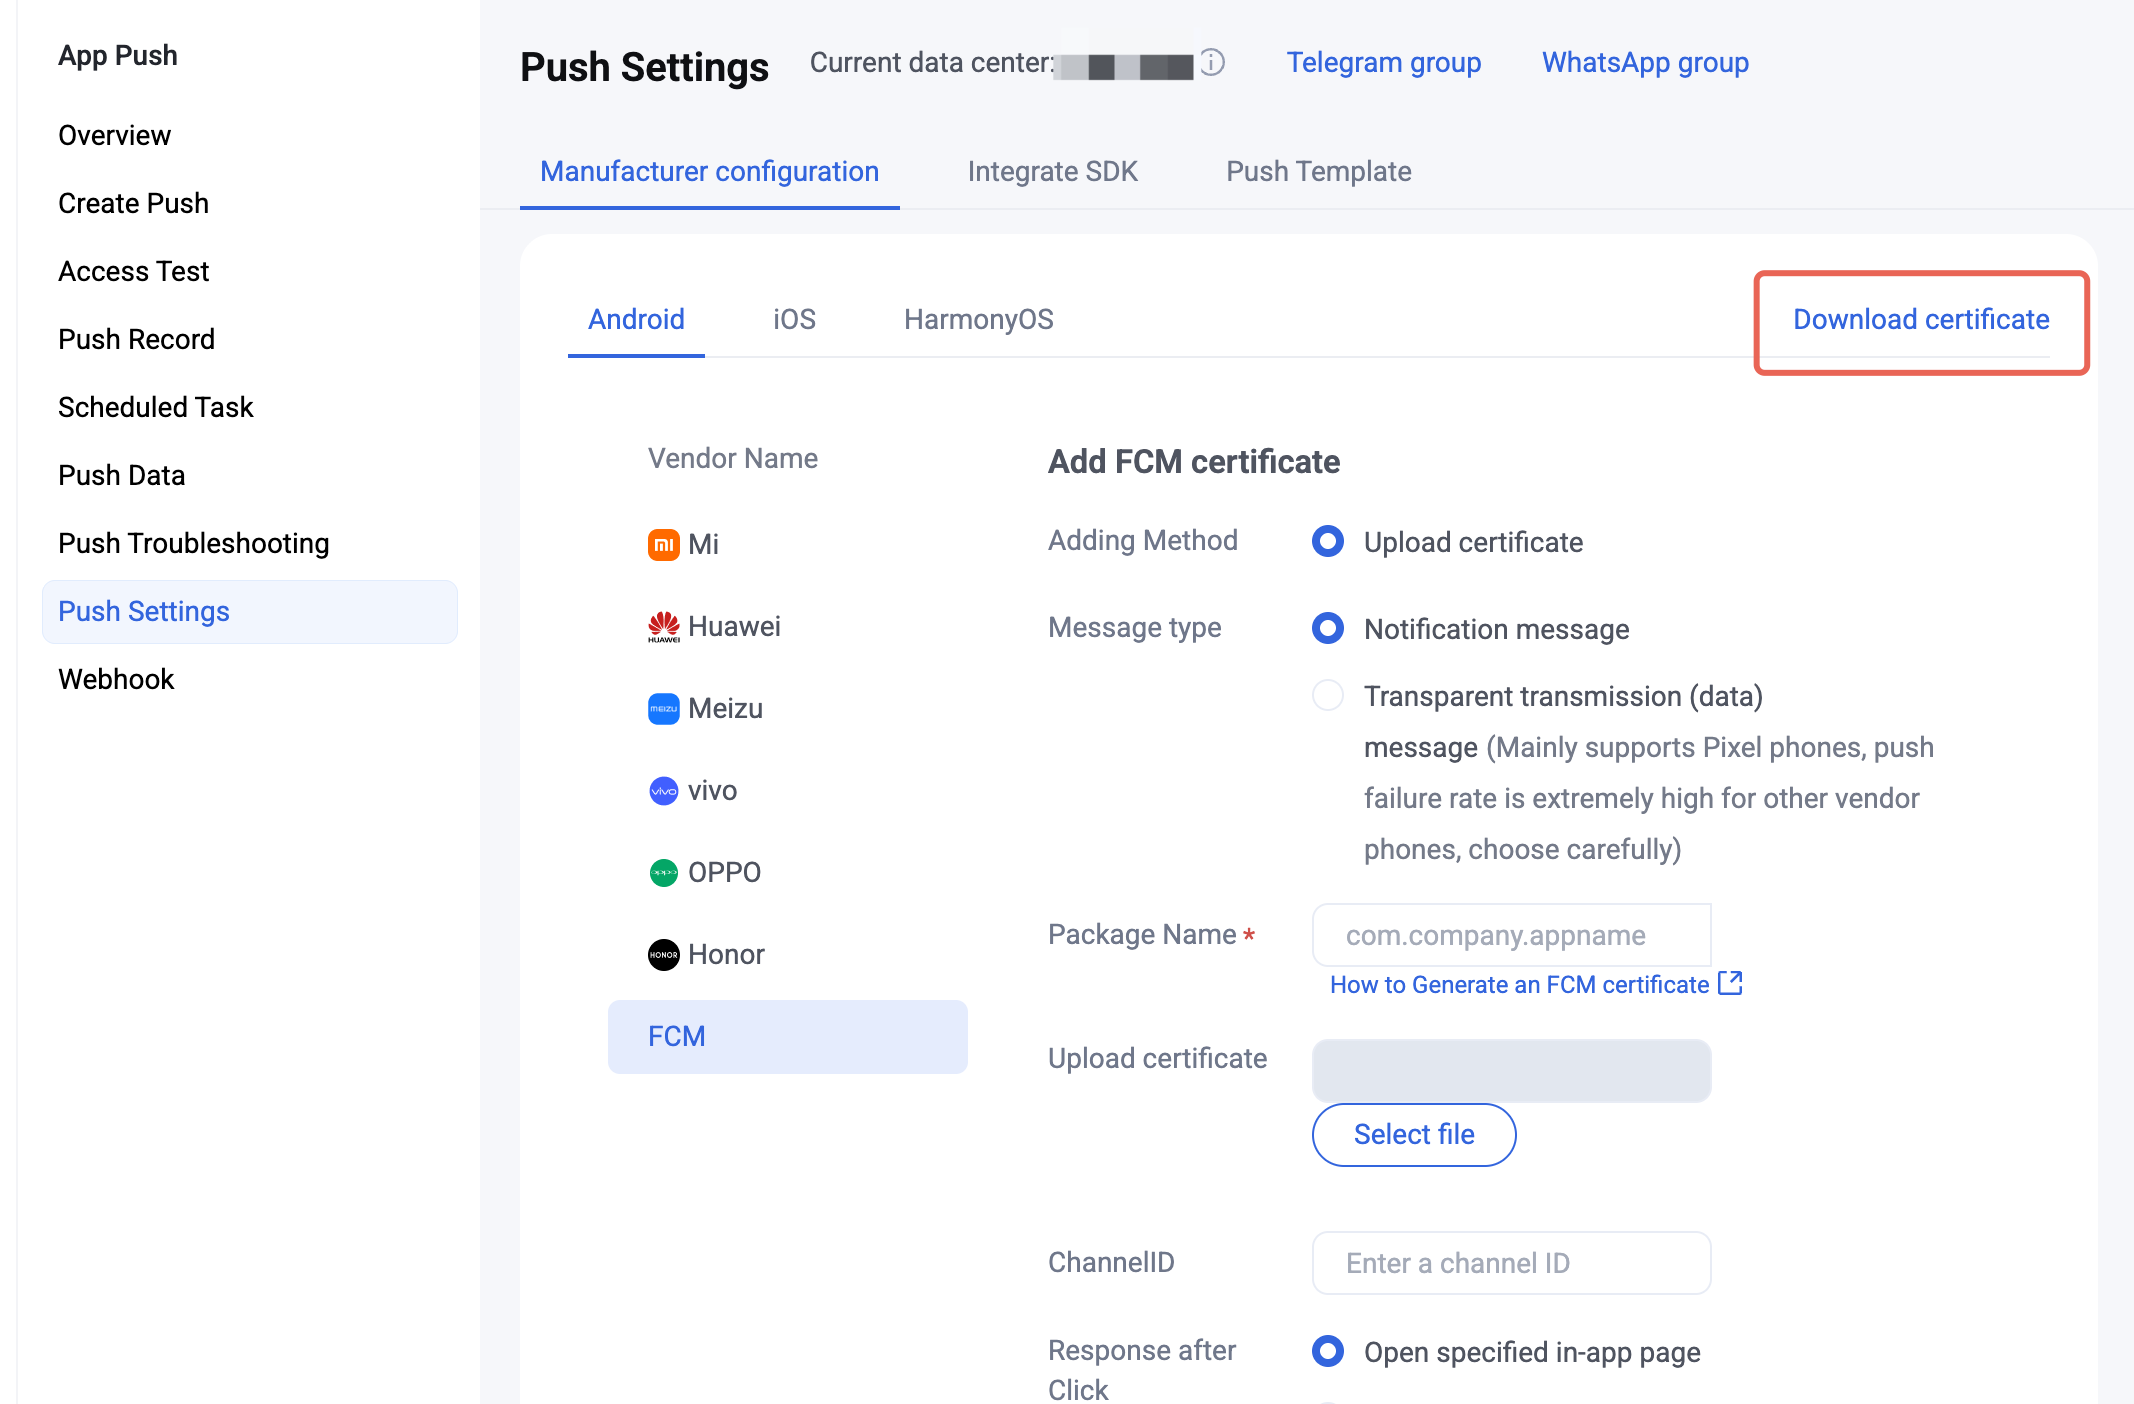
Step 3: Client manufacturer configuration
No action is required on iOS for this step.
Go to File > Build Settings > Player Settings, then under the Android platform settings open Publishing Settings > Build, and select the three options shown below:
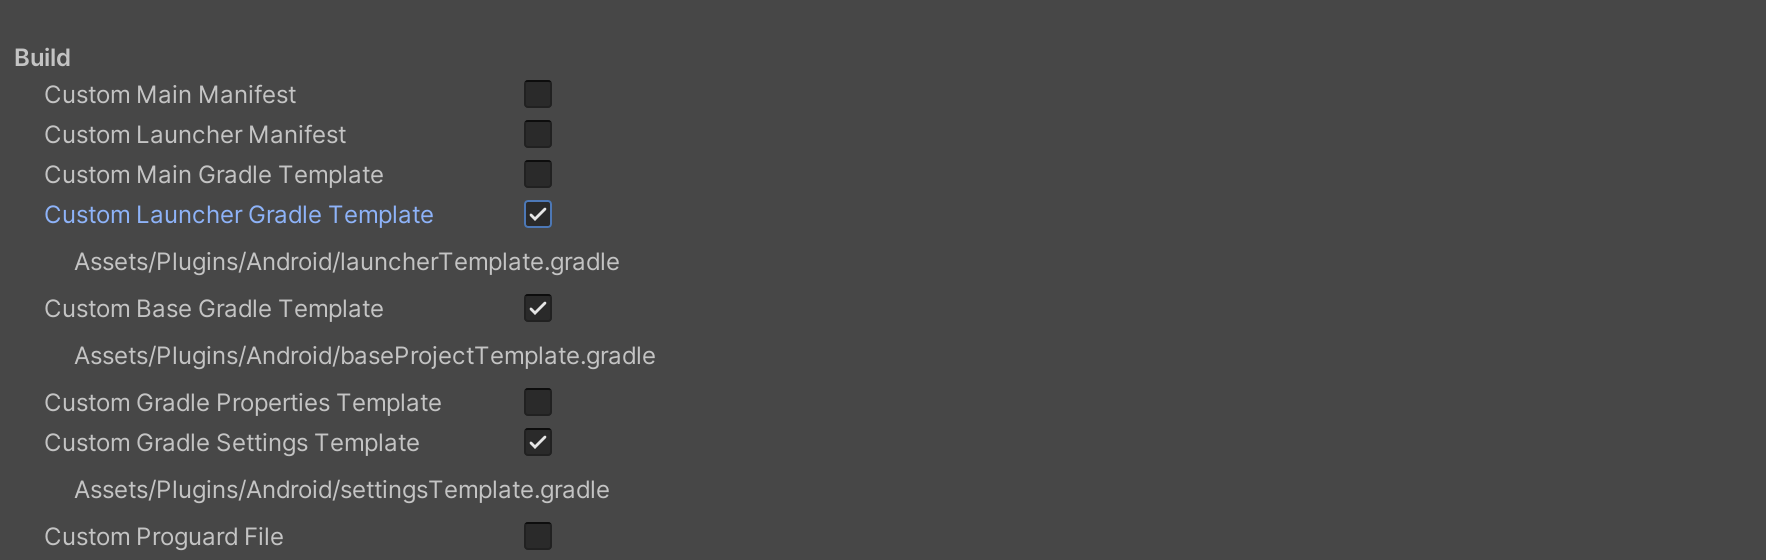
Open Assets/Plugins/Android/launcherTemplate.gradle, add a
dependencies block at the end of the file, and include all or some of the manufacturer push packages as needed. Native push for a manufacturer is enabled only after you add the corresponding package.dependencies {// Replace VERSION with the version from Release Notes.// The main push package is requiredimplementation 'com.tencent.timpush:tpush:VERSION'// Other dependenciesimplementation 'androidx.appcompat:appcompat:1.3.0'implementation 'com.google.code.gson:gson:2.10.1'// Add manufacturer packages as neededimplementation 'com.tencent.timpush:fcm:VERSION'}
Google FCM adaptation
Follow the manufacturer instructions to integrate the corresponding plugin and JSON configuration files.
1.1 Download the configuration file and add it under Assets/Plugins/Android/JsonConfigs in the project root. Create this directory manually.
Configuration file download location:
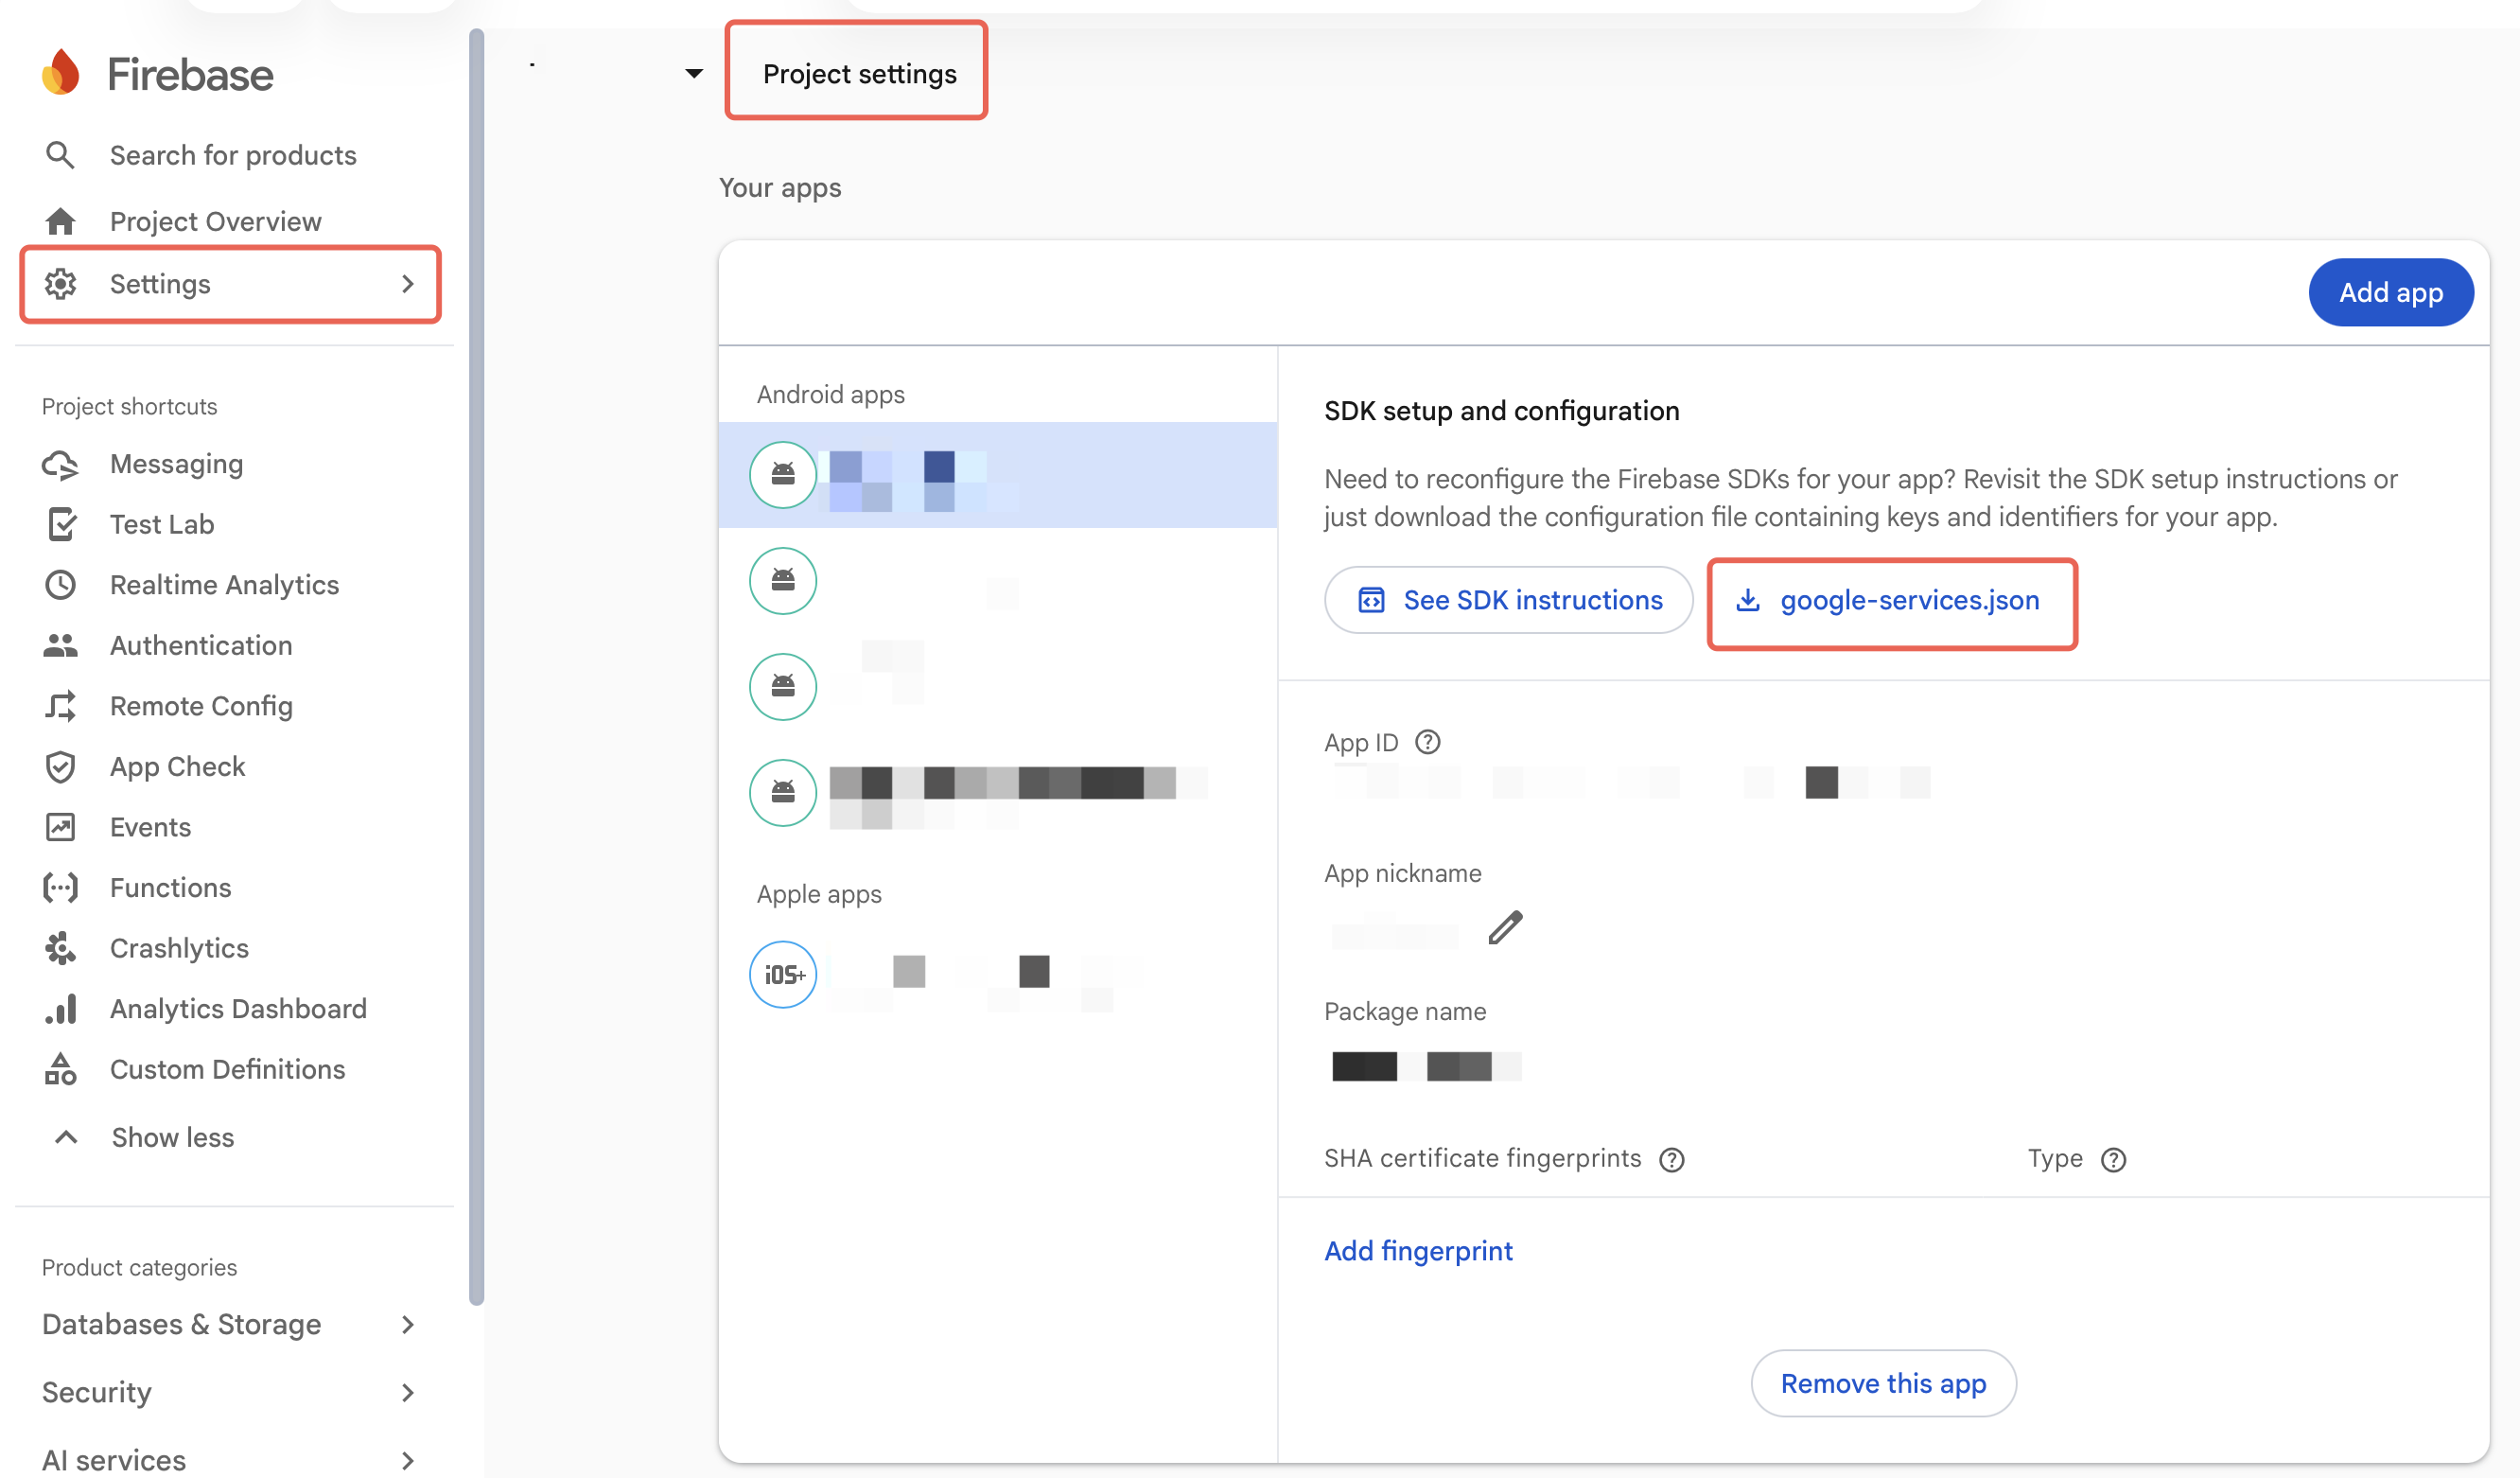
Place the configuration file as shown below:
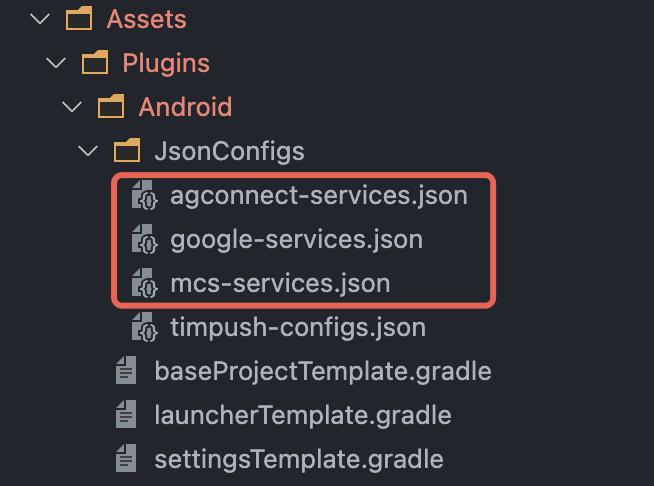
1.2 In Assets/Plugins/Android/baseProjectTemplate.gradle, under buildscript > dependencies, add the following configuration (if you need to add a new
buildscript, place it at the top of the file):In Assets/Plugins/Android/baseProjectTemplate.gradle, under buildscript > dependencies, add:
buildscript {dependencies {...classpath 'com.google.gms:google-services:4.3.15'}}
In Assets/Plugins/Android/settingsTemplate.gradle, under buildscript > repositories and allprojects > repositories, add the following repositories:
pluginManagement {repositories {gradlePluginPortal()mavenCentral()maven { url "https://mirrors.tencent.com/nexus/repository/maven-public/" }}}dependencyResolutionManagement {...repositories {mavenCentral()maven { url "https://mirrors.tencent.com/nexus/repository/maven-public/" }}}
In Assets/Plugins/Android/baseProjectTemplate.gradle, under buildscript, add:
buildscript {repositories {mavenCentral()maven { url "https://mirrors.tencent.com/nexus/repository/maven-public/" }}dependencies {...classpath 'com.google.gms:google-services:4.2.0'}}
In Assets/Plugins/Android/settingsTemplate.gradle, under allprojects > repositories, add:
allprojects {...repositories {mavenCentral()maven { url "https://mirrors.tencent.com/nexus/repository/maven-public/" }}}
In the project-level build.gradle, under
buildscript and allprojects, add:buildscript {repositories {mavenCentral()maven { url "https://mirrors.tencent.com/nexus/repository/maven-public/" }}dependencies {...classpath 'com.google.gms:google-services:4.2.0'}}allprojects {repositories {mavenCentral()maven { url "https://mirrors.tencent.com/nexus/repository/maven-public/" }}}
1.3 In Assets/Plugins/Android/launcherTemplate.gradle, add:
apply plugin: 'com.google.gms.google-services'
Step 4: Handle notification click callbacks and parse parameters
If you need to customize parsing of received remote push notifications, implement it as follows:
Note:
1. Register the callback in the program entry function.
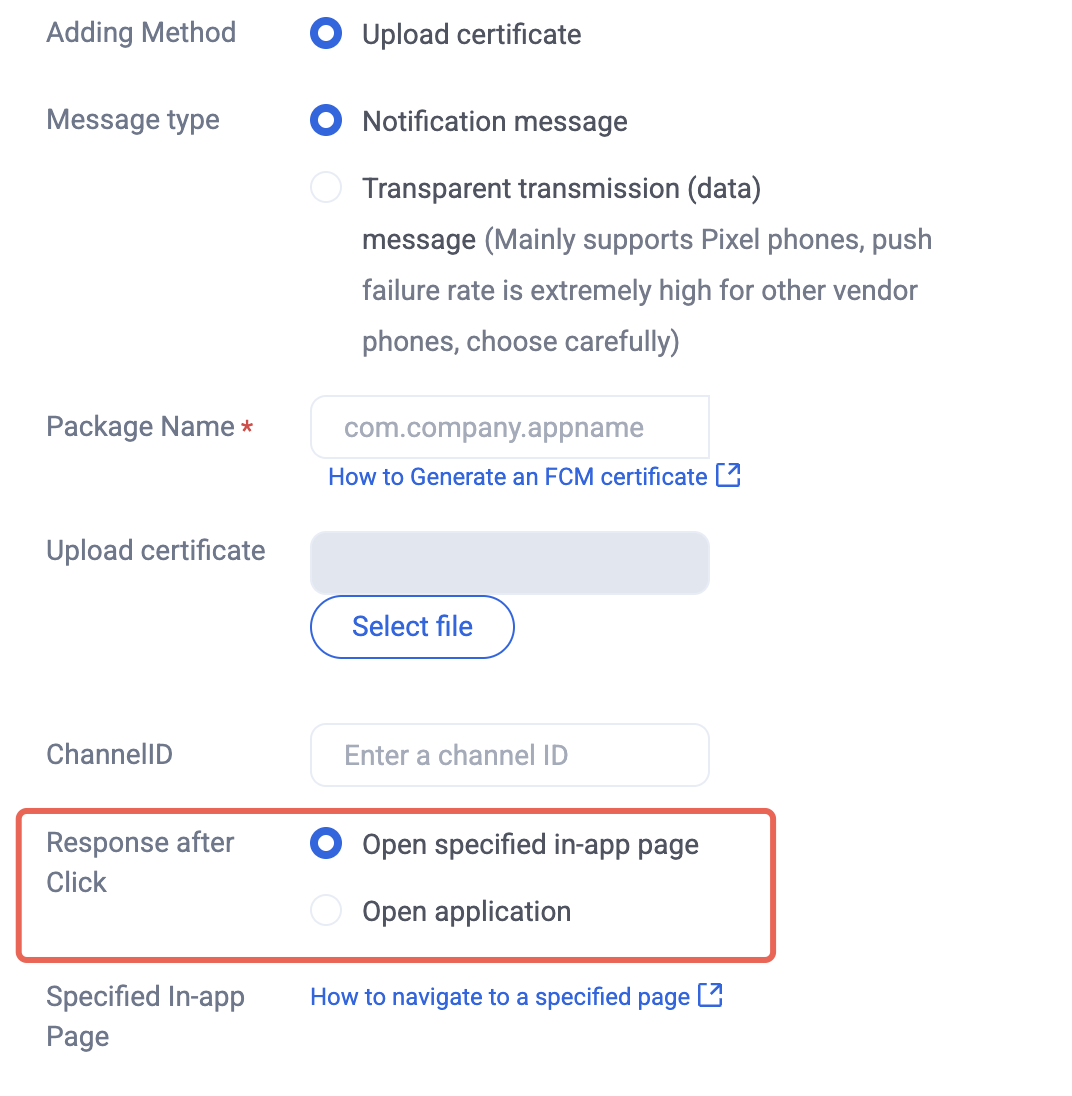
2. For After-click action in the Console, select Open a specified in-app page, and do not change the default value.
PushListener listener = new PushListener(onRecvPushMessage: (message) => {Debug.Log($"Received push message: title:{message.title}, content:{message.desc}, passthrough:{message.ext}, message ID:{message.messageID}");}, onRevokePushMessage: (messageID) => {Debug.Log($"Revoked push message ID: {messageID}");}, onNotificationClicked: (ext) => {Debug.Log($"Notification clicked: {ext}");});PushManager.AddPushListener(listener);
Step 5: Register the push plugin
After
PushManager.RegisterPush succeeds, the app can receive offline push notifications.Note:
If you have already integrated Chat and call this API after Chat login succeeds, set
appKey to null; otherwise the Chat account will be logged out.PushManager.RegisterPush(sdkAppId: YourSdkAppId, appKey: "AppKey", new PushCallback(onSuccess: (data) => {Debug.Log($"Push registration succeeded: {data}");}, onError: (errCode, errMsg, data) => {Debug.Log($"Push registration failed: error code:{errCode}, error message:{errMsg}");}));
Integration troubleshooting
If you still cannot receive push after integration, use Push Troubleshooting to check the cause. If the issue remains, Contact us to submit feedback.
文档反馈