iOS
ダウンロード
フォーカスモード
フォントサイズ
This document describes how to integrate TIMPush into an iOS project.
Prerequisites
Option1: AI integration
Use npx to install @tencent-rtc/trtc-push-skill into your local AI IDE to help complete TIMPush offline push integration. After installation, you can ask the AI to "integrate iOS offline push" for you. The AI will guide you through environment checks, manufacturer channel configuration, credential setup, code integration, and verification based on your project type. For details, see AI Coding.
Note:
Push AI integration is not a fully automated process. Developers still need to configure push-related information manually in vendor consoles, the Tencent Cloud console, and similar backends. For the detailed configuration steps, see the relevant sections below.
Option2: Manual integration
Step 1: Integrate the TIMPush SDK
Integrate TIMPush into the main App target
TIMPush is integrated via CocoaPods. Add the TIMPush dependency for the main App target in your
Podfile. Podfile example:target 'YourAppName' douse_frameworks!use_modular_headers!pod 'TIMPush', 'VERSION'end
If your project already explicitly depends on Chat SDK, keep the versions of
TIMPush and TXIMSDK_Plus_iOS_XCFramework the same; otherwise dependency conflicts may occur when you run pod install:target 'YourAppName' douse_frameworks!use_modular_headers!pod 'TXIMSDK_Plus_iOS_XCFramework', 'VERSION'pod 'TIMPush', 'VERSION'end
After saving the
Podfile, run the following in the project directory:pod install
If you cannot install the latest TIMPush version, run
pod repo update first to update the local CocoaPods repo list, then run pod install.Note:
Whether your project is Swift or Objective-C, integrate TXChat SDK_Plus_iOS_XCFramework.
Configure push parameters
Configure businessID
businessID is the certificate ID generated after you upload an APNs certificate in the console. TIMPush uses this ID to identify which iOS push certificate in the console the current app uses.Implement the businessID() method in AppDelegate and return the certificate ID generated in the console.
// Add in AppDelegate.swiftimport TIMPush// Note: On the Swift side, add the @objc annotation@objc func businessID() -> Int32 {// TODO: Replace <#YOUR_BUSINESS_ID#> with the certificate ID generated in the Tencent Cloud console.return <#YOUR_BUSINESS_ID#>}
// Add in AppDelegate.m#import <TIMPush/TIMPushManager.h>- (int)businessID {// TODO: Replace <#YOUR_BUSINESS_ID#> with the certificate ID generated in the Tencent Cloud console.return <#YOUR_BUSINESS_ID#>;}
Configure applicationGroupID (optional)
If you need to measure the push reach rate, configure the App Group ID and implement the applicationGroupID() method. This ID must match the App Group ID you prepared during manufacturer configuration. If you do not need push reach statistics, you can skip this section.
// Add in AppDelegate.swiftimport TIMPush@objc func applicationGroupID() -> String {// TODO: Replace <#YOUR_APP_GROUP_ID#> with the App Group ID configured in Apple Developer Center / Xcode.return "group.<#YOUR_APP_GROUP_ID#>"}
// Add in AppDelegate.m#import <TIMPush/TIMPushManager.h>- (NSString *)applicationGroupID {// TODO: Replace <#YOUR_APP_GROUP_ID#> with the App Group ID configured in Apple Developer Center / Xcode.return @"group.<#YOUR_APP_GROUP_ID#>";}
Step 2: Register the push service
Call registerPush
registerPush registers the current device’s push token with TIMPush. After successful registration, TIMPush creates a push target identifier
registrationID for the device. The server, Console Access Test, and troubleshooting tools can use this identifier to send offline pushes to the device. If the app also integrates Chat and completes login, you can also use userID to send offline pushes to devices that have established a push relationship for that user.The value of
appKey affects the registration method and available push identifiers:appKey = Push Key: Register TIMPush standalone push capability. The Push Key is the AppKey under Console > Push > Overview.appKey = nil: Reuse the Chat login state to register for push. Call this only after Chat login succeeds.First confirm the call order based on your business scenario:
Scenario | Call order | Push identifiers available on the backend | Description |
TIMPush only | Call after every App cold start registerPush(appKey = Push Key) | registrationID | Suitable for marketing / campaign / notification pushes without integrating the Chat SDK. |
Chat SDK + TIMPush Register Push first, then log in | registerPush(appKey = Push Key)→ Chat login | Before login: registrationID;After login: registrationID + userID | Suitable when you want users to receive marketing pushes even before login. |
Chat SDK + TIMPush Log in first, then register Push | Chat login→ registerPush(appKey = null) | After login: userIDAfter registration: userID + registrationID,At this point registrationID = userID | Suitable when you want users to receive Chat offline messages and marketing pushes after login. |
Note:
If the user logs out of the Chat SDK, in Chat SDK + TIMPush scenarios the established push relationships between
userID and registrationID become invalid and must be registered again.The Chat app secret is used only for Chat login and cannot be used as the
appKey of registerPush.After App cold start and the user agrees to the privacy policy, call
registerPush(appKey = Push Key).import TIMPushfunc registerTIMPush() {// TODO: Replace 0 with your SDKAppID.let sdkAppID: Int32 = 0// TODO: Replace "<#YOUR_PUSH_KEY#>" with your Push Key.let appKey = "<#YOUR_PUSH_KEY#>"TIMPushManager.registerPush(sdkAppID, appKey: appKey, succ: { deviceToken inprint(">>>>> TIMPush register success")}, fail: { code, desc inprint(">>>>> TIMPush register failed, code:\\(code), desc:\\(desc)")})}
#import <TIMPush/TIMPushManager.h>- (void)registerTIMPush {// TODO: Replace 0 with your SDKAppID.int sdkAppID = 0;// TODO: Replace @"<#YOUR_PUSH_KEY#>" with your Push Key.NSString *appKey = @"<#YOUR_PUSH_KEY#>";[TIMPushManager registerPush:sdkAppIDappKey:appKeysucc:^(NSData * _Nonnull deviceToken) {NSLog(@">>>>> TIMPush register success");} fail:^(int code, NSString * _Nonnull desc) {NSLog(@">>>>> TIMPush register failed, code:%d, desc:%@", code, desc);}];}
Call
registerPush(appKey = nil) in the success callback of Chat login.import TIMPushimport ImSDK_Plusfunc loginIMAndRegisterPush() {// TODO: Replace 0 with your SDKAppID.let sdkAppID: Int32 = 0let userID = "<#YOUR_USER_ID#>"let userSig = "<#YOUR_USER_SIG#>"let initSuccess = V2TIMManager.sharedInstance().initSDK(sdkAppID, config: V2TIMSDKConfig())if !initSuccess {print(">>>>> IM SDK init failed")return}V2TIMManager.sharedInstance().login(userID: userID, userSig: userSig) {TIMPushManager.registerPush(sdkAppID, appKey: "", succ: { deviceToken inprint(">>>>> TIMPush register success")}, fail: { code, desc inprint(">>>>> TIMPush register failed, code:\\(code), desc:\\(desc)")})} fail: { code, msg inprint(">>>>> IM login failed, code:\\(code), msg:\\(msg ?? "")")}}
#import <TIMPush/TIMPushManager.h>#import <ImSDK_Plus/ImSDK_Plus.h>- (void)loginIMAndRegisterPush {// TODO: Replace 0 with your SDKAppID.int sdkAppID = 0;NSString *userID = @"<#YOUR_USER_ID#>";NSString *userSig = @"<#YOUR_USER_SIG#>";V2TIMSDKConfig *config = [[V2TIMSDKConfig alloc] init];BOOL initSuccess = [[V2TIMManager sharedInstance] initSDK:sdkAppID config:config];if (!initSuccess) {NSLog(@">>>>> IM SDK init failed");return;}[[V2TIMManager sharedInstance] login:userID userSig:userSig succ:^{[TIMPushManager registerPush:sdkAppIDappKey:nilsucc:^(NSData * _Nonnull deviceToken) {NSLog(@">>>>> TIMPush register success");} fail:^(int code, NSString * _Nonnull desc) {NSLog(@">>>>> TIMPush register failed, code:%d, desc:%@", code, desc);}];} fail:^(int code, NSString *msg) {NSLog(@">>>>> IM login failed, code:%d, msg:%@", code, msg);}];}
Warning:
If your business uses only Chat messaging capabilities, do not call
registerPush before Chat login. Otherwise the SDK may register a Push-type account as in the standalone push scenario and generate corresponding Push DAU. Extra charges may apply if Push DAU exceeds the package quota.Verification:The
onSuccess callback of registerPush is triggered.If onError is triggered, look up the meaning of code in Error codes.Custom registrationID (optional)
To customize the push identifier (for example, using a business-side user ID), call setRegistrationID before
registerPush.Note:
In mixed scenarios, the custom
registrationID must be exactly the same as the userID used for Chat login; otherwise mutual kick (forced logout) can cause push loss.Step 3: Configure message reach statistics (optional)
Complete this section only if you need to measure the push reach rate. If you only need to receive regular offline pushes, you can skip this section.
The full process includes:
1. Create and configure a Notification Service Extension target in Xcode
2. Ensure the APNs payload enables
mutable-content3. Call TIMPush in the Extension to process notifications.
Create and configure the Notification Service Extension target
1. In Xcode, choose File > New > Target.
2. Select Notification Service Extension.
3. Enter the Extension name.
4. After creation, confirm that a new Extension target appears in the project.
5. In the Extension target’s Signing & Capabilities, configure the same App Groups as the main App.
6. Add the TIMPush dependency for the Extension target in the
Podfile:target 'YourNotificationServiceExtensionTarget' douse_frameworks!use_modular_headers!pod 'TIMPush', 'VERSION'end
7. Run
pod install.Note:
The Extension target is an independent target and cannot reuse the Pod dependencies of the main App target. If you do not add
TIMPush to the Extension target, import TIMPush or #import <TIMPush/TIMPushManager.h> in NotificationService will fail.Enable mutable-content
mutable-content is an APNs payload field set by the sender in the push content. Only when mutable-content is enabled in the payload will iOS 10 and later invoke the Notification Service Extension before delivery, so that reach statistics can take effect.Make sure
mutable-content is enabled in one of the following ways:Console push: On the console push test or send page, select the
mutable-content related option.Server REST API: Set
"mutable-content": 1 in the APNs payload.Chat SDK send: Follow the Chat SDK offline push configuration documentation.
Process notifications in the Extension
Replace
group.<#YOUR_APP_GROUP_ID#> with the App Group ID you configured in Apple Developer Center and Xcode. The main App and the Extension must use the same App Group ID. // Add in NotificationService.swiftimport UserNotificationsimport TIMPushclass NotificationService: UNNotificationServiceExtension {var contentHandler: ((UNNotificationContent) -> Void)?var bestAttemptContent: UNMutableNotificationContent?override func didReceive(_ request: UNNotificationRequest,withContentHandler contentHandler: @escaping (UNNotificationContent) -> Void) {self.contentHandler = contentHandlerself.bestAttemptContent = request.content.mutableCopy() as? UNMutableNotificationContentlet appGroupID = "group.<#YOUR_APP_GROUP_ID#>"TIMPushManager.handleNotificationServiceRequest(request: request, appGroupID: appGroupID) { [weak self] content inguard let self = self else {contentHandler(content)return}self.bestAttemptContent = content.mutableCopy() as? UNMutableNotificationContentcontentHandler(self.bestAttemptContent ?? content)}}override func serviceExtensionTimeWillExpire() {if let contentHandler = contentHandler, let bestAttemptContent = bestAttemptContent {contentHandler(bestAttemptContent)}}}
// Add in NotificationService.m#import "NotificationService.h"#import <TIMPush/TIMPushManager.h>@implementation NotificationService- (void)didReceiveNotificationRequest:(UNNotificationRequest *)requestwithContentHandler:(void (^)(UNNotificationContent * _Nonnull))contentHandler {NSString *appGroupID = @"group.<#YOUR_APP_GROUP_ID#>";[TIMPushManager handleNotificationServiceRequest:requestappGroupID:appGroupIDcallback:^(UNNotificationContent *content) {contentHandler(content);}];}@end
Step 4: Test the push delivery chain
After completing the integration steps above, send a test message to verify that the end-to-end path works. Before sending, confirm that:
1. The App has obtained system notification permission;
2. Push Notifications is enabled for the main App target in Xcode, and AppDelegate correctly returns
businessID;3. The App is in the background or killed (offline push may not trigger when the App is in the foreground).
You can send test messages in the following ways:
For users who integrate TIMPush only, we recommend using the Console Access Test capability first to verify offline push.
Path: Console > Push > App Push > Access Test. On the Access Test page, you can specify
registrationID or userID to send an offline push test.If your project has integrated the Chat SDK, when calling sendMessage you can set offline push parameters via
V2TIMOfflinePushInfo, then send the message through V2TIMManager. Use the method signatures in the Chat SDK version header files you integrate.import ImSDK_Pluslet pushInfo = V2TIMOfflinePushInfo()pushInfo.title = "Push title"pushInfo.desc = "Push content"let message = V2TIMManager.sharedInstance().createTextMessage("Hello TIMPush")V2TIMManager.sharedInstance().sendMessage(message: message,receiver: "<#TARGET_USER_ID#>",groupID: nil,priority: V2TIM_PRIORITY_DEFAULT,onlineUserOnly: false,offlinePushInfo: pushInfo,progress: nil,succ: { msg inprint(">>>>> sendMessage success, msgID = \\(msg?.msgID ?? "")")},fail: { code, desc inprint(">>>>> sendMessage failed, code:\\(code), desc:\\(desc ?? "")")})
#import <ImSDK_Plus/ImSDK_Plus.h>V2TIMOfflinePushInfo *pushInfo = [[V2TIMOfflinePushInfo alloc] init];pushInfo.title = @"Push title";pushInfo.desc = @"Push content";V2TIMMessage *message = [[V2TIMManager sharedInstance] createTextMessage:@"Hello TIMPush"];[[V2TIMManager sharedInstance] sendMessage:messagereceiver:@"<#TARGET_USER_ID#>"groupID:nilpriority:V2TIM_PRIORITY_DEFAULTonlineUserOnly:NOofflinePushInfo:pushInfoprogress:nilsucc:^{NSLog(@">>>>> sendMessage success");} fail:^(int code, NSString *desc) {NSLog(@">>>>> sendMessage failed, code:%d, desc:%@", code, desc);}];
sendMessage is a Chat SDK message-sending capability. Users who integrate TIMPush only do not need to integrate the full Chat initialization, login, and message-sending flow just to verify offline push.Step 5: Handle notification click redirects
Notification click redirects require three coordinated steps: configure the click action in the console, include redirect parameters when sending the push, and register a listener on the client and parse the parameters. If any step is missing, the redirect will not take effect.
Configure the console click action
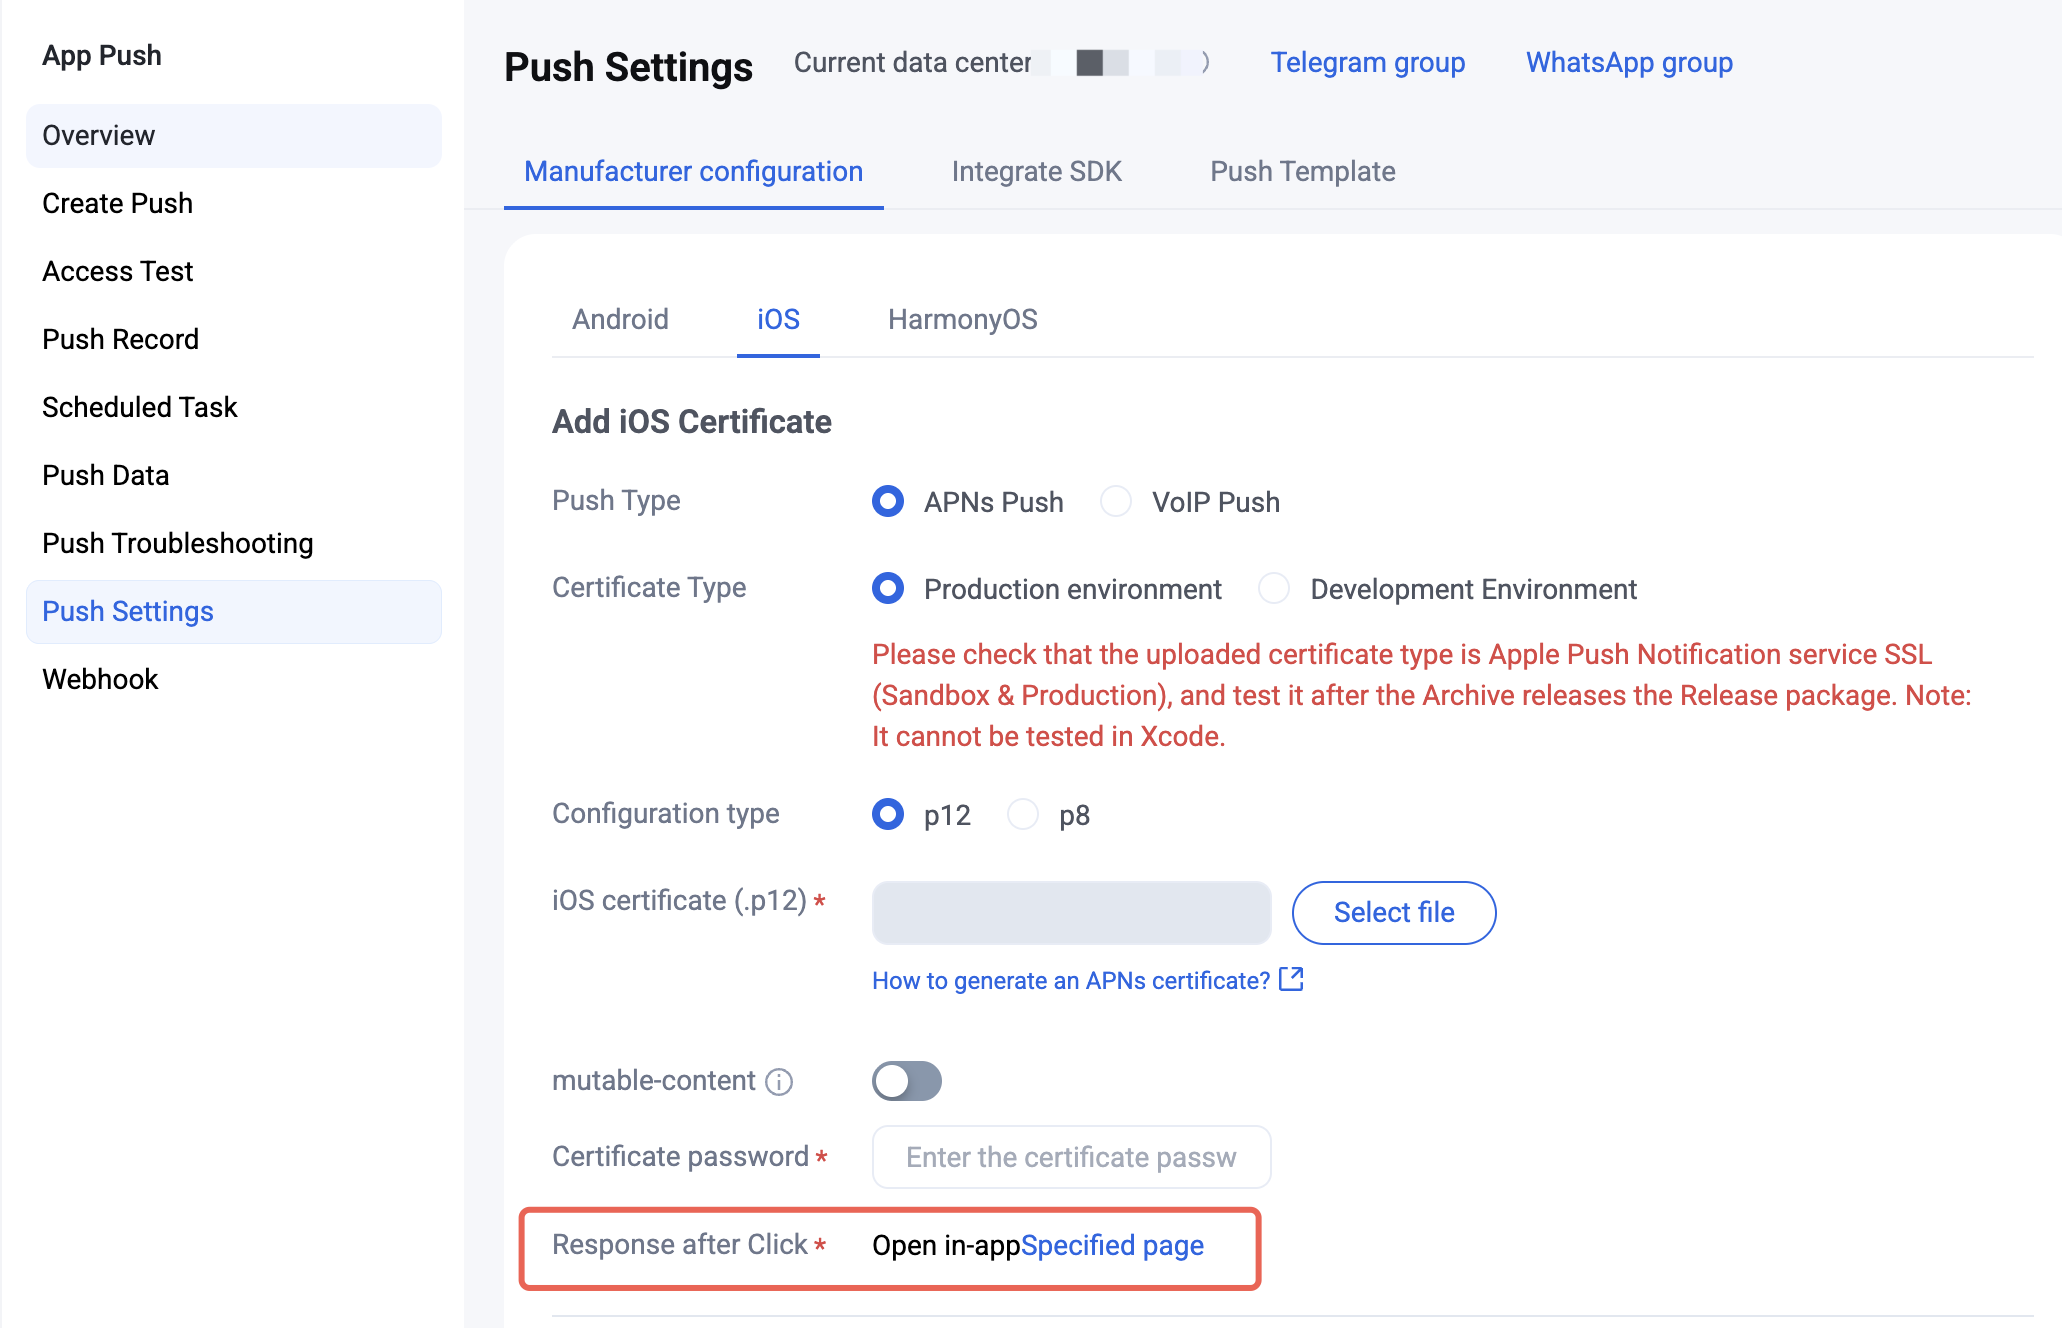
In the console, select “Open a specified in-app page”. Path: Console > Push > App Push > Push Settings > Manufacturer configuration > iOS > corresponding certificate > Edit > After-click action > Open a specified in-app page.
Include redirect info when sending the push
When sending an offline push, use the
ext field to carry the business information needed for the redirect (such as the target page or conversation ID). ext is a string whose structure is defined by your business. JSON is recommended for easier client parsing. The examples below use the following structure:// conversationType 1 means one-to-one chat (conversationID is the sender userID); 2 means group chat (conversationID is the groupID).{"conversationID":"user_A","conversationType":1}
When sending a push via REST API, set a JSON string in the
Ext field of the request body:{"MsgBody": [],"OfflinePushInfo": {"PushFlag": 0,"Title": "Offline push title","Desc": "Offline push content","Ext": "{\\"conversationID\\":\\"user_A\\",\\"conversationType\\":1}"}}
The Console Access Test page also supports setting the
Ext field; enter a JSON string.Use the
ext property of V2TIMOfflinePushInfo to carry redirect parameters, then send them with the message.If you integrate TUIKit, the built-in message-sending path automatically assembles
ext with OfflinePushExtInfo, so you do not need to set it manually. The sample below applies when you call the Chat SDK yourself to send messages.import ImSDK_Pluslet pushInfo = V2TIMOfflinePushInfo()pushInfo.title = "Push title"pushInfo.desc = "Push content"// TODO: ext is defined by your business. Replace with your target page, conversation ID, and other parameters as needed.pushInfo.ext = "{\\"conversationID\\":\\"user_A\\",\\"conversationType\\":1}"let message = V2TIMManager.sharedInstance().createTextMessage("Hello TIMPush")V2TIMManager.sharedInstance().sendMessage(message: message,receiver: "<#TARGET_USER_ID#>",groupID: nil,priority: V2TIM_PRIORITY_DEFAULT,onlineUserOnly: false,offlinePushInfo: pushInfo,progress: nil,succ: { msg inprint(">>>>> sendMessage success, msgID = \\(msg?.msgID ?? "")")},fail: { code, desc inprint(">>>>> sendMessage failed, code:\\(code), desc:\\(desc ?? "")")})
#import <ImSDK_Plus/ImSDK_Plus.h>V2TIMOfflinePushInfo *pushInfo = [[V2TIMOfflinePushInfo alloc] init];pushInfo.title = @"Push title";pushInfo.desc = @"Push content";// TODO: ext is defined by your business. Replace with your target page, conversation ID, and other parameters as needed.pushInfo.ext = @"{\\"conversationID\\":\\"user_A\\",\\"conversationType\\":1}";V2TIMMessage *message = [[V2TIMManager sharedInstance] createTextMessage:@"Hello TIMPush"];[[V2TIMManager sharedInstance] sendMessage:messagereceiver:@"<#TARGET_USER_ID#>"groupID:nilpriority:V2TIM_PRIORITY_DEFAULTonlineUserOnly:NOofflinePushInfo:pushInfoprogress:nilsucc:^(V2TIMMessage *msg) {NSLog(@">>>>> sendMessage success, msgID = %@", msg.msgID);} fail:^(int code, NSString *desc) {NSLog(@">>>>> sendMessage failed, code:%d, desc:%@", code, desc);}];
Register a client listener and parse redirect info
Conform to the TIMPushListener protocol in AppDelegate, call addPushListener in
didFinishLaunchingWithOptions to register the listener, and in onNotificationClicked parse ext and navigate to the business page. If you integrate TUIKit and use ext assembled by OfflinePushExtInfo, you can parse with OfflinePushExtInfo.create(withExtString:) and then navigate.import UIKitimport TIMPush@mainclass AppDelegate: UIResponder, UIApplicationDelegate, TIMPushListener {var window: UIWindow?func application(_ application: UIApplication, didFinishLaunchingWithOptions launchOptions: [UIApplication.LaunchOptionsKey: Any]?) -> Bool {TIMPushManager.addPushListener(listener: self)return true}// MARK: - TIMPushListener@objc func onNotificationClicked(_ ext: String) {print(">>>>> TIMPush notification clicked, ext:\\(ext)")// 1. Parse ext. The JSON structure is defined by your business and must match the sender.guard let data = ext.data(using: .utf8),let dict = try? JSONSerialization.jsonObject(with: data) as? [String: Any] else {return}let conversationID = dict["conversationID"] as? String ?? ""let conversationType = dict["conversationType"] as? Int ?? 0// 2. TODO: Navigate to the target page based on business fields.// If you use Chat / TUIKit, navigate after the user logs in successfully;// On cold start, cache the parameters first and navigate in the login callback.}// Required by the protocol; unrelated to click redirects. Implement if you need to observe received / revoked offline pushes.@objc func onRecvPushMessage(_ message: TIMPushMessage) {}@objc func onRevokePushMessage(_ messageID: String) {}}
// AppDelegate.h#import <UIKit/UIKit.h>#import <TIMPush/TIMPushManager.h>@interface AppDelegate : UIResponder <UIApplicationDelegate, TIMPushListener>@property (nonatomic, strong, nullable) UIWindow *window;@end// AppDelegate.m#import "AppDelegate.h"#import <TIMPush/TIMPushManager.h>@implementation AppDelegate- (BOOL)application:(UIApplication *)application didFinishLaunchingWithOptions:(NSDictionary *)launchOptions {[TIMPushManager addPushListener:self];return YES;}#pragma mark - TIMPushListener- (void)onNotificationClicked:(NSString *)ext {NSLog(@">>>>> TIMPush notification clicked, ext:%@", ext);// 1. Parse ext. The JSON structure is defined by your business and must match the sender.NSData *data = [ext dataUsingEncoding:NSUTF8StringEncoding];if (data.length == 0) {return;}NSDictionary *dict = [NSJSONSerialization JSONObjectWithData:data options:0 error:nil];if (![dict isKindOfClass:[NSDictionary class]]) {return;}NSString *conversationID = dict[@"conversationID"];NSInteger conversationType = [dict[@"conversationType"] integerValue];// 2. TODO: Navigate to the target page based on business fields.// If you use Chat / TUIKit, navigate after the user logs in successfully;// On cold start, cache the parameters first and navigate in the login callback.}// Required by the protocol; unrelated to click redirects. Implement if you need to observe received / revoked offline pushes.- (void)onRecvPushMessage:(TIMPushMessage *)message {}- (void)onRevokePushMessage:(NSString *)messageID {}@end
Integration troubleshooting
If you cannot receive push after integration, use the troubleshooting tool to check the cause. If the issue remains after troubleshooting, please contact us to submit feedback.
フィードバック