观众连线(Android)
下载
聚焦模式
字号
AtomicXCore 提供了 CoGuestStore 模块,专门用于管理观众连麦的完整业务流程。您无需关心复杂的状态同步和信令交互,只需调用几个简单的方法,即可为您的直播添加强大的观众与主播音视频互动功能。
核心场景
CoGuestStore 支持以下两种最主流的连麦场景:观众申请上麦:观众主动发起连麦请求,主播在收到请求后进行同意或拒绝。
主播邀请上麦:主播可以主动向直播间内的任意一位观众发起连麦邀请。
核心概念
核心概念 | 核心职责 | 关键 API / 属性 |
CoGuestStore | 负责管理观众与主播连麦的全流程信令交互(申请、邀请、接受、拒绝、断连),并实时维护连麦相关的人员列表状态。 | coGuestState:包含 connected (已连麦列表)、applicants (申请列表)、invitees (邀请列表) 的只读状态流 (StateFlow)。applyForSeat():观众发起连麦申请。inviteToSeat():主播邀请观众上麦。acceptApplication():主播同意连麦申请。disconnect():断开连麦。 |
HostListener | 用于 UI 层响应如“收到观众连麦申请”、“观众接受了邀请”等事件。 | onGuestApplicationReceived():收到观众连麦申请。onHostInvitationResponded():观众回应了邀请。 |
GuestListener | 用于 UI 层响应如“收到主播邀请”、“连麦申请被批准”、“被踢下麦”等事件。 | onHostInvitationReceived():收到主播连麦邀请。onGuestApplicationResponded():主播处理了申请(同意/拒绝)。onKickedOffSeat():被主播踢下麦位。 |
实现步骤
步骤1:组件集成
步骤2:实现观众申请上麦
观众端实现
作为观众,您的核心任务是发起申请、接收结果和主动下麦。
1. 发起连麦申请
当用户点击界面上的"申请连麦"按钮时,调用
applyForSeat 方法。import io.trtc.tuikit.atomicxcore.api.live.CoGuestStoreimport io.trtc.tuikit.atomicxcore.api.CompletionHandlerval liveId = "房间ID"val guestStore = CoGuestStore.create(liveId)// 用户点击"申请连麦"fun requestToConnect() {// timeout: 请求超时时间,例如 30 秒guestStore.applyForSeat(seatIndex = 0, // 麦位索引timeout = 30,extraInfo = null,completion = object : CompletionHandler {override fun onSuccess() {println("连麦申请已发送,等待主播处理...")}override fun onFailure(code: Int, desc: String) {println("申请发送失败: $desc")}})}
2. 监听主播的响应
通过添加
GuestListener,您可以接收到主播的处理结果。import android.os.Bundleimport androidx.appcompat.app.AppCompatActivityimport io.trtc.tuikit.atomicxcore.api.device.DeviceStoreimport io.trtc.tuikit.atomicxcore.api.live.CoGuestStoreimport io.trtc.tuikit.atomicxcore.api.live.GuestListenerimport io.trtc.tuikit.atomicxcore.api.live.LiveUserInfo// 在您的Activity或Fragment中实现监听class YourActivity : AppCompatActivity() {val liveId = "房间ID"val guestStore = CoGuestStore.create(liveId)val deviceStore = DeviceStore.shared()private val guestListener = object : GuestListener() {override fun onGuestApplicationResponded(isAccept: Boolean, hostUser: LiveUserInfo) {if (isAccept) {println("主播 ${hostUser.userName} 同意了你的申请,准备上麦")// 上麦申请被同意,进行上麦后的操作// 1. 打开摄像头、麦克风DeviceStore.shared().openLocalCamera(true, completion = null)DeviceStore.shared().openLocalMicrophone(completion = null)// 2. 在此更新 UI,例如关闭申请按钮,显示连麦中的状态} else {println("主播 ${hostUser.userName} 拒绝了你的申请")// 上麦申请被拒绝,弹窗提示}}}override fun onCreate(savedInstanceState: Bundle?) {super.onCreate(savedInstanceState)// 添加监听器guestStore.addGuestListener(guestListener)}override fun onDestroy() {super.onDestroy()// 移除监听器guestStore.removeGuestListener(guestListener)}}
3. 主动下麦
当连麦观众想结束互动时,调用
disconnect 方法即可返回普通观众状态。// 用户点击"下麦"按钮fun leaveSeat() {guestStore.disconnect(object : CompletionHandler {override fun onSuccess() {println("已成功下麦")}override fun onFailure(code: Int, desc: String) {println("下麦失败: $desc")}})}
4. (可选) 取消申请
如果观众在主播处理前想撤回申请,可以调用
cancelApplication。// 用户在等待时,点击"取消申请"fun cancelRequest() {guestStore.cancelApplication(object : CompletionHandler {override fun onSuccess() {println("申请已取消")}override fun onFailure(code: Int, desc: String) {println("申请取消失败: $desc")}})}
主播端实现
作为主播,您的核心任务是接收申请、展示申请列表和处理申请。
1. 监听新的连麦申请
通过添加
HostListener,您可以在有新观众申请时立即收到通知,并给出提示。import android.os.Bundleimport androidx.appcompat.app.AppCompatActivityimport io.trtc.tuikit.atomicxcore.api.live.CoGuestStoreimport io.trtc.tuikit.atomicxcore.api.live.HostListenerimport io.trtc.tuikit.atomicxcore.api.live.LiveUserInfoclass YourActivity : AppCompatActivity() {val liveId = "房间ID"val guestStore = CoGuestStore.create(liveId)val hostListener = object : HostListener() {override fun onGuestApplicationReceived(guestUser: LiveUserInfo) {println("收到观众 ${guestUser.userName} 的连麦申请")// 在此更新 UI,例如在"申请列表"按钮上显示红点}}override fun onCreate(savedInstanceState: Bundle?) {super.onCreate(savedInstanceState)// 添加监听器guestStore.addHostListener(hostListener)}override fun onDestroy() {super.onDestroy()// 移除监听器guestStore.removeHostListener(hostListener)}}
2. 展示申请列表
CoGuestStore 的 state 会实时维护当前的申请者列表,您可以订阅它来刷新您的 UI。class YourActivity : AppCompatActivity() {val liveId = "房间ID"val guestStore = CoGuestStore.create(liveId)override fun onCreate(savedInstanceState: Bundle?) {super.onCreate(savedInstanceState)// 订阅申请者列表变化lifecycleScope.launch {guestStore.coGuestState.applicants.collect { applicants ->println("当前申请人数: ${applicants.size}")// 在此刷新您的"申请者列表"UI// updateApplicantListView(applicants)}}}}
3. 处理连麦申请
当您在列表中选择一位观众并点击"同意"或"拒绝"时,调用相应的方法。
// 主播点击"同意"按钮,传入申请者的 userIDfun accept(userId: String) {guestStore.acceptApplication(userId, object : CompletionHandler {override fun onSuccess() {println("已同意 $userId 的申请,对方正在上麦")}override fun onFailure(code: Int, desc: String) {println("同意申请失败: $desc")}})}// 主播点击"拒绝"按钮fun reject(userId: String) {guestStore.rejectApplication(userId, object : CompletionHandler {override fun onSuccess() {println("已拒绝 $userId 的申请")}override fun onFailure(code: Int, desc: String) {println("拒绝申请失败: $desc")}})}
步骤3:实现主播邀请上麦
主播端实现
1. 向观众发起邀请
当主播在观众列表中选择某人并点击"邀请连麦"时,调用
inviteToSeat 方法。// 主播选择观众并发起邀请fun invite(userId: String) {// timeout: 邀请超时时间guestStore.inviteToSeat(inviteeID = userId,seatIndex = 0,timeout = 30,extraInfo = null,completion = object : CompletionHandler {override fun onSuccess() {println("已向 $userId 发出邀请,等待对方回应...")}override fun onFailure(code: Int, desc: String) {println("发送邀请失败: $desc")}})}
2. 监听观众的回应
通过
HostListener 监听 onHostInvitationResponded 事件。// 在 HostListener 的实现中添加override fun onHostInvitationResponded(isAccept: Boolean, guestUser: LiveUserInfo) {if (isAccept) {println("观众 ${guestUser.userName} 接受了你的邀请")} else {println("观众 ${guestUser.userName} 拒绝了你的邀请")}}
观众端实现
1. 接收主播的邀请
通过
GuestListener 监听 onHostInvitationReceived 事件。// 在 GuestListener 的实现中添加override fun onHostInvitationReceived(hostUser: LiveUserInfo) {println("收到主播 ${hostUser.userName} 的连麦邀请")// 在此弹出一个对话框,让用户选择"接受"或"拒绝"// showInvitationDialog(hostUser)}
2. 响应邀请
当用户在弹出的对话框中做出选择后,调用相应的方法。
val inviterId = "发起邀请的主播ID" // 从 onHostInvitationReceived 事件中获取// 用户点击"接受"fun accept() {guestStore.acceptInvitation(inviterId, object : CompletionHandler {override fun onSuccess() {// 2. 打开摄像头、麦克风DeviceStore.shared().openLocalCamera(true, completion = null)DeviceStore.shared().openLocalMicrophone(completion = null)}override fun onFailure(code: Int, desc: String) {println("接受邀请失败: $desc")}})}// 用户点击"拒绝"fun reject() {guestStore.rejectInvitation(inviterId, object : CompletionHandler {override fun onSuccess() {println("已拒绝邀请")}override fun onFailure(code: Int, desc: String) {println("拒绝邀请失败: $desc")}})}
运行效果
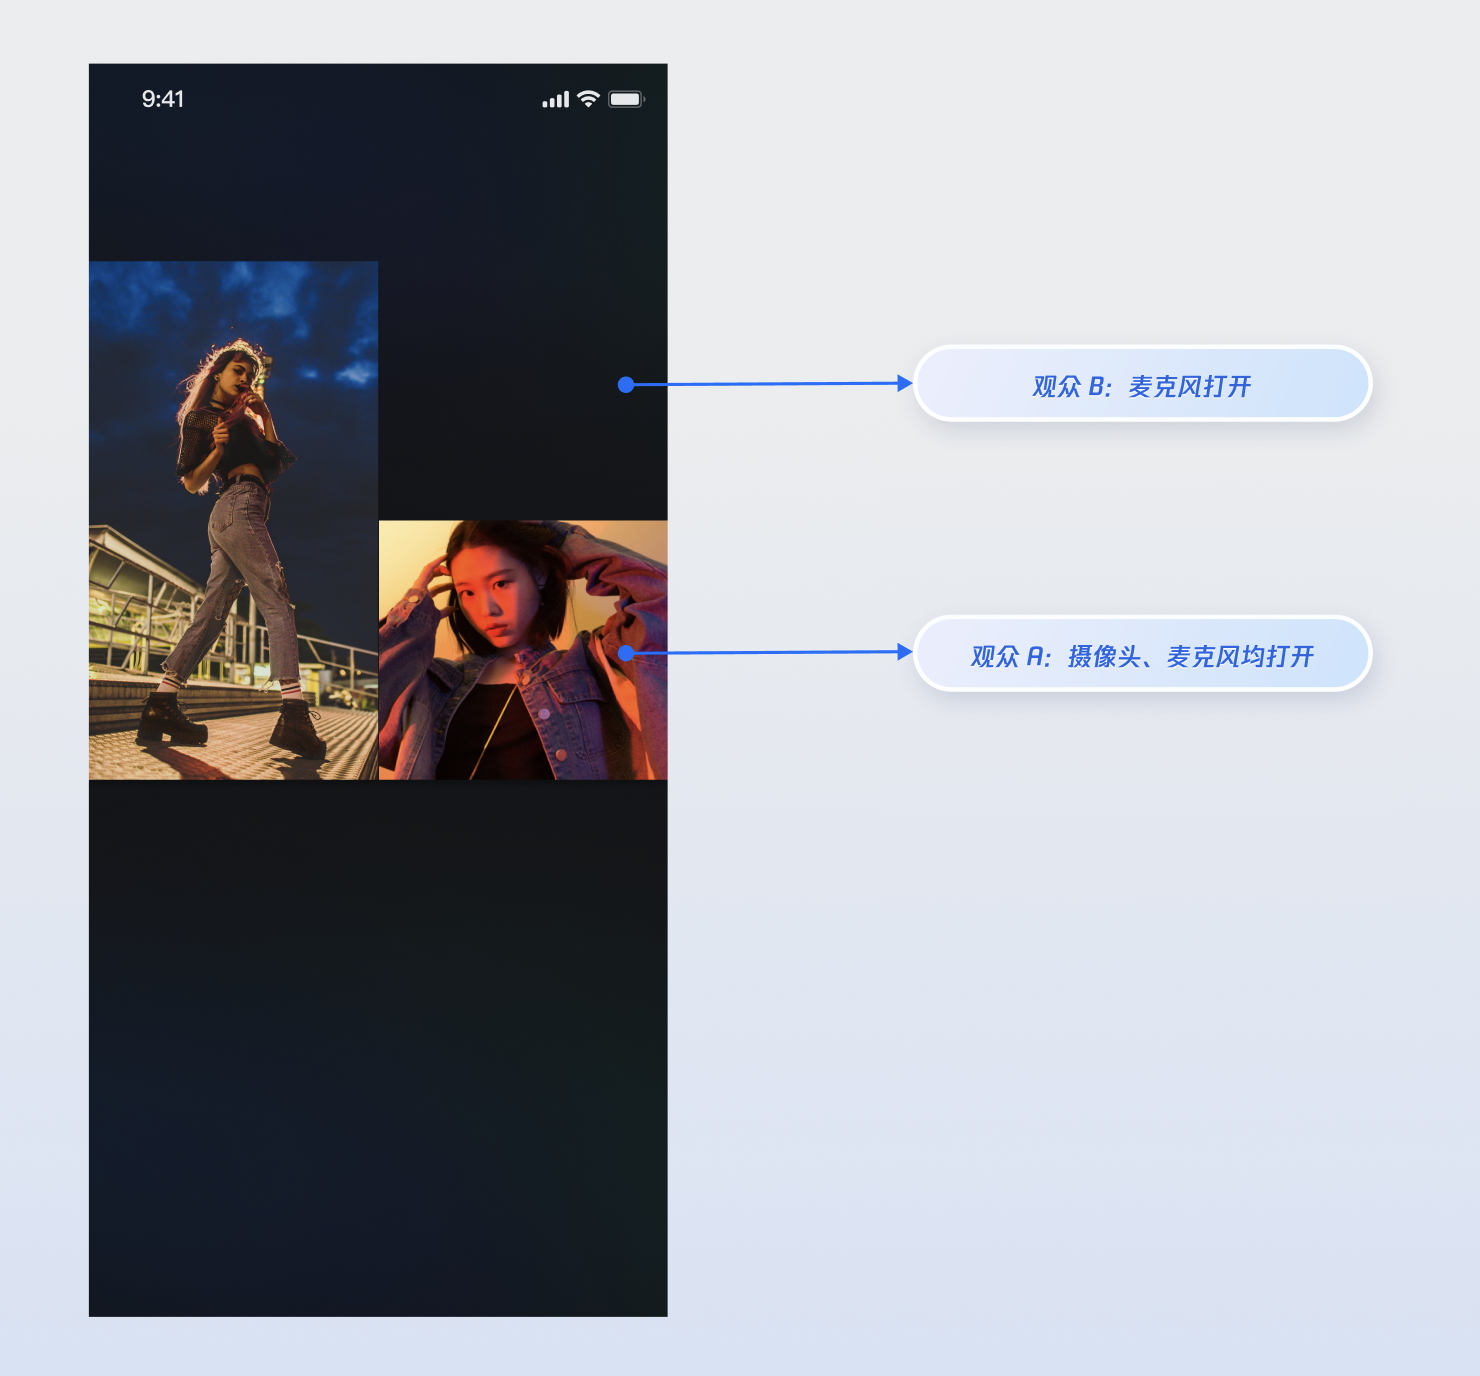
当您集成以上功能实现后,请分别使用两个观众与主播进行连麦操作,观众 A 同时打开摄像头和麦克风,观众 B 只打开麦克风,运行效果如下,您可以参考下一章节 完善 UI 细节 来定制您想要的 UI 逻辑。
完善 UI 细节
您可以通过
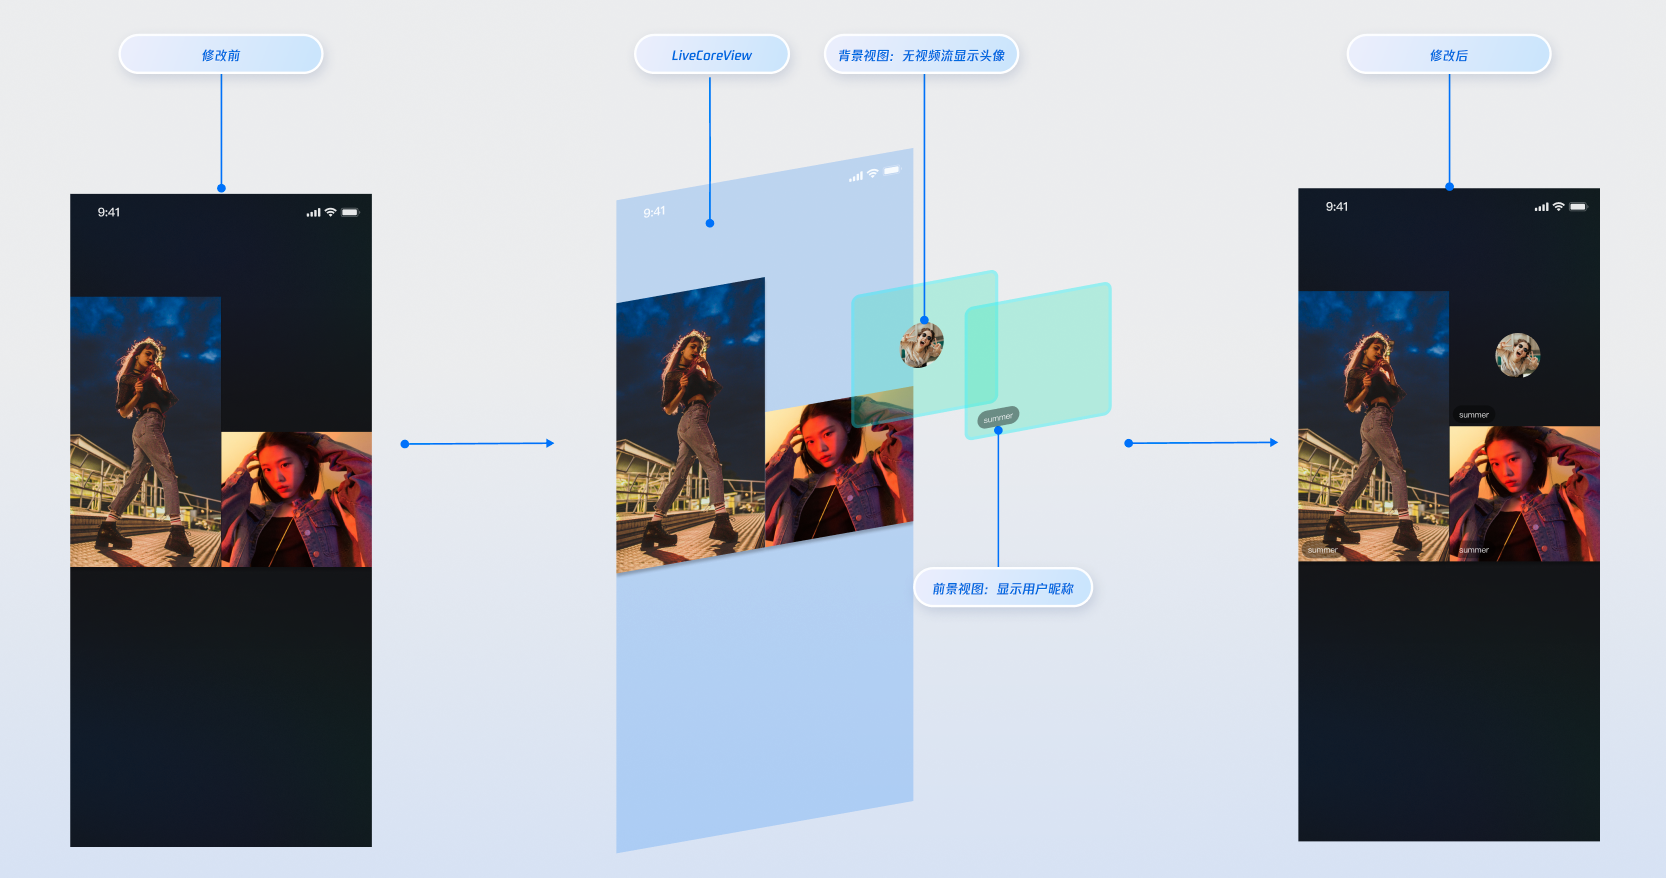
VideoViewAdapter 接口提供的"插槽"能力,在观众连麦的视频流画面上添加自定义视图,用于显示昵称、头像等信息,或在他们关闭摄像头时提供占位图,以优化视觉体验。实现视频流画面的昵称显示
实现效果
实现方式
提示:
步骤 1:创建前景视图 (CustomSeatView),该视图用于在视频流上方显示用户信息。
import android.content.Contextimport android.graphics.Colorimport android.view.Gravityimport android.view.ViewGroupimport android.widget.LinearLayoutimport android.widget.TextView// 自定义的用户信息悬浮视图(前景)class CustomSeatView(context: Context) : LinearLayout(context) {private val nameLabel: TextViewinit {orientation = VERTICALgravity = Gravity.BOTTOM or Gravity.STARTsetBackgroundColor(Color.parseColor("#80000000")) // 半透明黑色背景nameLabel = TextView(context).apply {setTextColor(Color.WHITE)textSize = 14f}addView(nameLabel, LayoutParams(ViewGroup.LayoutParams.WRAP_CONTENT,ViewGroup.LayoutParams.WRAP_CONTENT).apply {setMargins(20, 0, 0, 20) // 左边距20,下边距20})}fun setUserName(userName: String) {nameLabel.text = userName}}
步骤 2:创建背景视图 (CustomAvatarView),该视图用于在用户无视频流时作为占位图显示。
import android.content.Contextimport android.graphics.Colorimport android.view.Gravityimport android.view.ViewGroupimport android.widget.ImageViewimport android.widget.LinearLayout// 自定义的头像占位视图(背景)class CustomAvatarView(context: Context) : LinearLayout(context) {private val avatarImageView: ImageViewinit {orientation = VERTICALgravity = Gravity.CENTERsetBackgroundColor(Color.TRANSPARENT)avatarImageView = ImageView(context).apply {setColorFilter(Color.GRAY)scaleType = ImageView.ScaleType.CENTER_CROP}addView(avatarImageView, LayoutParams(120, 120)) // 60dp * 2 = 120px}fun setUserAvatar(avatarUrl: String) {// 在这里加载用户头像,可以使用Glide等图片加载库// Glide.with(context).load(avatarUrl).into(avatarImageView)}}
步骤 3:设置
LiveCoreView 自定义视图 VideoViewAdapter,实现 VideoViewAdapter.createCoGuestView 接口,根据 viewLayer 的值返回对应的视图。import android.os.Bundleimport android.view.Viewimport androidx.appcompat.app.AppCompatActivityimport com.tencent.cloud.tuikit.engine.room.TUIRoomDefineimport io.trtc.tuikit.atomicxcore.api.view.VideoViewAdapterimport io.trtc.tuikit.atomicxcore.api.view.ViewLayer// 1. 在您的Activity中,实现 VideoViewAdapter 接口class YourActivity : AppCompatActivity(), VideoViewAdapter {// ... 其他代码 ...override fun onCreate(savedInstanceState: Bundle?) {super.onCreate(savedInstanceState)// 1. 设置适配器liveCoreView.setVideoViewAdapter(this)}// 2. 完整实现接口方法,处理两种 viewLayeroverride fun createCoGuestView(userInfo: TUIRoomDefine.SeatFullInfo?, viewLayer: ViewLayer?): View? {userInfo ?: return nullval userId = userInfo.userIdif (userId.isNullOrEmpty()) return nullreturn when (viewLayer) {ViewLayer.FOREGROUND -> {// 用户摄像头开启时,显示前景视图val seatView = CustomSeatView(this)seatView.setUserName(userInfo.userName ?: "")seatView}ViewLayer.BACKGROUND -> {// 用户摄像头关闭时,显示背景视图val avatarView = CustomAvatarView(this)// 您可以在这里通过 userInfo.userAvatar 加载用户真实头像userInfo.userAvatar?.let { avatarView.setUserAvatar(it) }avatarView}else -> null}}}
参数说明:
参数 | 类型 | 说明 |
seatInfo | SeatFullInfo? | 麦位信息对象,包含麦上用户的详细信息 |
seatInfo.userId | String | 麦上用户的 ID |
seatInfo.userName | String | 麦上用户的昵称 |
seatInfo.userAvatar | String | 麦上用户的头像 URL |
seatInfo.userMicrophoneStatus | DeviceStatus | 麦上用户的麦克风状态 |
seatInfo.userCameraStatus | DeviceStatus | 麦上用户的摄像头状态 |
viewLayer | ViewLayer | 视图层级枚举 FOREGROUND 表示前景挂件视图,始终显示在视频画面的最上层BACKGROUND 表示背景挂件视图,位于前景视图下层,仅在对应用户没有视频流(例如未开摄像头)的情况下显示,通常用于展示用户的默认头像或占位图 |
API 文档
常见问题
如何管理通过 VideoViewAdapter 添加的自定义视图的生命周期和事件?
LiveCoreView 会自动管理您通过适配器方法返回的视图的添加和移除,您无需手动处理。如果需要在自定义视图中处理用户交互(例如点击事件),请在创建视图时为其添加相应的事件即可。
VideoViewAdapter 中的 viewLayer 参数有什么作用?
viewLayer 用于区分前景和背景挂件:FOREGROUND:前景层,始终显示在视频画面的最上层。BACKGROUND:背景层,仅在对应用户没有视频流(例如未开摄像头)的情况下显示,通常用于展示用户的默认头像或占位图。我的自定义视图为什么没有显示?
检查适配器设置:请确认已调用
liveCoreView.setVideoViewAdapter(this) 并成功设置了适配器。检查实现方法:请检查是否正确实现了对应的适配器方法(例如
createCoGuestView)。检查返回值:确保您的适配器方法在正确的时机返回了一个有效的
View 实例,而不是 null。您可以在适配器方法中添加日志进行调试。
文档反馈