ExternalSecretOperator assists in uniformly storing and managing key credentials in Tencent Cloud Secrets Manager (SSM), importing them into the cluster in the form of Kubernetes native Secret objects, thereby enabling automatic synchronization of key data. This process facilitates SSM's centralized key storage and lifecycle management of these keys. Limitations
Use of the ExternalSecrets component requires a Kubernetes version of v1.19 or later.
The operating system image supports an x86 architecture.
Enabling External Key Access Capability
Installing the Add-on
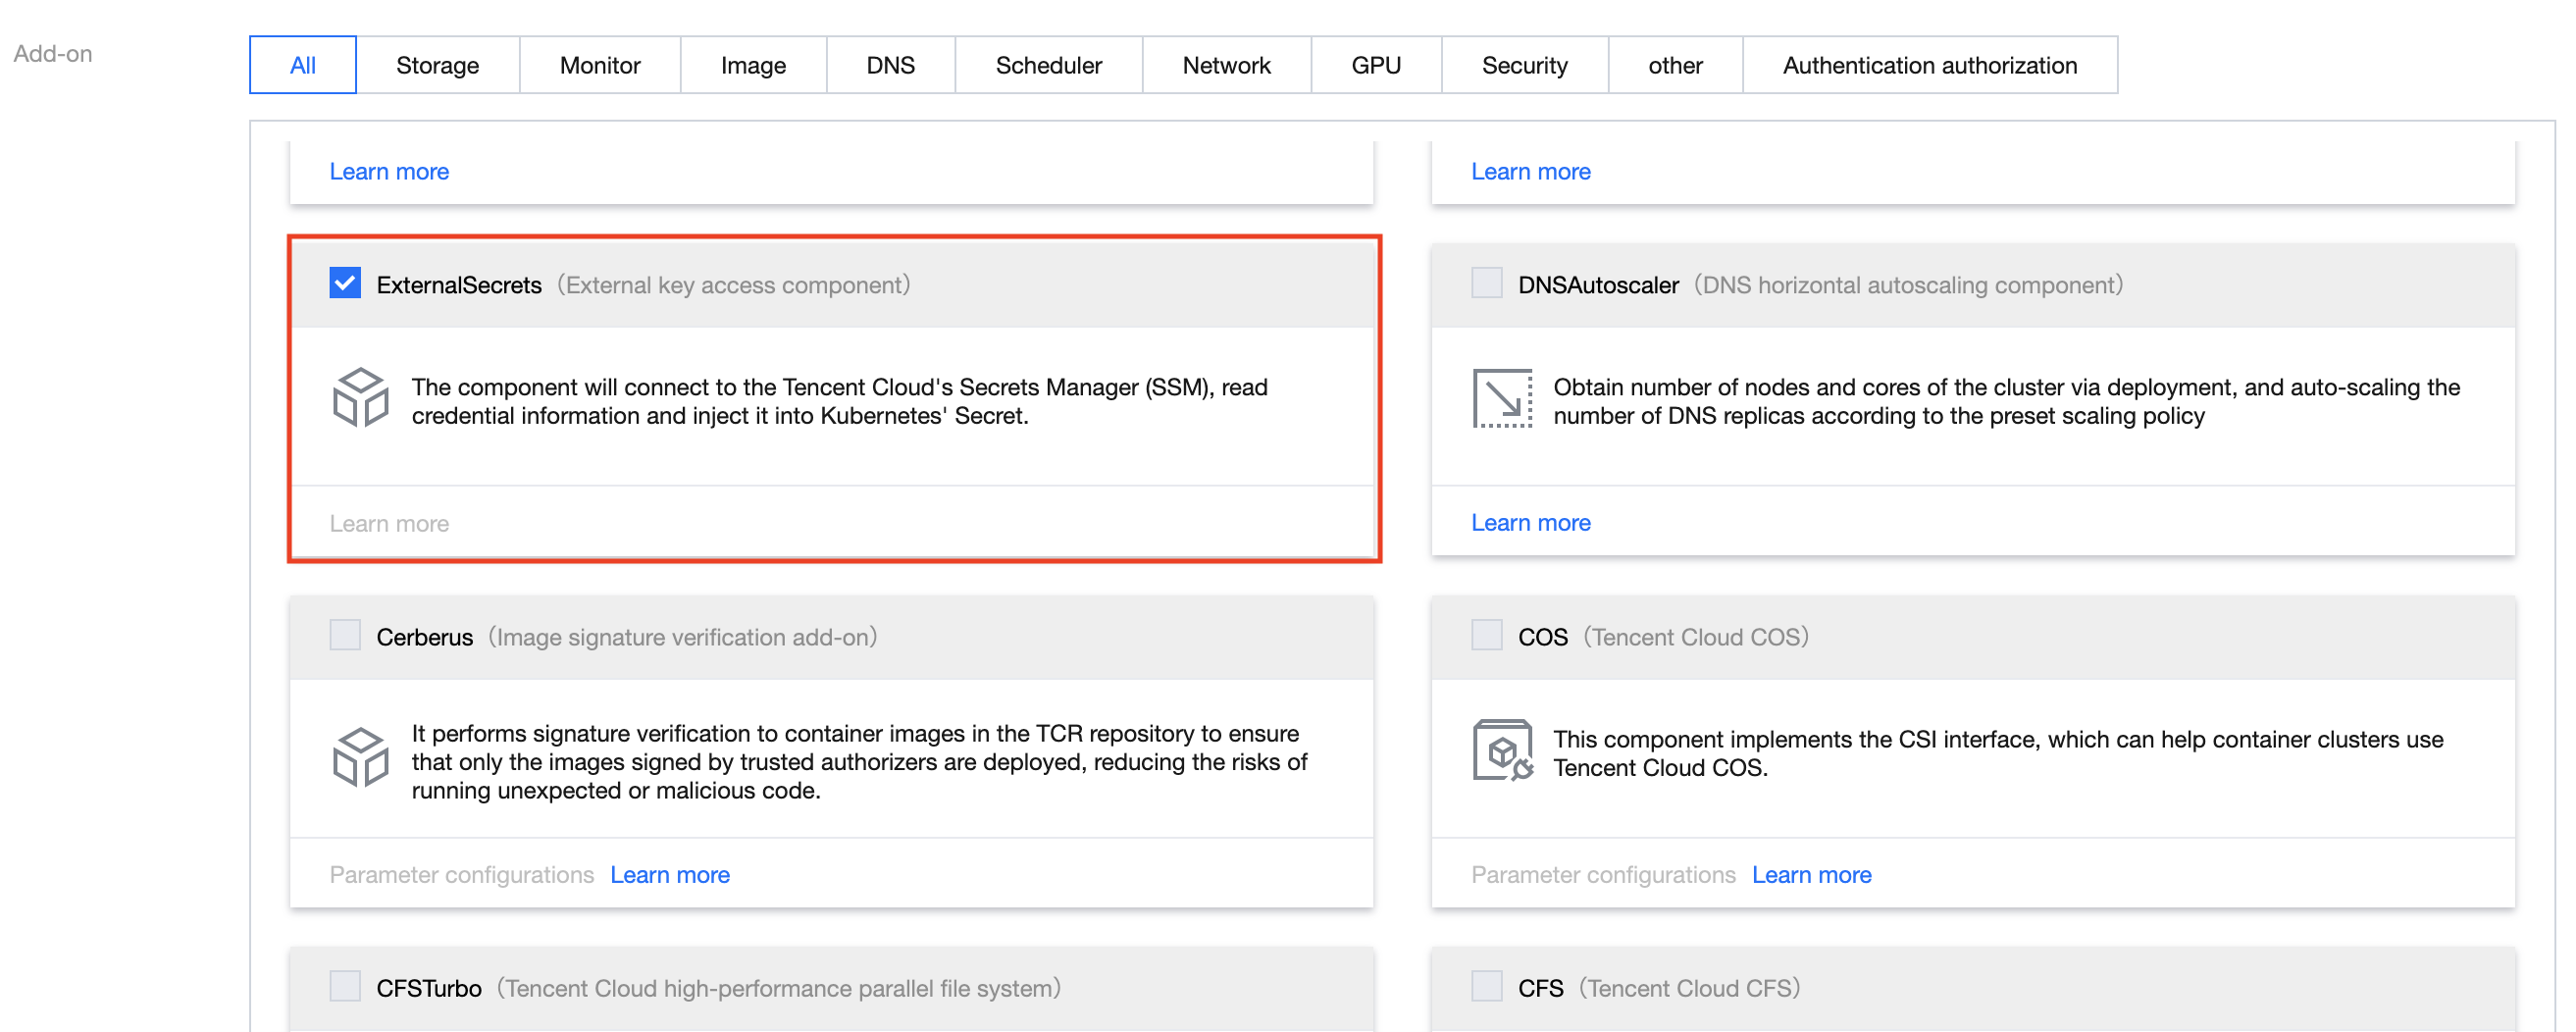
2. Install the ExternalSecrets (external key access component) component for the cluster.
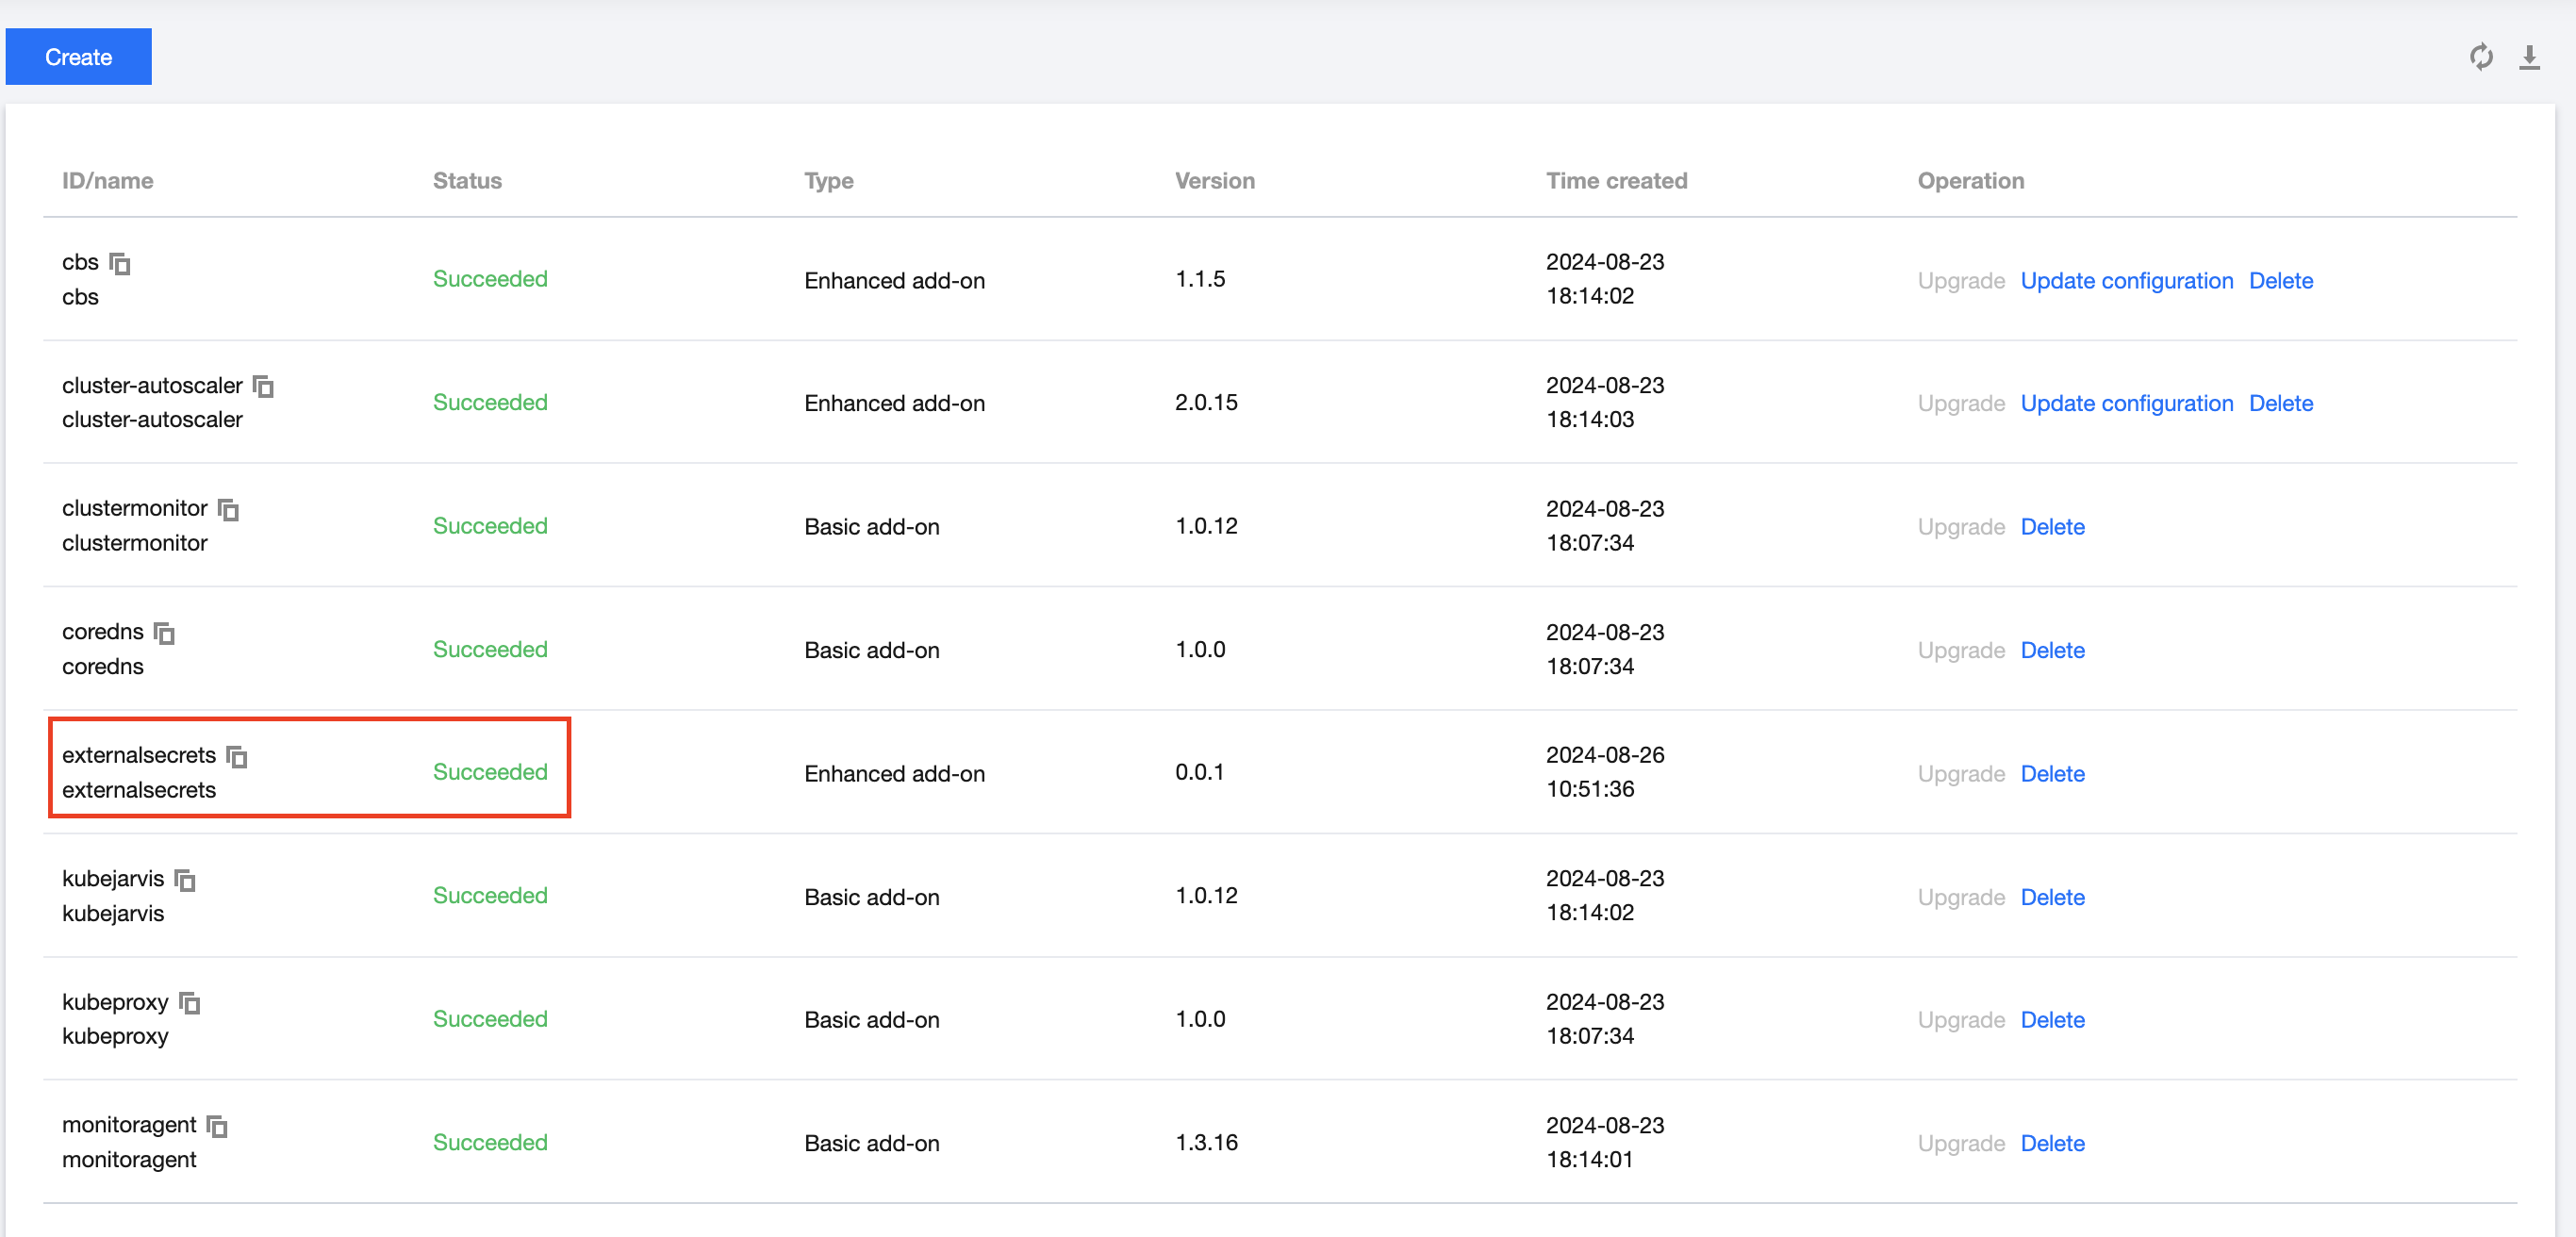
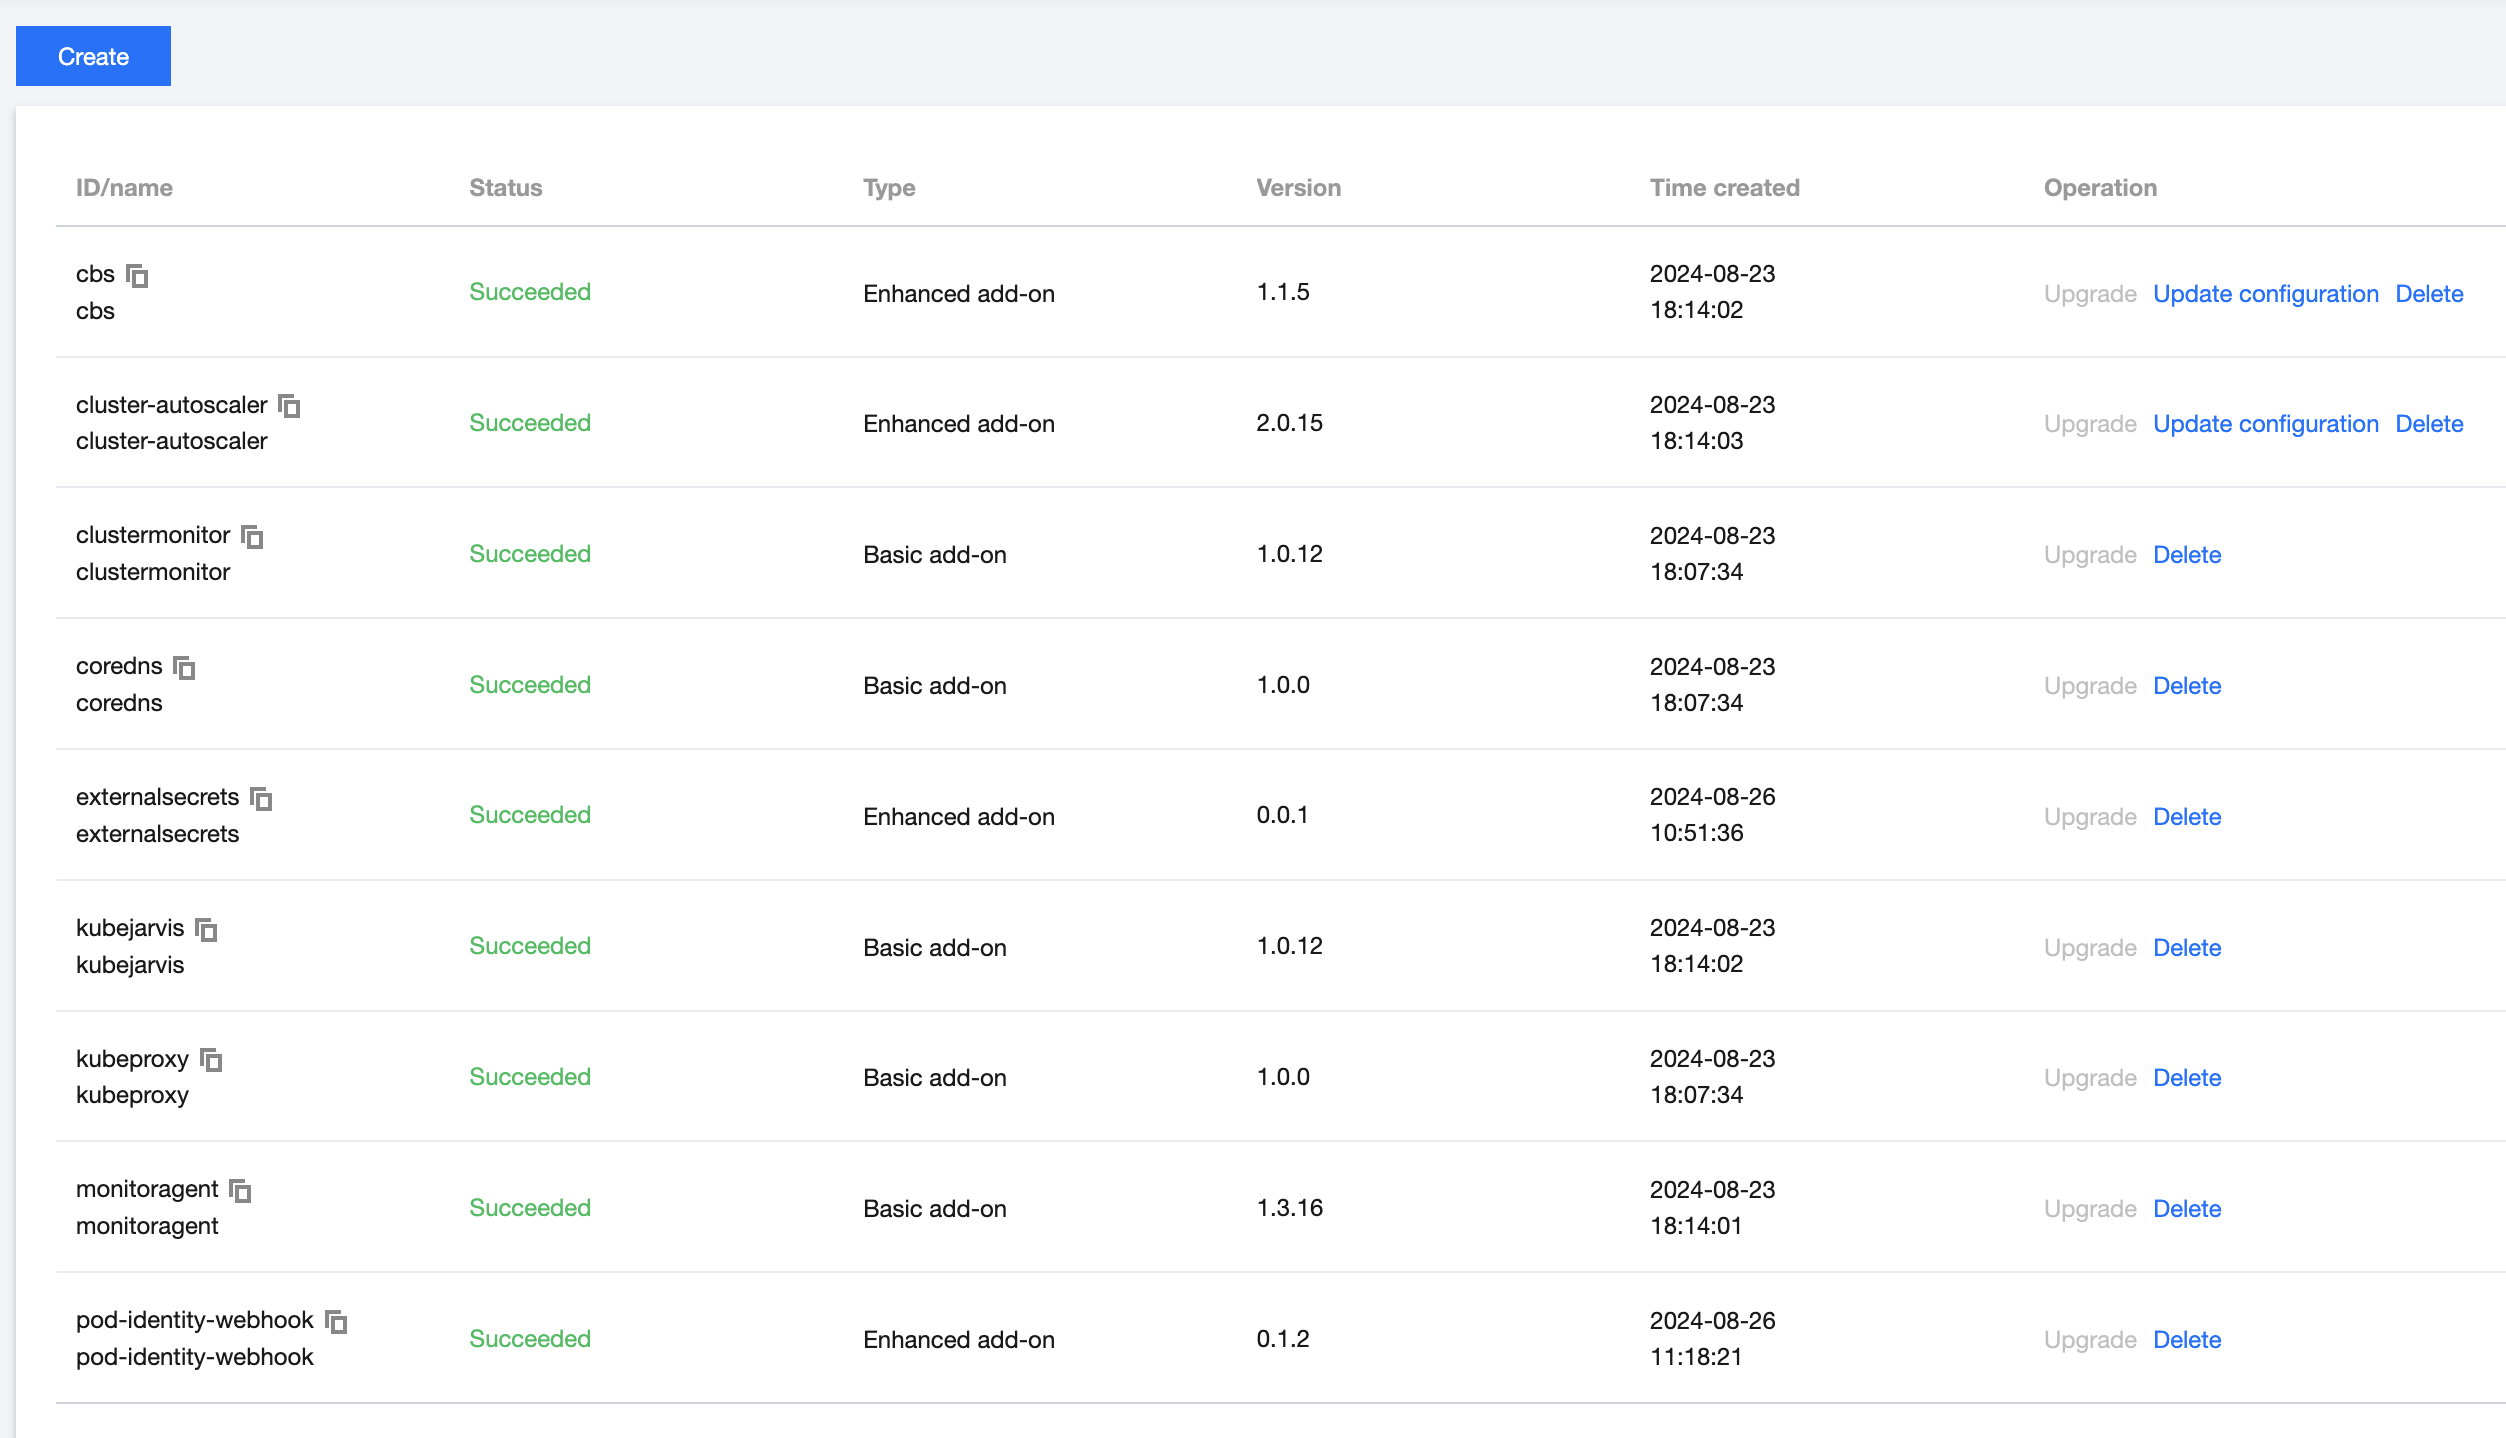
3. Check the component status on the Component Management page. If the component status is Succeeded, it indicates successful deployment of the component.
Use Methods
Method 1: Authorize via AK/SK.
Step 1: Configure authentication information using the AK/SK authorization method
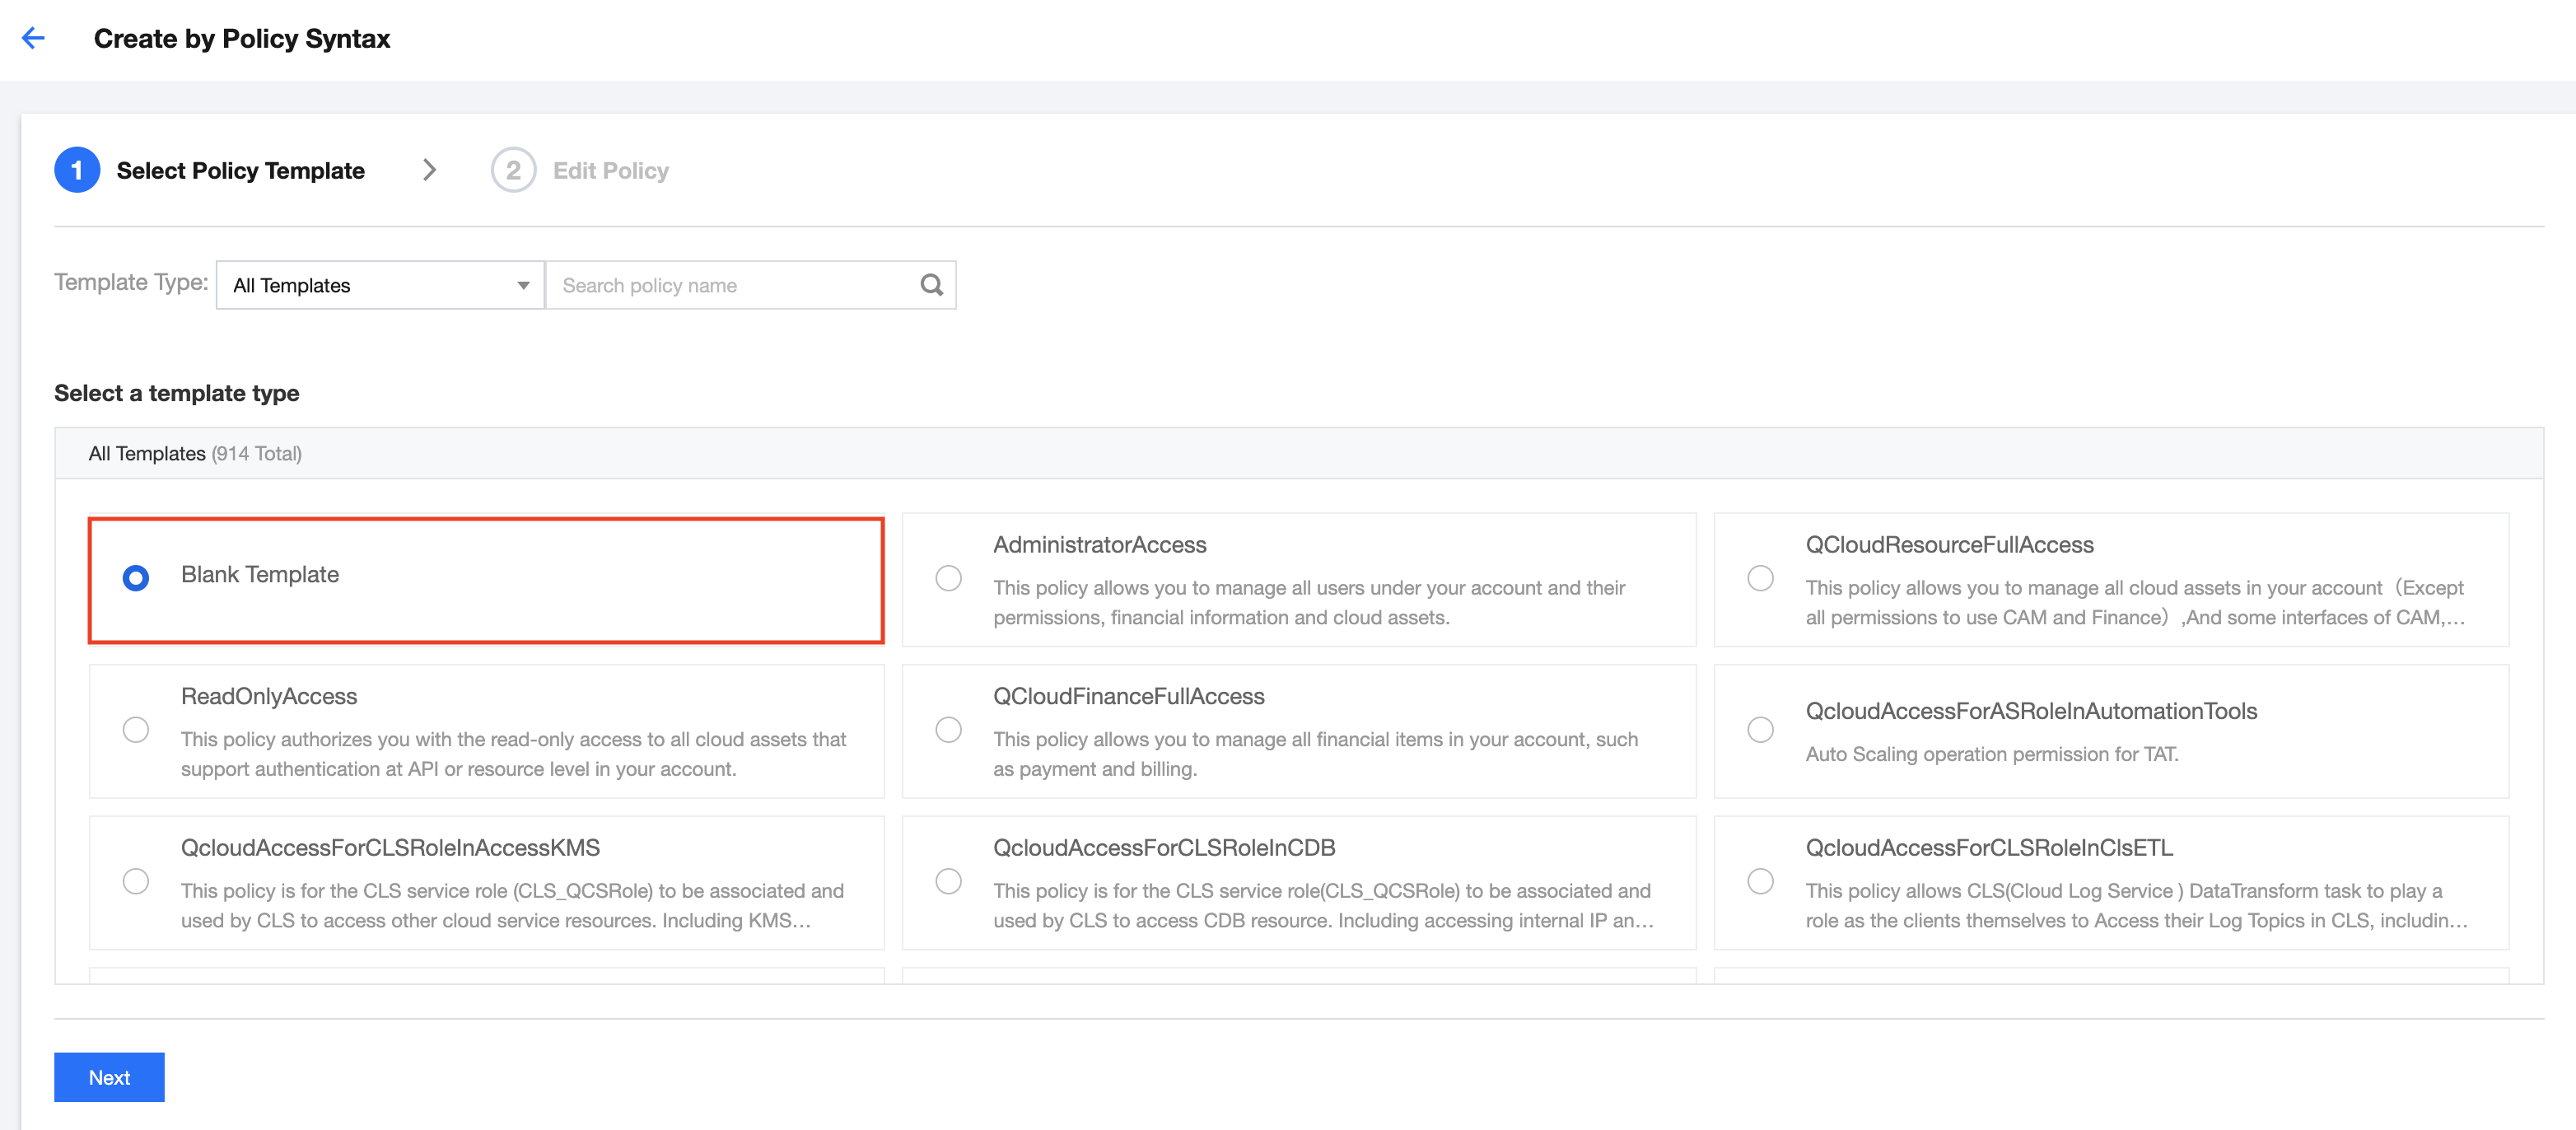
1. Log in to the CAM console and select Policy on the left sidebar. 2. Navigate to the Policy page and click New Custom Policy > Create by Syntax.
3. On the Create by Policy Syntax page, select Blank Template, as shown in the following figure:
4. Click Next to access the Edit Policy page, where you can add the following content to the policy editing box:
{
"statement": [
{
"action": [
"ssm:GetSecretValue"
],
"effect": "allow",
"resource": [
"qcs::ssm:$region:uin/$uin:secret/creatorUin/$creatorUin/$secretName"
]
}
],
"version": "2.0"
}
5. Click Complete to add the policy.
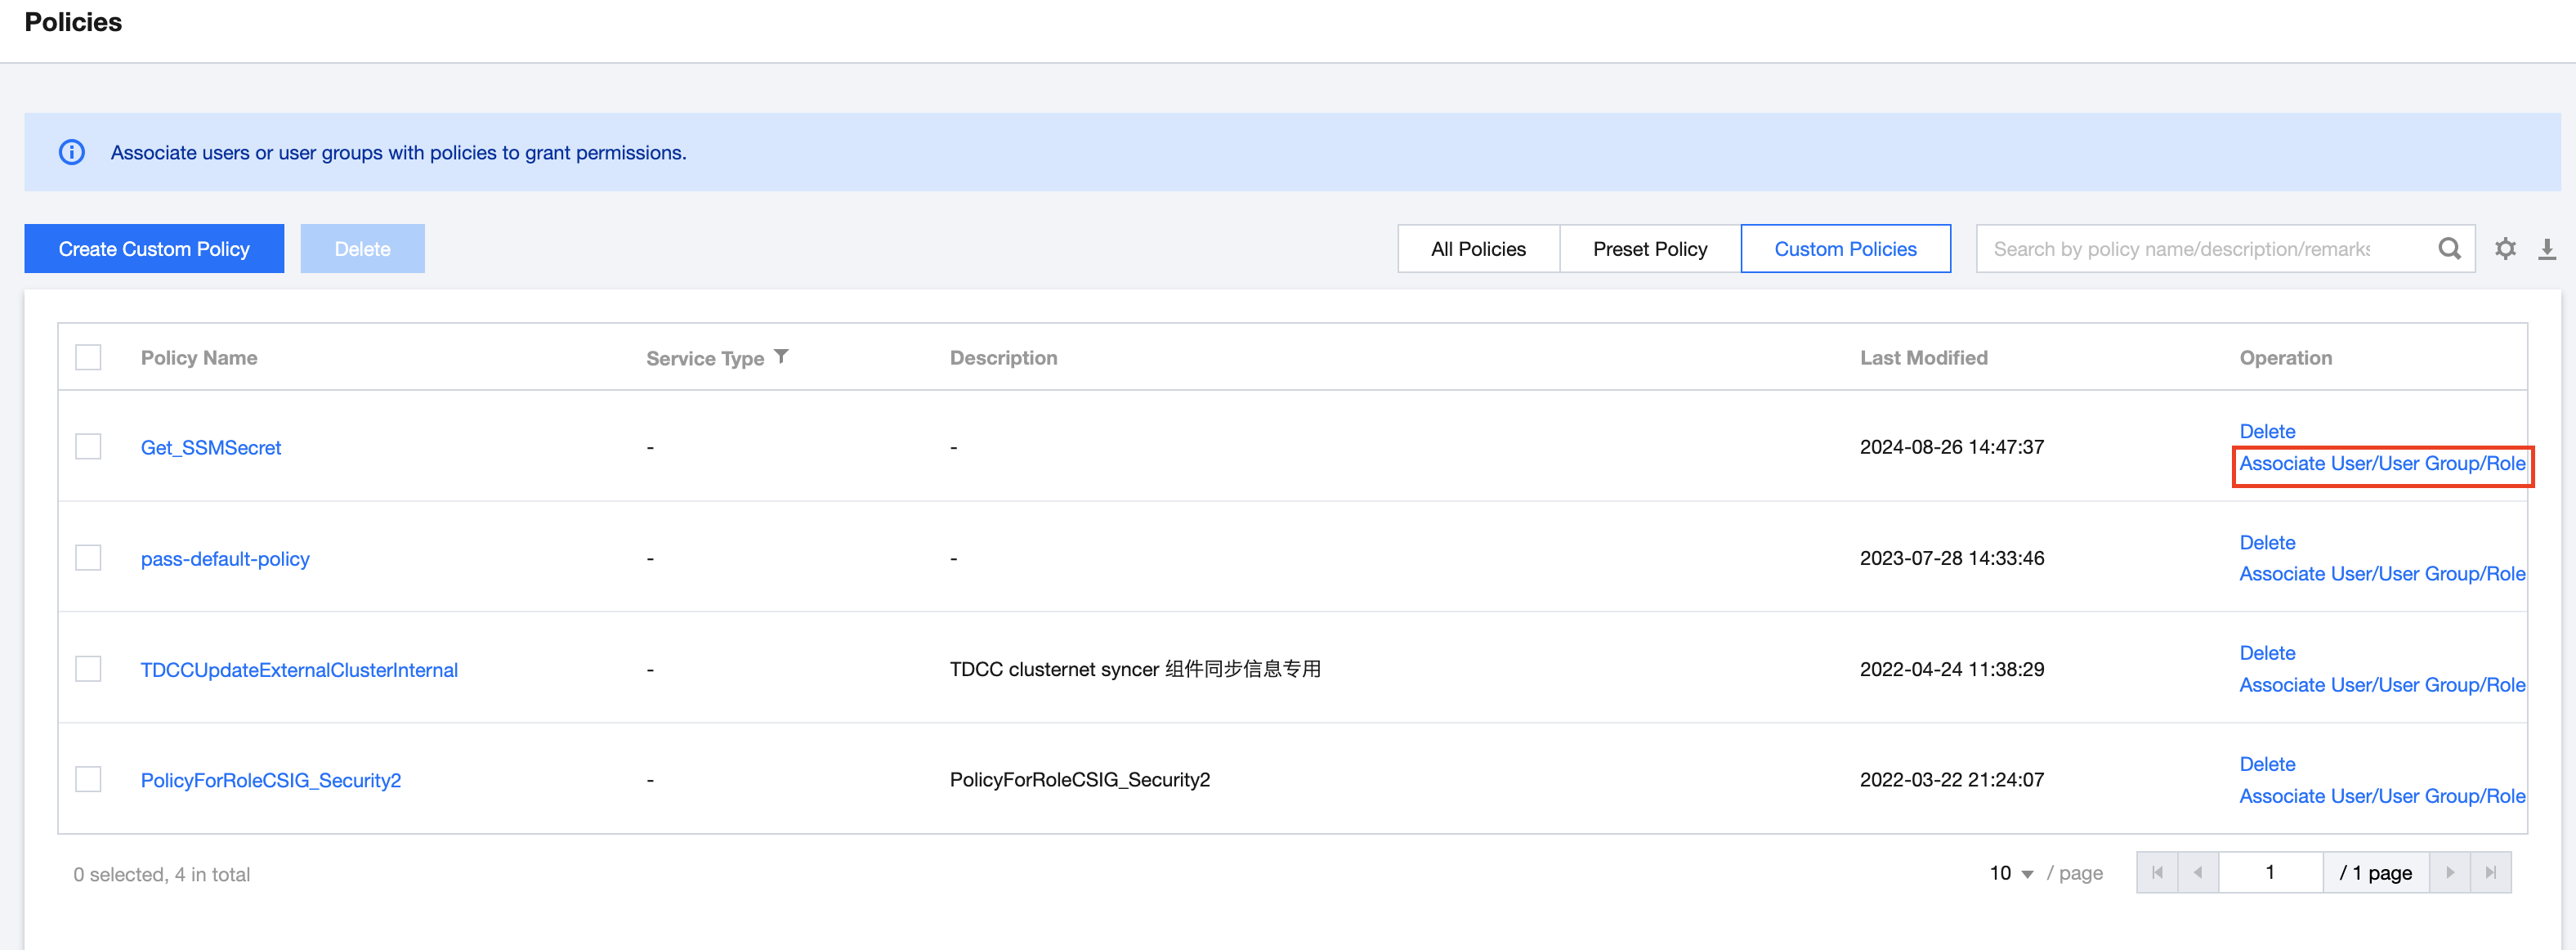
6. On the Policies page, view the created custom policy, then select Custom Policies > Associate User/User Group/Role, as shown below:
On the Associate User/User Group/Role page, select the user you want to bind, as shown below:
7. Click OK.
Step 2: Instructions for component use
This component involves two types of Custom Resource Definitions (CRDs): SecretStore for storing access credentials, and ExternalSecret for specifying SecretStore and storing the basic information of credentials that need to be synchronized. This achieves separation of permissions and data, enhancing flexibility in usage.
In SSM, you need to add the following credentials:
SecretName: hello-test
SecretData: {"name":"jack","password":"123"}
VersionId: v1
Note:
The following secret, SecretStore, and ExternalSecret are all located in the default namespace.
1. Create a secret.
You can create a secret by executing the following command:
echo -n 'KEYID' > ./accessKeyId
echo -n 'SECRETKEY' > ./accessKeySecret
kubectl create secret generic tencent-credentials --from-file=./accessKeyId --from-file=./accessKeySecret
Note:
The key can be obtained from CAM. 2. Create a SecretStore.
You can save the following content into a file named my-secretstore.yaml:
apiVersion: external-secrets.io/v1beta1
kind: SecretStore
metadata:
  name: my-secretstore
spec:
  provider:
    tencent:
      regionID: ap-guangzhou
      auth:
        secretRef:
          accessKeyIDSecretRef:
            name: tencent-credentials
            key: accessKeyId
          accessKeySecretSecretRef:
            name: tencent-credentials
            key: accessKeySecret
3. Create an ExternalSecret.
You can save the following content into a file named my-externalsecret.yaml:
apiVersion: external-secrets.io/v1beta1
kind: ExternalSecret
metadata:
name: my-externalsecret
spec:
refreshInterval: 1m
secretStoreRef:
kind: SecretStore
name: my-secretstore
target:
name: my-secret-key-to-be-created
creationPolicy: Owner
data:
- secretKey: secret-key-to-be-managed
remoteRef:
key: hello-test
version: v1
property: password
4. To deploy the sample, run the following command:
kubectl apply -f my-secretstore.yaml
kubectl apply -f my-externalsecret.yaml
5. Use the obtained credentials.
You can save the following content into a file named my-pod.yaml:
apiVersion: v1
kind: Pod
metadata:
  name: my-pod
spec:
  containers:
    - name: my-container
      image: busybox
      command:
        - /bin/sh
        - -c
        - 'echo "Secret value: ${SECRET_KEY_TO_BE_MANAGED}"'
      env:
        - name: SECRET_KEY_TO_BE_MANAGED
          valueFrom:
            secretKeyRef:
              name: my-secret-key-to-be-created
              key: secret-key-to-be-managed
  restartPolicy: Never
Then, deploy the Pod resource by running the following command:
kubectl apply -f my-pod.yaml
Finally, view the obtained credentials by running the following command:
You will see the information of the obtained credentials:
Method 2: Authorize via AKSK and Role Play
Step 1. Create a policy to obtain SSM credentials
1. Log in to the CAM console and select Policy on the left sidebar. 2. Navigate to the Policy page and click New Custom Policy > Create by Policy Syntax.
3. On the Create by Policy Syntax page, select Blank Template, as shown in the following figure:
4. Click Next to access the Edit Policy page, where you can add the following content to the policy editing box:
{
"statement": [
{
"action": [
"ssm:GetSecretValue"
],
"effect": "allow",
"resource": [
"qcs::ssm:$region:uin/$uin:secret/creatorUin/$creatorUin/$secretName"
]
}
],
"version": "2.0"
}
5. Click Complete to add the policy.
Step 2: Assign the role-play policy to the sub-account
2. On the User List page, click Create User. For details on the process of creating a new user, refer to Creating a Sub-user. Step 3: Assign a policy to the created sub-user for accessing SSM credentials
1. On the Policies page, view the created custom policy and select Custom Policies > Associate User/User Group/Role, as shown in the following figure:
2. On the Associate User/User Group/Role page, select the sub-user that needs to be associated, as shown below:
3. Click OK.
Step 4: Instructions for component use
This component involves two types of CRDs: SecretStore for storing access credentials, and ExternalSecret for specifying SecretStore and storing the basic information of credentials that need to be synchronized. This achieves separation of permissions and data, enhancing flexibility in usage.
In SSM, you need to add the following credentials:
SecretName: hello-test
SecretData: {"name":"jack","password":"123"}
VersionId: v1
Note:
The following secret, SecretStore, and ExternalSecret are all located in the default namespace.
1. Create a secret.
You can create a secret by executing the following command:
echo -n 'KEYID' > ./accessKeyId
echo -n 'SECRETKEY' > ./accessKeySecret
kubectl create secret generic tencent-credentials --from-file=./accessKeyId --from-file=./accessKeySecret
Note:
The key can be obtained from CAM. 2. Create a SecretStore.
You can save the following content into a file named my-secretstore.yaml:
apiVersion: external-secrets.io/v1beta1
kind: SecretStore
metadata:
name: secretstore-assumerole
spec:
provider:
tencent:
regionID: ap-guangzhou
role: "qcs::cam::uin/12345:roleName/test-assume-role"
auth:
secretRef:
accessKeyIDSecretRef:
name: tencent-credentials
key: accessKeyId
accessKeySecretSecretRef:
name: tencent-credentials
key: accessKeySecret
Note:
The role field is obtained in Step 2. 3. Create an ExternalSecret.
You can save the following content into a file named my-externalsecret.yaml:
apiVersion: external-secrets.io/v1beta1
kind: ExternalSecret
metadata:
name: external-secret-assumerole
spec:
refreshInterval: 1m
secretStoreRef:
kind: SecretStore
name: secretstore-assumerole
target:
name: my-secret-key-to-be-created
creationPolicy: Owner
data:
- secretKey: secret-key-to-be-managed
remoteRef:
key: hello-test
version: v1
property: password
4. To deploy the sample, run the following command:
kubectl apply -f my-secretstore.yaml
kubectl apply -f my-externalsecret.yaml
5. Use the obtained credentials.
You can save the following content into a file named my-pod.yaml:
apiVersion: v1
kind: Pod
metadata:
name: my-pod
spec:
containers:
- name: my-container
image: busybox
command:
- /bin/sh
- -c
- 'echo "Secret value: ${SECRET_KEY_TO_BE_MANAGED}"'
env:
- name: SECRET_KEY_TO_BE_MANAGED
valueFrom:
secretKeyRef:
name: my-secret-key-to-be-created
key: secret-key-to-be-managed
restartPolicy: Never
Then, deploy Pod resources by running the following command:
kubectl apply -f my-pod.yaml
Finally, view the obtained credentials by running the following command:
You will see the information of the obtained credentials:
# The credential information obtained from ExternalSecret is as follows.
Secret value: 123
Method 3: Authorize via TKE OIDC
Step 1. Enable OIDC resource access control capabilities
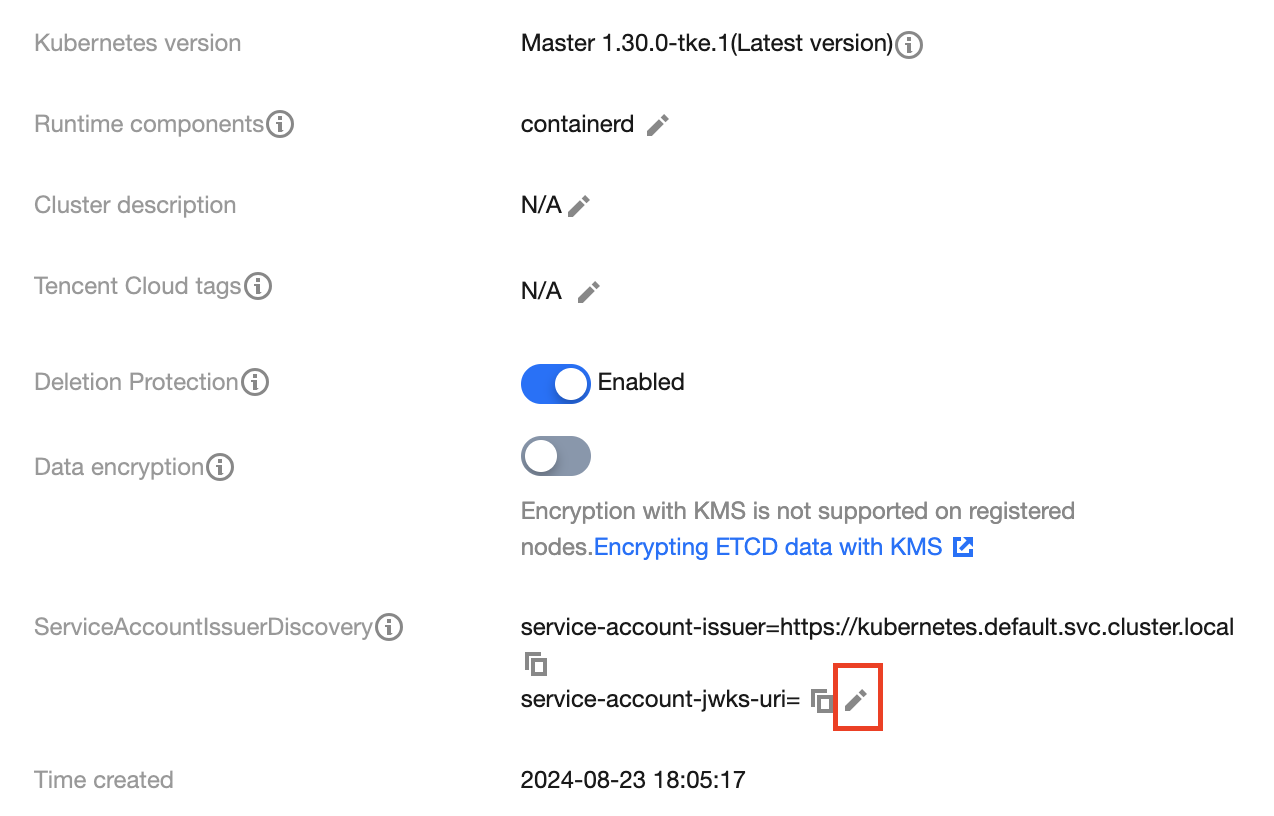
1. Log in to the TKE console and select Cluster on the left sidebar. 2. On the Cluster Management page, select the cluster ID to enter the basic information page of the cluster.
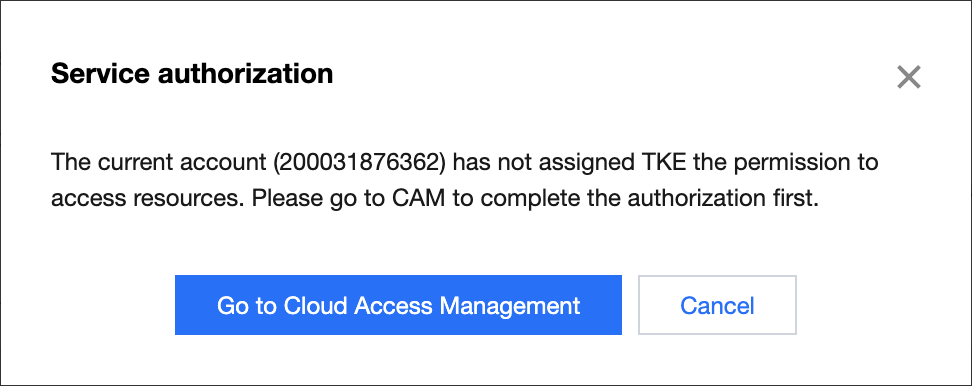
3. In the cluster basic information, click on the right side of the ServiceAccountIssuerDiscovery, as shown below: 4. Navigate to the Edit ServiceAccountIssuerDiscovery Parameters page. If the system prompts that you cannot modify the relevant parameters, authorize the service first.
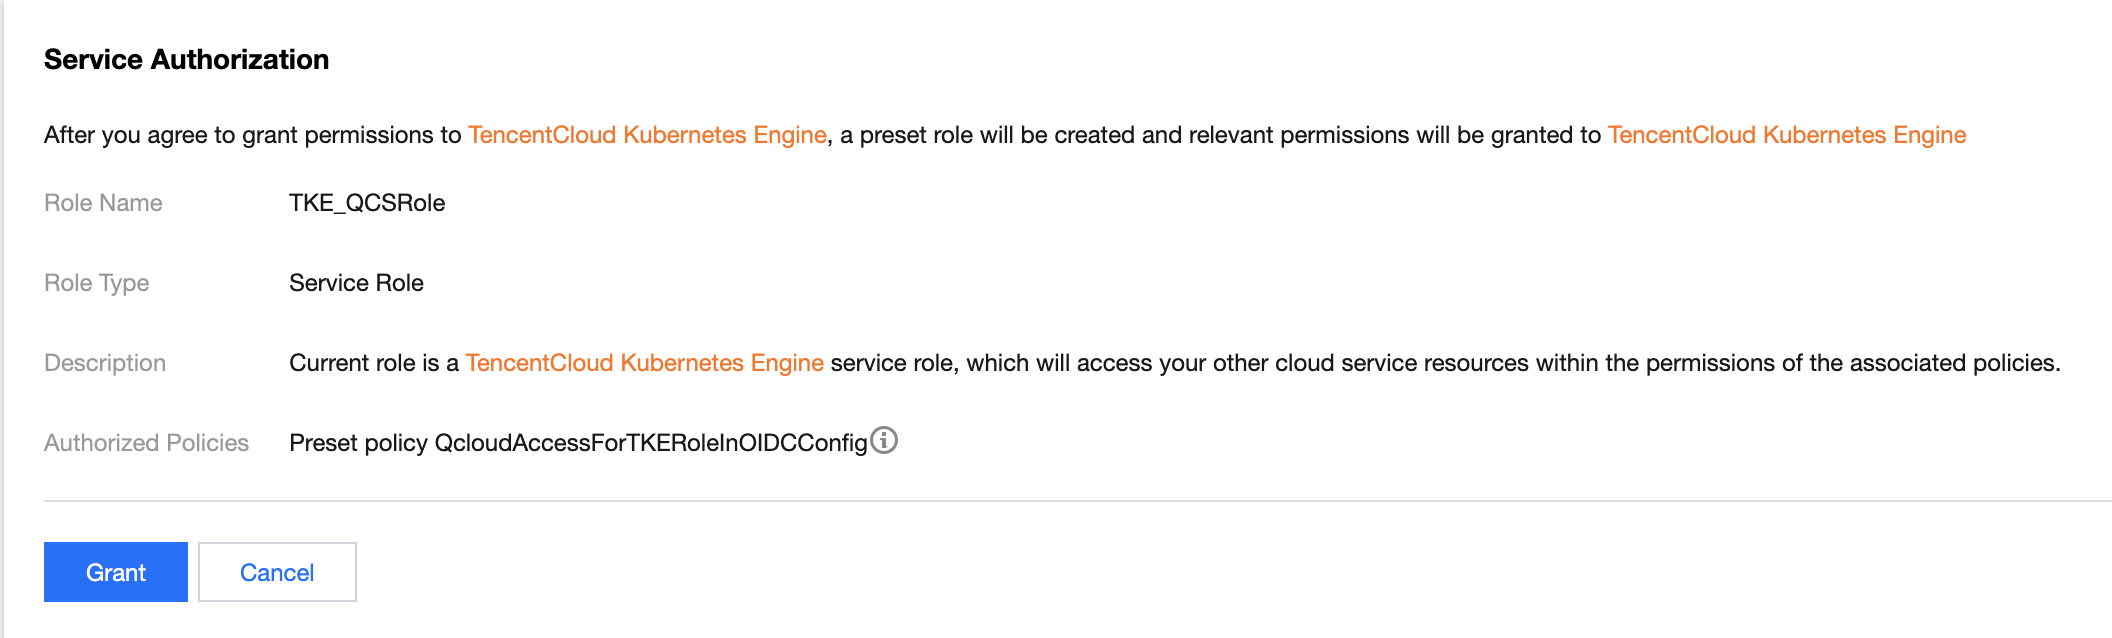
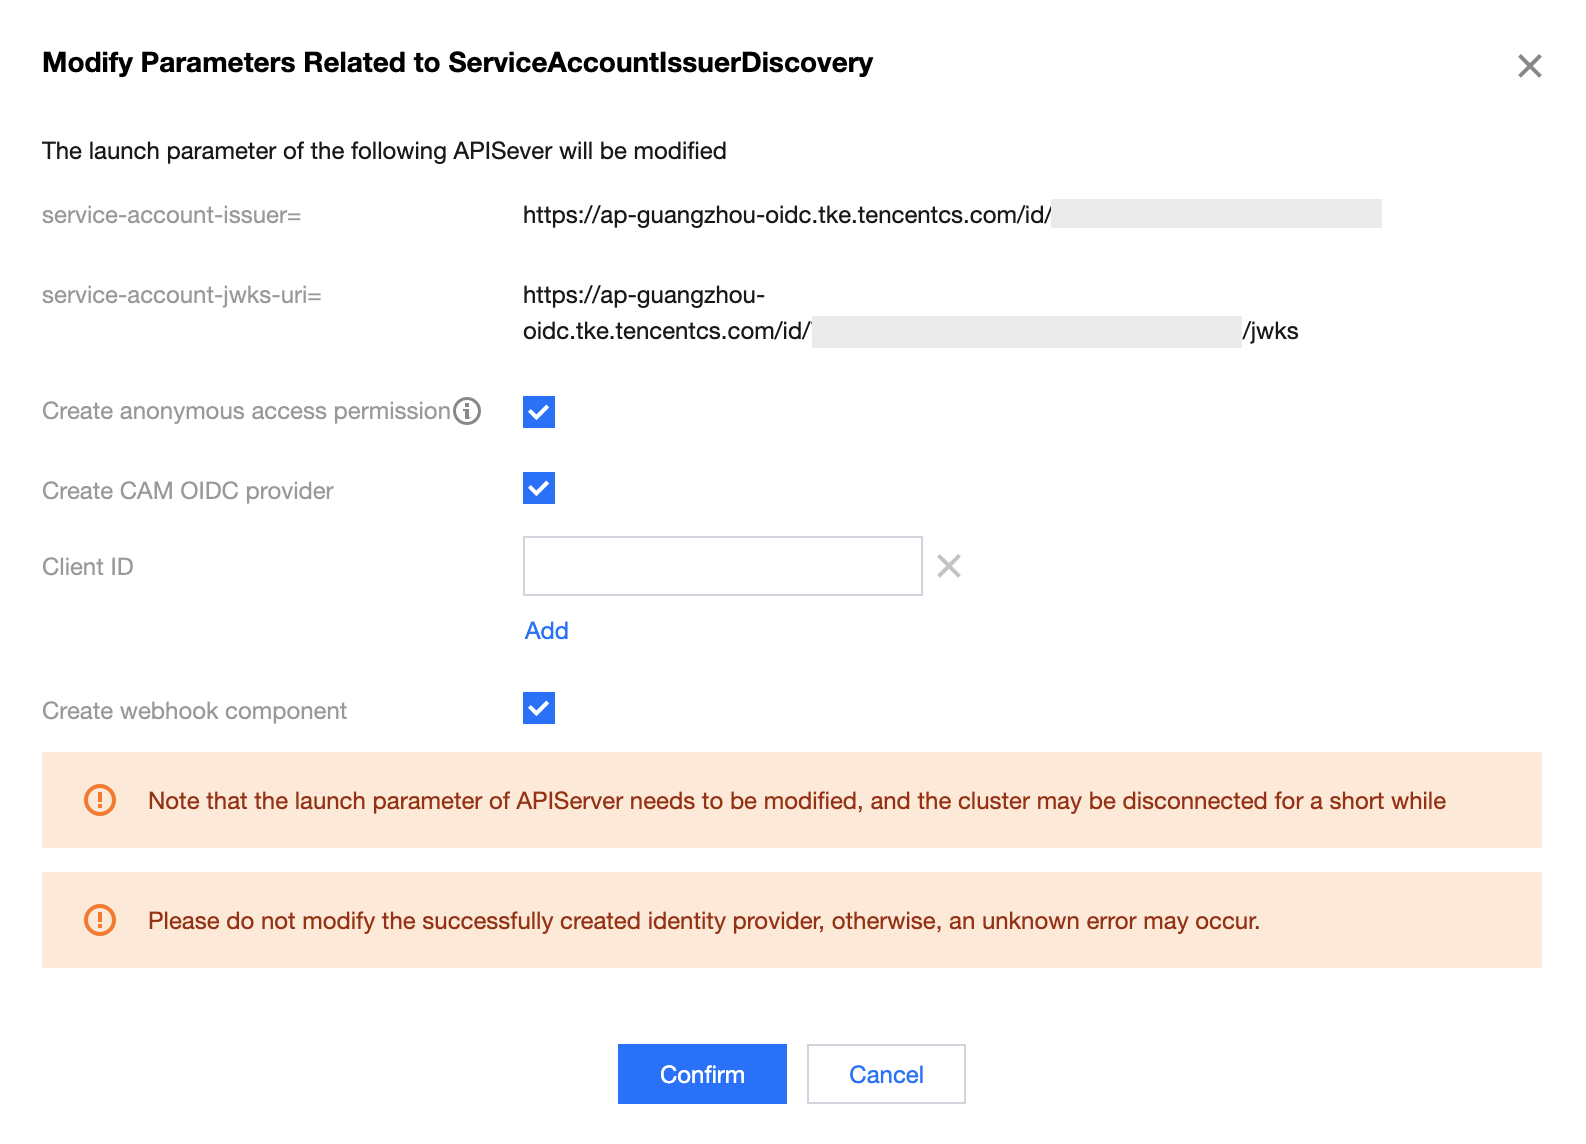
On the Role Management page, check the authorization policy QcloudAccessForTKERoleInOIDCConfig, and click Grant. 5. Once the authorization is completed, check the options of "Create CAM OIDC provider" and "Create webhook component", fill in the client ID, and click Confirm, as shown below:
Note:
Client ID is an optional parameter. When it is left blank, the default value is "sts.cloud.tencent.com". Here, Create CAM OIDC provider uses the default value.
6. Return to the cluster details page. When the ServiceAccountIssuerDiscovery is again editable, it indicates the end of the current initiation of OIDC resource access control.
Note
The parameters "service-account-issuer" and "service-account-jwks-uri" are not editable and follow default rules.
7. Navigate to the Modify ServiceAccountIssuerDiscovery Parameters page. You will see a prompt that 'You have created the identity provider. Check details'. Click Check details, as shown below:
8. In Cluster Info > Component Management, if you find that the status of pod-identity-webhook is Succeeded, it indicates that the component has been successfully installed, as shown below:
Step 2: Create a policy to retrieve SSM credentials
1. Log in to the CAM console and select Policy on the left sidebar. 2. Navigate to the Policy page and click New Custom Policy > Create by Policy Syntax.
3. On the Create by Policy Syntax page, choose Blank Template, as shown below:
4. Click Next to access the Edit Policy page, where you can add the following content to the policy editing box:
{
"statement": [
{
"action": [
"ssm:GetSecretValue"
],
"effect": "allow",
"resource": [
"qcs::ssm:$region:uin/$uin:secret/creatorUin/$creatorUin/$secretName"
]
}
],
"version": "2.0"
}
5. Click Complete to add the policy.
Step 3. Create a new OIDC role
1. Log in to the CAM console and select Roles on the left sidebar. 2. On the Roles page, select New Role > Identity Provider.
3. On the Create Custom Role page, you can refer to the following information for configuration.
IdP Type: Select OIDC.
Select IdP: Choose the identity provider for which the role is being created this time.
Conditions: Enter the value of oidc:aud.
Note:
The Value identifier for the identity provider is $my_provider_id.
The Value of oidc:aud should be consistent with that of the Client ID for the CAM OIDC provider.
The Value identifier of oidc:aud is $my_pod_audience. When there are multiple Values for oidc:aud, choose any one of them.
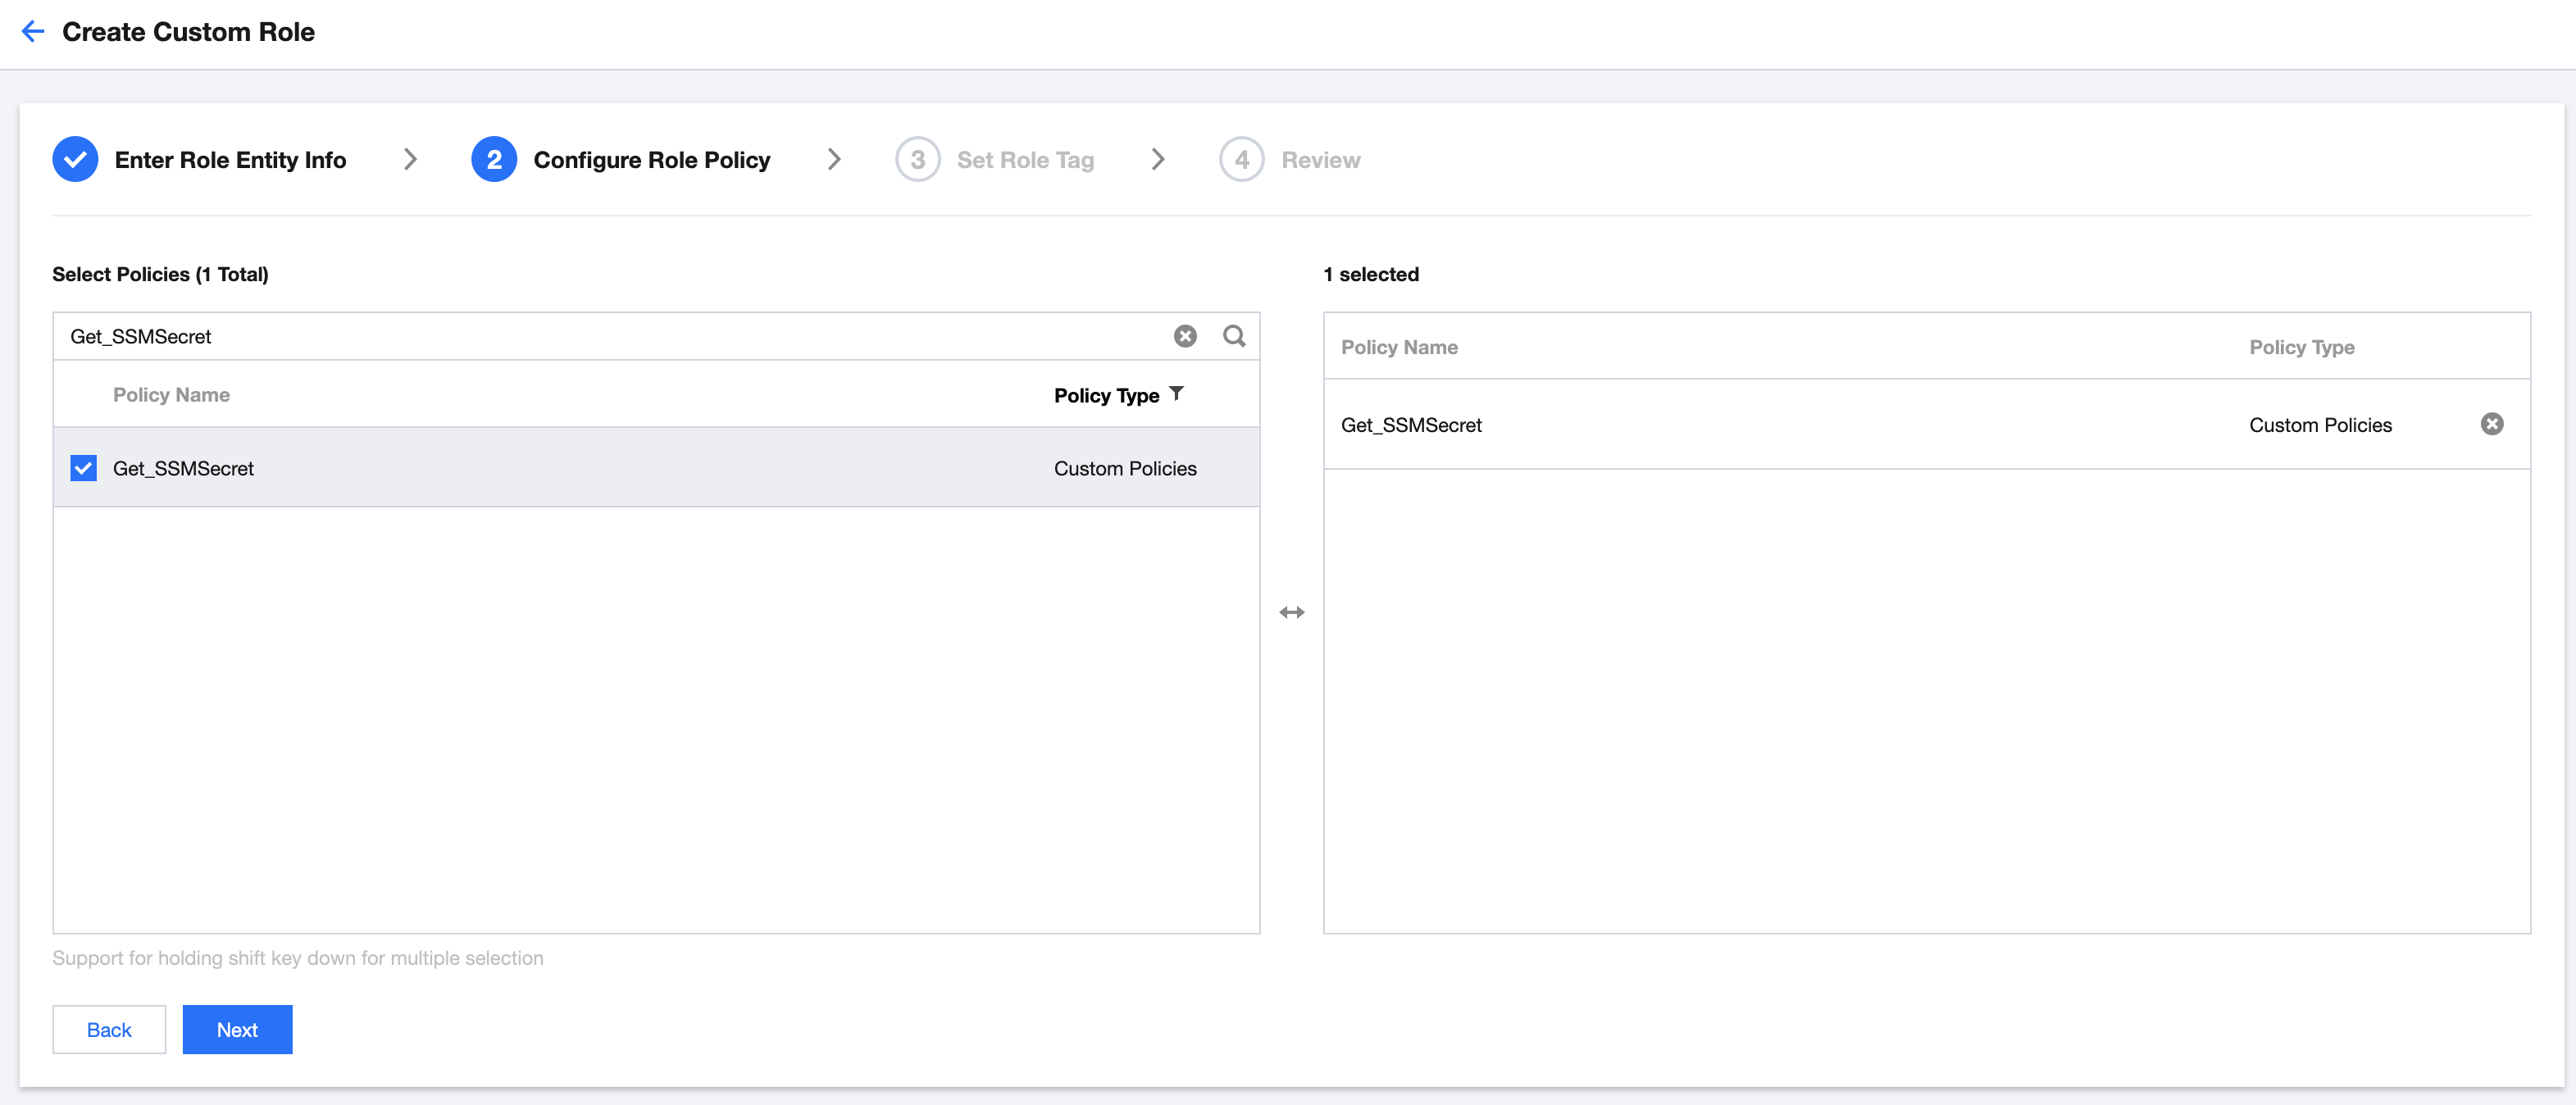
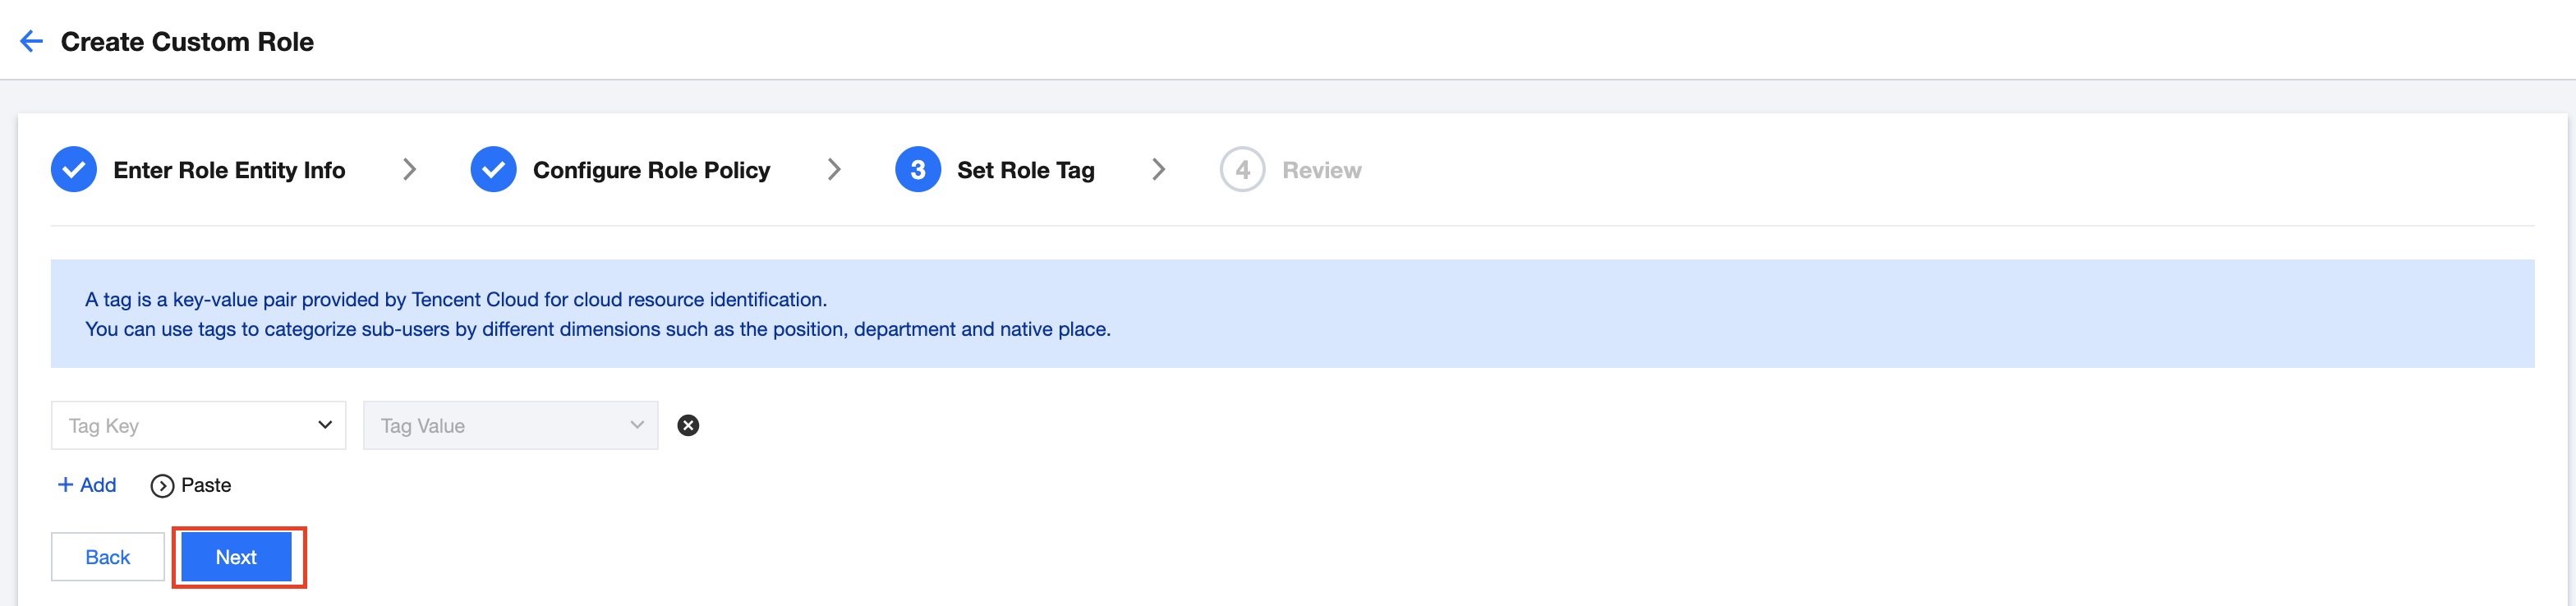
4. Click Next to proceed to the Configure Role Policy page, where you should select the policy for SSM that was created and obtained in Step 2, as shown in the following image: 5. Click Next to proceed to the Set Role Tag page. If there is no need to set the tag, directly click Next, as shown below:
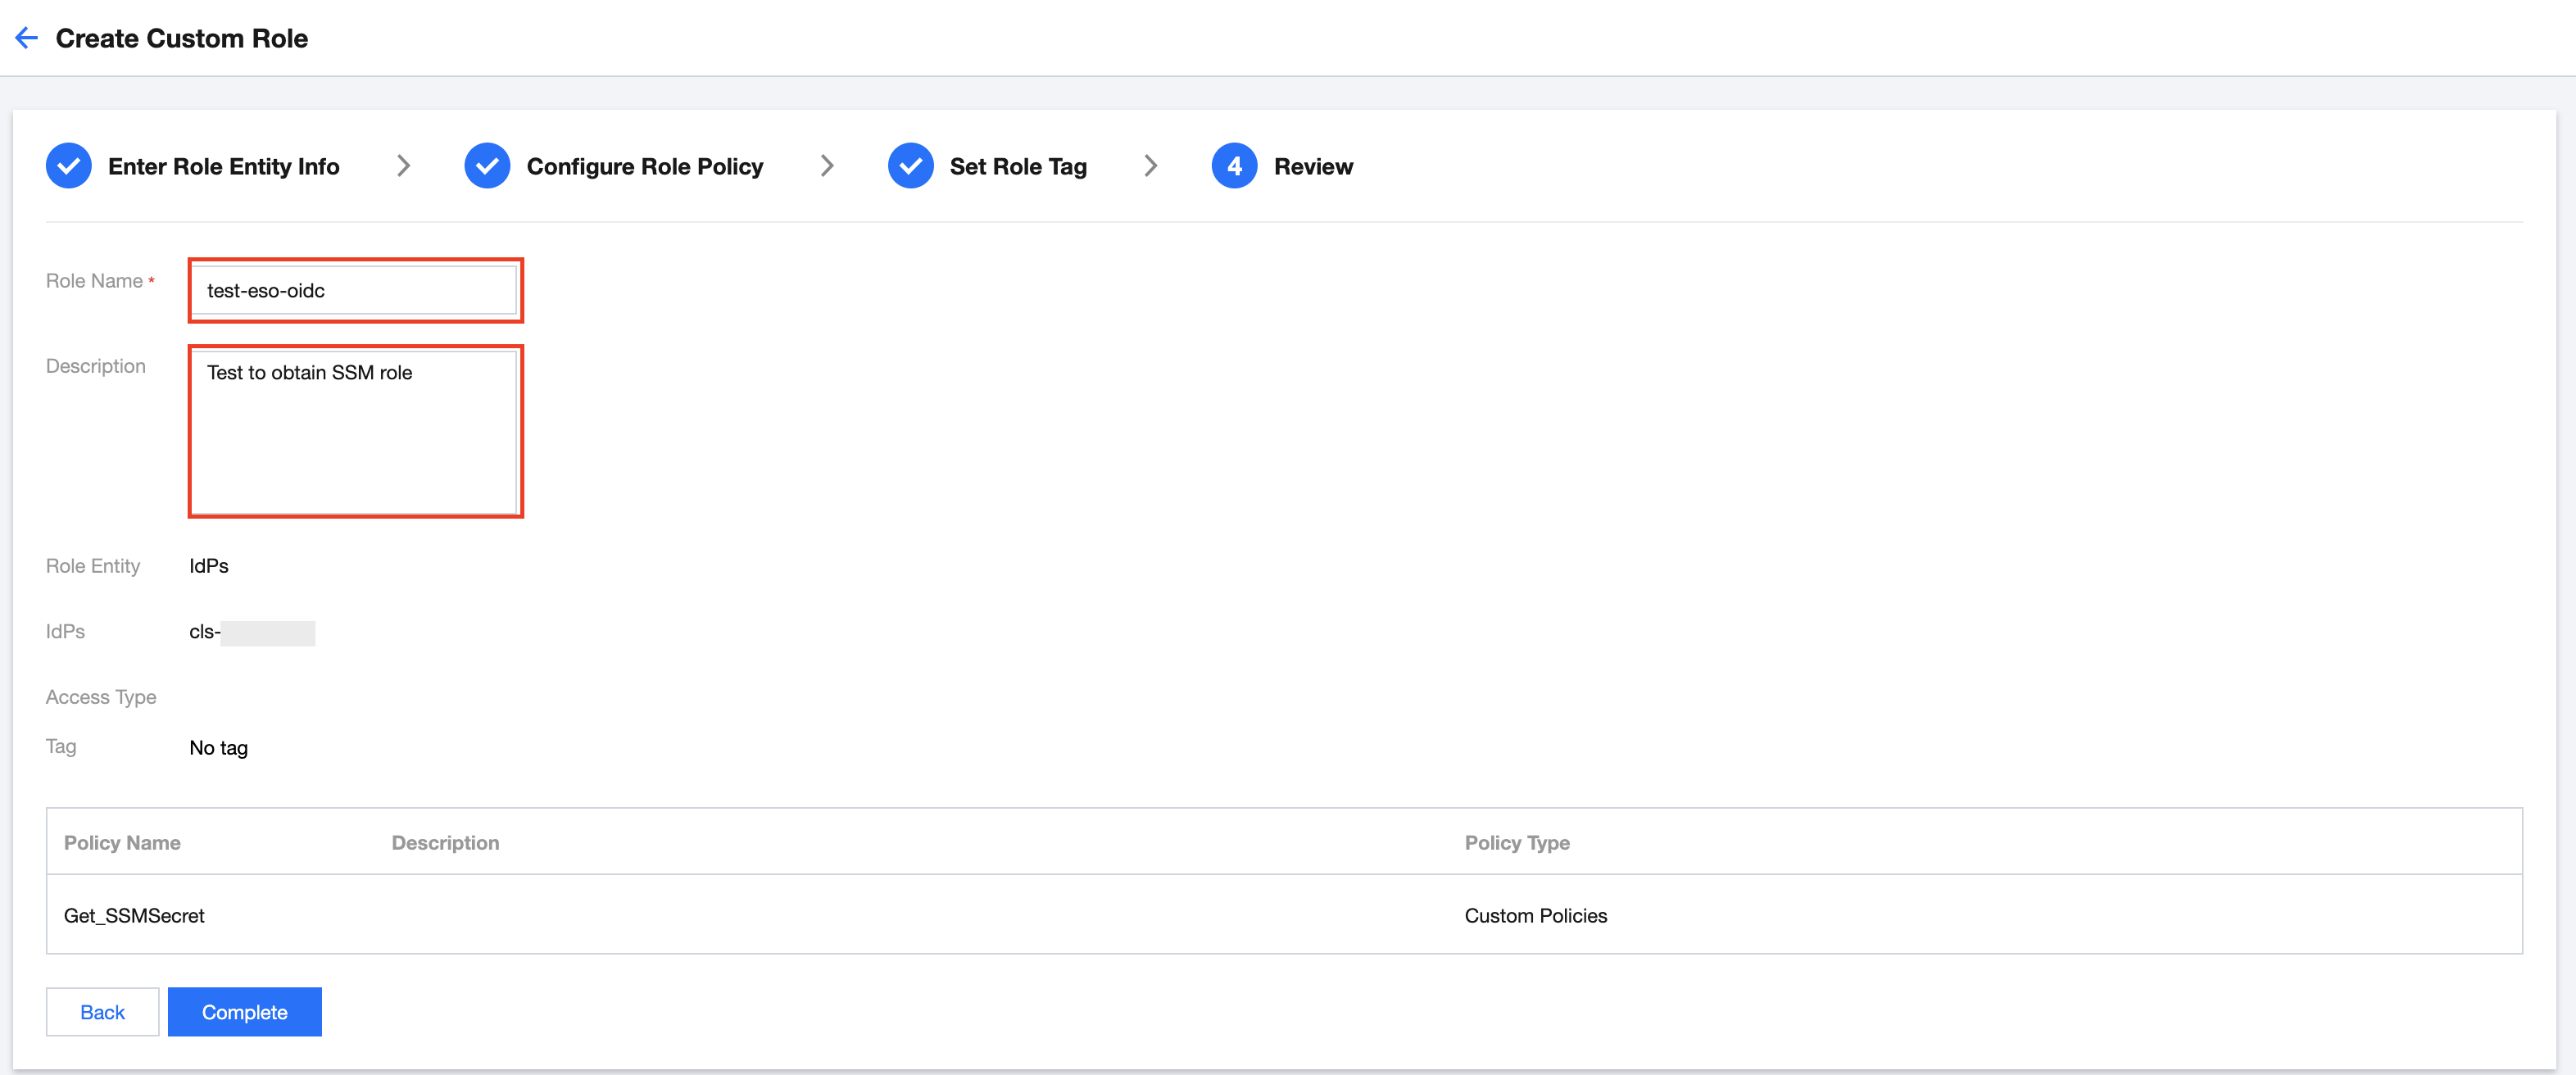
6. Click Next to enter the Review page. Edit the Role Name and Description, as shown below:
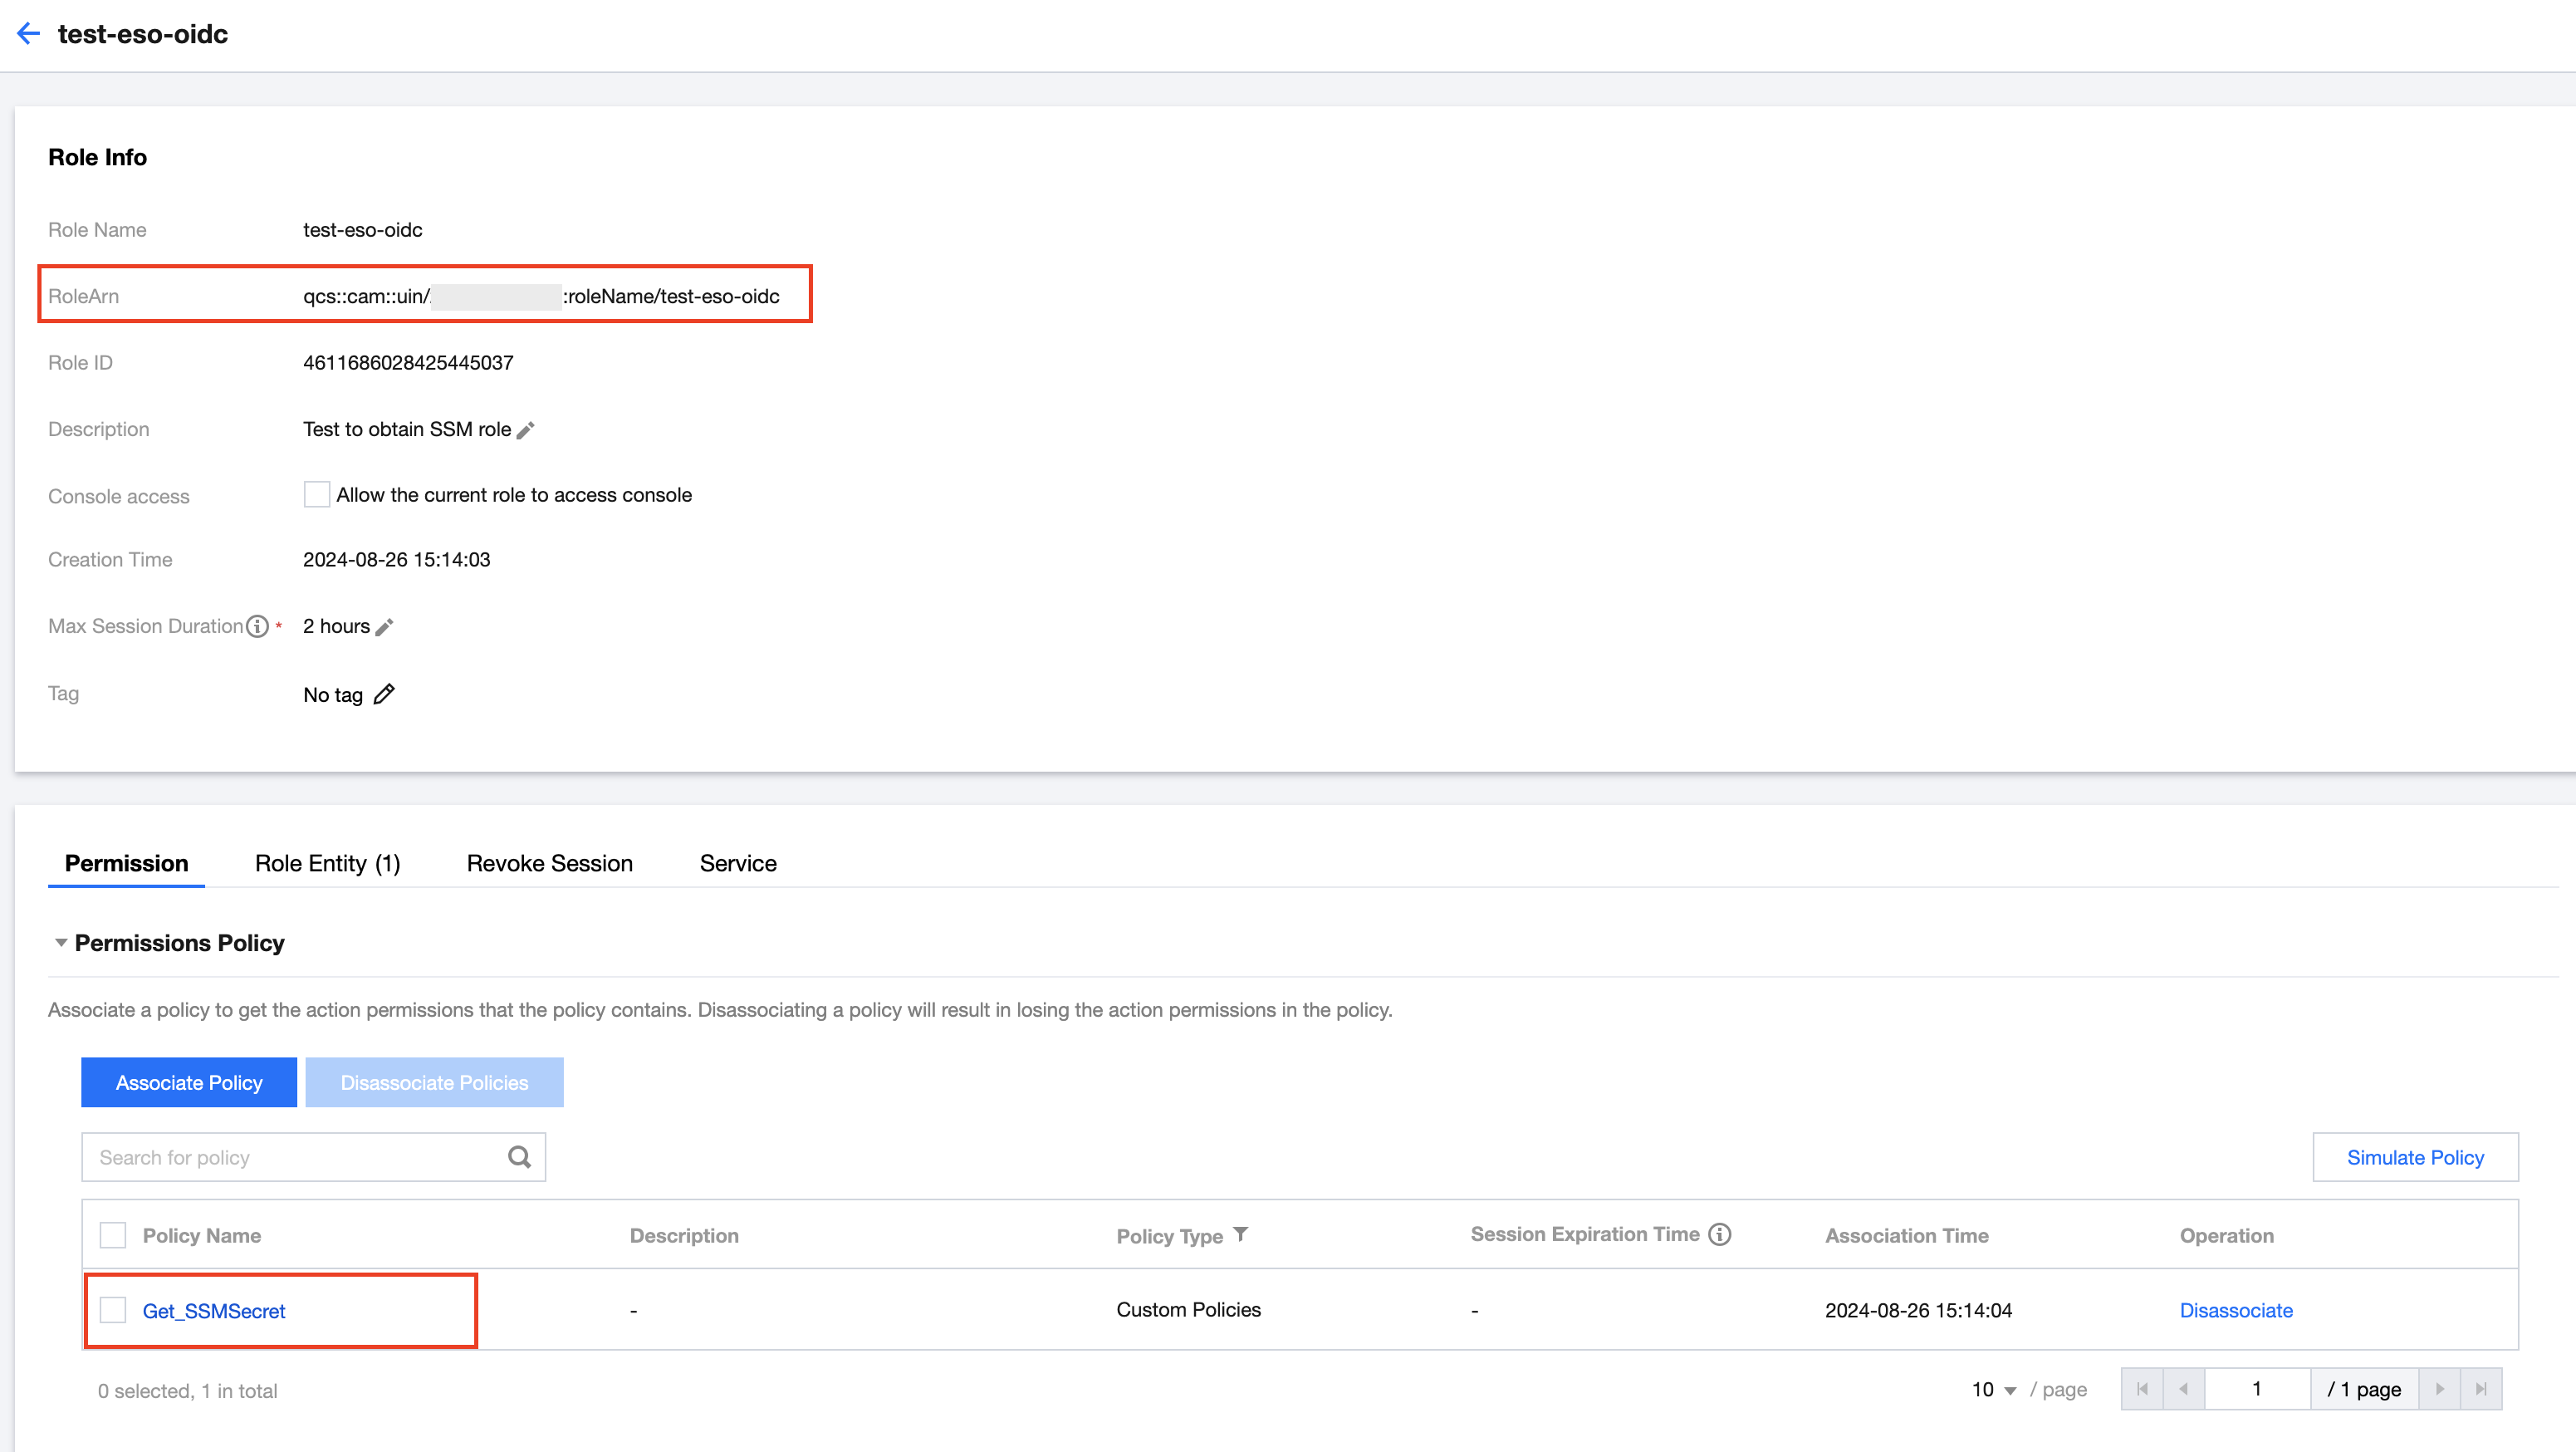
7. Click Complete. On the role details page, you can check RoleArn of the OIDC role and the corresponding permission, as shown below:
Note:
The value identifier of RoleArn is $my_pod_role_arn.
Step 4: Instructions for component use
This component involves two types of CRDs: SecretStore for storing access credentials, and ExternalSecret for specifying SecretStore and storing the basic information of credentials that need to be synchronized. This achieves separation of permissions and data, enhancing flexibility in usage.
In SSM, you need to add the following credentials:
SecretName: hello-test
SecretData: {"name":"jack","password":"123"}
VersionId: v1
Note:
The following secret, SecretStore, and ExternalSecret are all located in the default namespace.
1. Create a ServiceAccount.
You can save the information below into a file called my-serviceaccount.yaml:
apiVersion: v1
kind: ServiceAccount
metadata:
name: my-serviceaccount
annotations:
tke.cloud.tencent.com/role-arn: $my_pod_role_arn
tke.cloud.tencent.com/audience: $my_pod_audience
tke.cloud.tencent.com/providerID: $my_provider_id
Note:
Replace $my_pod_role_arn with the value of RoleArn.
Replace $my_pod_audience with the value of oidc:aud.
Replace $my_provider_id with "Identity Provider".
2. Create a SecretStore.
You can save the following content into my-secretstore.yaml:
apiVersion: external-secrets.io/v1beta1
kind: SecretStore
metadata:
name: secretstore-tkeoidc
spec:
provider:
tencent:
regionID: ap-guangzhou
auth:
serviceAccountRef:
name: my-serviceaccount
3. Create an ExternalSecret.
You can save the following content into my-externalsecret.yaml:
apiVersion: external-secrets.io/v1beta1
kind: ExternalSecret
metadata:
name: external-secret-tkeoidc
spec:
refreshInterval: 1h
secretStoreRef:
kind: SecretStore
name: secretstore-tkeoidc
target:
name: my-secret-key-to-be-created
creationPolicy: Owner
data:
- secretKey: secret-key-to-be-managed
remoteRef:
key: hello-test
version: v1
property: password
4. To deploy the sample, run the following command:
kubectl apply -f my-serviceaccount.yaml
kubectl apply -f my-secretstore.yaml
kubectl apply -f my-externalsecret.yaml
5. To check whether the target secret has been successfully created, run the following command:
kubectl get secret my-secret-key-to-be-created -o yaml
Note:
Given that synchronization refresh has not been disabled, you can modify the key content in SSM. Upon reaching the refresh time, the target secret will be synchronized.