tencent cloud

Cloud Virtual Machine

Dinâmicas e anúncios
Dinâmica do produto
Dinâmica de atualização de imagem pública
Anúncio do produto
Introdução do produto
Visão geral da Cloud Virtual Machine
Vantagens do produto
Conceitos básicos
Regiões e zonas
Tutorial
Service Regions and Service Providers
Cobrança do produto
Visão geral de cobrança
Modo de cobrança
Item de cobrança
Converter modo de cobrança
Aquisição de instâncias
Descrição de cobrança de ajustes de configuração
Descrição de cobrança em atraso
Guia de início rápido
Comprar instância Linux personalizada
Comprar instância Windows personalizada
Guia do usuário
Visão geral do guia de operação
Visão geral dos limites de uso
Instância
Instância spot
Instância reservada
Imagem
Armazenamento
Backup e recuperação
Rede
Segurança
Senhas/chaves secretas
Gerenciamento de operação e manutenção
Migrar o servidor
Migração online
Consultoria de migração
Solução de falhas
Falhas relacionados ao login em instâncias Windows
Falhas relacionados ao login em instâncias Linux
Outras falhas relacionadas ao login em instâncias
Falha na execução de instância
Falha de memória em instâncias Linux
Falha de rede
Tutorial prático
Recomendações de seleção da CVM
Configurar o ambiente
Configurar o site
Configurar o aplicativo
Configurar a página visual
Carregar arquivos locais para a CVM
Teste de desempenho de rede
Outros tutoriais práticos
Segurança e conformidade
Gerenciamento de acesso
Rede
Perguntas frequentes
Regiões e zonas
Sobre o faturamento
Instância
Armazenamento
Imagem
Migração de servidor
Rede
Segurança
Operação/manutenção e monitoramento
Gerenciamento de acesso
Serviço NTP
Cenário de aplicação
Agreements
CVM Service Level Agreements
Red Hat Enterprise Linux Image Service Agreement
Public IP Service Level Agreement
Glossário
DocumentaçãoCloud Virtual Machine

Connecting to a Linux Instance via a Mobile Device

Modo Foco
Tamanho da Fonte
Última atualização: 2024-01-08 09:32:02

Overview

This document describes how to log in to a Linux instance from different mobile devices. The following tools are used as an example.
iOS device: Termius-SSH client
Android device: JuiceSSH

Applicable Mobile Devices

iOS and Android devices

Prerequisites

The CVM instance is in the Running status.
You already have the admin account and password (or key) to log in to the instance.
If you use a system default password to log in to the instance, go to Message Center to obtain the password first.
If you’ve forgotten your password, you can reset the instance password.
A public IP has been purchased for your CVM instance, and the port 22 is open. It is open by default for a CVM instance purchased with quick configuration.

Directions

Log in to the instance from the mobile device you are using:
iOS device
Android device
1. Download the Termius-SSH client from the App Store, and register as instructed.
2. Tap New Host on the home screen.
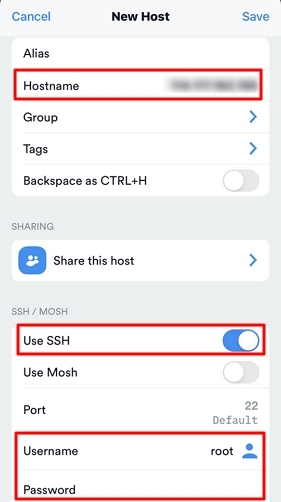
3. Access the New Host page and configure the login information as follows:


Hostname: the public IP address of your CVM instance. For more information, see Getting Public IP Addresses.
Use SSH: enabled by default.
Username: enter the admin account root, or ubuntu if your instance uses the Ubuntu operating system.
Password: enter the login password of the instance.
4. Tap Save in the upper-right corner to save the login configuration.
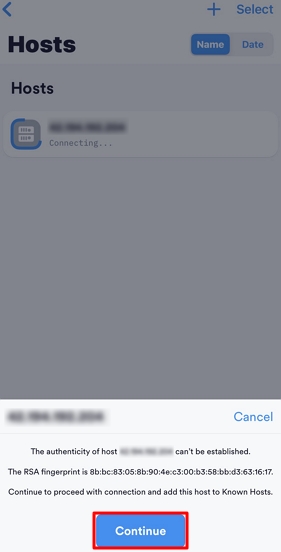
5. Select the login information on the Hosts page and tap Continue in the prompt box at the bottom of the page.


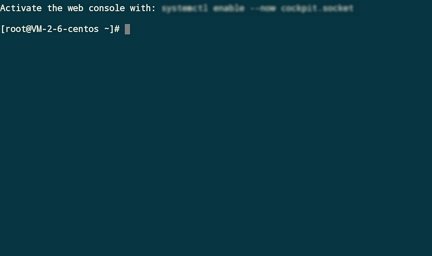
6. Login succeeds if you see the following.


Creating an identity

1. Download and install JuiceSSH.
2. From the home screen, tap Connections to reach the Identities tab.
3. Tap + in the lower-right corner.
4. Configure the account name and password on the Identity page.
Nickname: enter a custom name for the identity, optional.
Username: enter the admin account root, or ubuntu if your instance uses the Ubuntu operating system.
Password: tap Set (optional) and enter the instance login password in the pop-up window.
5. Tap in the upper-right corner of the page.

Creating a connection

1. From the home screen, tap Connections, then tap + in the lower-right corner of the Connections page.
2. Configure the login information for the new connection.
Nickname: enter a custom connection name, optional.
Type: select SSH.
Address: the public IP address of your CVM instance. For more information, see Getting Public IP Addresses.
Identity: select the identity created in Creating an identity.
Port: enter the port 22. Retain the default settings for other parameters.
3. Tap Add to team in the bottom of the page to save the login configuration.

Logging in to the instance

1. On the Connections page, select the instance to log in and tap Accept.
2. Login succeeds if you see the following.


Ajuda e Suporte

Esta página foi útil?

comentários