This document provides guidance on quick deployment of GooseFS. Without writing code or running programs, users can create a GooseFS cluster directly on the GooseFS console and use Cloud Object Storage (COS) as remote storage.
Preparations
Account and Permission Preparation
1. Sign up for a Tencent Cloud account.
Before using the Tencent Cloud GooseFS service, you need to sign up for a Tencent Cloud account. Click the button below to start the registration. (Skip this step if you have already registered.)
2. Complete identity verification.
After completing account registration, log in to the Tencent Cloud Console with this account and start identity verification. For detailed instructions, see Identity Verification Overview. (Skip this step if you have already completed it.)
3. Activate the GooseFS service.
Before using GooseFS in the console, you need to contact us to activate the GooseFS service.
4. GooseFS authorization.
After activating the GooseFS service, you need to preset roles and grant GooseFS-related permissions. Click the Authorize button to complete authorization.
Click Agree to Authorize. If you do not have authorization permissions, copy this link to the root account or a sub-account with authorization permissions for role authorization.
After authorization is completed, you can proceed with the following steps such as Cluster Deployment.
5. Associate buckets and nodes.
To create a namespace using GooseFS, you need to mount a COS bucket. Prepare a COS bucket in advance (you can create one in the COS Console).
If you use modes such as the Master-Only Hosting Model, you need to prepare Master or Worker nodes yourself (create a CVM instance in the CVM Console).
Cluster deployment
Step 1: Creating a GooseFS Cluster
1. Log in to the GooseFS console. Choose GooseFS > Instance List in the left sidebar to go to the GooseFS cluster list page.
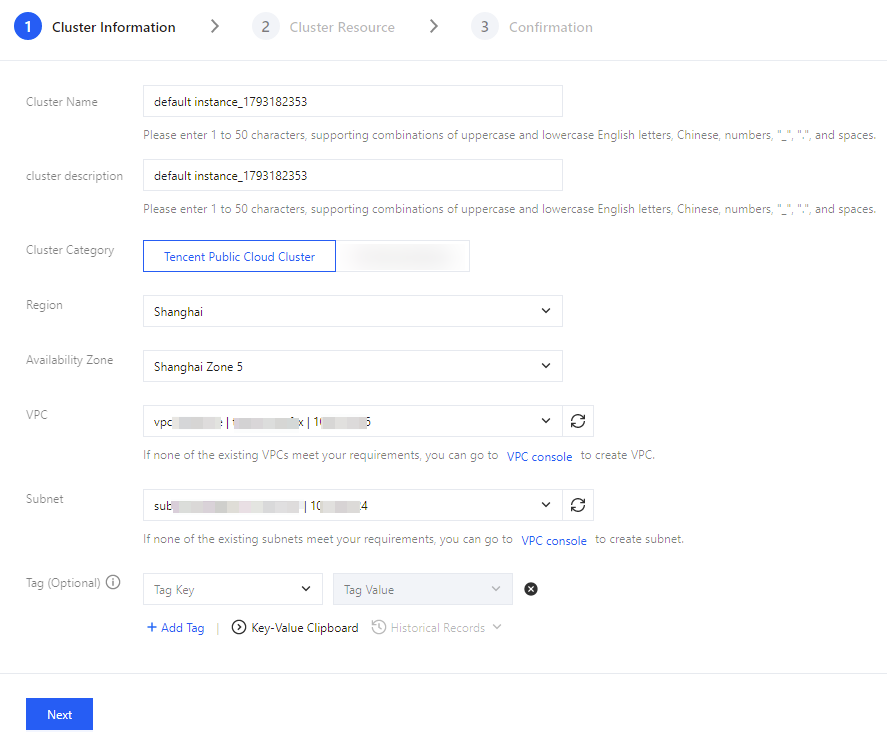
3. The GooseFS cluster creation flow consists of three main steps: configuring cluster information, configuring cluster resources, and confirming the information.
Cluster Information: Used to describe the basic attributes of a GooseFS cluster. The configuration items are described as follows.
Cluster Name: Cluster unique identifier, globally unique under the account. Enter 1 to 50 characters, supporting a combination of uppercase and lowercase letters, Chinese characters, digits, underscores (_), periods (.), and spaces.
Cluster Description: Used to describe the attributes, purpose, and other information of the cluster.
Cluster Category: Tencent Public Cloud clusters.
Region: The region where the cluster is located, generally consistent with the region of the cluster where the computing business resides.
AZ: The AZ where the cluster is located, generally the same AZ as the computing cluster.
VPC: The VPC where the cluster is located, generally the same VPC as the computing cluster. Try to avoid cross-VPC deployment.
Subnet: The subnet where the cluster is located.
Tag: Cluster tag information.
Cluster Resources: Used to configure the cache storage capacity that the GooseFS cluster needs to manage. The configuration items are described as follows.
Deployment Mode: Select the Fully Managed Hosting Mode. In this mode, users do not need to self-purchase Master nodes and Worker nodes. All nodes are hosted by Tencent Cloud. The Tencent Cloud team is responsible for the overall availability and stability of the cluster, ensuring users can focus on core business. The configuration items are described as follows:
Number of Replicas: You can select one, two, or three replicas, corresponding to data reliability of 99%, 99.999%, and 99.9999999% (nine 9s), respectively. If you need to use one replica, please contact us.
Attention:
After the cluster is created, the replica quantity configuration cannot be hot-switched. To modify the number of replicas, disable the write cache and then re-enable it with the specified number of replicas.
Total Instance Capacity: Total instance capacity = read cache capacity + write cache capacity. In an instance, read and write cache capacities are used for read and write scenarios. The read and write cache capacity can be selected from 10TB to 1000TB in increments of 10TB. The total capacity scales in multiples of 10TB, and a larger capacity provides higher total bandwidth.
Single replica: With a step size of 10TB, it can provide a peak read bandwidth of 2GBps and a peak write bandwidth of 1.4GBps. Note: These peak bandwidths refer to actual physical bandwidth.
Two replicas: With a step size of 20TB, it can provide a peak read bandwidth of 4GBps and a peak write bandwidth of 2.8GBps. Note: These peak bandwidths refer to actual physical bandwidth.
Three replicas: With a step size of 30TB, it can provide a peak read bandwidth of 6GBps and a peak write bandwidth of 4.2GBps. Note: These peak bandwidths refer to actual physical bandwidth.
Note:
This capacity is the actual disk capacity, and the actual cacheable business capacity depends on the number of write replicas. For example, if you purchase 30TB of write cache capacity, the actual cacheable business capacity is 15TB when two replicas are selected, and 10TB when three replicas are selected.
Correspondingly, the peak throughput provided by the write cache is also related to the number of replicas. By default, the write cache provides a peak throughput of 140MBps/TB. When two replicas are selected, the available peak business bandwidth is 70MBps/TB.
After the cluster is created, you can scale down the write cache capacity or disable the write cache. During the scale-down or disabling process, the scaled-down capacity is locked and cannot be written to. After the cached data is persisted, the capacity is released.
Instance Fee: Confirm that the instance fee is correct. The instance fee is calculated based on the total instance capacity.
Terms of Service: Select the terms of service.
Confirmation Information
After filling in the required parameters, click Next to start checking the node status. After the system check is successful, click OK to execute. You will then enter the cluster creation flow, where you can view the detailed progress of cluster deployment in the Task Center.
Step 2: Adding Nodes
To learn about GooseFS node details, see GooseFS Cluster Overview. The following describes the process of adding nodes.
1. Select the GooseFS cluster to which you want to add nodes, go to the cluster details page, select Node Management in the sidebar, and enter the node management subpage.
2. On the node management page, click Add Node and fill in the following parameters.
Instance Type: Currently only support adding CVM instances.
Associated Configuration Group: Keep the default configuration.
Formatted Mounting: Used to format the disk and perform file system mounting. Users can choose whether to perform formatted mounting. If formatted mounting is not enabled, there is no need to set the data disk mounting option during the creation flow; it can be mounted manually or using scripts. If formatted mounting is enabled, the device name, system formatting, mount point, and other parameters need to be filled in.
Device Name: The hardware device that needs to be mounted, usually a specific disk partition. You need to log in to the machine to view it, typically located under the /dev path.
Format System: Linux file system type.
Mount Point: File system mount point.
3. After confirming that the above configuration information is correct, click OK to execute and add the node.
Step 3: Creating a Namespace
GooseFS organizes and manages cached data through namespaces. A GooseFS namespace is a unified access interface for the GooseFS cluster to access data, and it can mount multiple underlying storage systems, including COS and CHDFS.
1. Select the GooseFS cluster that requires creating a namespace, enter the cluster details page, select the Namespace option from the sidebar, and enter the namespace subpage.
2. On the namespace page, click Add Namespace and fill in the following fields.
Bucket Source: You can select buckets from your own account or other accounts. Note: When selecting buckets from other accounts, ensure that the corresponding account has read/write permissions for the corresponding bucket.
COS Bucket: Select the bucket you need to mount.
Project Name: Namespace name.
Mounting Range: Selectable for the entire bucket or a specified directory prefix.
UFS URI: An address used to access and operate files in the UFS file system.
Read Policy: Used to manage the cache policy of data in the GooseFS cluster when data is read from GooseFS. Currently only supports CACHE.
Write Policy: Used to manage the cache policy of data in the GooseFS cluster when data is written through GooseFS. Currently supports synchronous dual-write to GooseFS and COS and direct write to COS.
UFS Attributes: Used to set configuration information for accessing underlying storage, such as access keys.
fs.cosn.bucket.region: The region of the selected bucket, such as ap-beijing.
fs.cosn.flush.enabled: Whether to enable the data flush mechanism. The default value is true.
fs.cosn.upload.part.size: The size of a single part in a multipart upload. The default value is 8388608, which is 8 MB.
fs.cosn.userinfo.secretId: Used to identify the API caller. One APPID can create multiple TencentCloud API keys.
fs.cosn.userinfo.secretKey: The encrypted signature key of the Tencent Cloud account, used to verify the validity of requests.
Attention:
SecretId and SecretKey are collectively referred to as TencentCloud API keys, which are security credentials required for identity verification when users access Tencent Cloud APIs. Create them on the CAM page. In the left sidebar, choose Access Key > API Key Management, and click Create Key to obtain them. SecretKey can only be obtained on the Create Key page, so keep it safe.
3. After confirming that the above configuration information is correct, click OK to create the namespace.
Step 4: Adding a Client
After adding nodes and creating a namespace, you need to add the GooseFS-FUSE client to the new nodes to access the namespace.
1. Select the GooseFS cluster to which you want to add a client, go to the cluster details page, choose Client Management in the sidebar, and enter the Client Management page.
2. On the client management page, perform the Add New Client operation to deploy a GooseFS client on a designated node. The optional parameters are as follows.
Instance Type: Currently only support adding CVM instances.
Client Type: Currently only FUSE type is supported. For an introduction to the GooseFS FUSE client, see GooseFS FUSE Tool.
Node IP: Select the IP address of the node to which the client needs to be added.
Attention:
In Fully Managed Hosting Mode, clients can only be deployed on Client nodes of the GooseFS cluster.
Mount Information: Used to add local file system mount points. After adding, users can access cached files on GooseFS via client. Optional parameters are as follows:
Local Mounting Directory: The FUSE client's local mounting directory, used to access cached files on the GooseFS cluster, with a default value of /data/goosefs.
GooseFS Directory: A directory in the GooseFS file system, that is, a path in the GooseFS namespace, for example, /0-aaa-int-1250000000/data. If not specified, the root path of the namespace is mounted by default, for example, /0-aaa-int-1250000000.
Mount Parameters: FUSE client mount parameters. Default mount parameter allow_other means allowing other users to access; direct_io means enabling direct I/O. More parameters can be found in FUSE mount parameter list.
Batch Concurrency Level: Controls the number of tasks executed simultaneously (default is 1), suitable for batch mount clients.
Batch Failure Strategy: The strategy after task failure, which allows choosing to continue execution or terminate the execution of subsequent batches.
Advanced Parameters: Can be enabled as needed. For this operation, keep the default disabled state.
3. After confirming that the above configuration information is correct, click OK to execute and add the client.
Step 5: Mount Verification
Log in to the CVM instance and go to the local mount directory /data/goosefs to view all files in the bucket associated with the namespace. As shown in the following figure, the bucket has been successfully mounted to the corresponding Client node.