Android
Baixar
Modo Foco
Tamanho da Fonte
This document describes how to integrate TIMPush into an Android project.
Prerequisites
Make sure you have enabled Push service and completed Android manufacturer configuration as needed (Google FCM).
Option 1: AI integration
Use npx to install @tencent-rtc/trtc-push-skill in your local AI IDE to help integrate TIMPush offline push. After installation, you can ask your AI to "integrate Android FCM offline push". The AI guides you through environment checks, manufacturer channel configuration, credential setup, code integration, and verification based on your project type. For details, see AI Coding.
Option 2: Manual integration
Step 1: Integrate the TIMPush SDK
The steps in this section are independent of the target manufacturer and are required for all integration scenarios. For manual integration, complete placing the configuration file, configuring Gradle, adding base dependencies, and setting ProGuard rules in order.
Download and add the TIMPush configuration file
After manufacturer configuration, download
timpush-configs.json from the console. Path: Console > Push > App Push > Push Settings > Manufacturer configuration > Android > FCM > Download certificate.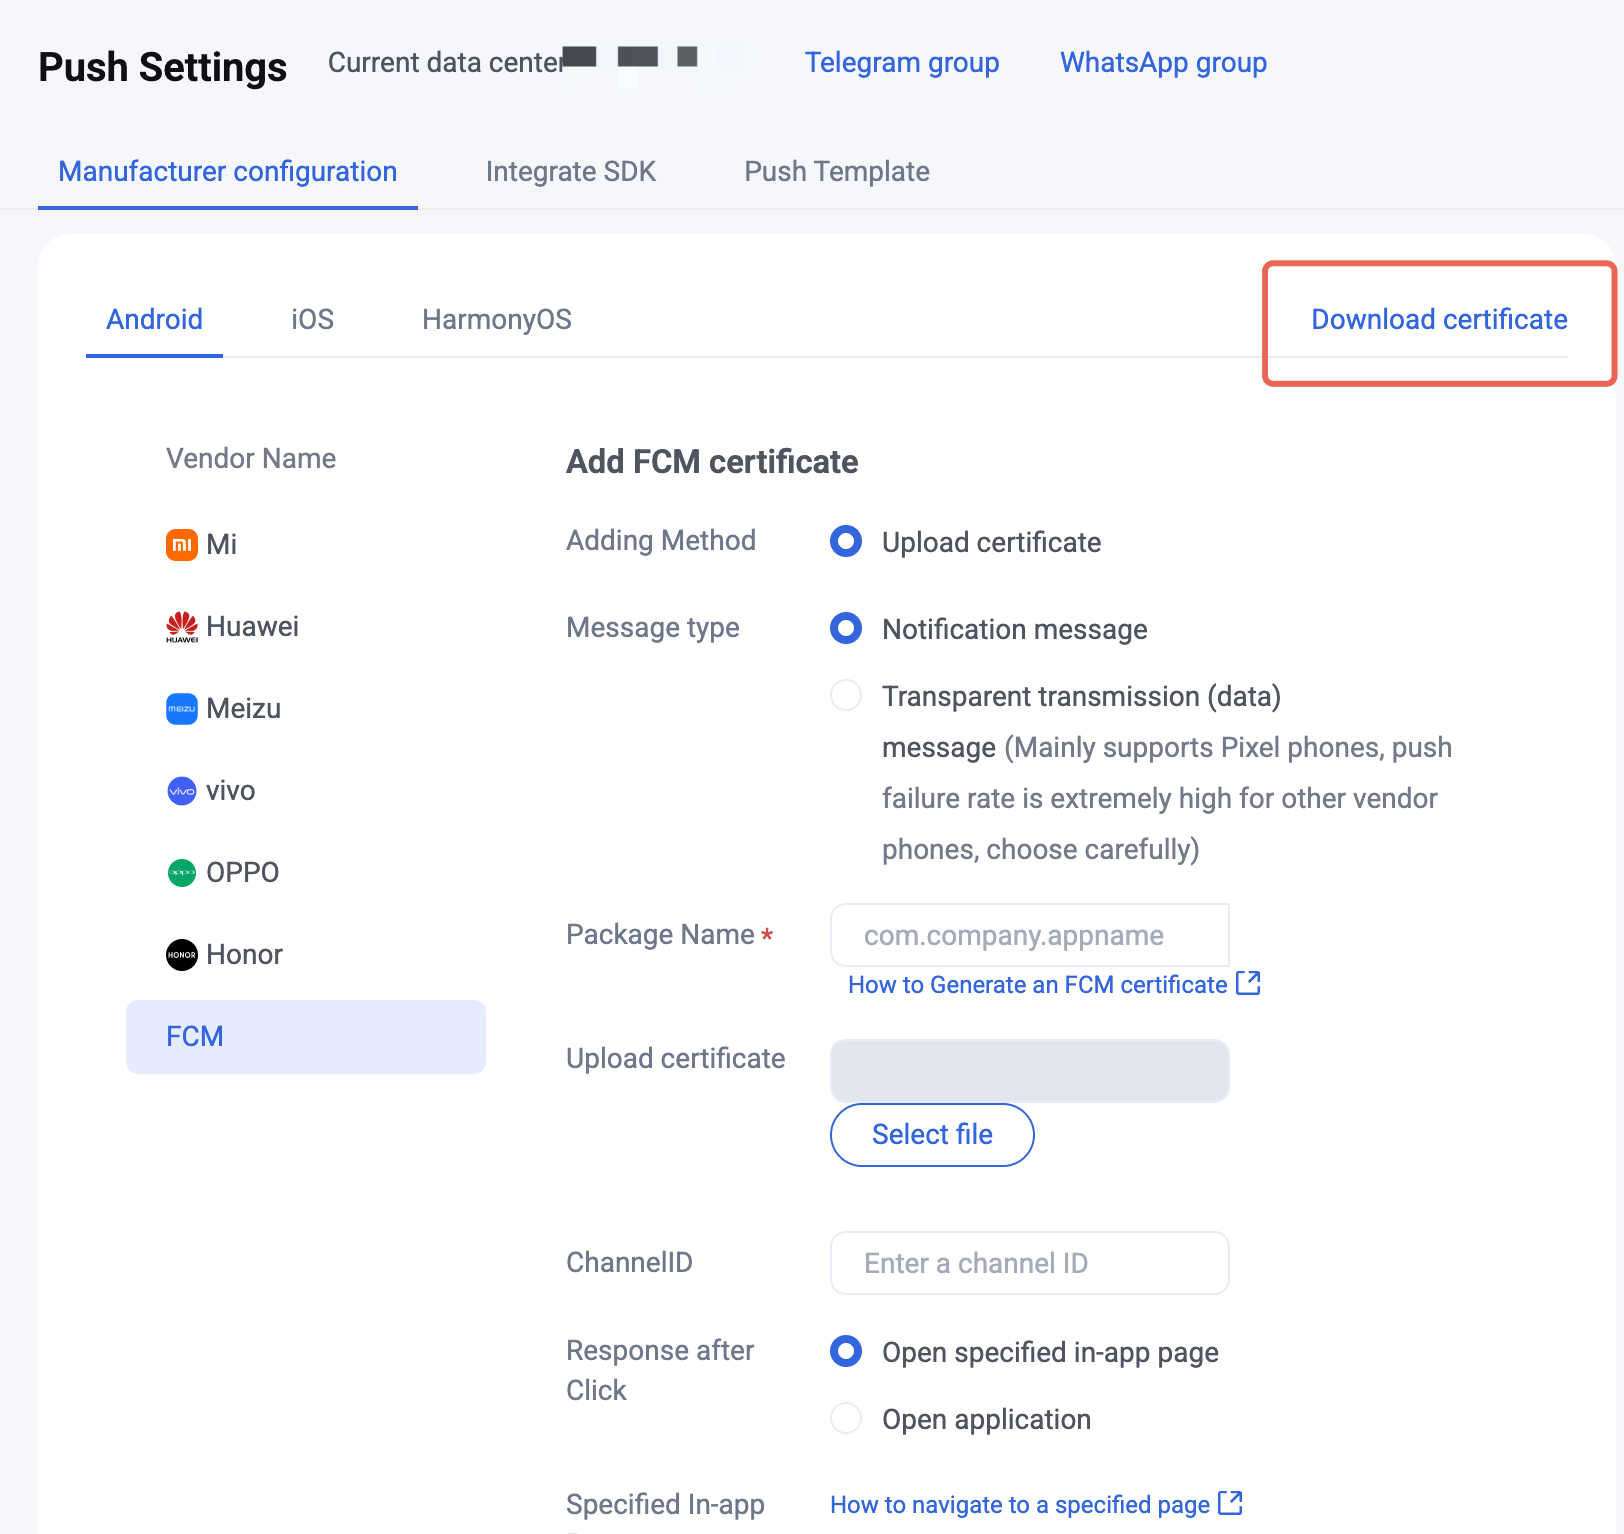
After downloading, add the file to the app module
assets directory. Recommended path: app/src/main/assets/timpush-configs.json, where app is your app module name and can be replaced with the actual name. If the project has no assets directory, create it under src/main/.Configure Gradle repositories
Configure repositories so Gradle can download TIMPush and related dependencies. This section only configures manufacturer-independent common repositories:
google() and mavenCentral() resolve Android official components, and the Tencent Cloud Maven repository resolves TIMPush and other Tencent Cloud dependencies.An Android project may use Groovy DSL or Kotlin DSL. First determine the DSL type from the file extension:
File | DSL type |
settings.gradle、build.gradle | Groovy DSL |
settings.gradle.kts、build.gradle.kts | Kotlin DSL |
Choose the configuration location based on the Gradle version used by the project. If you are unsure, check the version in
distributionUrl in gradle/wrapper/gradle-wrapper.properties at the project root.In the project-level
settings.gradle (Groovy DSL) or settings.gradle.kts (Kotlin DSL), add repositories in both pluginManagement > repositories and dependencyResolutionManagement > repositories.pluginManagement {repositories {gradlePluginPortal()google()mavenCentral()maven { url "https://mirrors.tencent.com/nexus/repository/maven-public/" }}}dependencyResolutionManagement {repositoriesMode.set(RepositoriesMode.FAIL_ON_PROJECT_REPOS)repositories {google()mavenCentral()maven { url "https://mirrors.tencent.com/nexus/repository/maven-public/" }}}
pluginManagement {repositories {gradlePluginPortal()google()mavenCentral()maven { url = uri("https://mirrors.tencent.com/nexus/repository/maven-public/") }}}dependencyResolutionManagement {repositoriesMode.set(RepositoriesMode.FAIL_ON_PROJECT_REPOS)repositories {google()mavenCentral()maven { url = uri("https://mirrors.tencent.com/nexus/repository/maven-public/") }}}
1. Add plugin repositories in
buildscript > repositories of the project-level build.gradle. Add Huawei, Honor, and Google FCM plugin classpaths in the corresponding manufacturer tab under Manufacturer channel integration.buildscript {repositories {google()mavenCentral()maven { url "https://mirrors.tencent.com/nexus/repository/maven-public/" }}}
2. Add dependency repositories in
dependencyResolutionManagement > repositories of settings.gradle.dependencyResolutionManagement {repositoriesMode.set(RepositoriesMode.FAIL_ON_PROJECT_REPOS)repositories {google()mavenCentral()maven { url "https://mirrors.tencent.com/nexus/repository/maven-public/" }}}
Add repositories in
buildscript > repositories and allprojects > repositories of the project-level build.gradle. Add Huawei, Honor, and Google FCM plugin classpaths in the corresponding manufacturer tab under Manufacturer channel integration.buildscript {repositories {google()mavenCentral()maven { url "https://mirrors.tencent.com/nexus/repository/maven-public/" }}}allprojects {repositories {google()mavenCentral()maven { url "https://mirrors.tencent.com/nexus/repository/maven-public/" }}}
Integrate TIMPush base dependencies
Add TIMPush base dependencies in the app module
build.gradle or build.gradle.kts. The base package provides TIMPush registration, listeners, and common capabilities.In the examples below,
VERSION means the TIMPush SDK version (for example 8.9.7537). For the latest version, see Release Notes。dependencies {implementation 'com.tencent.timpush:timpush:VERSION'implementation 'com.tencent.liteav.tuikit:tuicore:VERSION'}
dependencies {implementation("com.tencent.timpush:timpush:VERSION")implementation("com.tencent.liteav.tuikit:tuicore:VERSION")}
Note:
If the project already integrates Chat SDK or TUIKit, also confirm SDK version compatibility.
Step 2: Integrate the manufacturer channel SDK
After completing TIMPush common integration, configure the manufacturer channel on the Google FCM tab.
Prerequisites
The FCM manufacturer certificate has been added in the console;
timpush-configs.json that includes the FCM certificate has been re-downloaded and placed in the app module assets directory;The test device has usable Google Play services (devices without GMS cannot verify the FCM channel).
1. Add the manufacturer configuration file
Download
google-services.json from the Firebase console and add it to the app module root (same level as the app module build.gradle / build.gradle.kts):app/google-services.json
2. Configure the Gradle plugin
Configure project-level plugin dependencies
The Google Services plugin is declared via the
buildscript > dependencies > classpath directive. Consequently, the buildscript > repositories block in the project-level build.gradle (or build.gradle.kts) must include the google() repository (and any other required repositories); otherwise, resolution of the plugin classpath may fail.For projects that already declare AGP through the
plugins {} block in the project-level build file, the existing configuration can be retained as is, and no migration is required.buildscript {repositories {google()mavenCentral()gradlePluginPortal()maven { url "https://mirrors.tencent.com/nexus/repository/maven-public/" }}dependencies {// Keep this consistent with the Android Gradle Plugin version currently used by the project.classpath 'com.android.tools.build:gradle:<AGP_VERSION>'// If the project uses the Kotlin Android plugin, keep this consistent with the current Kotlin Gradle Plugin version.classpath 'org.jetbrains.kotlin:kotlin-gradle-plugin:<KOTLIN_VERSION>'// Google FCM. 4.4.2 requires AGP 7.3.0 or later. For lower AGP versions, use 4.3.15.classpath 'com.google.gms:google-services:4.4.2'}}
buildscript {repositories {google()mavenCentral()gradlePluginPortal()maven { url = uri("https://mirrors.tencent.com/nexus/repository/maven-public/") }}dependencies {// Keep this consistent with the Android Gradle Plugin version currently used by the project.classpath("com.android.tools.build:gradle:<AGP_VERSION>")// If the project uses the Kotlin Android plugin, keep this consistent with the current Kotlin Gradle Plugin version.classpath("org.jetbrains.kotlin:kotlin-gradle-plugin:<KOTLIN_VERSION>")// Google FCM. 4.4.2 requires AGP 7.3.0 or later. For lower AGP versions, use 4.3.15.classpath("com.google.gms:google-services:4.4.2")}}
Note:
com.google.gms:google-services:4.4.2 requires AGP 7.3.0 or later. If the project AGP is lower than 7.3.0, use a Google Services Gradle Plugin version compatible with the current AGP, for example 4.3.15.Append the following in
buildscript > dependencies of the project-level build.gradle:classpath 'com.google.gms:google-services:4.3.15'
Enable the plugin in the app module
Enable the Google Services plugin in the app module
build.gradle or build.gradle.kts.plugins {// Google FCM。id 'com.google.gms.google-services'}// Or: apply plugin: 'com.google.gms.google-services'
plugins {// Google FCM。id("com.google.gms.google-services")}// Or: apply(plugin = "com.google.gms.google-services")
3. Integrate TIMPush manufacturer dependencies
Append the FCM channel package in
dependencies of the app module build.gradle or build.gradle.kts, and keep VERSION consistent with the base package:implementation 'com.tencent.timpush:fcm:VERSION'
implementation("com.tencent.timpush:fcm:VERSION")
4. Configure message categorization (optional)
On Android 8.0 and later, you can control FCM notification display policy through a notification channel ID. For channel creation and configuration, see Google FCM manufacturer configuration. When sending offline push, you can set it through the SDK API. API settings usually take priority over the console certificate defaults. Call
setAndroidFCMChannelID(String channelID) to set the FCM channel notification channel ID:V2TIMOfflinePushInfo pushInfo = new V2TIMOfflinePushInfo();pushInfo.setAndroidFCMChannelID("your_fcm_channel_id");
Step 3: Register the push service
Call registerPush
registerPush registers the current device’s push token with TIMPush. After successful registration, TIMPush creates a push target identifier
registrationID for the device. The server, Console Access Test, and troubleshooting tools can use this identifier to send offline pushes to the device. If the app also integrates Chat and completes login, you can also use userID to send offline pushes to devices that have established a push relationship for that user.appKey affects the registration method and available push identifiers:appKey = Push Key: Register TIMPush standalone push capability. The Push Key is the client key.appKey = null: Reuse the Chat login state to register for push. Call this only after Chat login succeeds.First confirm the call order based on your business scenario:
Note:
If the user logs out of Chat SDK, in scenarios that integrate both Chat SDK and TIMPush, the established push relationship between
userID and registrationID becomes invalid and must be registered again.The Chat app key is only for Chat login and cannot be used as the
appKey of registerPush.After the user agrees to the privacy policy, call
registerPush(appKey = Push Key).It is recommended to call
getRegistrationID and print the registrationID within the success callback of registerPush. This facilitates sending offline push notifications based on the registrationID afterwards.import android.util.Log;import com.tencent.timpush.TIMPushCallback;import com.tencent.timpush.TIMPushManager;// The method should be called after the user has agreed to the privacy policy.private void registerTIMPush() {int sdkAppId = 0; // TODO: Replace with your SDKAppID.String appKey = ""; // TODO: Replace with your Push Key.TIMPushManager.getInstance().registerPush(this, sdkAppId, appKey, new TIMPushCallback<Object>() {@Overridepublic void onSuccess(Object data) {Log.d(TAG, ">>>>> registerPush success, data = " + data);TIMPushManager.getInstance().getRegistrationID(new TIMPushCallback<Object>() {@Overridepublic void onSuccess(Object data) {String registrationID = (String) data;Log.d(TAG, ">>>>> getRegistrationID success, registrationID = " + registrationID);}@Overridepublic void onError(int errCode, String errMsg, Object data) {Log.e(TAG, ">>>>> getRegistrationID failed, errCode = " + errCode+ ", errMsg = " + errMsg);}});}@Overridepublic void onError(int errCode, String errMsg, Object data) {Log.e(TAG, ">>>>> registerPush failed, errCode = " + errCode+ ", errMsg = " + errMsg);}});}
import android.util.Logimport com.tencent.timpush.TIMPushCallbackimport com.tencent.timpush.TIMPushManager// The method should be called after the user has agreed to the privacy policy.private fun registerTIMPush() {val sdkAppId = 0 // TODO: Replace with your SDKAppID.val appKey = "" // TODO: Replace with your Push Key.TIMPushManager.getInstance().registerPush(this, sdkAppId, appKey, object : TIMPushCallback<Any?>() {override fun onSuccess(data: Any?) {Log.d("TIMPush", ">>>>> registerPush success, data = $data")TIMPushManager.getInstance().getRegistrationID(object : TIMPushCallback<Any?>() {override fun onSuccess(data: Any?) {Log.d("TIMPush", ">>>>> getRegistrationID success, registrationID = $data")}override fun onError(errCode: Int, errMsg: String?, data: Any?) {Log.e("TIMPush", ">>>>> getRegistrationID failed, errCode = $errCode, errMsg = $errMsg")}})}override fun onError(errCode: Int, errMsg: String?, data: Any?) {Log.e("TIMPush", ">>>>> registerPush failed, errCode = $errCode, errMsg = $errMsg")}})}
Call
registerPush(appKey = null) in the Chat login success callback. It is recommended to call getRegistrationID and print the registrationID within the success callback of registerPush. This facilitates sending offline push notifications based on the registrationID afterwards.import android.content.Context;import android.util.Log;import com.tencent.imsdk.v2.V2TIMCallback;import com.tencent.imsdk.v2.V2TIMManager;import com.tencent.imsdk.v2.V2TIMSDKConfig;import com.tencent.qcloud.tim.push.TIMPushCallback;import com.tencent.qcloud.tim.push.TIMPushManager;public void loginIMAndRegisterPush(Context context) {int sdkAppId = 0; // TODO: Replace with your SDKAppID.String userID = "<YOUR_USER_ID>";String userSig = "<YOUR_USER_SIG>";boolean initSuccess = V2TIMManager.getInstance().initSDK(context, sdkAppId, new V2TIMSDKConfig());if (!initSuccess) {Log.e("TIMPush", ">>>>> IM SDK init failed");return;}V2TIMManager.getInstance().login(userID, userSig, new V2TIMCallback() {@Overridepublic void onSuccess() {TIMPushManager.getInstance().registerPush(context, sdkAppId, null, new TIMPushCallback<Object>() {@Overridepublic void onSuccess(Object data) {Log.d("TIMPush", ">>>>> registerPush success, data = " + data);TIMPushManager.getInstance().getRegistrationID(new TIMPushCallback<Object>() {@Overridepublic void onSuccess(Object data) {String registrationID = (String) data;Log.d(TAG, ">>>>> getRegistrationID success, registrationID = " + registrationID);}@Overridepublic void onError(int errCode, String errMsg, Object data) {Log.e(TAG, ">>>>> getRegistrationID failed, errCode = " + errCode+ ", errMsg = " + errMsg);}});}@Overridepublic void onError(int errCode, String errMsg, Object data) {Log.e("TIMPush", ">>>>> registerPush failed, errCode = " + errCode+ ", errMsg = " + errMsg);}});}@Overridepublic void onError(int code, String desc) {Log.e("TIMPush", ">>>>> IM login failed, code = " + code + ", desc = " + desc);}});}
import android.content.Contextimport android.util.Logimport com.tencent.imsdk.v2.V2TIMCallbackimport com.tencent.imsdk.v2.V2TIMManagerimport com.tencent.imsdk.v2.V2TIMSDKConfigimport com.tencent.qcloud.tim.push.TIMPushCallbackimport com.tencent.qcloud.tim.push.TIMPushManagerfun loginIMAndRegisterPush(context: Context) {val sdkAppId = 0 // TODO: Replace with your SDKAppID.val userID = "<YOUR_USER_ID>"val userSig = "<YOUR_USER_SIG>"val initSuccess = V2TIMManager.getInstance().initSDK(context, sdkAppId, V2TIMSDKConfig())if (!initSuccess) {Log.e("TIMPush", ">>>>> IM SDK init failed")return}V2TIMManager.getInstance().login(userID, userSig, object : V2TIMCallback {override fun onSuccess() {TIMPushManager.getInstance().registerPush(context, sdkAppId, null, object : TIMPushCallback<Any>() {override fun onSuccess(data: Any?) {Log.d("TIMPush", ">>>>> registerPush success, data = $data")TIMPushManager.getInstance().getRegistrationID(object : TIMPushCallback<Any?>() {override fun onSuccess(data: Any?) {Log.d("TIMPush", ">>>>> getRegistrationID success, registrationID = $data")}override fun onError(errCode: Int, errMsg: String?, data: Any?) {Log.e("TIMPush", ">>>>> getRegistrationID failed, errCode = $errCode, errMsg = $errMsg")}})}override fun onError(errCode: Int, errMsg: String?, data: Any?) {Log.e("TIMPush", ">>>>> registerPush failed, errCode = $errCode, errMsg = $errMsg")}})}override fun onError(code: Int, desc: String?) {Log.e("TIMPush", ">>>>> IM login failed, code = $code, desc = $desc")}})}
Warning:
If your business only uses Chat messaging, do not call
registerPush before Chat login. Otherwise the SDK may register a Push-type account for the standalone push scenario and generate corresponding Push DAU. Extra fees may apply after Push DAU exceeds the package quota.Verification:
1. The
onSuccess callback of registerPush is triggered.2. Sign in to Console > Push > App Push > Push Troubleshooting, enter
registrationID or userID for the current scenario, and confirm that the token has been uploaded.3. If
onError is triggered, check the meaning of code in Error codes.Custom registrationID (optional)
To customize the push identifier (for example, use a business-side user ID), call setRegistrationID before
registerPush.Note:
In mixed scenarios, the custom
registrationID must be exactly the same as the userID used for Chat login. Otherwise account kick-out may cause push loss.Step 4: Test the push delivery chain
After completing the integration steps above, send a test message to verify that the pipeline works. Before sending, confirm that:
1. Notification permission is allowed on Android 13 and later;
2. The target notification channel is enabled on Android 8.0 and later (including banner, lock screen, and sound switches);
3. The app is in the background.
You can send a test message in any of the following ways:
For users who integrate TIMPush only, we recommend using the Console Access Test capability first to verify offline push.
Path: Console > Push > App Push > Access Test. On the Access Test page, you can specify
registrationID or userID to send an offline push test.If your project has integrated Chat SDK, when calling sendMessage, you can set offline push parameters through
V2TIMOfflinePushInfo. Example:V2TIMOfflinePushInfo pushInfo = new V2TIMOfflinePushInfo();pushInfo.setTitle("Push title");pushInfo.setDesc("Push content");pushInfo.setExt("Business custom ext".getBytes());V2TIMManager.getMessageManager().sendMessage(v2TIMMessage,userID,null,V2TIMMessage.V2TIM_PRIORITY_DEFAULT,false,pushInfo,new V2TIMSendCallback<V2TIMMessage>() {@Overridepublic void onProgress(int progress) {}@Overridepublic void onError(int code, String desc) {Log.e("TIMPush", ">>>>> sendMessage failed, code = " + code + ", desc = " + desc);}@Overridepublic void onSuccess(V2TIMMessage message) {Log.d("TIMPush", ">>>>> sendMessage success, msgID = " + message.getMsgID());}});
sendMessage belongs to Chat SDK messaging. Users who integrate TIMPush only do not need to add full Chat initialization, login, and message sending just to verify offline push.Verification:After the app is in the background, send a test message and the device should receive an offline push notification. If notification bar permission is enabled, an offline push banner appears.
Step 5: Handle notification click redirects
Notification click redirects require three steps working together: configure the click action in the console, carry redirect parameters when sending push, and register a listener on the client to parse the parameters. Missing any step causes the redirect to fail.
Configure the console click action
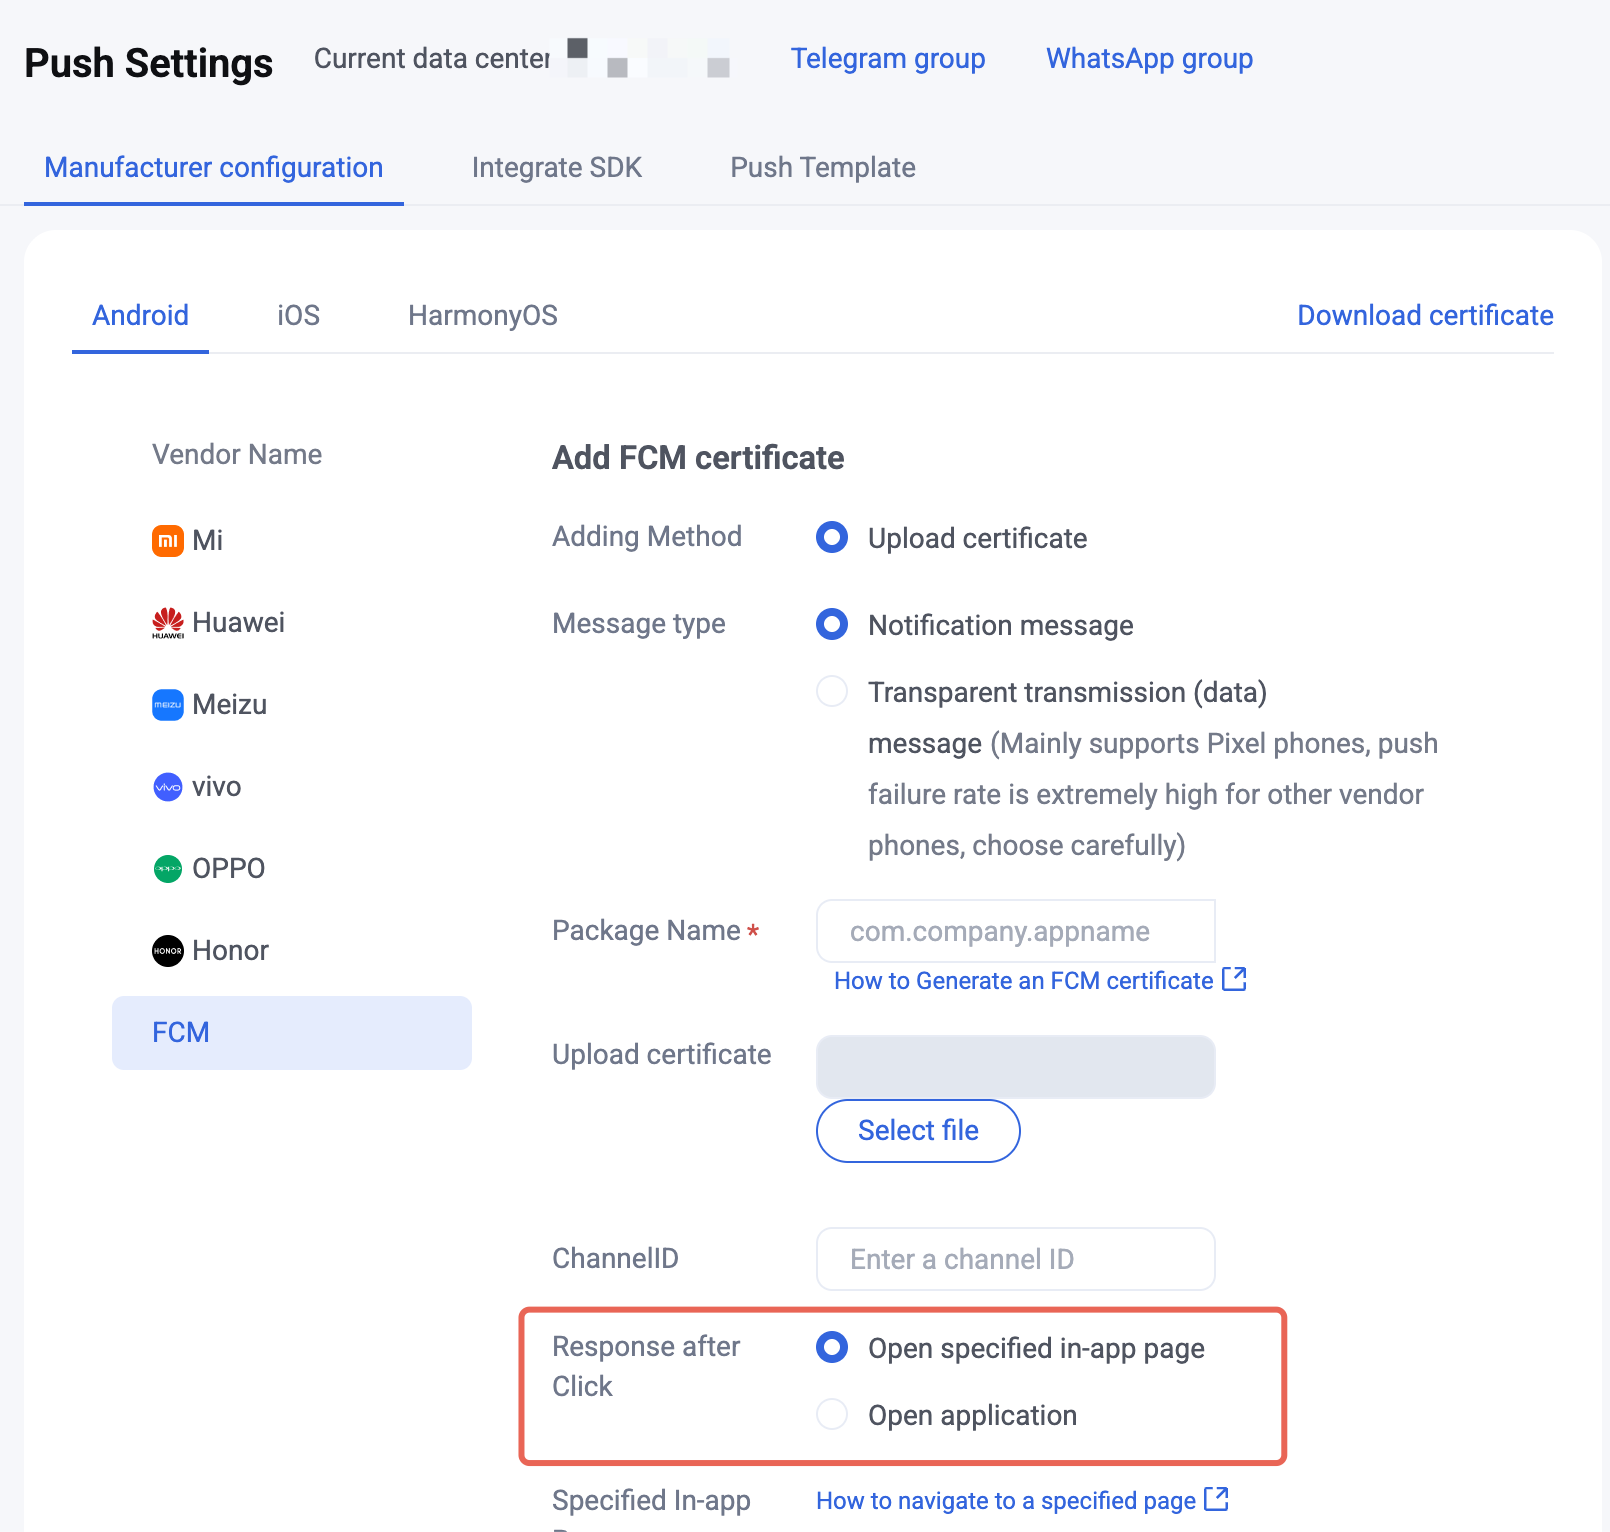
In the console, configure “Open a specified in-app page”. Path: Console > Push > App Push > Push Settings > Manufacturer configuration, select the corresponding certificate, and set After-click action to Open a specified in-app page.
Carry redirect info when sending push
When sending offline push, carry the business information needed for redirect in the
ext field (for example, target page or conversation ID). ext is a string with a business-defined structure. JSON is recommended for easier client parsing. The examples below use the following structure:# conversationType 1 means one-to-one chat (conversationID is the sender userID). 2 means group chat (conversationID is groupID).{"conversationID":"user_A","conversationType":1}
When sending push through REST API, set a JSON string in the
Ext field of the request body:{"MsgBody": [],"OfflinePushInfo": {"PushFlag": 0,"Title": "Offline push title","Desc": "Offline push content","Ext": "{\\"conversationID\\":\\"user_A\\",\\"conversationType\\":1}"}}
The Console Access Test page also supports setting the
Ext field; enter a JSON string.Carry redirect parameters in the
ext property of V2TIMOfflinePushInfo, then send them with the message. setExt takes byte[], so convert your custom JSON string to a byte array first.If you integrate TUIKit, the built-in message sending path automatically builds
ext with OfflinePushExtInfo, so you do not need to set it manually. The example below applies when you call Chat SDK yourself to send messages.import android.util.Log;import com.tencent.imsdk.v2.V2TIMManager;import com.tencent.imsdk.v2.V2TIMMessage;import com.tencent.imsdk.v2.V2TIMOfflinePushInfo;import com.tencent.imsdk.v2.V2TIMSendCallback;V2TIMOfflinePushInfo pushInfo = new V2TIMOfflinePushInfo();pushInfo.setTitle("Push title");pushInfo.setDesc("Push content");// TODO: ext is business-defined. Replace with your target page, conversation ID, and other parameters as needed.String ext = "{\\"conversationID\\":\\"user_A\\",\\"conversationType\\":1}";pushInfo.setExt(ext.getBytes());V2TIMMessage message = V2TIMManager.getMessageManager().createTextMessage("Hello TIMPush");V2TIMManager.getMessageManager().sendMessage(message,"<TARGET_USER_ID>", // For one-to-one chat, pass the peer userID; for group chat, pass nullnull, // For group chat, pass groupID; for one-to-one chat, pass nullV2TIMMessage.V2TIM_PRIORITY_DEFAULT,false,pushInfo,new V2TIMSendCallback<V2TIMMessage>() {@Overridepublic void onProgress(int progress) {}@Overridepublic void onSuccess(V2TIMMessage msg) {Log.d("TIMPush", ">>>>> sendMessage success, msgID = " + msg.getMsgID());}@Overridepublic void onError(int code, String desc) {Log.e("TIMPush", ">>>>> sendMessage failed, code = " + code + ", desc = " + desc);}});
import android.util.Logimport com.tencent.imsdk.v2.V2TIMManagerimport com.tencent.imsdk.v2.V2TIMMessageimport com.tencent.imsdk.v2.V2TIMOfflinePushInfoimport com.tencent.imsdk.v2.V2TIMSendCallbackval pushInfo = V2TIMOfflinePushInfo()pushInfo.title = "Push title"pushInfo.desc = "Push content"// TODO: ext is business-defined. Replace with your target page, conversation ID, and other parameters as needed.pushInfo.ext = "{\\"conversationID\\":\\"user_A\\",\\"conversationType\\":1}".toByteArray()val message = V2TIMManager.getMessageManager().createTextMessage("Hello TIMPush")V2TIMManager.getMessageManager().sendMessage(message,"<TARGET_USER_ID>", // For one-to-one chat, pass the peer userID; for group chat, pass nullnull, // For group chat, pass groupID; for one-to-one chat, pass nullV2TIMMessage.V2TIM_PRIORITY_DEFAULT,false,pushInfo,object : V2TIMSendCallback<V2TIMMessage> {override fun onProgress(progress: Int) {}override fun onSuccess(msg: V2TIMMessage) {Log.d("TIMPush", ">>>>> sendMessage success, msgID = ${msg.msgID}")}override fun onError(code: Int, desc: String?) {Log.e("TIMPush", ">>>>> sendMessage failed, code = $code, desc = $desc")}})
Register a client listener and parse redirect info
In
Application.onCreate(), call addPushListener to register TIMPushListener, then parse ext in onNotificationClicked and redirect to the business page. If you integrate TUIKit and use ext built by OfflinePushExtInfo, you can parse with new Gson().fromJson(ext, OfflinePushExtInfo.class) and then redirect.import android.app.Application;import android.text.TextUtils;import android.util.Log;import com.tencent.timpush.TIMPushListener;import com.tencent.timpush.TIMPushManager;import org.json.JSONObject;public class App extends Application {private static final String TAG = "TIMPush";@Overridepublic void onCreate() {super.onCreate();TIMPushManager.getInstance().addPushListener(new TIMPushListener() {@Overridepublic void onNotificationClicked(String ext) {Log.d(TAG, ">>>>> TIMPush notification clicked, ext = " + ext);if (TextUtils.isEmpty(ext)) {return;}// 1. Parse ext. The JSON structure is business-defined and must match the sender.String conversationID;int conversationType;try {JSONObject json = new JSONObject(ext);conversationID = json.optString("conversationID");conversationType = json.optInt("conversationType");} catch (Exception e) {Log.e(TAG, ">>>>> parse ext failed: " + e.getMessage());return;}// 2. TODO: Redirect to the target page based on business fields.// If using Chat / TUIKit, redirect after user login succeeds;// For cold start, cache the parameters first and redirect in the login callback.}});}}
import android.app.Applicationimport android.text.TextUtilsimport android.util.Logimport com.tencent.timpush.TIMPushListenerimport com.tencent.timpush.TIMPushManagerimport org.json.JSONObjectclass App : Application() {override fun onCreate() {super.onCreate()TIMPushManager.getInstance().addPushListener(object : TIMPushListener() {override fun onNotificationClicked(ext: String?) {Log.d("TIMPush", ">>>>> TIMPush notification clicked, ext = $ext")if (TextUtils.isEmpty(ext)) return// 1. Parse ext. The JSON structure is business-defined and must match the sender.val conversationID: Stringval conversationType: Inttry {val json = JSONObject(ext)conversationID = json.optString("conversationID")conversationType = json.optInt("conversationType")} catch (e: Exception) {Log.e("TIMPush", ">>>>> parse ext failed: ${e.message}")return}// 2. TODO: Redirect to the target page based on business fields.// If using Chat / TUIKit, redirect after user login succeeds;// For cold start, cache the parameters first and redirect in the login callback.}})}}
Integration troubleshooting
If you still cannot receive push after integration, use Push Troubleshooting to check the cause. If the issue remains, Contact us to submit feedback.
Ajuda e Suporte
Esta página foi útil?
Você também pode entrar em contato com a Equipe de vendas ou Enviar um tíquete em caso de ajuda.
comentários