Access credentials are an enhanced security control mechanism launched by Tencent Cloud File Storage (CFS). They add an extra layer of access control to file system mount operations on top of the standard permission management system, effectively meeting the demand for fine-grained data control in highly sensitive scenarios such as finance, healthcare, and AI. In addition, when you access a file system using the NFS protocol, communication data is transmitted in plaintext by default. However, if you mount the file system with credentials, the system automatically enables Stunnel (an open-source multipurpose network relay service) to encrypt data transmission based on TLS (Transport Layer Security), further improving the overall data security of file storage.
Note:
This feature requires allowlist permission. If needed, submit a ticket to contact us.
Enabling credential-based mounting (Stunnel + TLS encryption) introduces additional encryption/decryption and relay overhead. Performance is expected to drop by 10% to 50% compared with standard mounting, and the actual impact varies depending on instance specifications, network bandwidth, and read/write loads. Evaluate whether to enable this feature based on your needs.
Use Limits
Subject
Category
Specific Limitation
Cloud virtual machine
Operating system restrictions
Access credentials can be set only when a Linux CVM is mounted. Windows is not supported. If you need to use access credentials in container scenarios, submit a ticket to contact us.
Server security group settings
Before mounting a General series (including enhanced) file system with credentials, ensure that ports 2049 and 2050 on the client are open.
File System
File System Type
Only General series (including enhanced) file systems support credential binding.
File system region
Credential files in the Chinese mainland region can be bound only to file systems in the Chinese mainland. Credential files in Hong Kong (China), Macao (China), Taiwan (China), and overseas regions can be bound only to file systems in those regions.
Binding to an incorrect region will prevent you from using the credential to mount a file system.
Recommended time to enable mandatory authentication
If the file system is already mounted and in use, you should have all clients unmount it, remount it using the credential-based mount command, and then enable mandatory credential authentication to avoid service interruption.
To ensure a smooth transition, both credential-based mounting and standard mounting are supported before mandatory credential authentication is enabled. You can gradually switch to credential-based mounting based on your business needs. After all clients have been switched, enable mandatory credential authentication in the console to block standard mounting.
Credential file
Replacement process
Before replacing the credential bound to the file system, unmount the file system on all clients. After reassociating a new credential in the console, use the new credential mount command to remount.
Security management
Keep the credential file safe after downloading it. If it is leaked, bind a new credential.
Operation Steps
Step 1: Create an Access Credential
1. Log in to the CFS console and select Access Credentials in the left sidebar.
2. On the Access Credentials page, click Create Credential. In the pop-up window, select the credential type and enter a credential name (up to 25 characters, supporting only letters, digits, and underscores "_"). Then click Confirm.
Step 2: Download the Access Credential
1. Click the newly created Access Credential ID to go to its details page.
2. In the credential information section, click the download icon
to download the credential to your local device. If your browser has a firewall enabled, it may block the download. Allow the download manually if prompted. General series credential files use the .pem extension.
3. Upload the access credential to the CVM instance where the file system is to be mounted, and note the credential storage path, for example: /cfscert/cfscert-12345678.pem.
Step 3: Bind the File System
1. Log in to the CFS console and select Access Credentials in the left sidebar. In the operation column of the corresponding credential, click Associate with file system.
2. In the Associate with file system dialog, filter by region and select file systems. Batch binding of file systems is currently not supported.
Enabling mandatory credential authentication is a high-risk operation. After it is enabled, all clients that are not mounted with credentials will be unable to access this file system. Pay attention to the impact on your business, and perform this operation only after you have made proper arrangements for related business.
This operation is performed asynchronously and has a latency of about 1 minute. During the latency period, a mount without credentials may succeed, but read and write operations cannot be performed.
After confirming that all clients have unmounted file systems mounted without credentials, you can enable mandatory credential authentication to block mount requests and read/write access from clients without credentials. The detailed steps are as follows:
1. Log in to the File System console, select File Systems in the left sidebar, and click the file system ID/name for which you want to modify mandatory credential authentication.
2. Click Basic Info and check the current status in the Force credential authentication section. Click the edit icon to modify the authentication switch status in the dialog.
3. After making the changes, click Confirm.
Step 5: Mount with the Credential Mount Command
1. Log in to the CVM instance and run the following command.
2. Log in to the File System console and click the file system ID/name to go to the file system mount point.
3. Copy the credential mount command for mounting on Linux. Replace /path/to/pem with the path where the credential is stored on the CVM instance, and replace /localfolder with the local directory where the file system is to be mounted. The credential mount command is similar to the following:
# NFS 3.0 Credential Mount
sudo mount -t cfs -o vers=3,nolock,proto=tcp,noresvport,tls,cert=/path/to/pem x.x.x.x://localfolder
# Example: sudo mount -t cfs -o vers=3,nolock,proto=tcp,noresvport,tls,cert=/cfscert/cfscert-12345678.pem 192.168.x.x:/ /mnt/cfs/
# NFS 4.0 Credential Mount
sudo mount -t cfs -o vers=4.0,noresvport,tls,cert=/path/to/pem x.x.x.x://localfolder
# Example: sudo mount -t cfs -o vers=4.0,noresvport,tls,cert=/cfscert/cfscert-12345678.pem 192.168.x.x:/ /mnt/cfs/
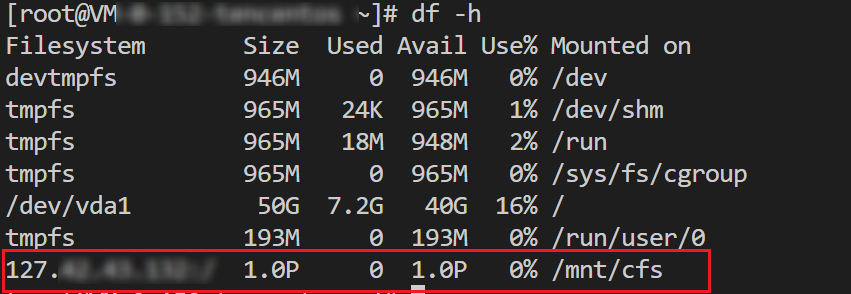
4. After you run the credential mount command on the CVM instance, the system mounts the file system using the credentials. After the mount succeeds, run the df -h command. If the file system address corresponding to the mount target (such as /mnt/cfs) is displayed as the local loopback address 127.x.x.x.x (instead of the original file system mount target IP address), the traffic has been forwarded through the local Stunnel tunnel and the credential mount has taken effect.