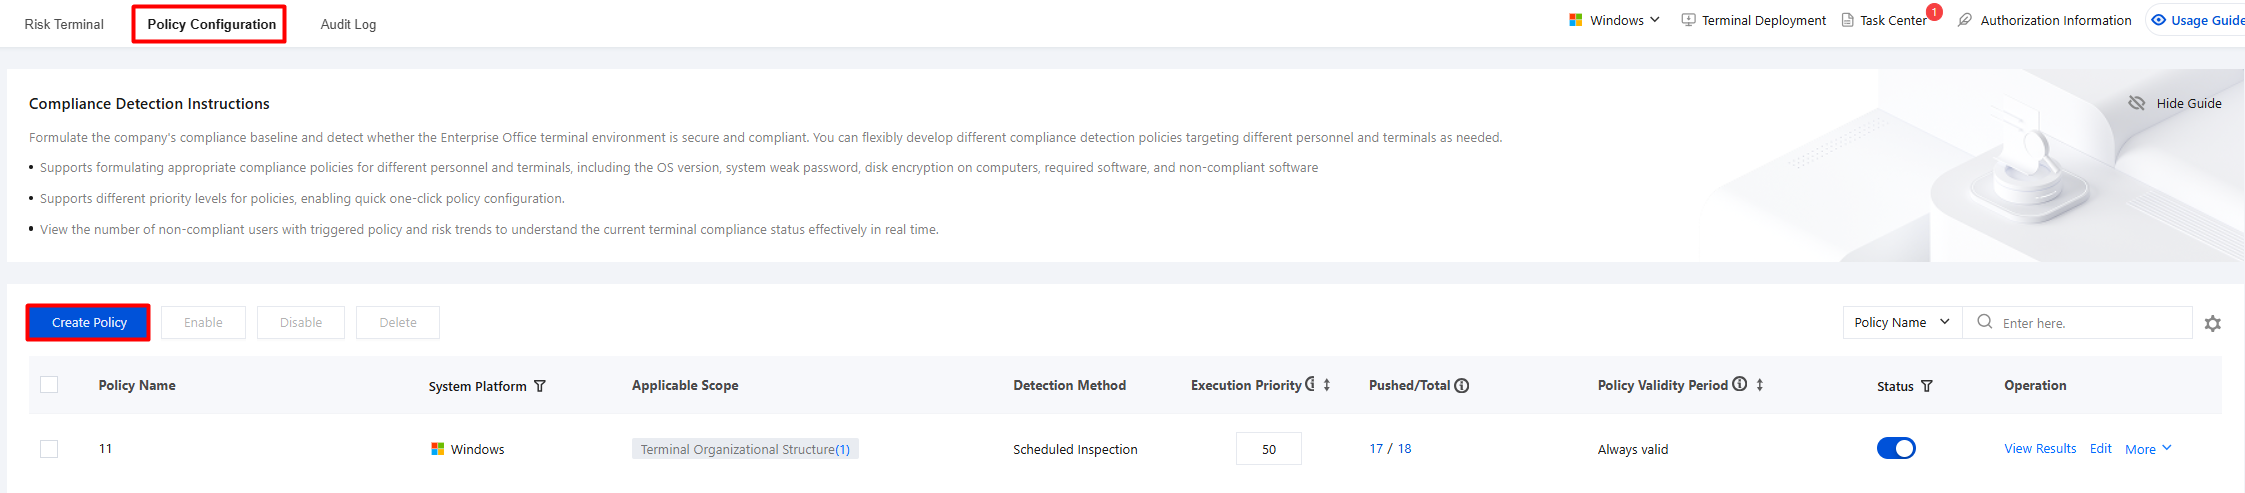
2. On the Compliance Detection page, select Policy Configuration and click Create Policy.
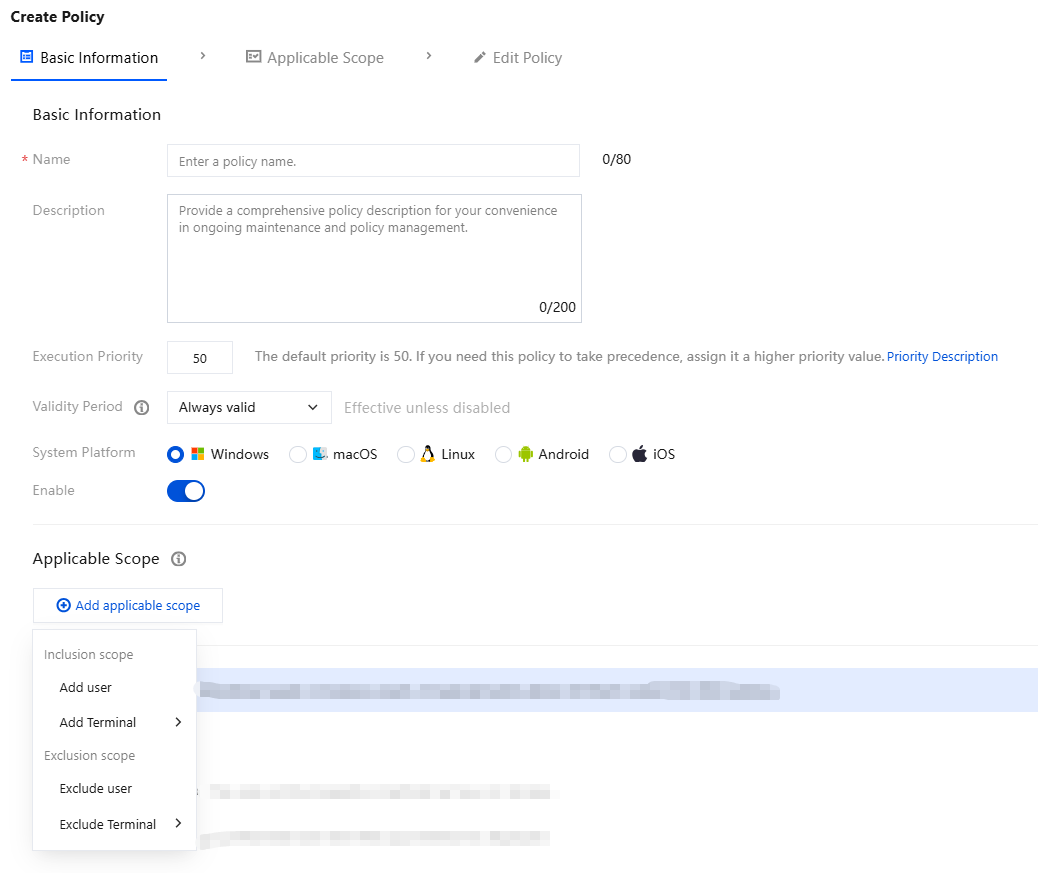
3. On the Create Policy page, configure the relevant parameters.
3.1 Enter the policy name and other parameters such as the policy description.
3.2 Click Add Applicable Scope, select the names of users/terminals to control/exclude, and click Save.
4. Based on your actual needs, select one of the following compliance detection policies and click Save.
Scheduled Inspection
1. You can select different inspection frequencies as needed, including 30 minutes, 1 hour, 4 hours, 8 hours, 12 hours, 1 day, 1 week, or a custom frequency.
2. The custom option allows you to set a specific number of minutes in the input box to adjust the inspection frequency in minutes.
3. The minimum supported frequency is 5 minutes. When the terminals in this group reach the time that meets the conditions, a compliance check is automatically performed.
Triggering a Scan
1. This feature automatically performs a security scan each time you open the application interface. It supports triggering compliance scans in multiple scenarios such as startup, authentication login, and network switching, flexibly adapting to user environments and ensuring devices receive security checks at these critical moments.
2. When the following option is selected, a scan is performed once in each of the three scenarios: at computer startup, when the iOA client is logged in to, and when the network is switched between the private and public networks.
Terminal Name
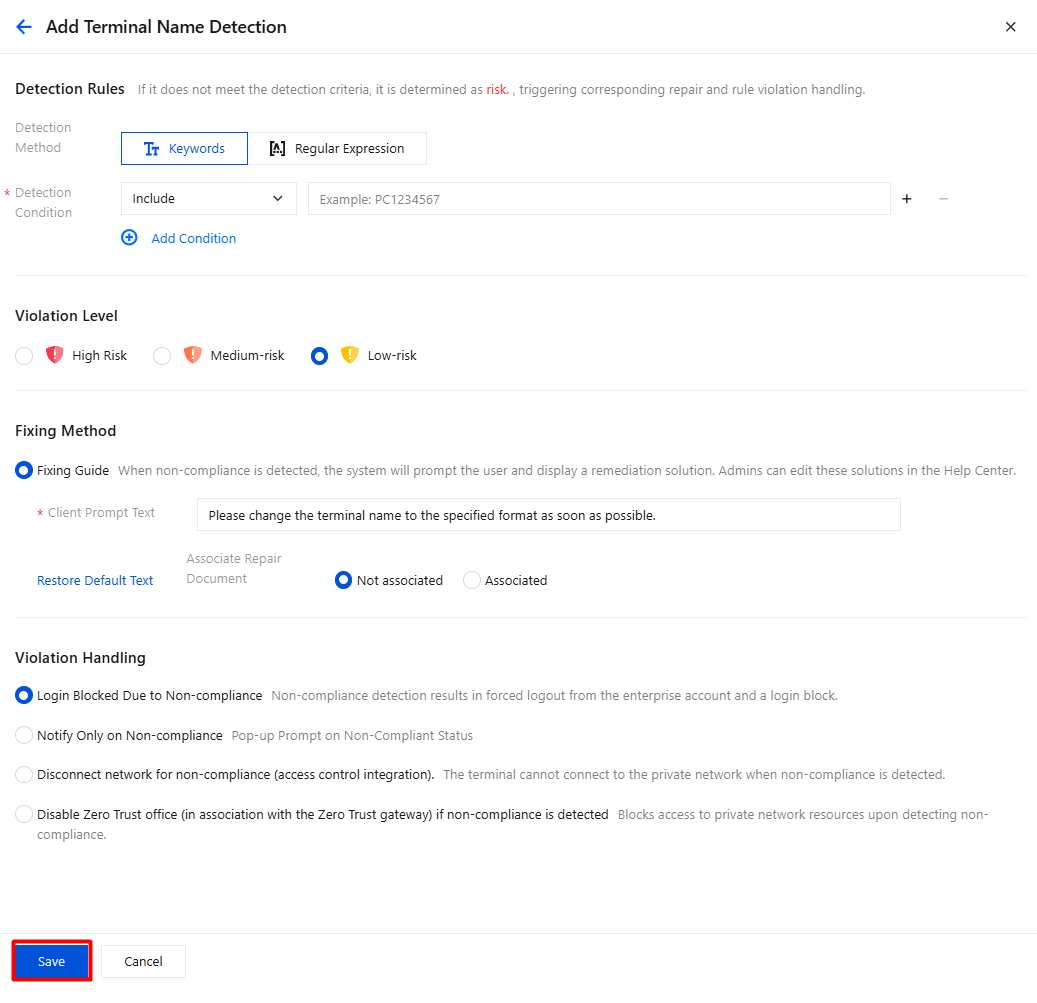
1. To detect whether terminal names are compliant, click Enable Detection
and click Add Detection Point.
2. Configure parameters such as detection rules, violation levels, remediation methods, and violation handling.
Parameter Name
Description
Detection Method
Keyword
Detection condition: Matches specific words and is suitable for detecting explicit word information.
Regex
Regular expression: Matches text formats through flexible pattern rules and is suitable for detecting complex patterns such as variants.
Violation level
High, medium, and low severity.
Repair Guide
Customize the client notification message.
You can associate remediation documents to guide users through customized instructions for completing the fix, improving compliance remediation efficiency.
Login prohibited when non-compliant: Non-compliance detection results in forced logout from the enterprise account and a login block.
Alert only when non-compliant: Prompt users through a pop-up upon detecting non-compliance.
Network disconnected when non-compliant (linked to admission): The terminal cannot connect to the private network when non-compliance is detected.
Disable Zero Trust Office when non-compliant (linked to the Zero Trust gateway): Blocks access to private network resources upon detecting non-compliance.
3. After completing the configuration, click Save.
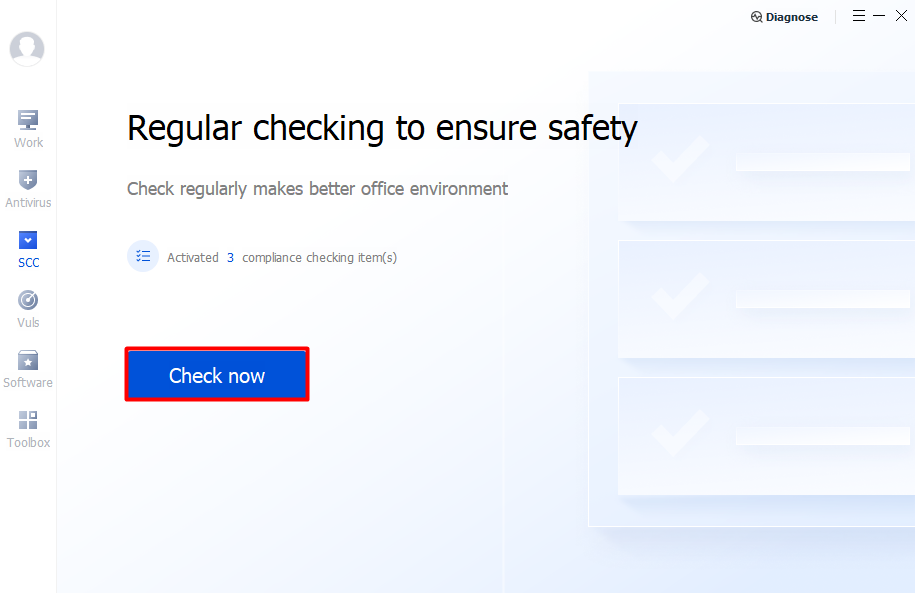
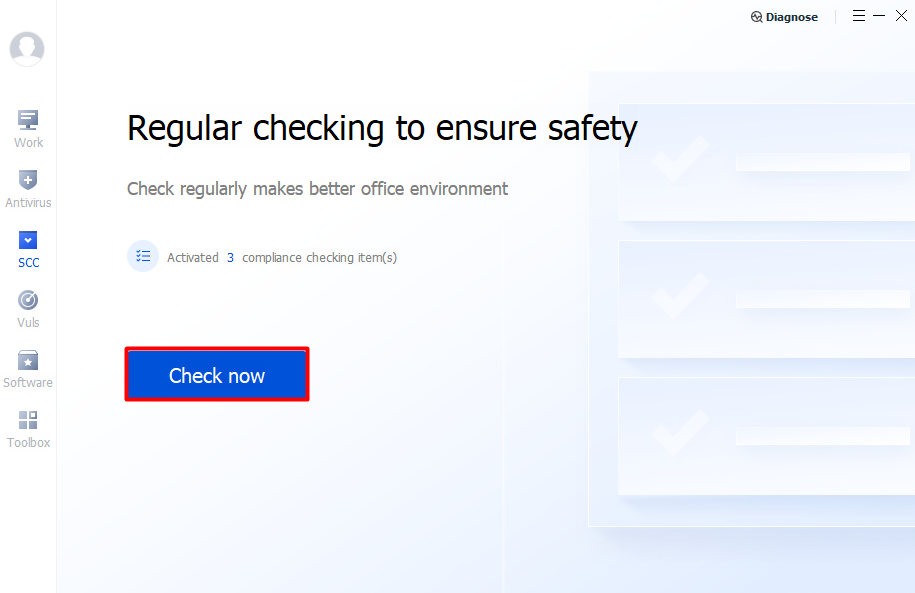
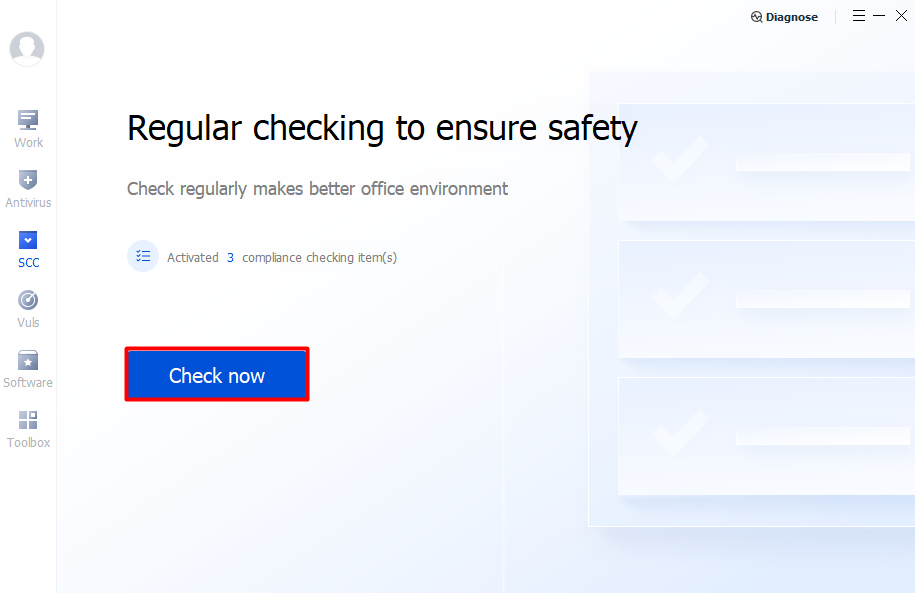
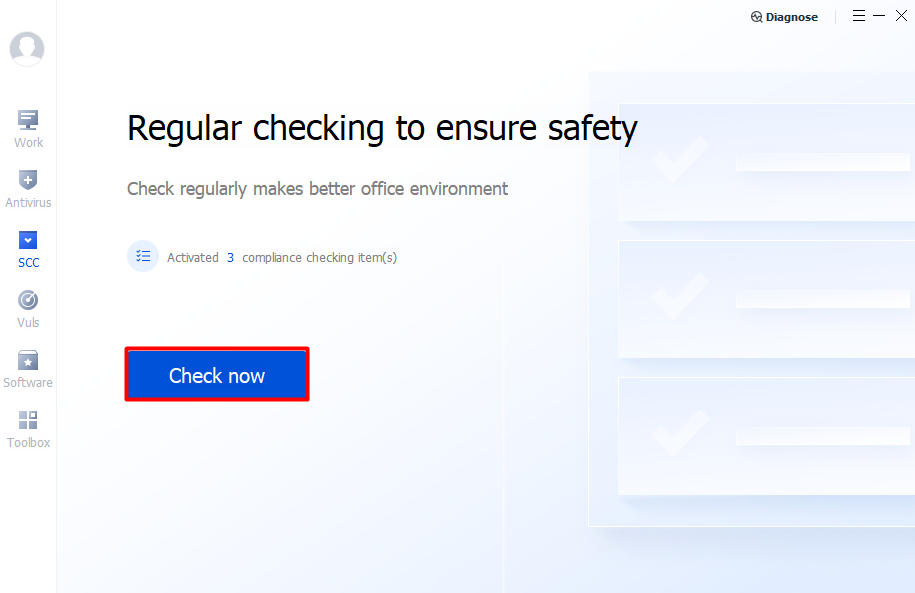
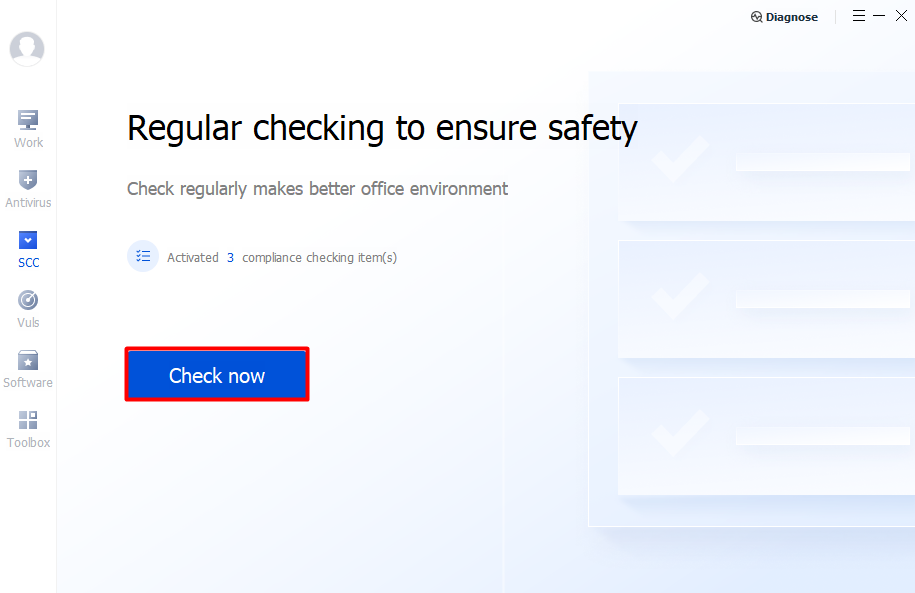
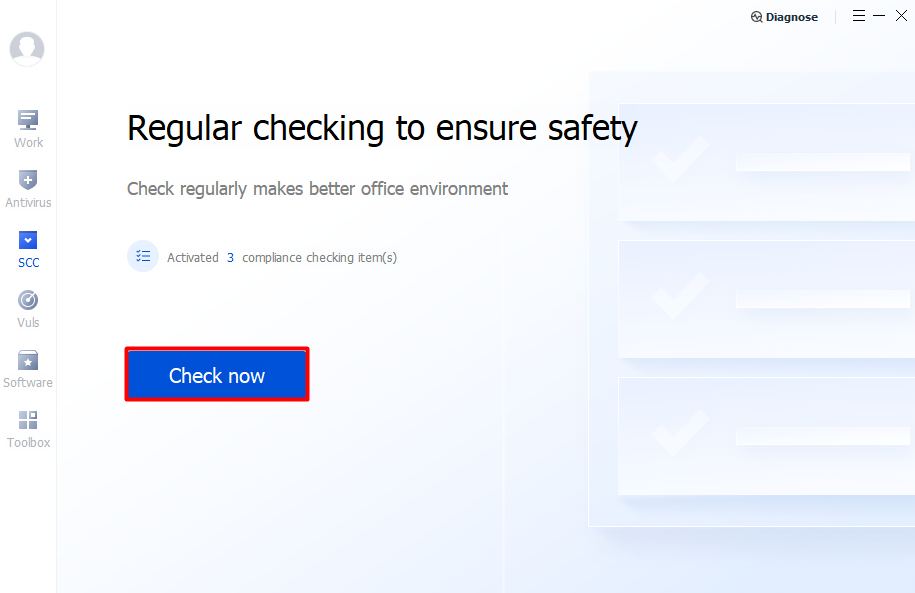
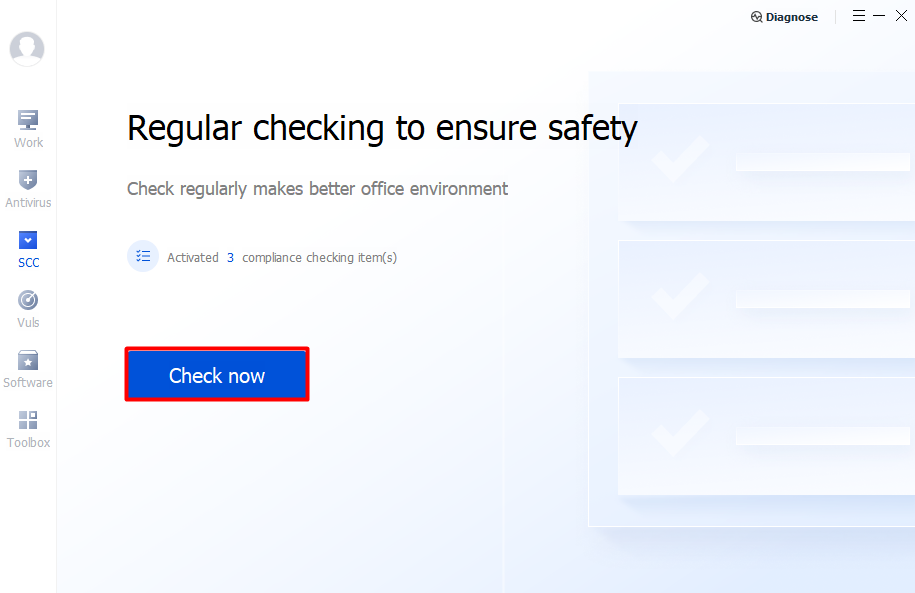
4. After the client pulls the policy, open the client compliance page and click Detect Now.
5. If a terminal does not meet the detection conditions, it is determined as risky, triggering corresponding remediation and violation handling.
Terminal Username
1. To detect whether terminal usernames are compliant, click Enable Detection
and click Add Detection Point.
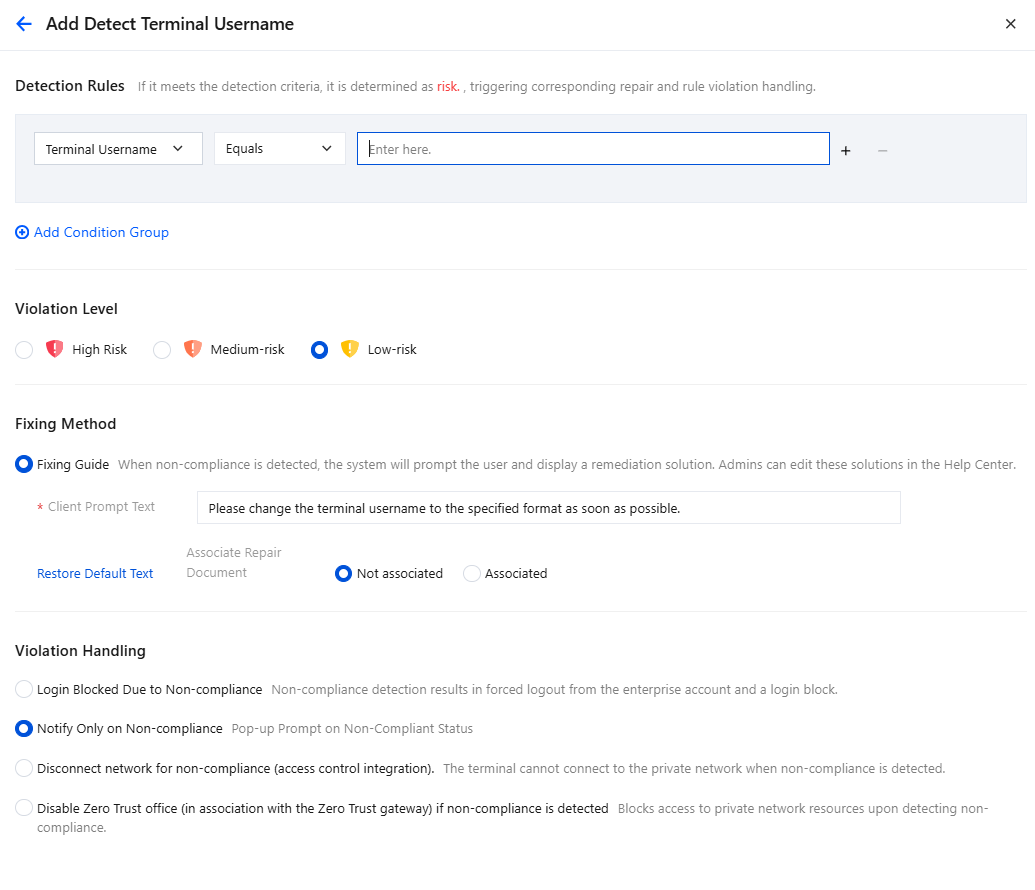
2. Configure detection rules. If the detection conditions are met, the terminal is determined as risky, triggering corresponding remediation and violation handling.
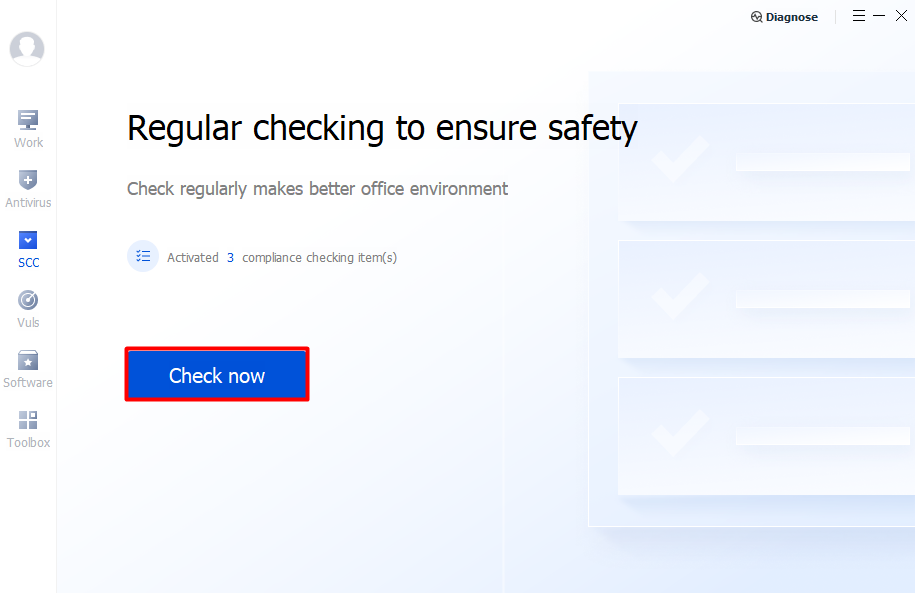
3. After the client pulls the policy, open the client compliance page and click Detect Now.
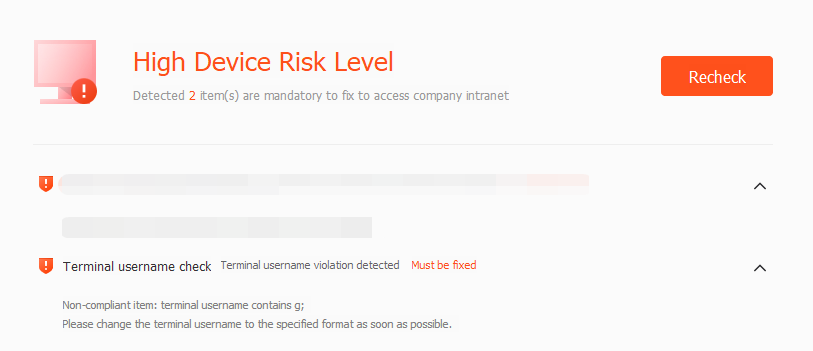
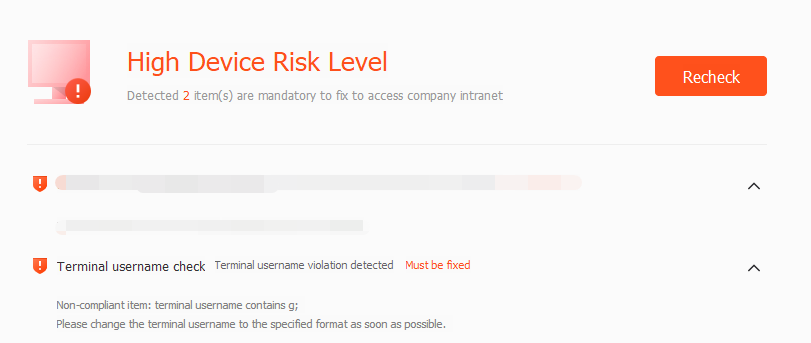
4. If the username on the terminal does not contain the detection condition, the detection item is compliant.
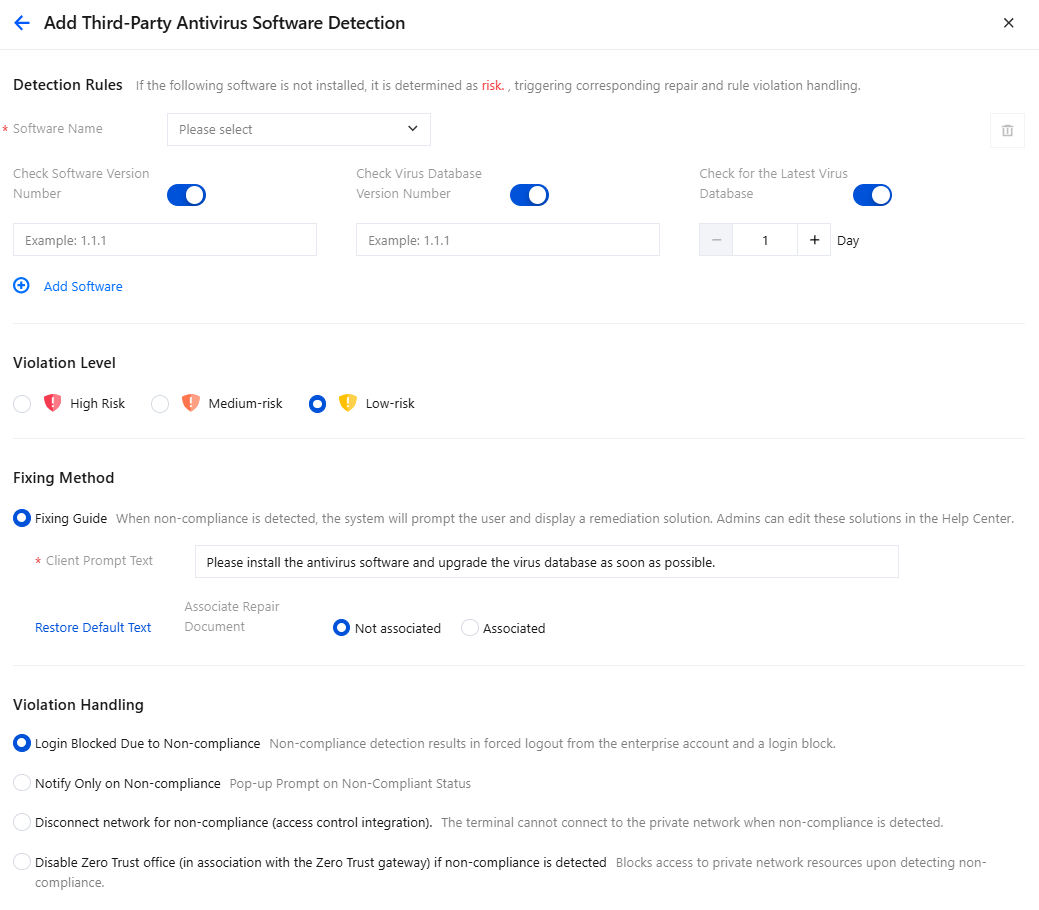
Third-Party Antivirus Software
1. Detect whether the terminal has the corresponding version of third-party antivirus software installed.
2. Click Enable Detection
, and then click Add Detection Point.
3. In the Add Third-Party Antivirus Software dialog, configure the relevant parameters and click Save.
Parameter
Description
Software
Select the third-party antivirus software name based on control requirements.
Check software version.
Enable: If you select Enable, you must set the software version number.
Disable: No software version number is required.
Check virus database version.
Enable: If you select Enable, you must set the virus database version number.
Disable: No virus database version number is required.
Check for latest virus database.
Enable: Set the number of days since the latest virus database detection update based on your management requirements.
Disable: No need to configure checking for the latest virus database.
Violation level
High, medium, and low severity.
Repair Guide
Customize the client notification message.
You can associate remediation documents to guide users through customized instructions for completing the fix, improving compliance remediation efficiency.
Violation handling
Login prohibited when non-compliant: Non-compliance detection results in forced logout from the enterprise account and a login block.
Alert only when non-compliant: Only alert users about whether they are compliant.
Network disconnected when non-compliant (linked to admission): The terminal cannot connect to the private network when non-compliance is detected.
Disable Zero Trust Office when non-compliant (linked with the Zero Trust gateway): Force logout of the enterprise account and restrict terminal access to private network resources.
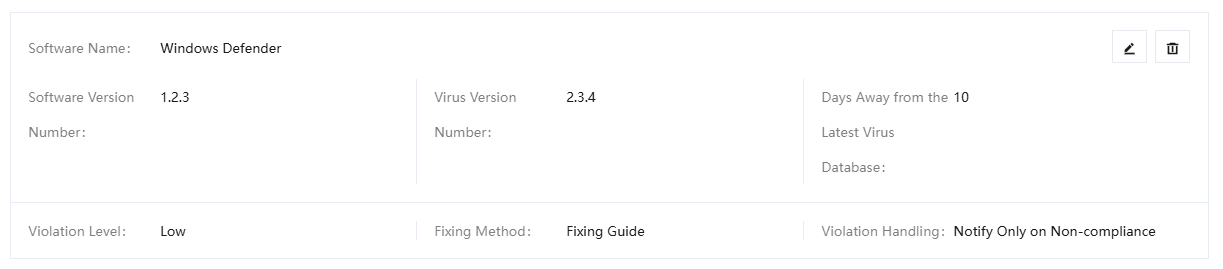
4. After configuration, click Save. For configuration parameters, refer to the example in the following figure.
5. After completing the addition, click Save.
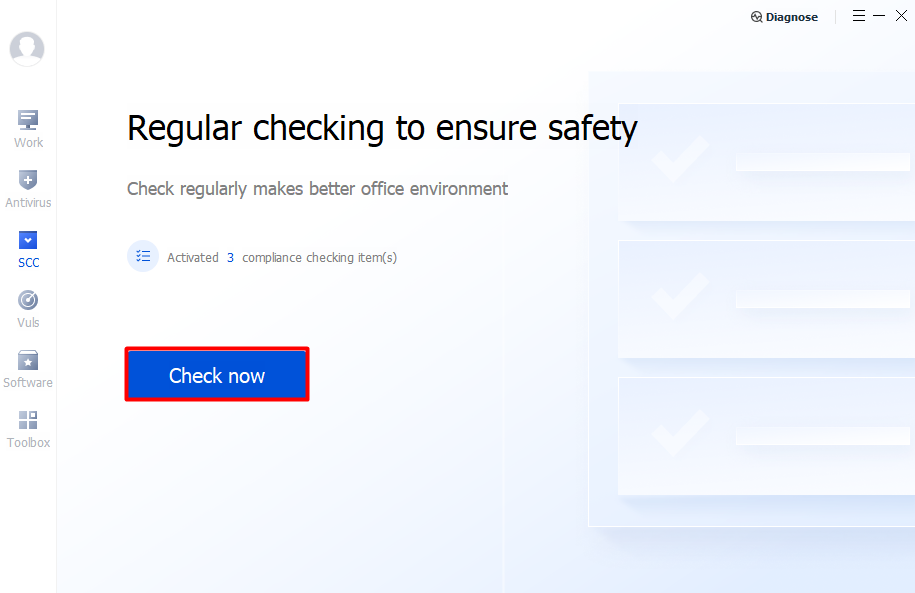
6. After the client pulls the policy, open the client compliance page and click Detect Now.
7. The terminal does not have the corresponding third-party antivirus software installed, and the detection result is non-compliant.
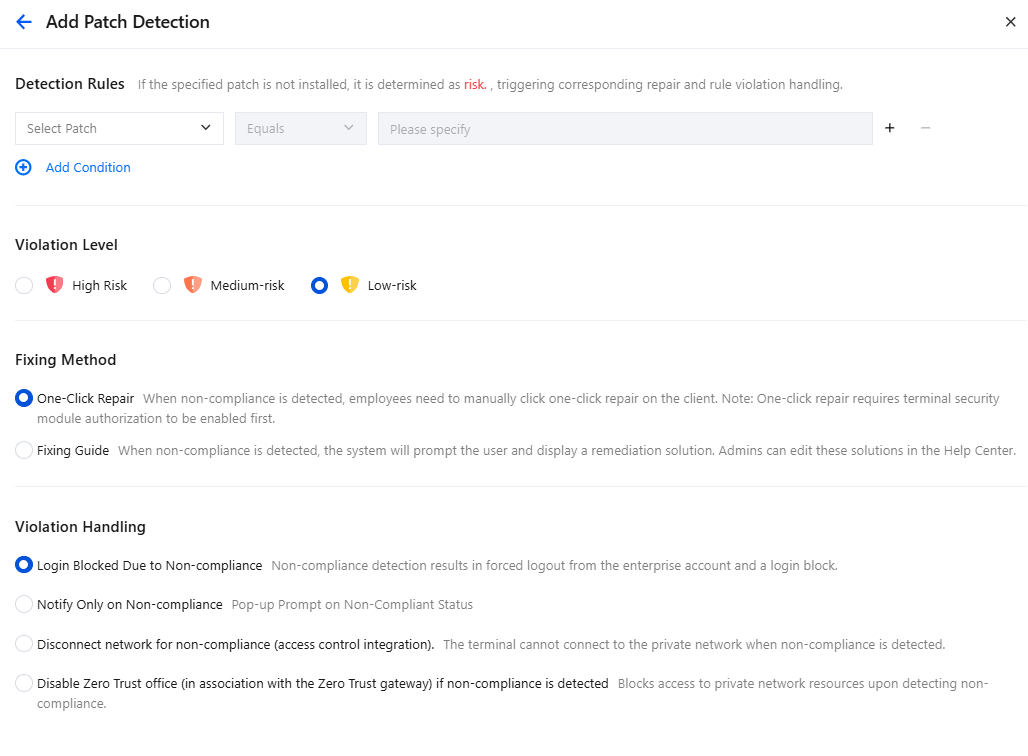
Patch List
1. Detect whether the terminal has patches that are required but not installed.
2. Click Enable Detection
, and then click Add Detection Point.
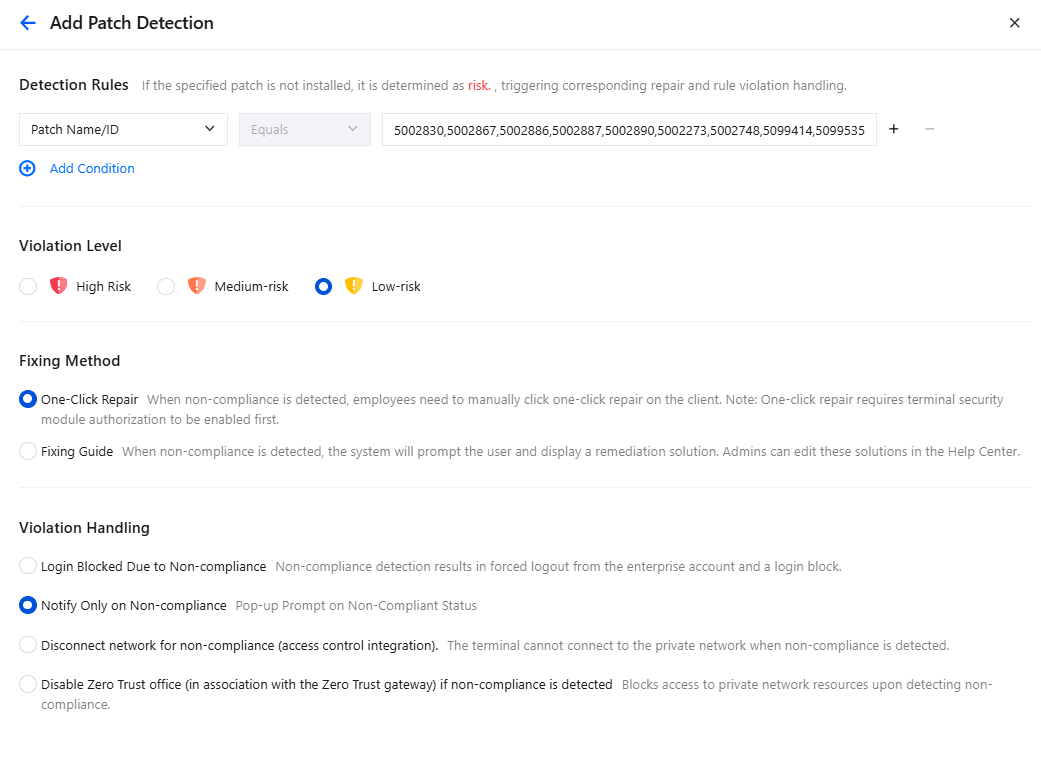
3. In the Add Patch Detection dialog box, configure the parameters and click Save.
4. For configuration parameters, refer to the example in the following figure:
5. After completing the addition, click Save.
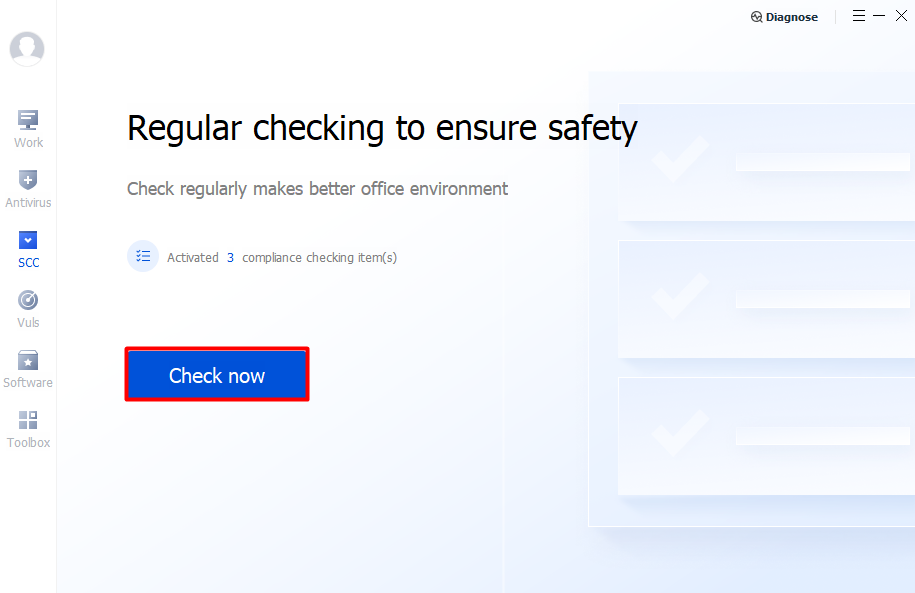
6. After the client pulls the policy, open the client compliance detection page and click Detect Now.
7. The terminal does not have a required patch installed, and the detection result shows that the device is non-compliant.
Software Security Baseline
1. Detect whether the terminal has prohibited software installed or is missing essential software.
2. On the compliance detection policy page, click Enable Detection
, and click Add Detection Point.
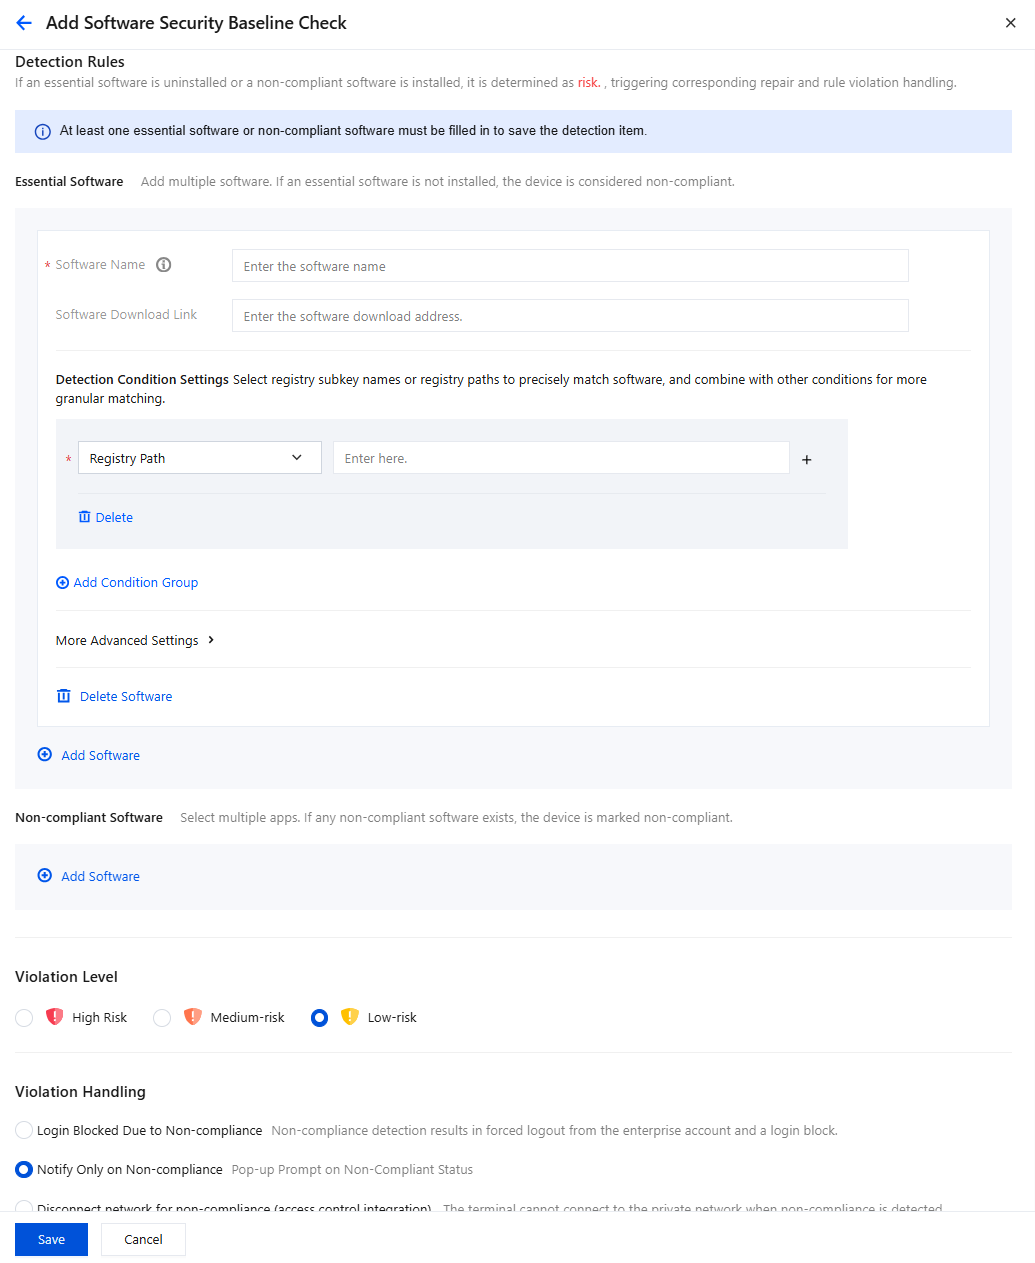
3. In the Add Software Security Baseline Detection Item dialog, configure the relevant parameters and click Save.
Parameter Name
Description
Required software
Software
Required field.
It is only used to display the required software name on the client and is not used as a detection condition.
Software download URL
Optional.
After you enter the download URL of this software (the official website download URL), if the client detection result is non-compliant, the page will display the software download URL.
Registry subkey name
When Registry Subdirectory Name is selected, the corresponding subdirectory name is searched from the registry uninstallation path to determine whether the software is installed. For example, if Edge is entered, the registry uninstall directory is searched.
Some software may not write its subdirectory name to the uninstall registry path, which may make detection impossible. In this case, you are advised to use Registry Path for detection.
How to find the registry subkey name:
1. Open Registry Editor: Press Win + R to open the Run dialog, type regedit, and then press Enter.
2. Navigate to the target path: In Registry Editor, expand the target path in sequence and view the names of its subkeys.
Software version
Optional. After you select Registry Subdirectory Name, the software version number is displayed when you click
to add a condition.
Custom software version number.
Process name
Optional. After you select Registry Subdirectory Name, the process name is displayed when you click
to add a condition.
If a process name is entered, the system detects whether the process is started and prompts that the device is non-compliant if it is not.
MD5 (32-bit)
Optional. After you select Registry Subdirectory Name, the MD5 value is displayed when you click
to add a condition.
The MD5 value of the software.
Registry path
When "Registry path" is selected, you can search the full registry path to determine whether the software is installed. Example: HKEY_LOCAL_MACHINE\\SOFTWARE\\Microsoft\\Edge.
How to find the registry path of a software:
1. Open Registry Editor: Press Win + R to open the Run dialog, type regedit, and then press Enter.
2. Navigate to possible paths: Registry entries for most application software are located in HKEY_LOCAL_MACHINE\\SOFTWARE or HKEY_CURRENT_USER\\Software.
3. You can search by software installation path or company name. For example:
HKEY_LOCAL_MACHINE\\SOFTWARE\\Microsoft\\Windows\\CurrentVersion\\Uninstall: Uninstall information for installed software is stored under this path.
HKEY_LOCAL_MACHINE\\SOFTWARE\\WOW6432Node\\Microsoft\\Windows\\CurrentVersion\\App Paths: Executable file paths for certain applications are stored under this path.
4. Search by software name: In Registry Editor, use the Find feature (Ctrl + F) and enter the software name or related keywords to search.
Version key name.
Optional. After you select Registry Path, the version key name is displayed when you click
to add a condition.
Find the version key name: In Registry Editor, software version information is typically stored in HKEY_LOCAL_MACHINE\\SOFTWARE\\[Software Vendor]\\[Software Name].
Common key names include DisplayVersion, Version, and ProductVersion.
Version key value
Optional. After you select a registry path, the version key value is displayed when you click
to add a condition.
Find the version key value: You can view it through file properties. Right-click the program file and go to Properties > Details > File version/Product version.
Process name
Optional. After you select Registry Path, the process name is displayed when you click
to add a condition.
If a process name is entered, the system detects whether the process is started and prompts that the device is non-compliant if it is not.
MD5 (32-bit)
Optional. After you select Registry Path, the MD5 value is displayed when you click
to add a condition.
The MD5 value of the software.
More advanced settings
Precise IP address settings: Supports precise matching by IP address range. The client applies the corresponding policy only within the specified network range.
Non-compliant Software
Software
Required field.
It is only used to display the required software name on the client and is not used as a detection condition.
Registry subkey name
When Registry Subdirectory Name is selected, the corresponding subdirectory name is searched from the registry uninstallation path to determine whether the software is installed.
For example, if you enter Edge, the registry uninstall directory is searched.
Some software may not write its subdirectory name to the uninstall registry path, which may make detection impossible. In this case, you are advised to use Registry Path for detection.
How to find the registry subkey name:
1. Open Registry Editor: Press Win + R to open the Run dialog, type regedit, and then press Enter.
2. Navigate to the target path: In Registry Editor, expand the target path in sequence and view the names of its subkeys.
Software version
Optional. After you select Registry Subdirectory Name, the software version number is displayed when you click
to add a condition.
Custom software version number.
Registry path
When "Registry path" is selected, you can search the full registry path to determine whether the software is installed. Example: HKEY_LOCAL_MACHINE\\SOFTWARE\\Microsoft\\Edge.
How to find the registry path of a software:
1. Open Registry Editor: Press Win + R to open the Run dialog, type regedit, and then press Enter.
2. Navigate to possible paths: Registry entries for most application software are located in HKEY_LOCAL_MACHINE\\SOFTWARE or HKEY_CURRENT_USER\\Software.
3. You can search by software installation path or company name. For example:
HKEY_LOCAL_MACHINE\\SOFTWARE\\Microsoft\\Windows\\CurrentVersion\\Uninstall: Uninstall information for installed software is stored under this path.
HKEY_LOCAL_MACHINE\\SOFTWARE\\WOW6432Node\\Microsoft\\Windows\\CurrentVersion\\App Paths: Executable file paths for certain applications are stored under this path.
4. Search by software name: In Registry Editor, use the Find feature (Ctrl + F) and enter the software name or related keywords to search.
Version key name.
Optional. After you select Registry Path, the version key name is displayed when you click
to add a condition.
Find the version key name: In Registry Editor, software version information is typically stored in HKEY_LOCAL_MACHINE\\SOFTWARE\\[Software Vendor]\\[Software Name].
Common key names include DisplayVersion, Version, and ProductVersion.
Version key value
Optional. After you select a registry path, the version key value is displayed when you click
to add a condition.
Find the version key value: You can view it through file properties. Right-click the program file and go to Properties > Details > File version/Product version.
More advanced settings
Precise IP address settings: Supports precise matching by IP address range. The client applies the corresponding policy only within the specified network range.
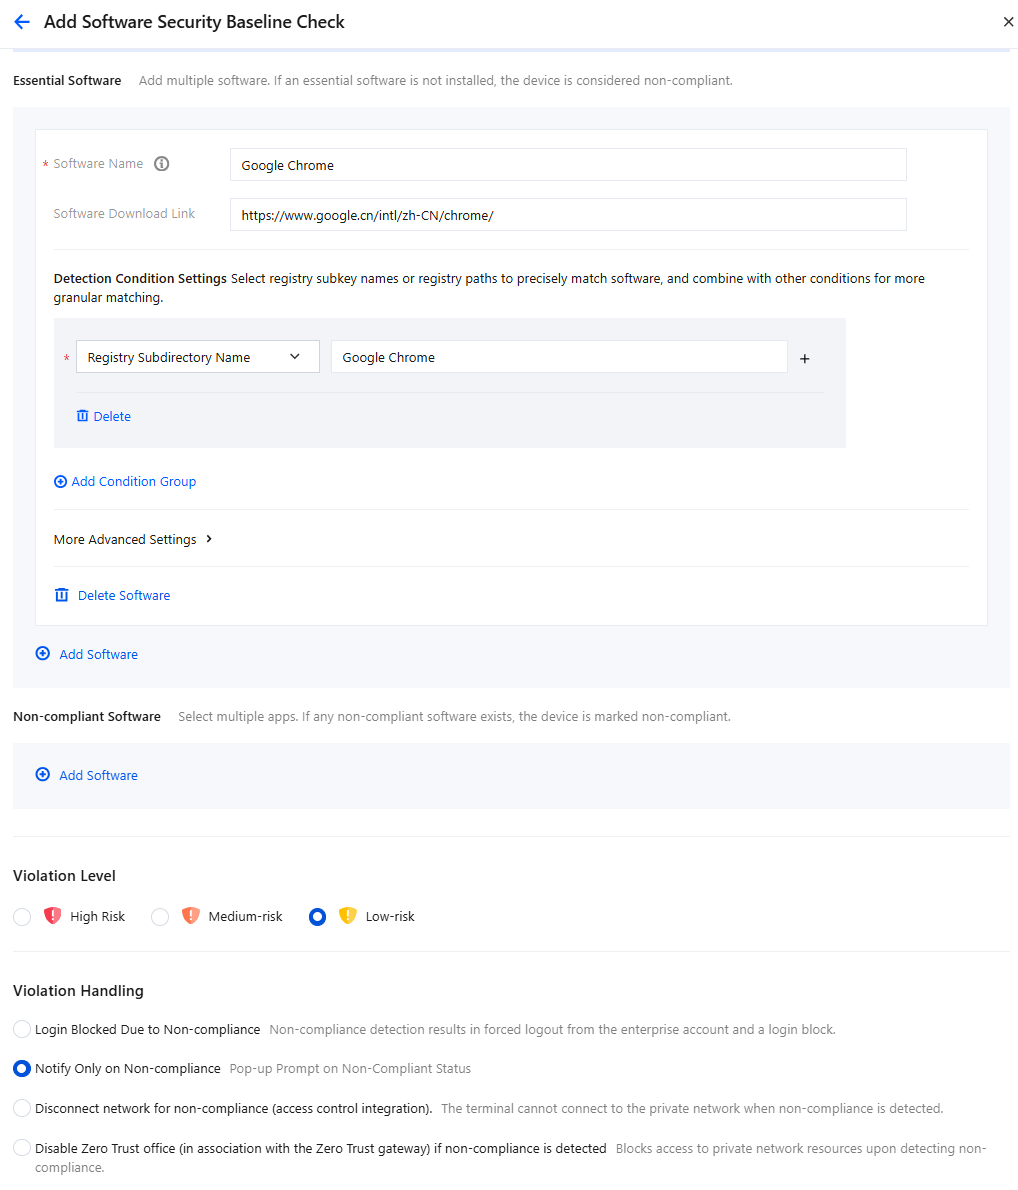
4. For configuration parameters, refer to the example in the following figure:
5. After completing the addition, click Save.
6. After the client pulls the policy, open the client compliance detection page and click Detect Now.
7. If the terminal has prohibited software or lacks required software, the device is detected as non-compliant.
Non-compliant Processes
1. Detect whether the client has any non-compliant processes.
2. Click Enable Detection
, and then click Add Detection Point.
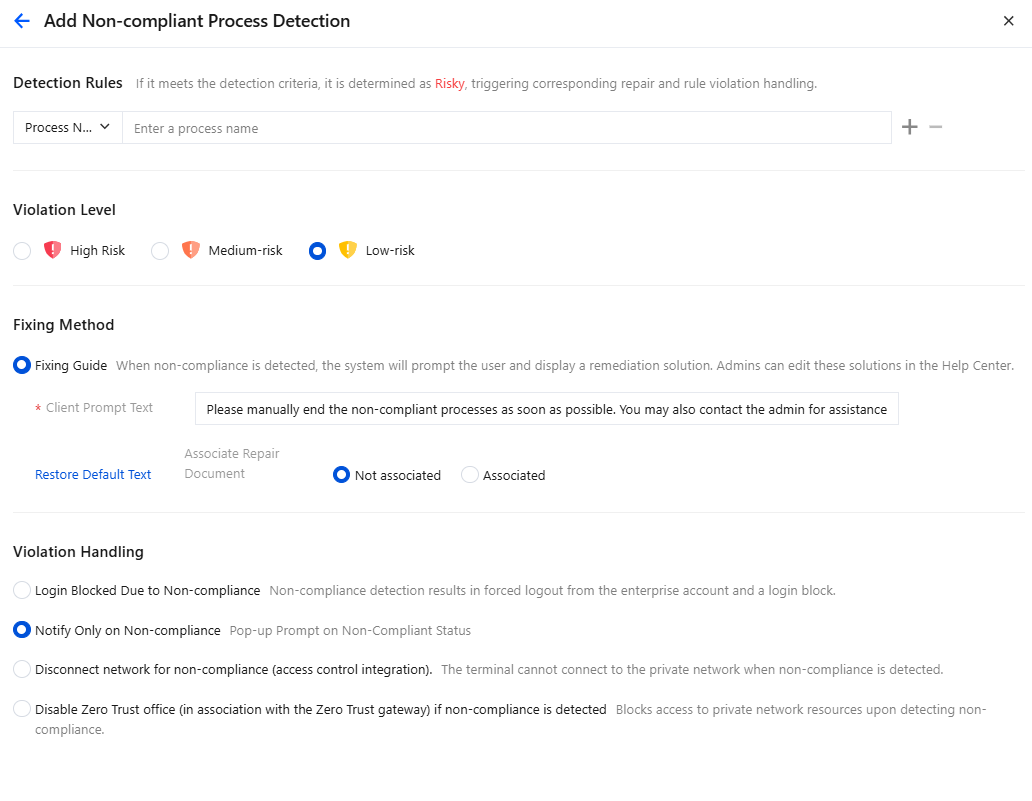
3. In the Add Non-compliant Process Detection Item dialog box, configure the parameters and click Save.
Note:
Configure a non-compliant process rule (wildcards supported), for example: n*
Parameter Name
Description
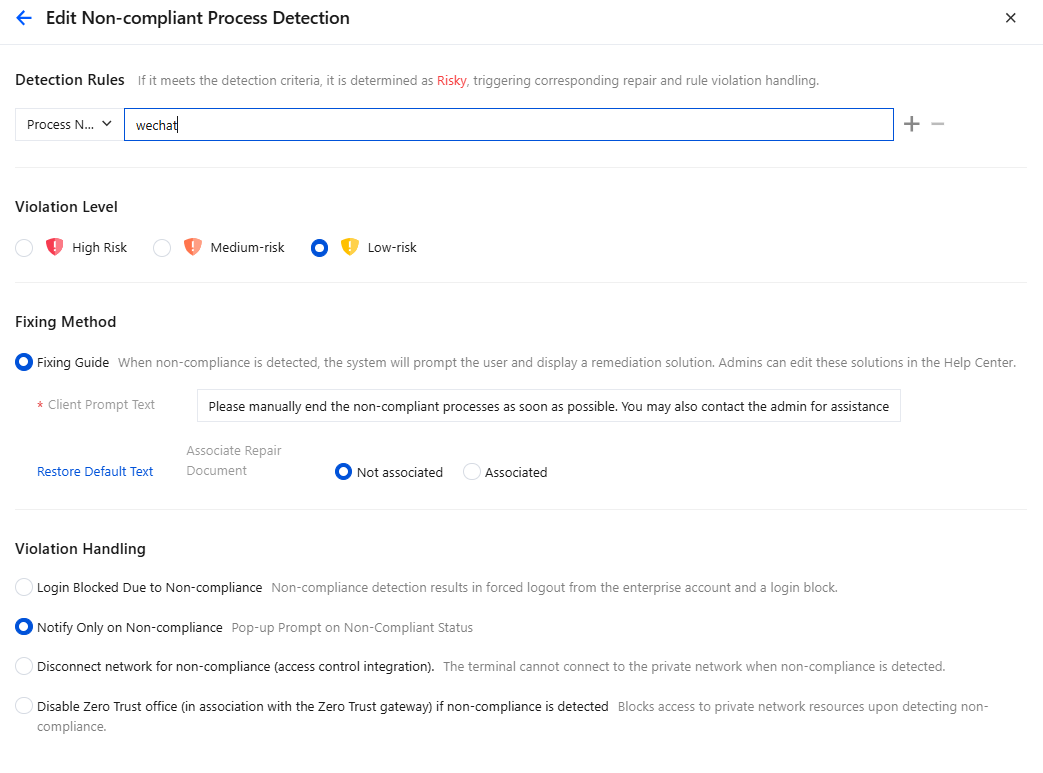
Non-compliant process
Enter the process name.
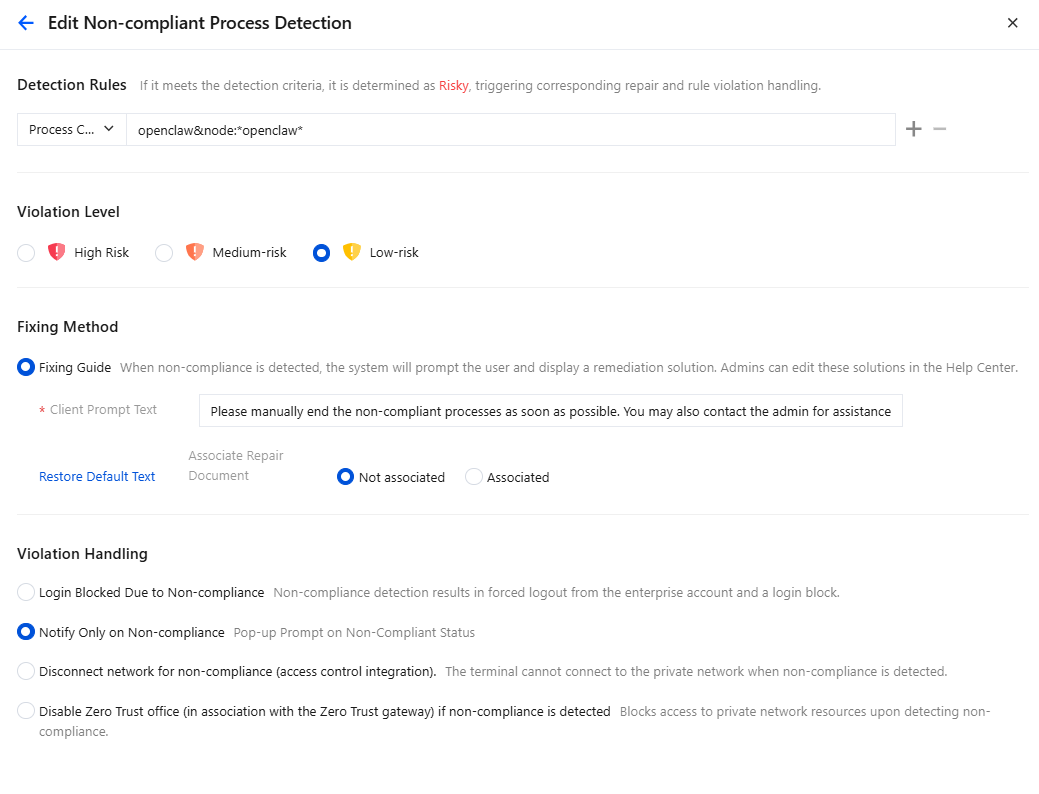
Process command line
Supports detection, identification, and display of AI agents such as OpenClaw and QClaw. Once a corresponding Agent is detected, the system can prompt users through a pop-up/prohibit access to the private network (integrated with the zero trust gateway module).
Violation level
High, medium, and low severity.
Repair Guide
Customize the client notification message.
You can associate remediation documents to guide users through customized instructions for completing the fix, improving compliance remediation efficiency.
Login prohibited when non-compliant: Non-compliance detection results in forced logout from the enterprise account and a login block.
Alert only when non-compliant: Prompt users through a pop-up upon detecting non-compliance.
Network disconnected when non-compliant (linked to admission): The terminal cannot connect to the private network when non-compliance is detected.
Disable Zero Trust Office when non-compliant (linked to the Zero Trust gateway): Blocks access to private network resources upon detecting non-compliance.
4. For configuration parameters, refer to the example in the following figure:
5. After completing the addition, click Save.
6. After the client pulls the policy, open the client compliance detection page and click Detect Now.
7. A prohibited process exists on the terminal, and the detection result indicates that the device is non-compliant.
Non-compliant Service
1. Detect whether the client has started any non-compliant services.
2. Click Enable Detection
, and then click Add Detection Point.
3. In the Add Non-compliant Service Detection Item dialog box, configure the parameters and click Save.
Note:
Configure a non-compliant service rule (wildcards supported), for example: VM*.
Parameter Name
Description
non-compliant service
Enter the service name.
Violation level
High, medium, and low severity.
Repair Guide
Customize the client notification message.
You can associate remediation documents to guide users through customized instructions for completing the fix, improving compliance remediation efficiency.
Violation handling
Login prohibited when non-compliant: Non-compliance detection results in forced logout from the enterprise account and a login block.
Alert only when non-compliant: Prompt users through a pop-up upon detecting non-compliance.
Network disconnected when non-compliant (linked to admission): The terminal cannot connect to the private network when non-compliance is detected.
Disable Zero Trust Office when non-compliant (linked to the Zero Trust gateway): Blocks access to private network resources upon detecting non-compliance.
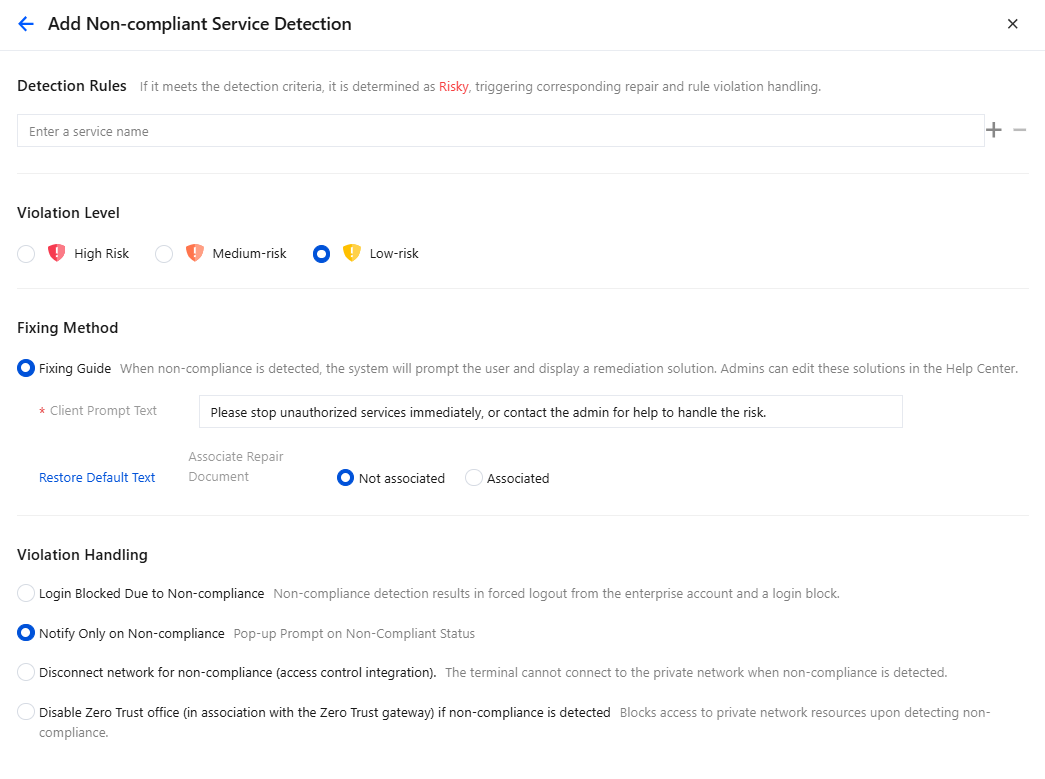
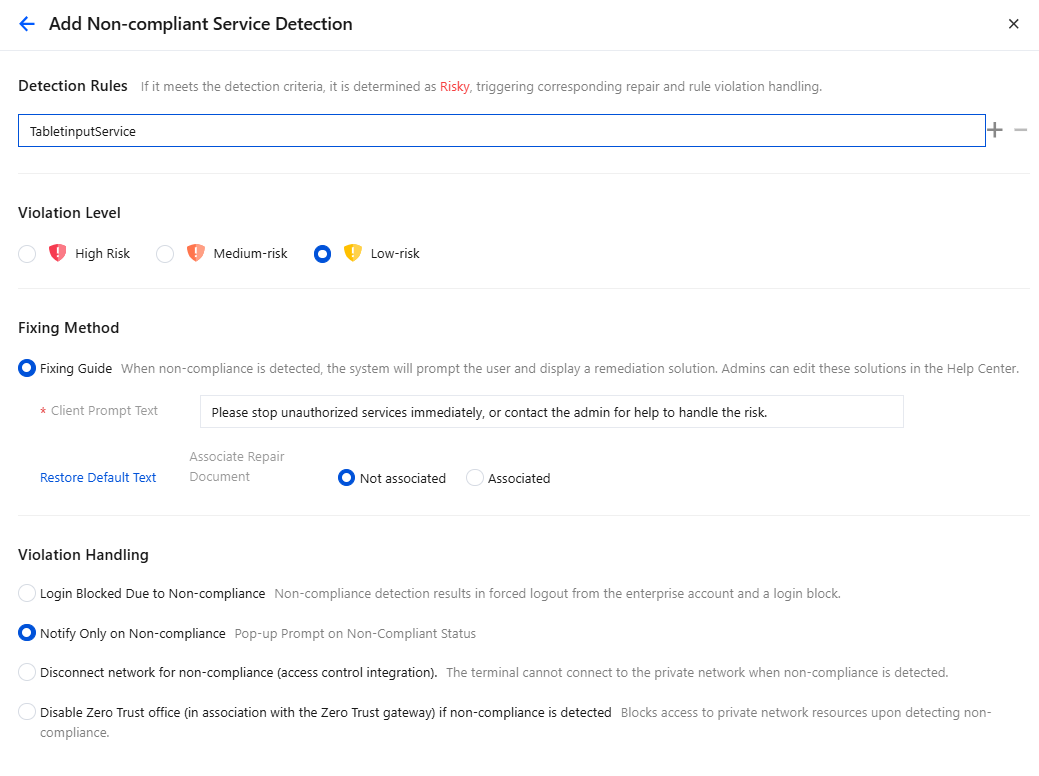
4. For configuration parameters, refer to the example in the following figure:
5. After completing the addition, click Save.
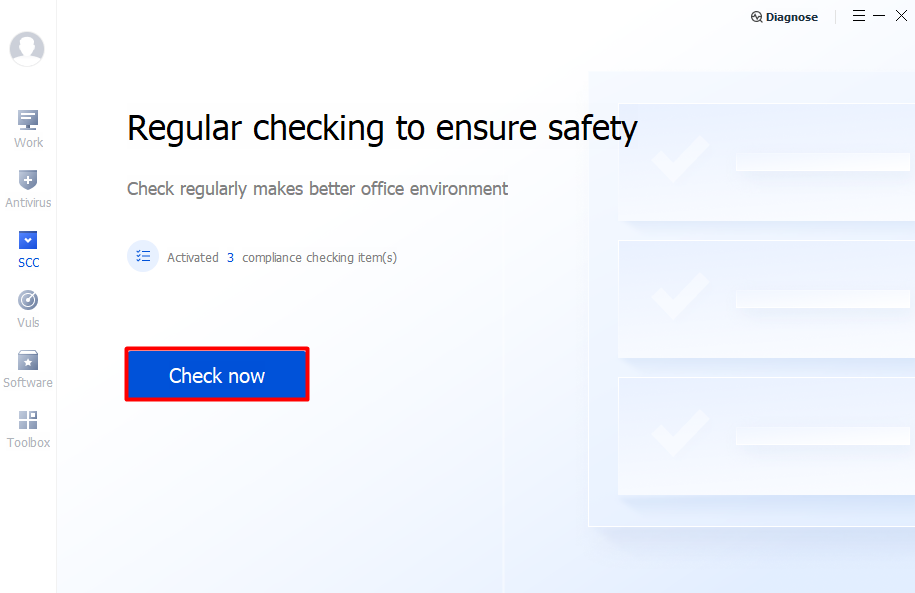
6. After the client pulls the policy, open the client compliance detection page and click Detect Now.
7. A non-compliant service exists on the terminal, and the detection result indicates that the device is non-compliant.
Non-compliant Ports
1. Detect whether the client has enabled any non-compliant ports.
Note:
To detect non-compliant port items, the system firewall must be disabled.
2. Click Enable Detection
, and then click Add Detection Point.
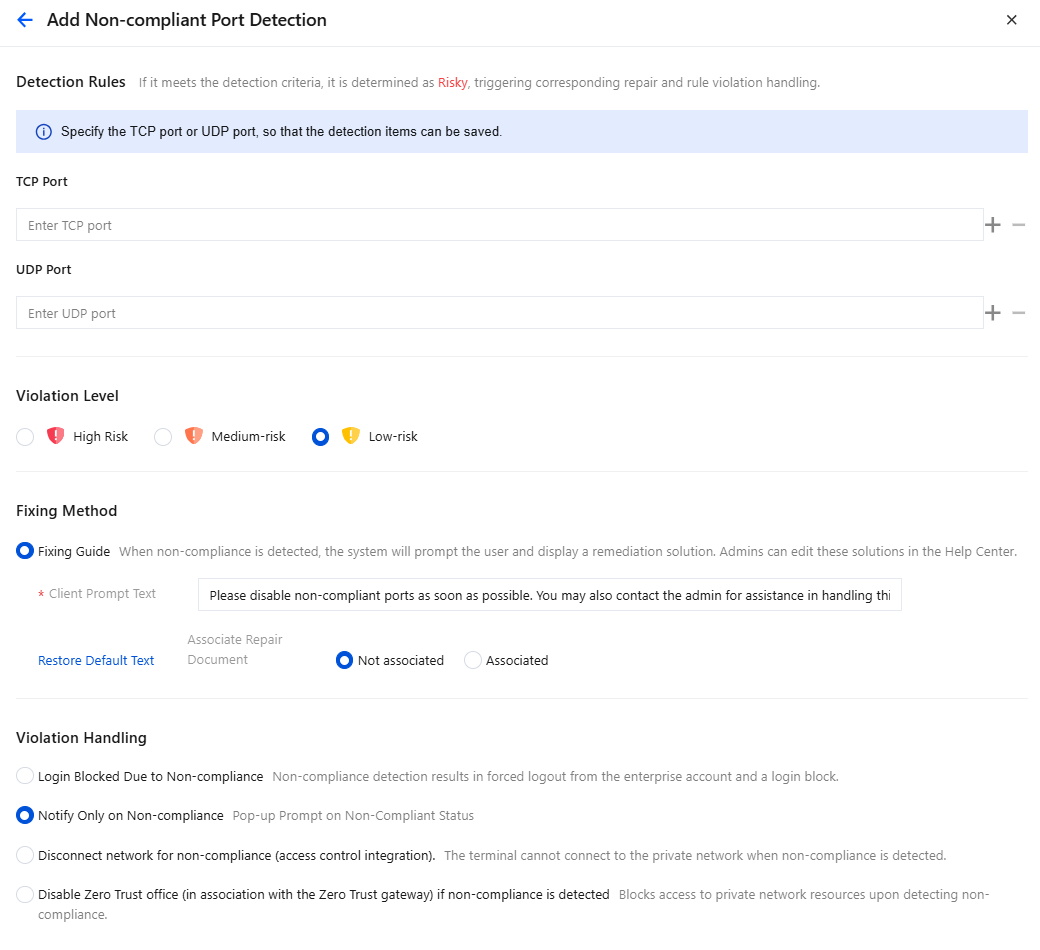
3. In the Add Non-compliant Port Detection Item dialog box, configure the parameters and click Save.
Parameter Name
Description
non-compliant ports
Enter the TCP port.
Enter the UDP port.
Violation level
High, medium, and low severity.
Repair Guide
Customize the client notification message.
You can associate remediation documents to guide users through customized instructions for completing the fix, improving compliance remediation efficiency.
Login prohibited when non-compliant: Non-compliance detection results in forced logout from the enterprise account and a login block.
Alert only when non-compliant: Prompt users through a pop-up upon detecting non-compliance.
Network disconnected when non-compliant (linked to admission): The terminal cannot connect to the private network when non-compliance is detected.
Disable Zero Trust Office when non-compliant (linked to the Zero Trust gateway): Blocks access to private network resources upon detecting non-compliance.
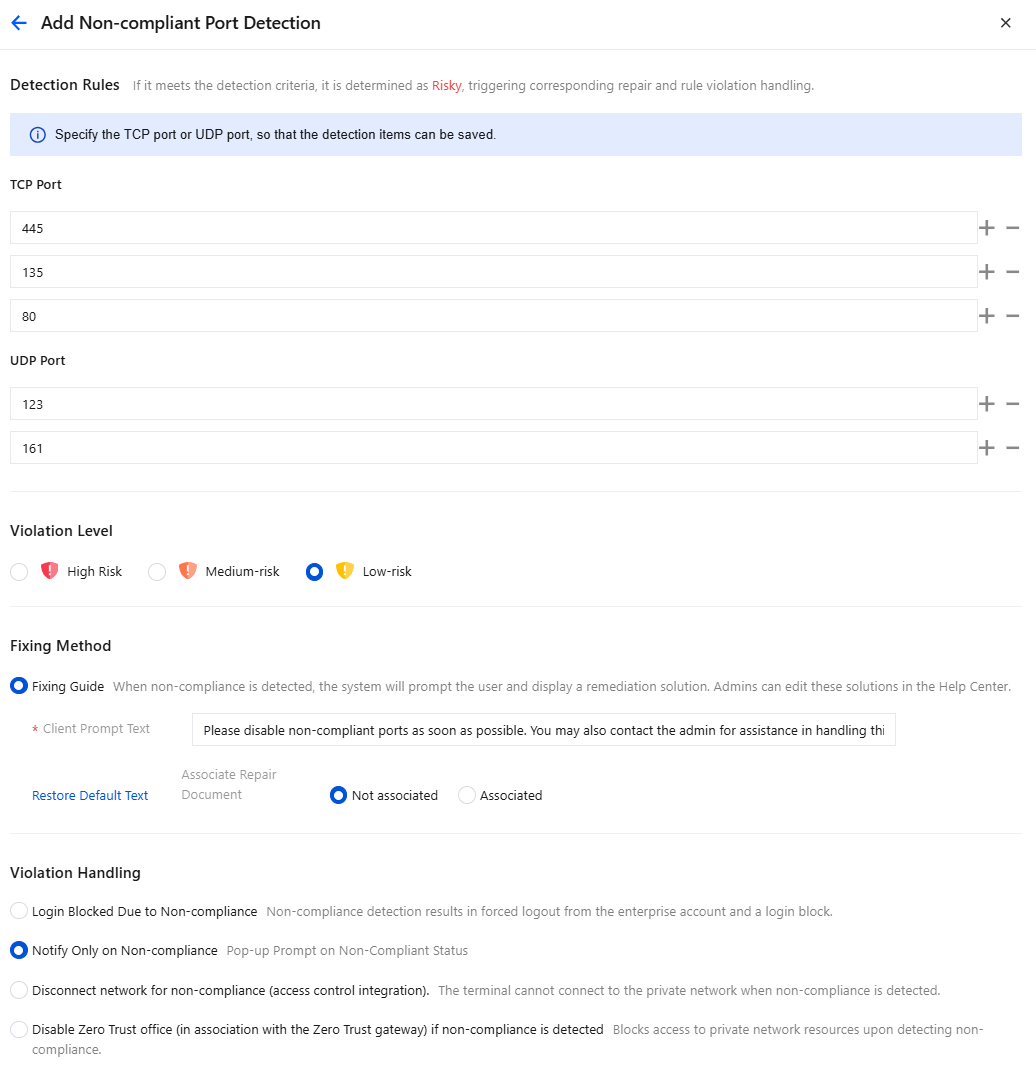
4. For configuration parameters, refer to the example in the following figure:
5. After completing the addition, click Save.
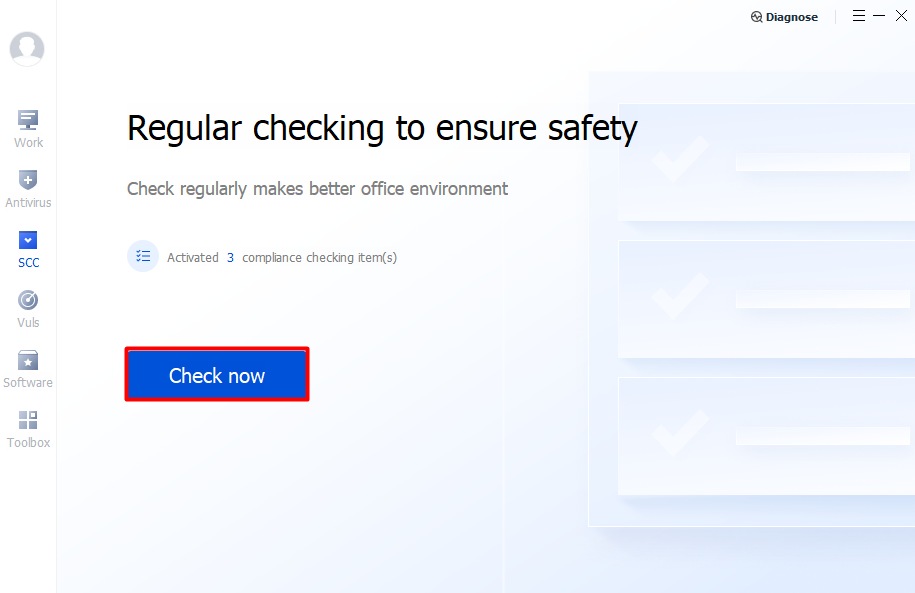
6. After the client pulls the policy, open the client compliance detection page and click Detect Now.
7. The terminal has enabled the corresponding non-compliant port, and the detection result is non-compliant.
Disk Encryption
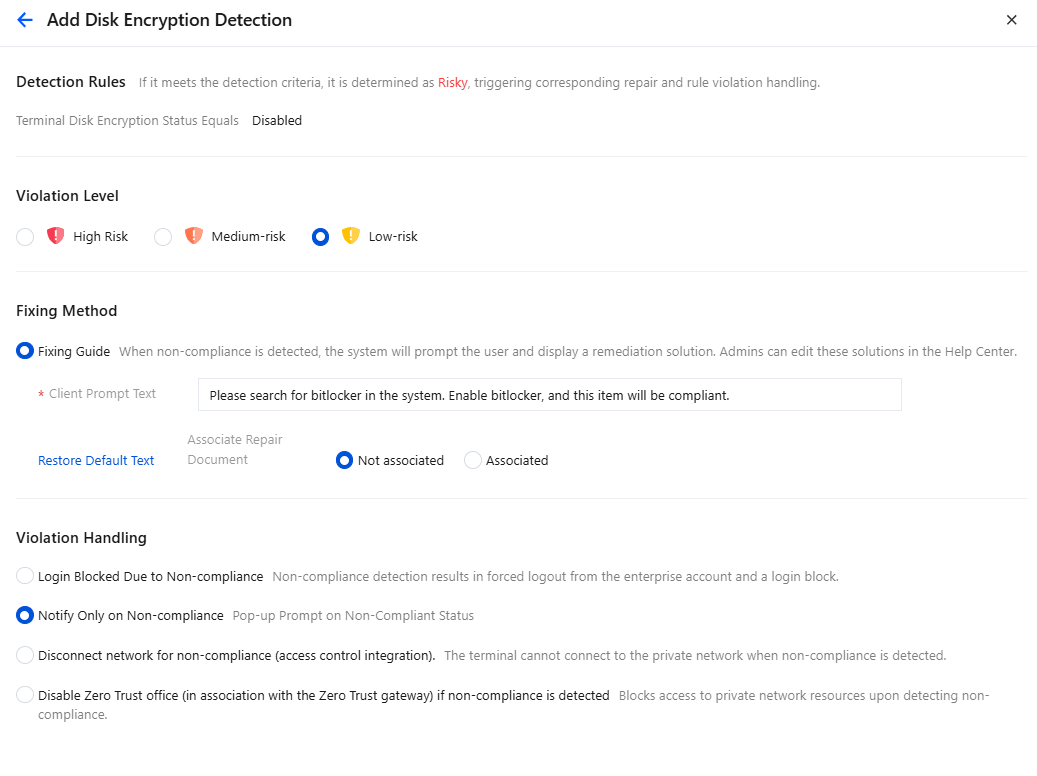
1. This policy detects whether all disks are encrypted. Click Enable Detection
, and click Add Detection Point.
2. Configure parameters such as detection rules and remediation methods. For parameter configuration, refer to the example in the following figure:
3. After the client pulls the policy, open the client compliance detection page and click Detect Now.
4. The terminal does not have disk encryption detection enabled, and the detection result is non-compliant.
Domain Join
1. Click Enable Detection
, and then click Add Detection Point.
2. In the Add Domain Join Detection Item dialog box, configure the parameters and click Save.
Parameter Name
Description
Detection domain
Enter the domain name.
Precise IP settings
All IPs: All IPs within the range will be detected.
Local IP address: The IP address used by the terminal to connect to the central console.
Egress IP: The IP address used by the terminal to connect to the public network.
Violation level
High, medium, and low severity.
Violation handling
Login prohibited when non-compliant: Non-compliance detection results in forced logout from the enterprise account and a login block.
Alert only when non-compliant: Prompt users through a pop-up upon detecting non-compliance.
Network disconnected when non-compliant (linked to admission): The terminal cannot connect to the private network when non-compliance is detected.
Disable Zero Trust Office when non-compliant (linked to the Zero Trust gateway): Blocks access to private network resources upon detecting non-compliance.
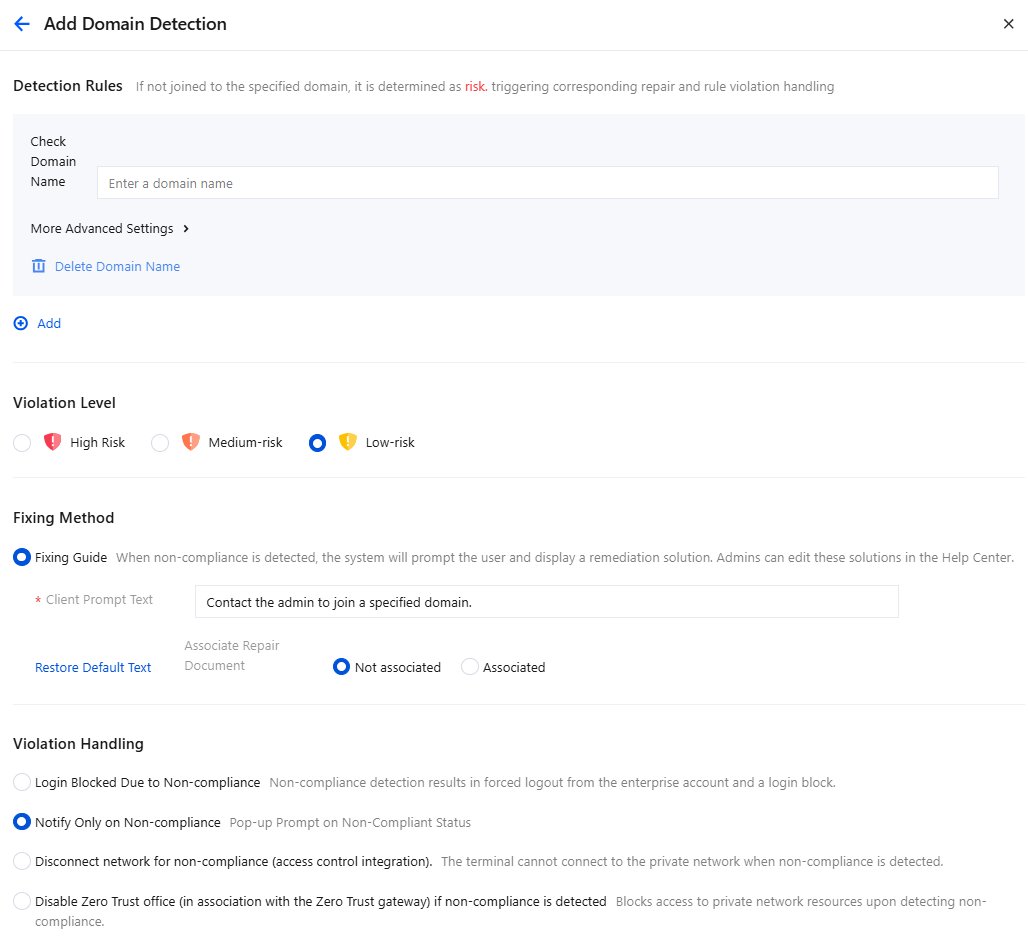
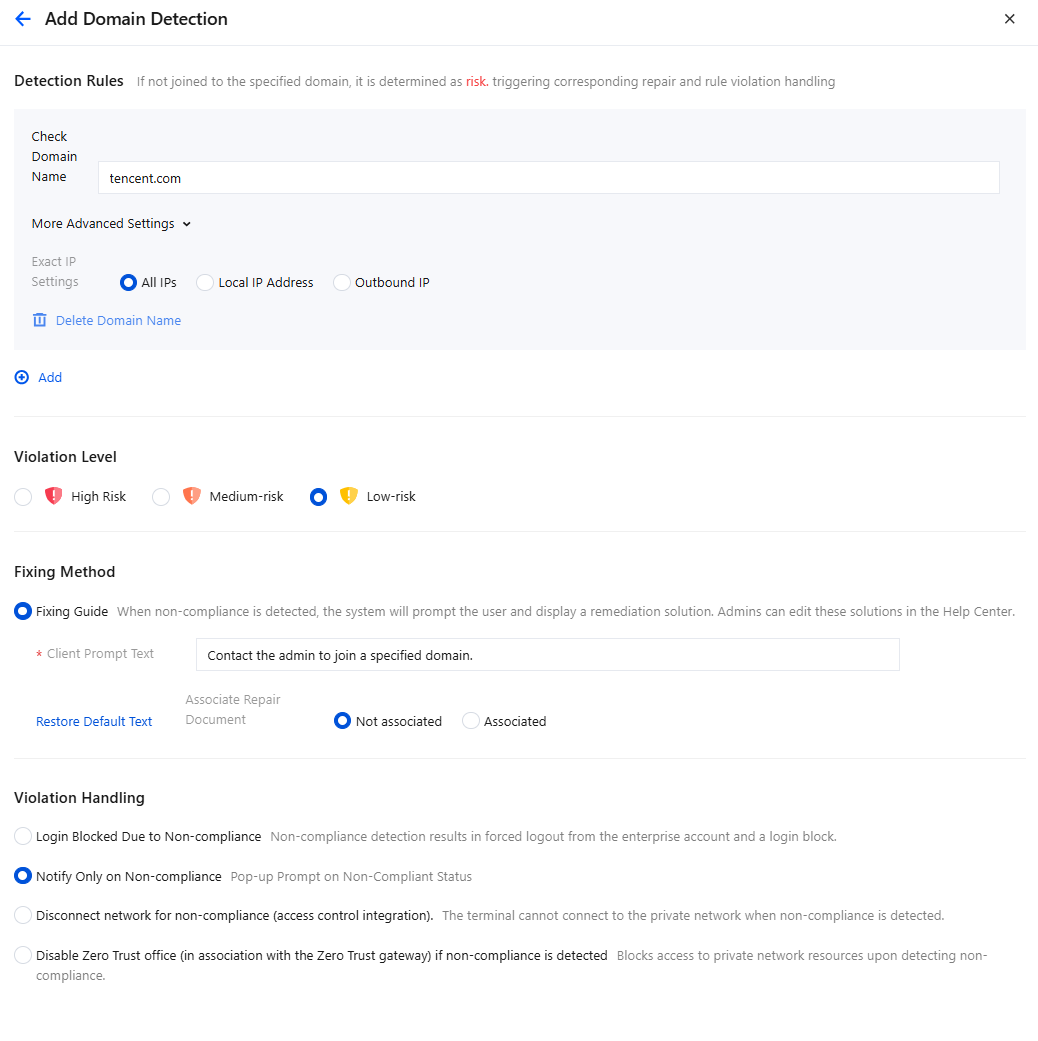
3. For configuration parameters, refer to the example in the following figure:
4. After completing the addition, click Save.
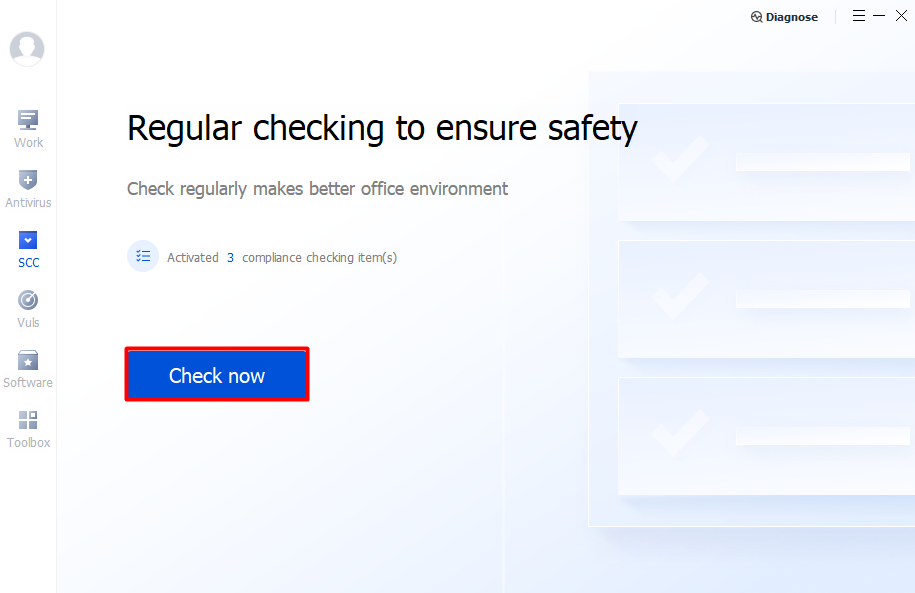
5. After the client pulls the policy, open the client compliance detection page and click Detect Now.
6. The terminal is not joined to the domain, and the detection result shows that the terminal is non-compliant.
Client Version
1. Click Enable Detection
, and then click Add Detection Point.
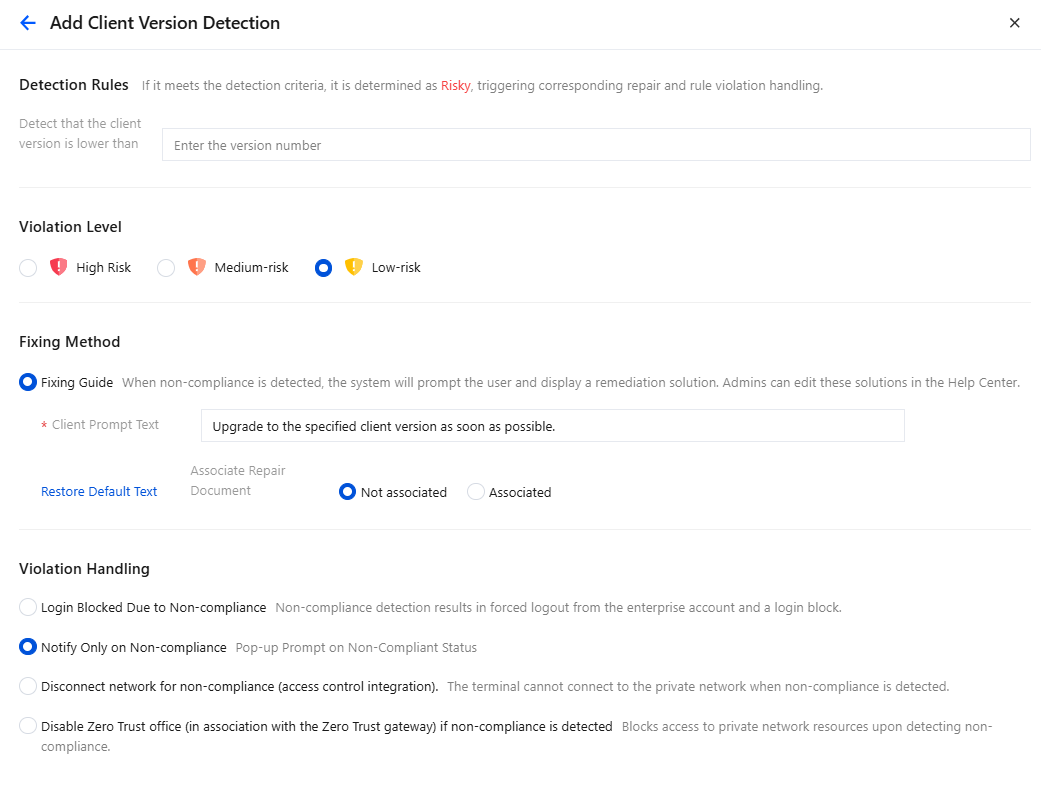
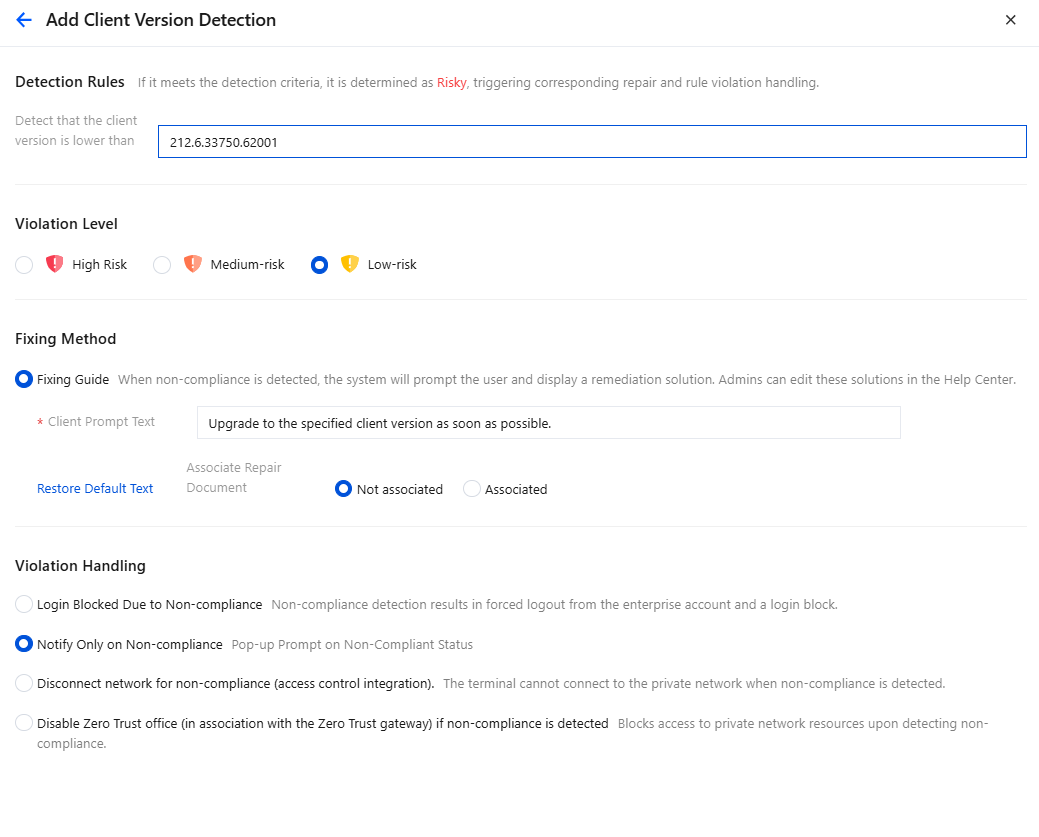
2. In the Add Client Version Detection Item dialog box, configure the parameters and click Save.
Parameter Name
Description
Detect client version lower than
Enter the minimum client version required for user installation based on your company's control requirements.
Violation level
High, medium, and low severity.
Repair Guide
Customize the client notification message.
You can associate remediation documents to guide users through customized instructions for completing the fix, improving compliance remediation efficiency.
Login prohibited when non-compliant: Non-compliance detection results in forced logout from the enterprise account and a login block.
Alert only when non-compliant: Prompt users through a pop-up upon detecting non-compliance.
Network disconnected when non-compliant (linked to admission): The terminal cannot connect to the private network when non-compliance is detected.
Disable Zero Trust Office when non-compliant (linked to the Zero Trust gateway): Blocks access to private network resources upon detecting non-compliance.
3. For configuration parameters, refer to the example in the following figure:
4. After completing the addition, click Save.
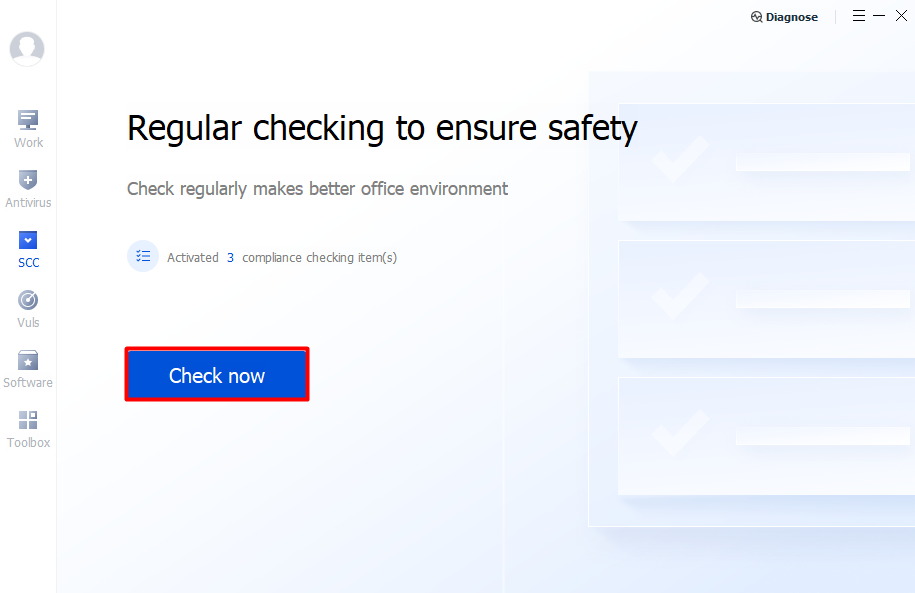
5. After the client pulls the policy, open the client compliance detection page and click Detect Now.
6. The iOA client version on the terminal does not meet the minimum version requirement, and the detection result shows that the device is non-compliant.
Operating System
1. Click Enable Detection
, and then click Add Detection Point.
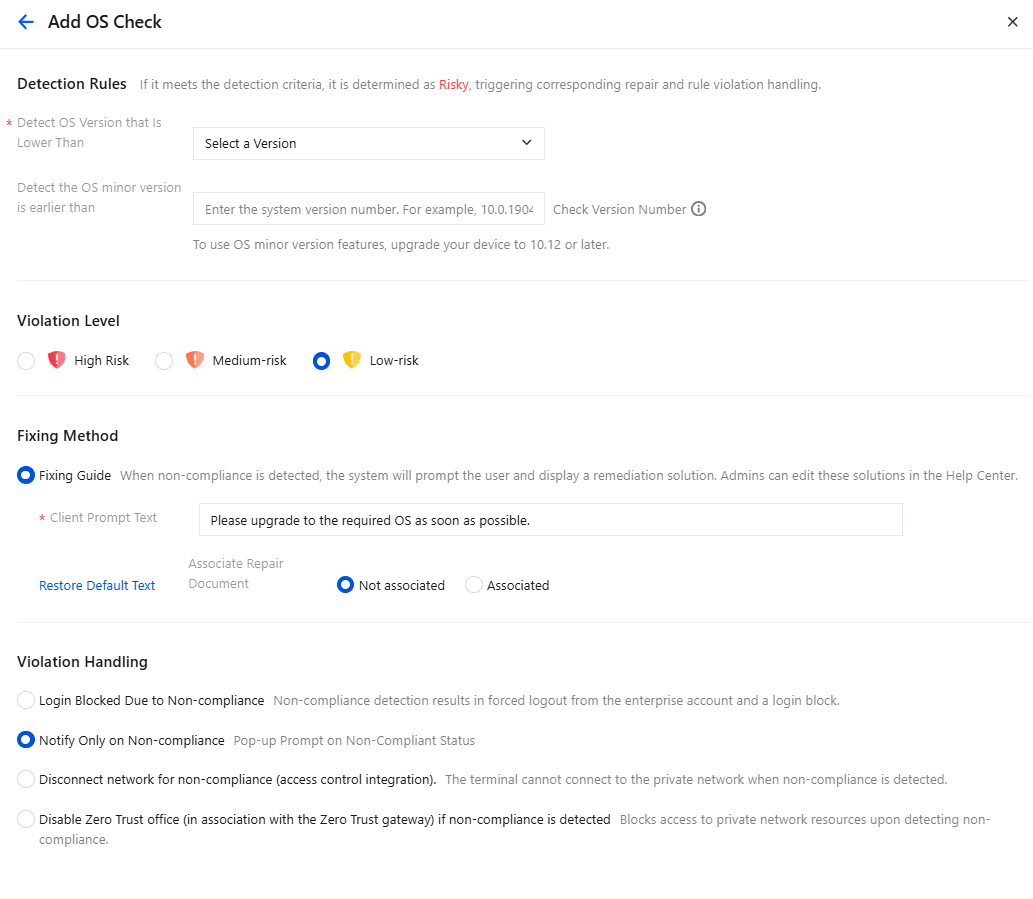
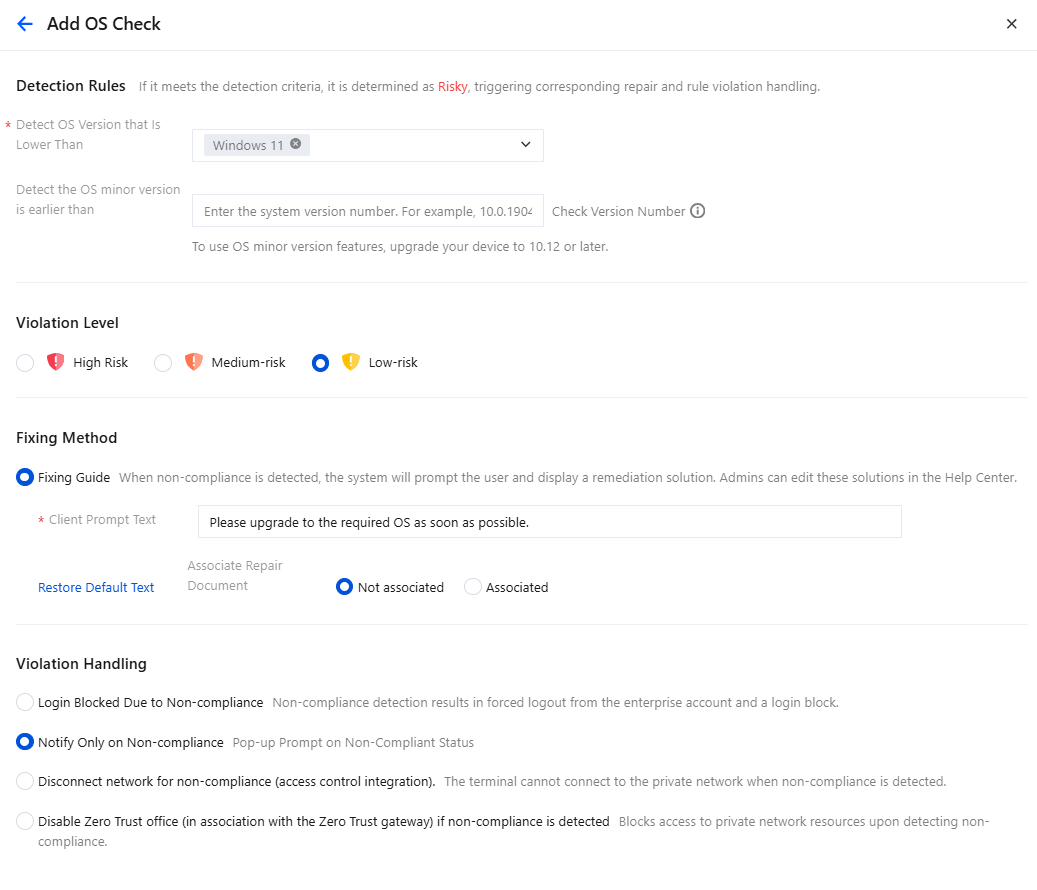
2. In the Add OS Detection Item dialog box, configure the parameters and click Save.
Parameter Name
Description
Detect OS version lower than
Dropdown selection: Windows XP, Windows Vista, Windows 7, Windows 8, Windows 10, Windows 11.
Detect OS minor version lower than
Enter the system version.
To view the system version: press Win+R, type cmd and press Enter, then type ver and press Enter.
Violation level
High, medium, and low severity.
Repair Guide
Customize the client notification message.
You can associate remediation documents to guide users through customized instructions for completing the fix, improving compliance remediation efficiency.
Login prohibited when non-compliant: Non-compliance detection results in forced logout from the enterprise account and a login block.
Alert only when non-compliant: Prompt users through a pop-up upon detecting non-compliance.
Network disconnected when non-compliant (linked to admission): The terminal cannot connect to the private network when non-compliance is detected.
Disable Zero Trust Office when non-compliant (linked to the Zero Trust gateway): Blocks access to private network resources upon detecting non-compliance.
3. For configuration parameters, refer to the example in the following figure:
4. After completing the addition, click Save.
5. After the client pulls the policy, open the client compliance detection page and click Detect Now.
6. The terminal's OS version is too low, and the detection result shows that the device is non-compliant.
Weak Password
Attention:
You are advised to enable this feature with caution. Once enabled, it reads sensitive information such as terminal account names and password hashes, which may cause false positive alarms from other terminal security software.
When a large number of weak passwords are configured, computing their hashes on the terminal can significantly degrade system performance, especially when domain account detection is enabled. It is recommended to configure no more than 10,000 weak passwords.
In domain account login scenarios, for special servers or systems with special security settings, if the system does not cache domain account login credentials, the weak password scanning feature for domain accounts cannot be used.
1. Click Enable Detection
, and then click Add Detection Point.
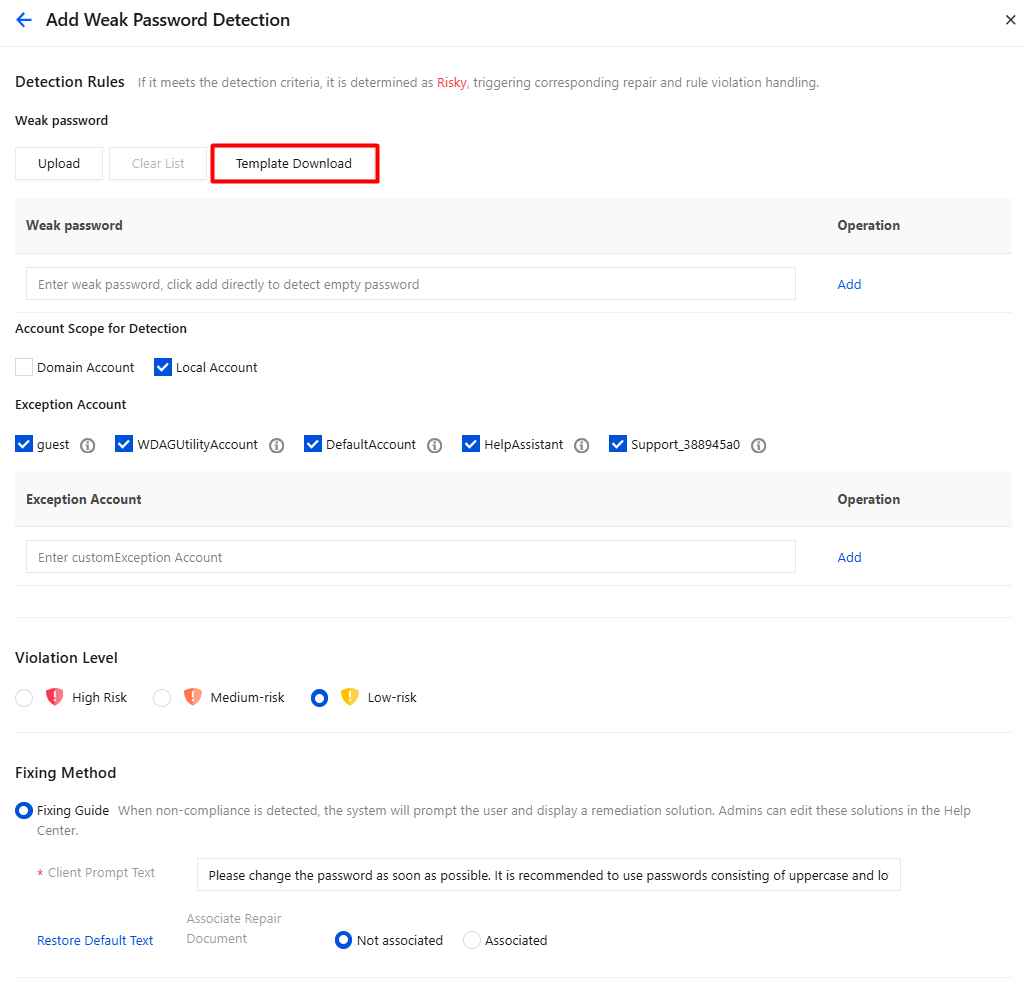
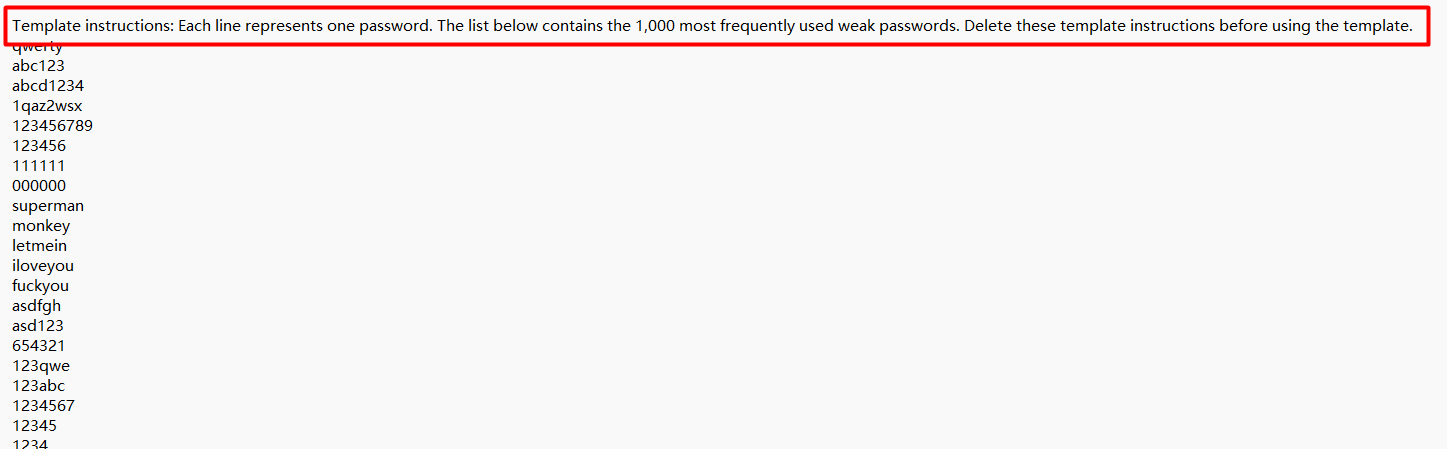
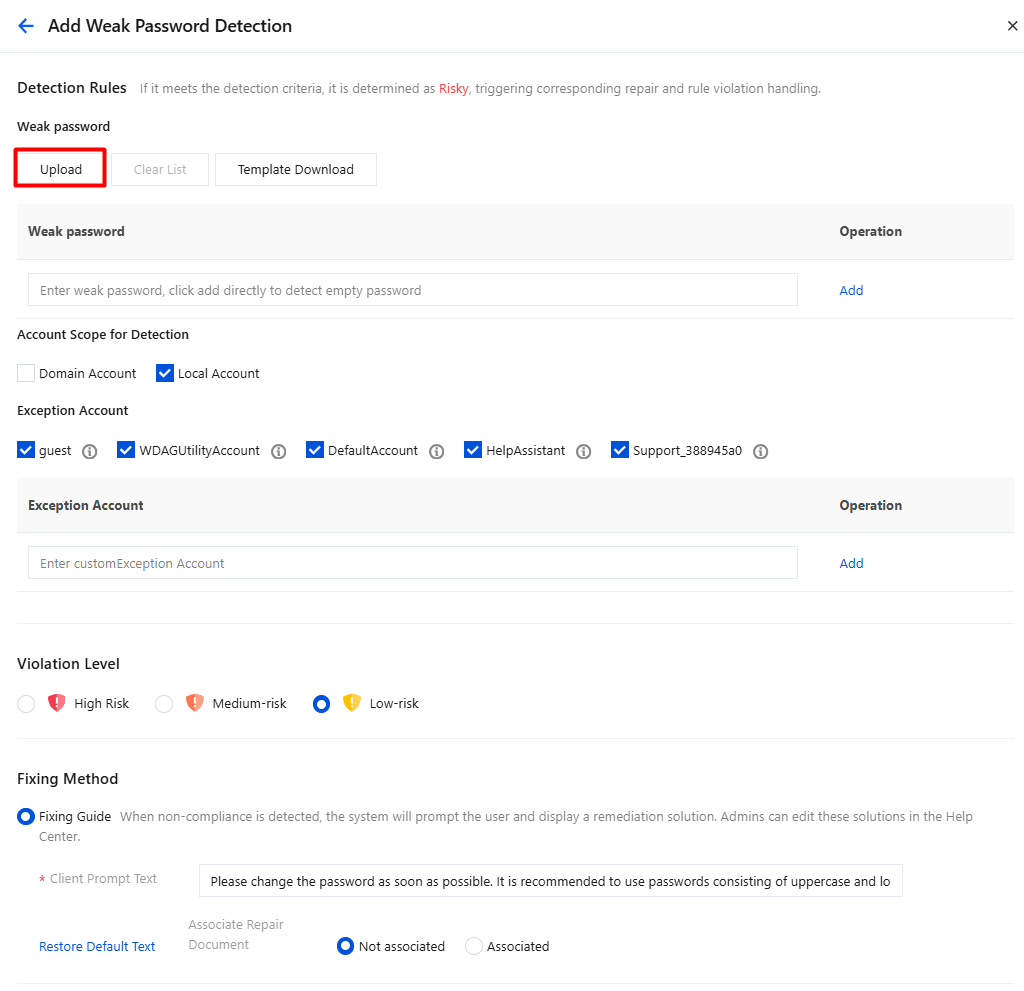
2. In the Add Weak Password Detection Item dialog, click Download Template.
3. Delete the template description and save the document.
4. For configuration parameters, refer to the example in the following figure. Click Upload, import the modified document, and then click Save.
5. After completing the addition, click Save.
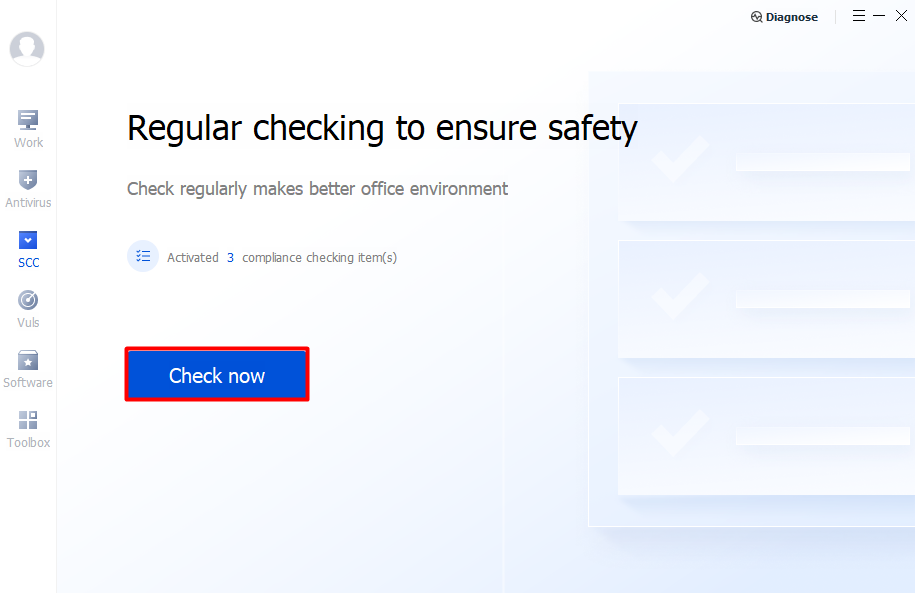
6. After the client pulls the policy, open the client compliance detection page and click Detect Now.
7. If the password of a terminal account is a weak password (which must exist in the imported document), for example: abc123.
8. When a terminal account password matches a password in the weak password list, the detection indicates non-compliance.
Registry
1. Click Enable Detection
, and then click Add Detection Point.
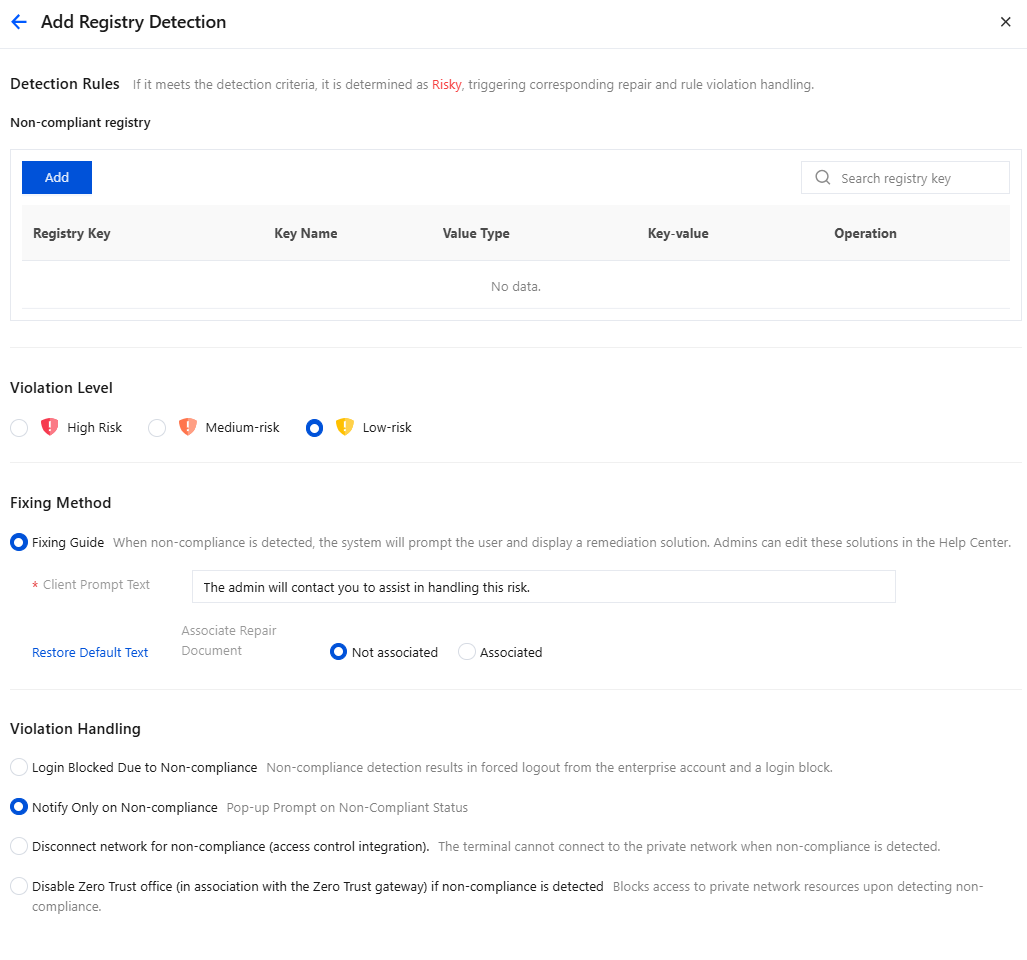
2. In the Add Registry Detection Item dialog box, configure the parameters and click Save.
Parameter Name
Description
Violating registry
Registry Entry
Required field.
Example: Install a WinRAR decompression software.
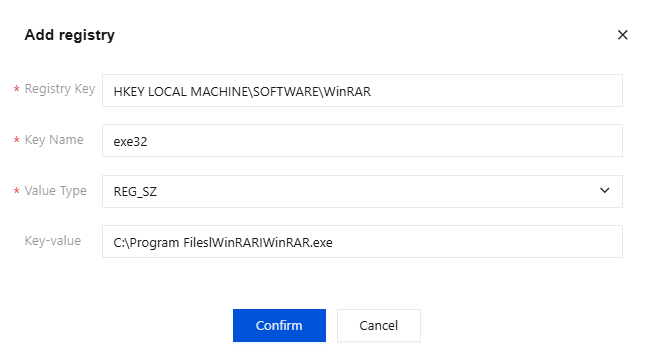
Example of registry entry: HKEY_LOCAL_MACHINE\\SOFTWARE\\WinRAR.
Key Name
Required field.
Example: exe32.
Value Type
Required field.
Select from the drop-down list: REG_SZ, REG_DWORD (decimal), REG_MULTI_SZ, REG_EXPAND_SZ, REG_QWORD (decimal).
Key-value
Optional.
Example: C:\\Program Files\\WinRAR\\WinRAR.exe.
Violation level
High, medium, and low severity.
Repair Guide
Customize the client notification message.
You can associate remediation documents to guide users through customized instructions for completing the fix, improving compliance remediation efficiency.
Login prohibited when non-compliant: Non-compliance detection results in forced logout from the enterprise account and a login block.
Alert only when non-compliant: Prompt users through a pop-up upon detecting non-compliance.
Network disconnected when non-compliant (linked to admission): The terminal cannot connect to the private network when non-compliance is detected.
Disable Zero Trust Office when non-compliant (linked to the Zero Trust gateway): Blocks access to private network resources upon detecting non-compliance.
3. For configuration parameters, refer to the example in the following figure:
4. After completing the addition, click Save.
5. After the client pulls the policy, open the client compliance detection page and click Detect Now.
6. No prohibited registry entries exist on the terminal, and the detection result is compliant.
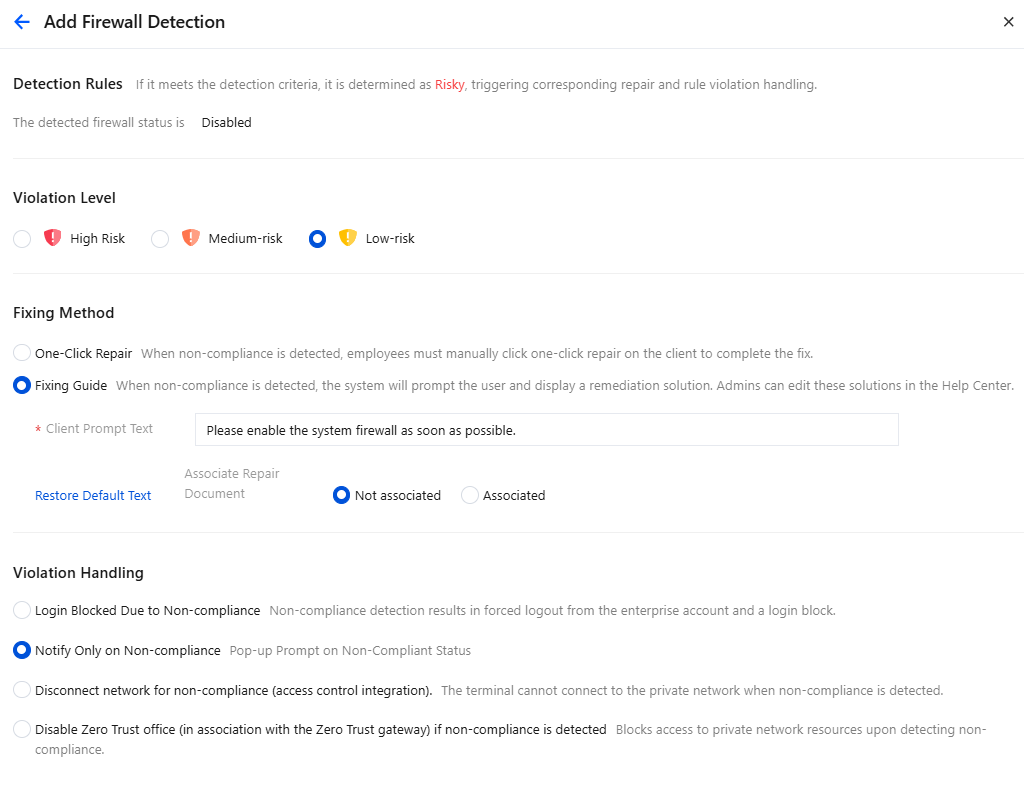
Firewalls
1. After configuring this policy, check whether the system firewall is enabled, click Enable Detection
, and then click Add Detection Point.
2. Configure parameters such as violation levels, remediation methods, and violation handling.
Parameter Name
Description
Violation level
High, medium, and low severity.
Remediation method
One-Click Fix
When non-compliance is detected, the user must manually click one-click repair on the client to complete the fix.
Repair Guide
Customize the client notification message.
You can associate remediation documents to guide users through customized instructions for completing the fix, improving compliance remediation efficiency.
Login prohibited when non-compliant: Non-compliance detection results in forced logout from the enterprise account and a login block.
Alert only when non-compliant: Prompt users through a pop-up upon detecting non-compliance.
Network disconnected when non-compliant (linked to admission): The terminal cannot connect to the private network when non-compliance is detected.
Disable Zero Trust Office when non-compliant (linked to the Zero Trust gateway): Blocks access to private network resources upon detecting non-compliance.
3. For configuration parameters, refer to the example in the following figure:
4. After completing the configuration, click Save.
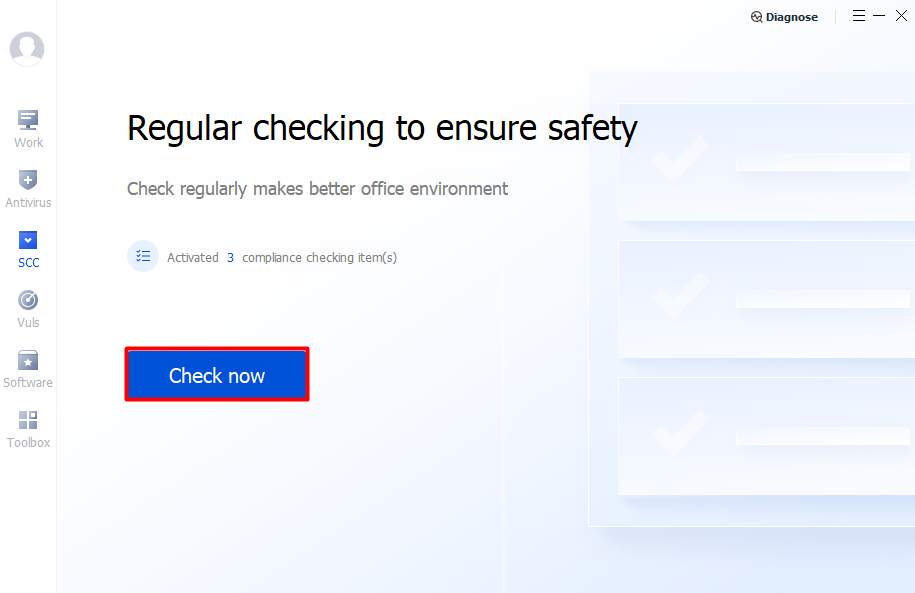
5. After the client pulls the policy, open the client compliance detection page and click Detect Now.
6. The system firewall is enabled on the terminal, and the detection result is compliant.
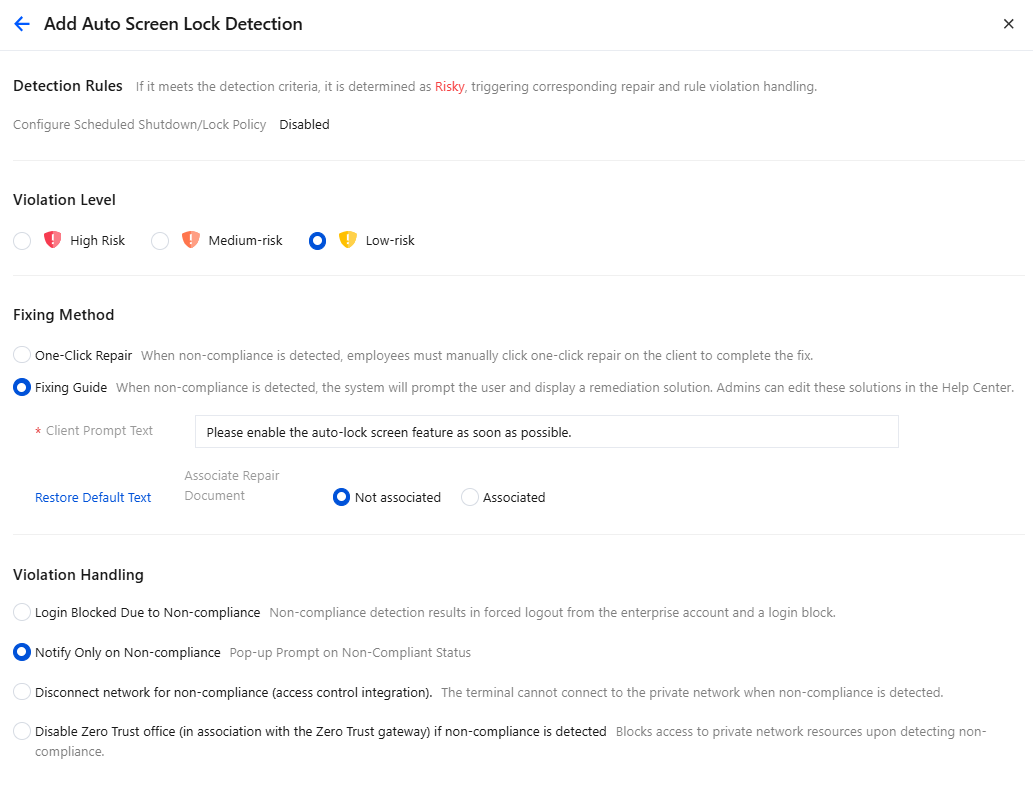
Automatic Screen Lock Detection
1. Detect whether the terminal has enabled automatic screen lock, click Start Detection
and then click Add Detection Point.
2. In the Add Automatic Screen Lock Detection dialog box, configure the relevant parameters.
Parameter Name
Description
Violation level
High, medium, and low severity.
Remediation method
One-Click Fix
When non-compliance is detected, the user must manually click one-click repair on the client to complete the fix.
Repair Guide
Customize the client notification message.
You can associate remediation documents to guide users through customized instructions for completing the fix, improving compliance remediation efficiency.
Login prohibited when non-compliant: Non-compliance detection results in forced logout from the enterprise account and a login block.
Alert only when non-compliant: Prompt users through a pop-up upon detecting non-compliance.
Network disconnected when non-compliant (linked to admission): The terminal cannot connect to the private network when non-compliance is detected.
Disable Zero Trust Office when non-compliant (linked to the Zero Trust gateway): Blocks access to private network resources upon detecting non-compliance.
3. For configuration parameters, refer to the example in the following figure:
4. After completing the addition, click Save.
5. After the client pulls the policy, open the client compliance detection page and click Detect Now.
6. If it is detected that automatic screen lock is not set, click One-Click Fix.
System Integrity Protection (SIP) Detection
Note:
This is a macOS feature and is not available on Windows.
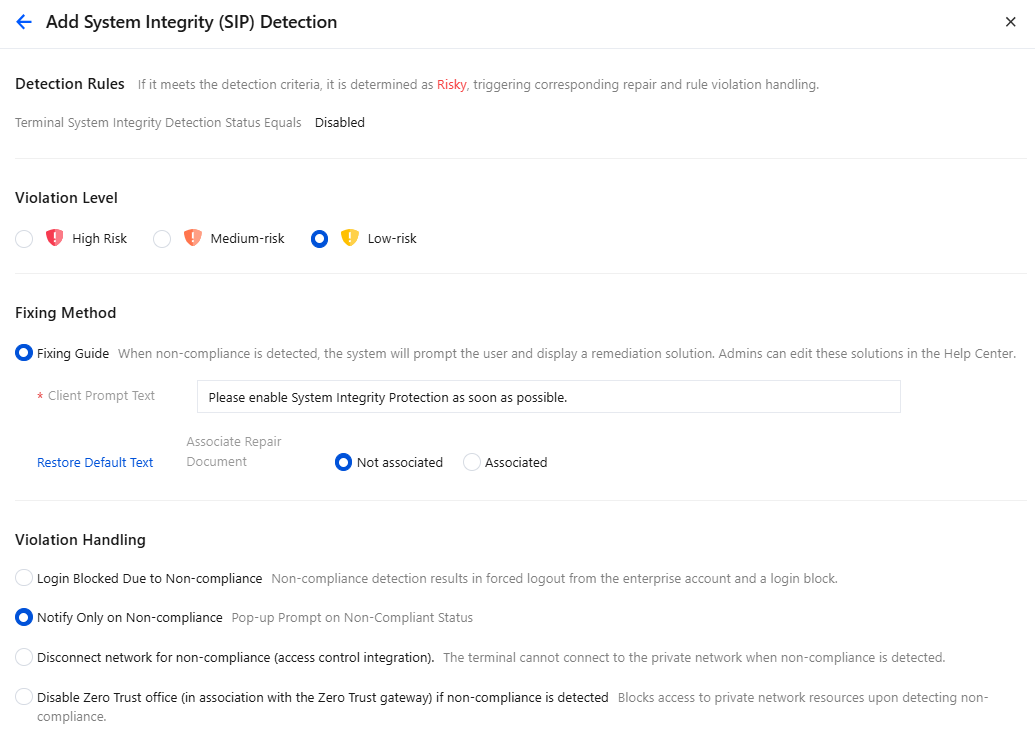
1. System Integrity Protection (SIP) is enabled by default on macOS. If a user disables it manually, the terminal system may be exposed to uncontrollable risks. Therefore, SIP status detection is added to compliance detection. Click Enable
, and then click Add Detection Point.
2. Remediation policy for non-compliance: Alert only or disable Zero Trust Office. After configuration, click Save.
Parameter Name
Description
Violation level
High, medium, and low severity.
Repair Guide
Customize the client notification message.
You can associate remediation documents to guide users through customized instructions for completing the fix, improving compliance remediation efficiency.
Login prohibited when non-compliant: Non-compliance detection results in forced logout from the enterprise account and a login block.
Alert only when non-compliant: Prompt users through a pop-up upon detecting non-compliance.
Network disconnected when non-compliant (linked to admission): The terminal cannot connect to the private network when non-compliance is detected.
Disable Zero Trust Office when non-compliant (linked to the Zero Trust gateway): Blocks access to private network resources upon detecting non-compliance.
3. Client detection item example:
Installing Security Response and System File Detection
Note:
This is a macOS feature and is not available on Windows.
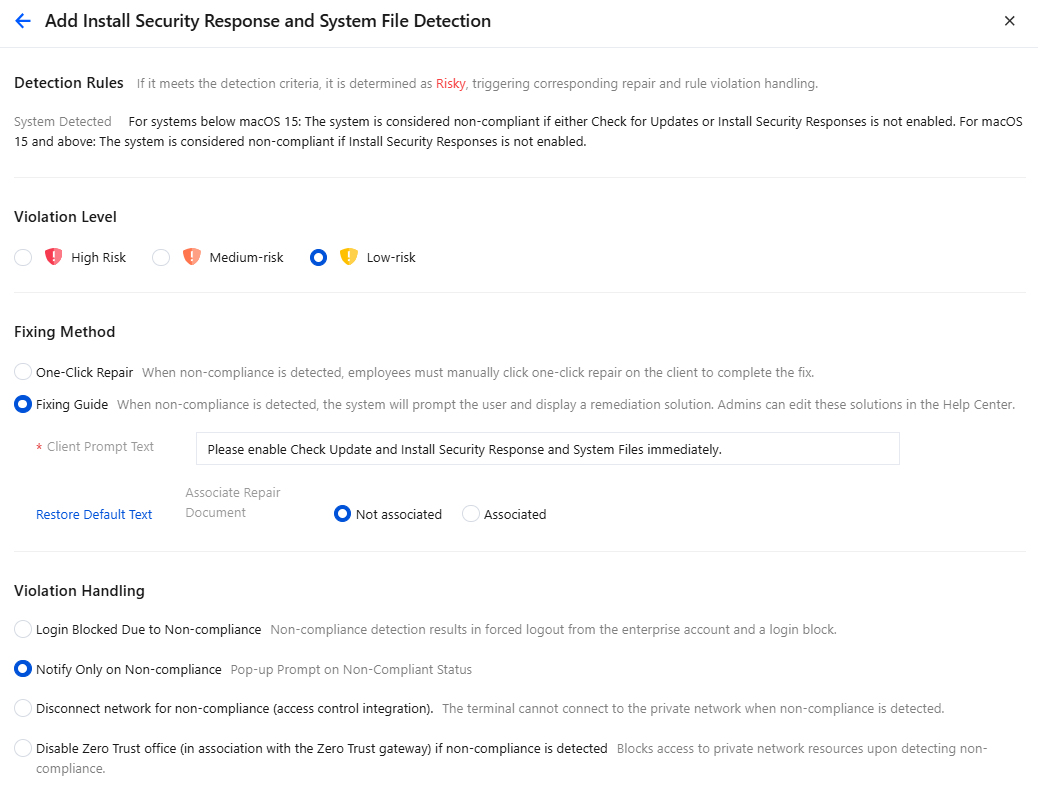
For systems below macOS 15: The system is considered non-compliant if either Check for Updates or Install Security Responses is not enabled. For macOS 15 and above: The system is considered non-compliant if Install Security Responses is not enabled.
1. Click Enable Check
, and click Add Detection Point.
2. Configure parameters such as violation levels, remediation methods, and violation handling. After configuration, click Save.
Parameter Name
Description
Violation level
High, medium, and low severity.
Remediation method
One-Click Fix
When non-compliance is detected, the user must manually click one-click repair on the client to complete the fix.
Repair Guide
Customize the client notification message.
You can associate remediation documents to guide users through customized instructions for completing the fix, improving compliance remediation efficiency.
Login prohibited when non-compliant: Non-compliance detection results in forced logout from the enterprise account and a login block.
Alert only when non-compliant: Prompt users through a pop-up upon detecting non-compliance.
Network disconnected when non-compliant (linked to admission): The terminal cannot connect to the private network when non-compliance is detected.
Disable Zero Trust Office when non-compliant (linked to the Zero Trust gateway): Blocks access to private network resources upon detecting non-compliance.
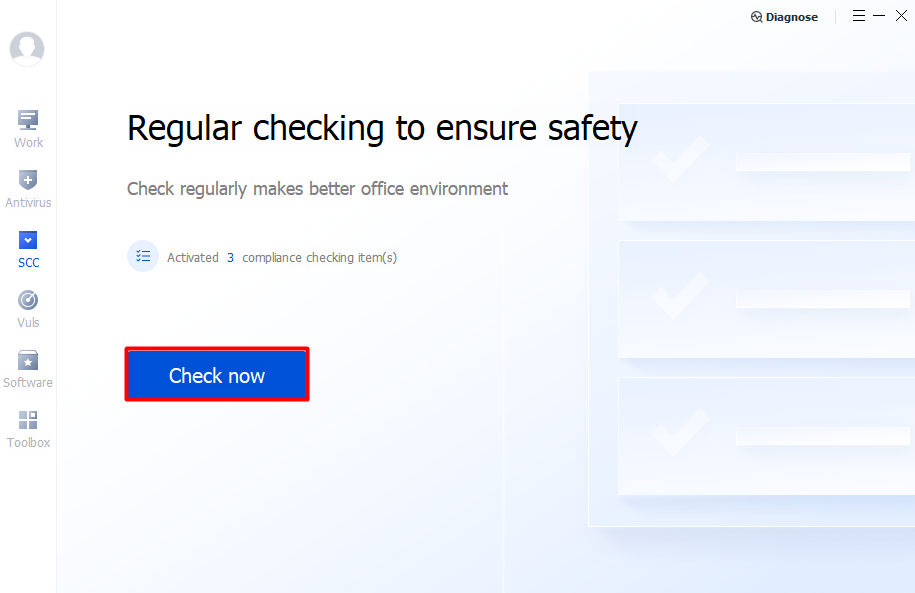
3. After the client pulls the policy, open the client compliance detection page and click Detect Now.
4. Install security response on the terminal and perform system file detection. The detection result is compliant.