Configuring Public Network Access
Download
聚焦模式
字号
Scenarios
By default, TDMQ for RocketMQ uses a private network for data transmission to achieve low network latency, high transmission bandwidth, and enhanced security isolation. When the consumer or producer client resides in a self-built data center or other cloud service environments and cannot communicate with a TDMQ for RocketMQ cluster directly, you can enable a public network route to achieve cross-network production and consumption. If public network access is enabled, it is recommended that you configure secure access policies to strictly restrict access IP addresses and ensure data security.
This document describes how to enable public network bandwidth, adjust the bandwidth configuration, and disable public network bandwidth in the TDMQ for RocketMQ console.
Constraints and Limitations
4.x virtual clusters do not support public network access.
Clusters in Shanghai Autonomous Driving Cloud do not support public network access.
Only one public network route can be created for a cluster.
After public network bandwidth is enabled, you need to pay public network bandwidth fees. For specific pricing, see Billing Overview.
Operation Steps
Enabling Public Network Bandwidth
There are two entries to enable public network bandwidth:
Entry 1: Log in to the TDMQ for RocketMQ console, click Create Cluster on the Cluster page, and enable public network access on the cluster purchase page.
Entry 2: Log in to the TDMQ for RocketMQ console, click More in the operation column of the target cluster on the Cluster page, and select Adjust Network Bandwidth from the drop-down list.
Entry 3: Log in to the TDMQ for RocketMQ console, click the cluster ID to go to the Basic Information page, and click Edit in the Public Network Bandwidth section of the Access Information module.
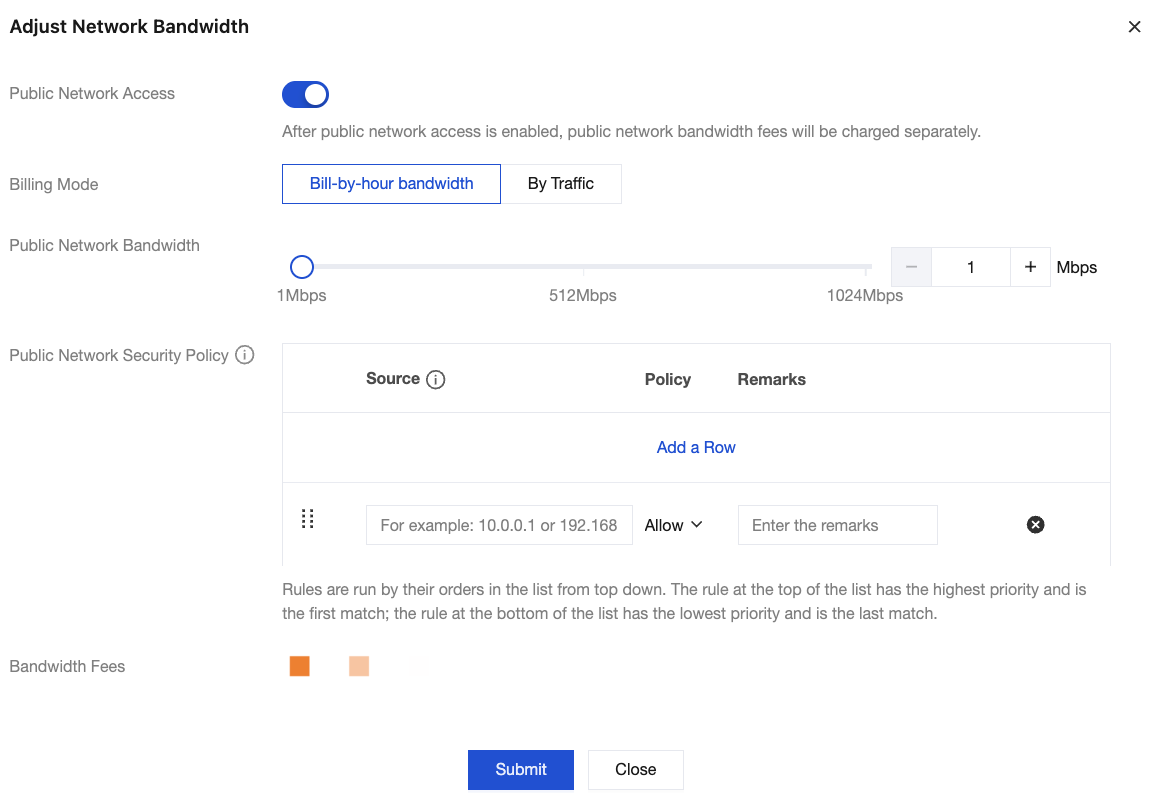
After public network bandwidth is enabled, configure the relevant parameters on the page.
Billing Mode: By default, the billing mode for public network access is the same as that of the cluster. For example, if the cluster uses monthly subscription, public network access also uses monthly subscription by default. In addition, regardless of whether a cluster uses yearly/monthly subscription or postpaid by hour, the billing mode can be adjusted to pay-by-traffic.
Public Network Bandwidth: Select the public network bandwidth you want to purchase. If pay-by-traffic is applied, the public network bandwidth will be the upper-limit public network bandwidth of the cluster.
Public Network Security Policy: Enter the IP addresses or IP ranges allowed/denied for access. If no security policy is set, all IP addresses are denied access by default. A single cluster supports up to 50 public network security policies. If a new rule is duplicated with an existing rule, the last added entry takes precedence.
Note:
Only one IP address or IP range can be specified in a public network security policy.
The IP address cannot be left blank or specified as 0.0.0.0.
Adjusting or Disabling Public Network Bandwidth
After public network bandwidth is enabled, you can adjust the public network bandwidth through the following two entries:
Entry 1: Log in to the TDMQ for RocketMQ console, click More in the operation column of the target cluster on the Cluster page, and select Adjust Network Bandwidth from the drop-down list.
Entry 2: Log in to the TDMQ for RocketMQ console, click the ID of the target cluster to go to the Basic Information page, and click Edit in the Public Network Bandwidth section of the Access Information module.
In the pop-up window, you can disable public network bandwidth or adjust the billing mode, bandwidth, and public network security policy as required based on business requirements.
文档反馈