TUIRoomKit is a comprehensive multi-party audio and video conferencing solution built on TRTC. It provides a complete set of UI components along with all the core functionality you need to get up and running quickly.
This documentation walks you through integrating TUIRoomKit into your project to enable reliable multi-party audio/video conferencing. You'll also find step-by-step guides for customizing image assets, localizing UI text, and configuring other options—everything you need to build audio/video experiences that align with your brand.
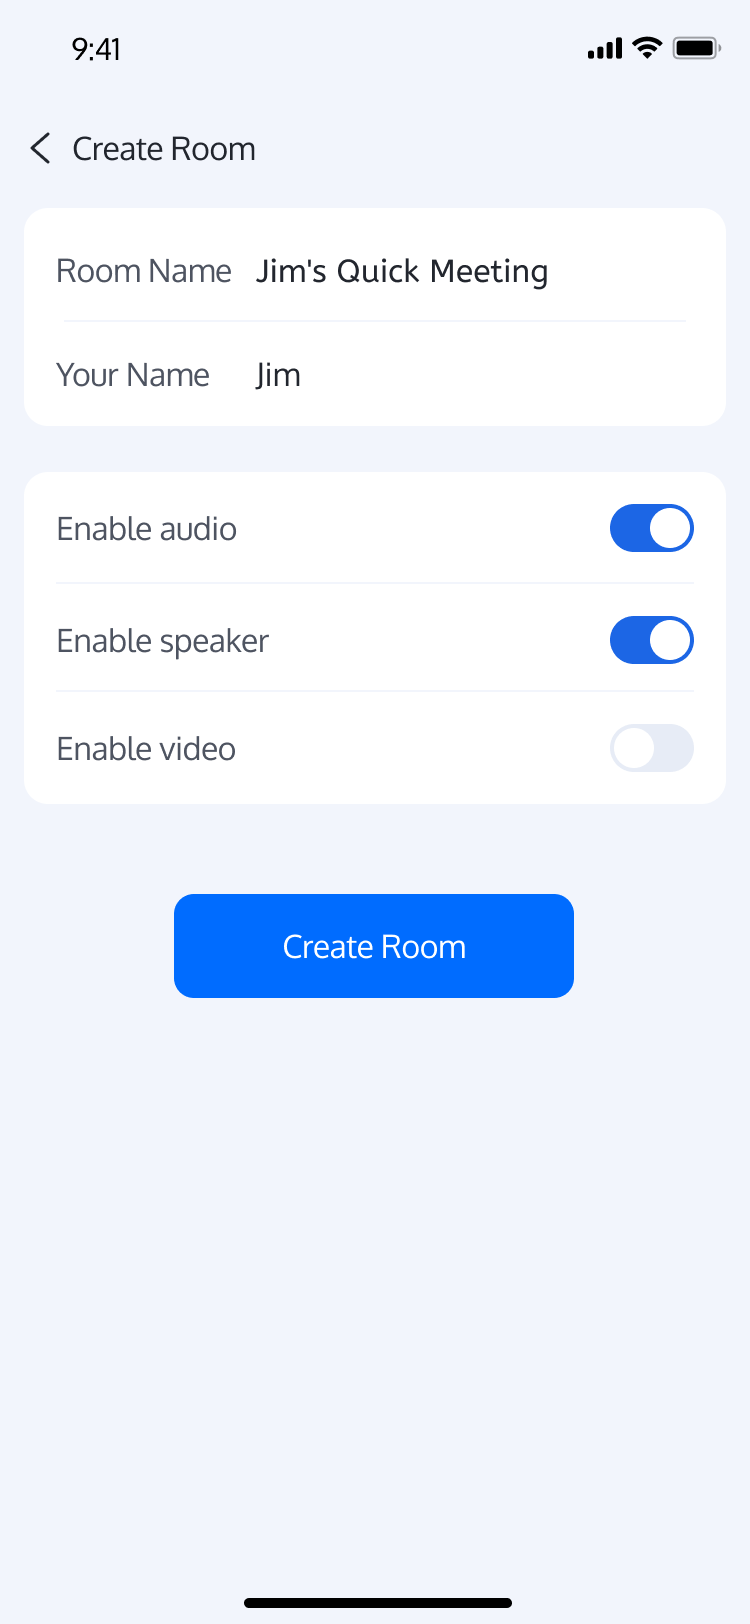
Room Preparation Page
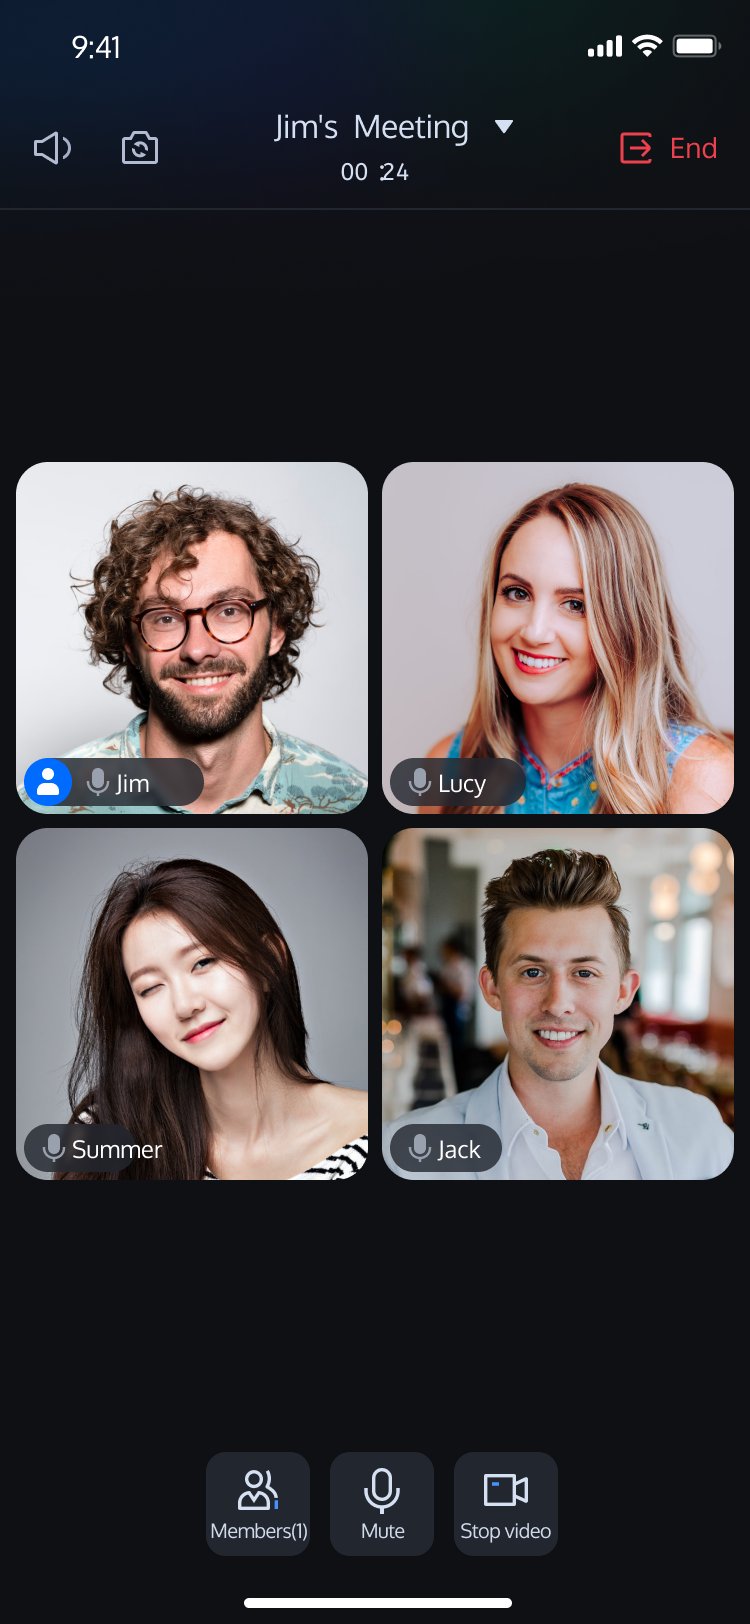
Room Main Page
Member Management
Prerequisites
Activate the Service
To activate TUIRoomKit and obtain your trial version, follow the instructions at Activate the Service. You will need your SDKAppID and SDKSecretKey:
SDKAppID: Required application identifier. Tencent Cloud uses SDKAppID for billing and analytics.
SDKSecretKey: Application secret key for initializing configuration file secret information.
Environment Setup
Before running the demo, make sure your development environment meets the following requirements:
Xcode: Version 15 or higher required.
iOS System: Compatible with devices running iOS 13.0 or later.
Install CocoaPods via gem: Run sudo gem install cocoapods in your terminal.
Tip:
When running sudo gem install cocoapods, you may be prompted for your computer's password. Enter your administrator password as requested.
Quick Integration
Step 1: Integrate the TUIRoomKit
1.
Add the Pod Dependency:
If your project already has a Podfile:
Add pod 'TUIRoomKit' to your project's Podfile, such as:
target 'YourProjectTarget'do
# Other existing pod dependencies...
# Add pod 'TUIRoomKit'
pod 'TUIRoomKit'
end
If your project does not have a Podfile:
Use cd to navigate to your .xcodeproj directory in the terminal, then run pod init to create a Podfile. After creation, add pod 'TUIRoomKit' to the Podfile, for example:
// If your project directory is /Users/yourusername/Projects/YourProject
// 1. cd to your .xcodeproj project directory
cd /Users/yourusername/Projects/YourProject
// 2. Run pod init to generate a Podfile
pod init
// 3. Add pod 'TUIRoomKit' to the generated Podfile
target 'YourProjectTarget'do
# Add pod 'TUIRoomKit'
pod 'TUIRoomKit'
end
2.
Install the Component:
In the terminal, cd to the directory containing your Podfile and run:
pod install
Step 2: Configure the Project
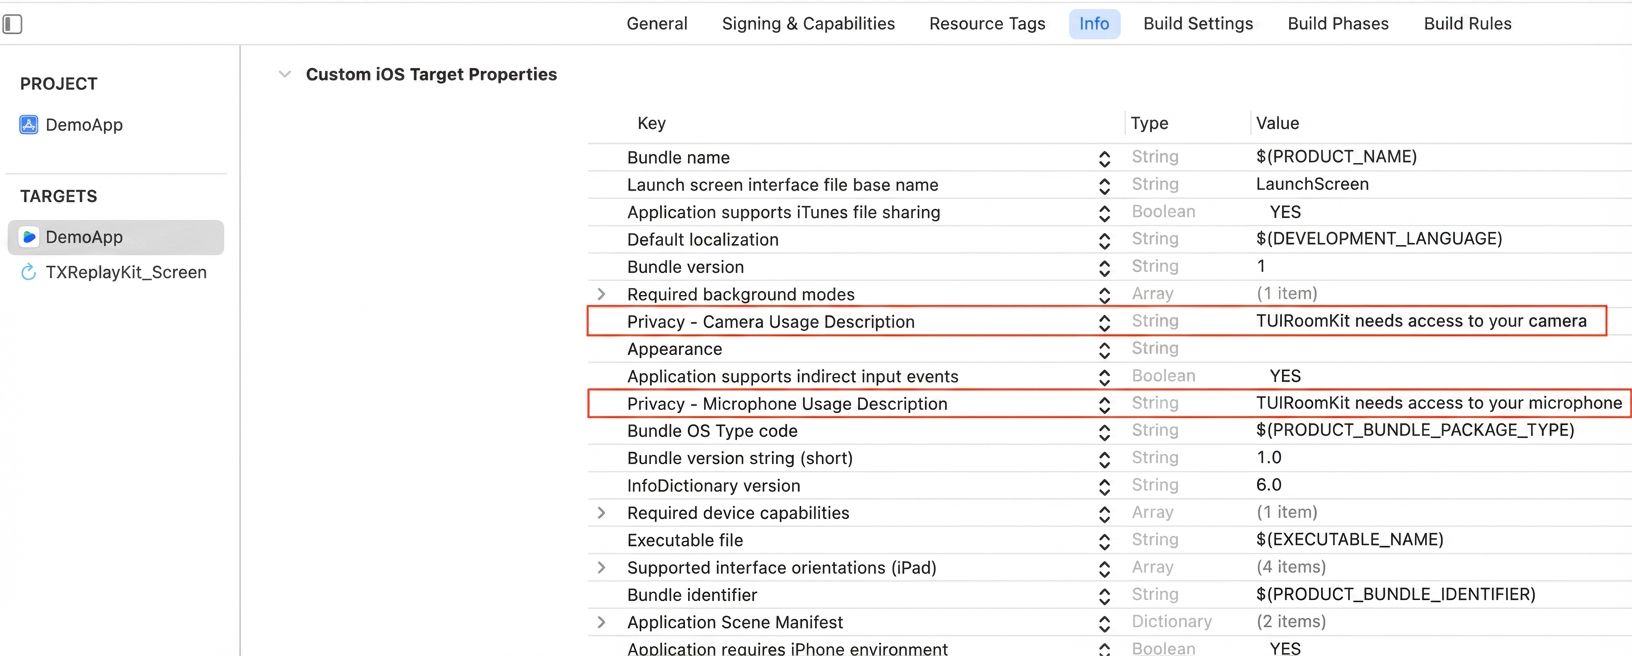
To enable audio/video features, your app must request microphone and camera permissions. Add the following keys and usage descriptions to your Info.plist file. These descriptions will be displayed when the system prompts users for permission:
<key>NSCameraUsageDescription</key>
<string>TUIRoomKit requires access to your camera</string>
<key>NSMicrophoneUsageDescription</key>
<string>TUIRoomKit requires access to your microphone</string>
Step 3: Log In
After integrating the code, complete the login process. This step is required to use TUIRoomKit. You must log in successfully before accessing any features. Verify that all parameters are correctly configured:
Note:
In the sample code, login is handled in the didFinishLaunchingWithOptions method. In real-world projects, call the AtomicXCore login service only after your own user authentication and login procedures have completed. This prevents business logic conflicts and ensures seamless integration with your user management and permission systems.
Unique user identifier. Use only English letters, numbers, hyphens, and underscores. Avoid using simple IDs like 1 or 123 to prevent multi-device login conflicts.
userSig
String
Authentication ticket for Tencent Cloud.
For development: Use GenerateTestUserSig.genTestSig or the UserSig Assistant Tool for a temporary UserSig.
Callback for the result of setting user info. Returns error code and message if failed.
Step 5: Create a Room
RoomMainView is the primary interface in TUIRoomKit for multi-party audio/video conferencing. The following example shows how to integrate RoomMainView as a room owner.
Implementation
1.
Conform to the Routing Navigation Protocol: TUIRoomKit uses the RouterContext protocol to manage page navigation. The host view controller must implement this protocol to handle internal navigation actions such as ending a room or returning to a previous page.
2.
Lazy Load the View: Instantiate RoomMainView lazily in your controller and set its routerContext property so it can invoke navigation methods via the protocol.
3.
Configure Room Entry Settings: Specify whether to automatically enable audio/video devices on entering the room.
4.
Initialize the Room Main Page: Initialize RoomMainView as a room owner.
5. Add the View to Your Controller: In viewDidLoad, add RoomMainView to your view hierarchy and use constraints to fill the controller's view.
Note:
TUIRoomKit's internal navigation is based on standard UINavigationController methods (push/pop). Ensure your view controller is either the root controller of a UINavigationController or part of its stack. If not, SDK navigation will fail due to the absence of a valid navigation context, resulting in page switching issues.
Sample Code
importUIKit
importTUIRoomKit
importSnapKit
importAtomicXCore
// YourMainViewController loads the room main page
// 1. YourMainViewController must conform to RouterContext in TUIRoomKit
Once you've integrated RoomMainView, your application will offer a full-featured multi-party audio/video conference interface, including member management, device controls, room information display, and more. This is the central functionality of TUIRoomKit.
Customize UI
Note:
Customizing UI elements, icons, or text requires modifying the TUIRoomKit source code. When you integrate TUIRoomKit via CocoaPods, it acts as an immutable dependency. Each time you run pod install, CocoaPods will:
Check the version listed in Podfile.lock.
Download the corresponding source code from the remote repository.
Overwrite files in the Pods/ directory with the original source.
Any manual modifications to the Pods/ directory will be lost the next time you run pod install.
Update your Podfile to reference your fork and branch:
pod 'TUIRoomKit',:git=>'https://github.com/your-username/TUIRoomKit.git',:branch=>'your-branch'
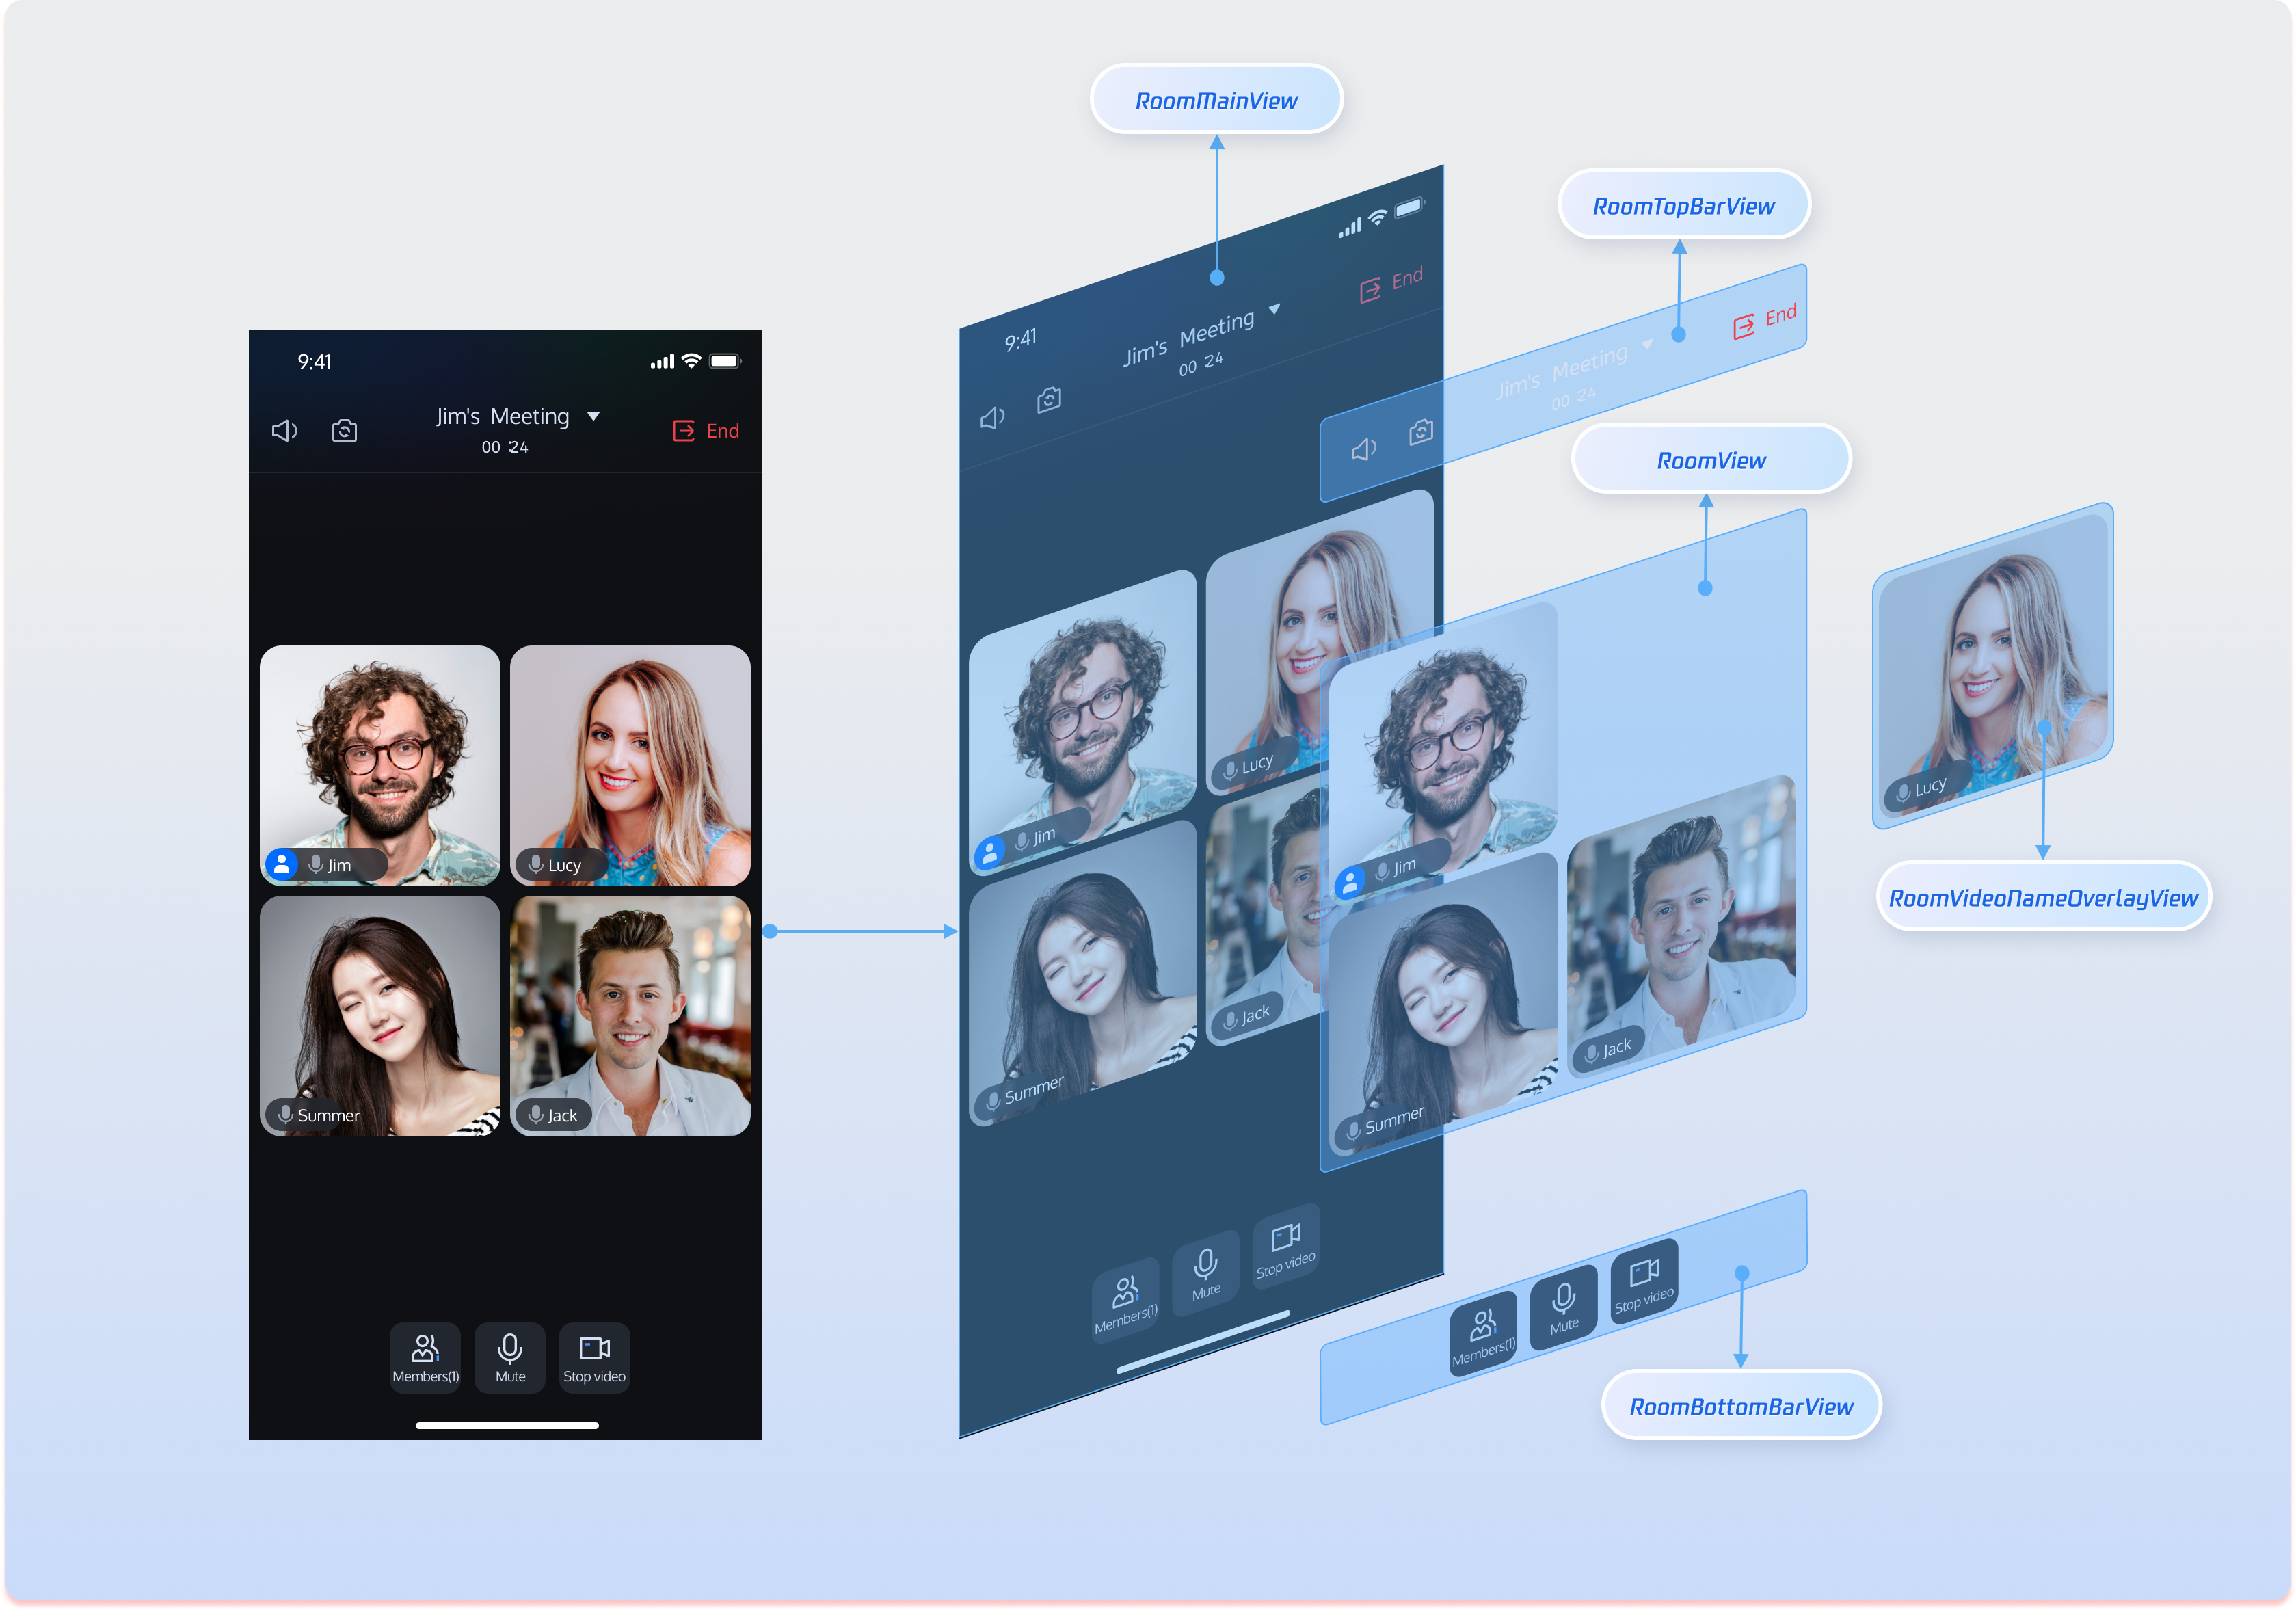
The RoomMainView main page is highly customizable. You can modify the UI to fit your product requirements and interaction scenarios. The following overview details the view components within RoomMainView to help you make quick adjustments.
Bottom toolbar for microphone, camera, and member management.
Rearrange buttons, modify styles (color, size), add business features (screen sharing, in-meeting call, beauty filter).
Customize Icons
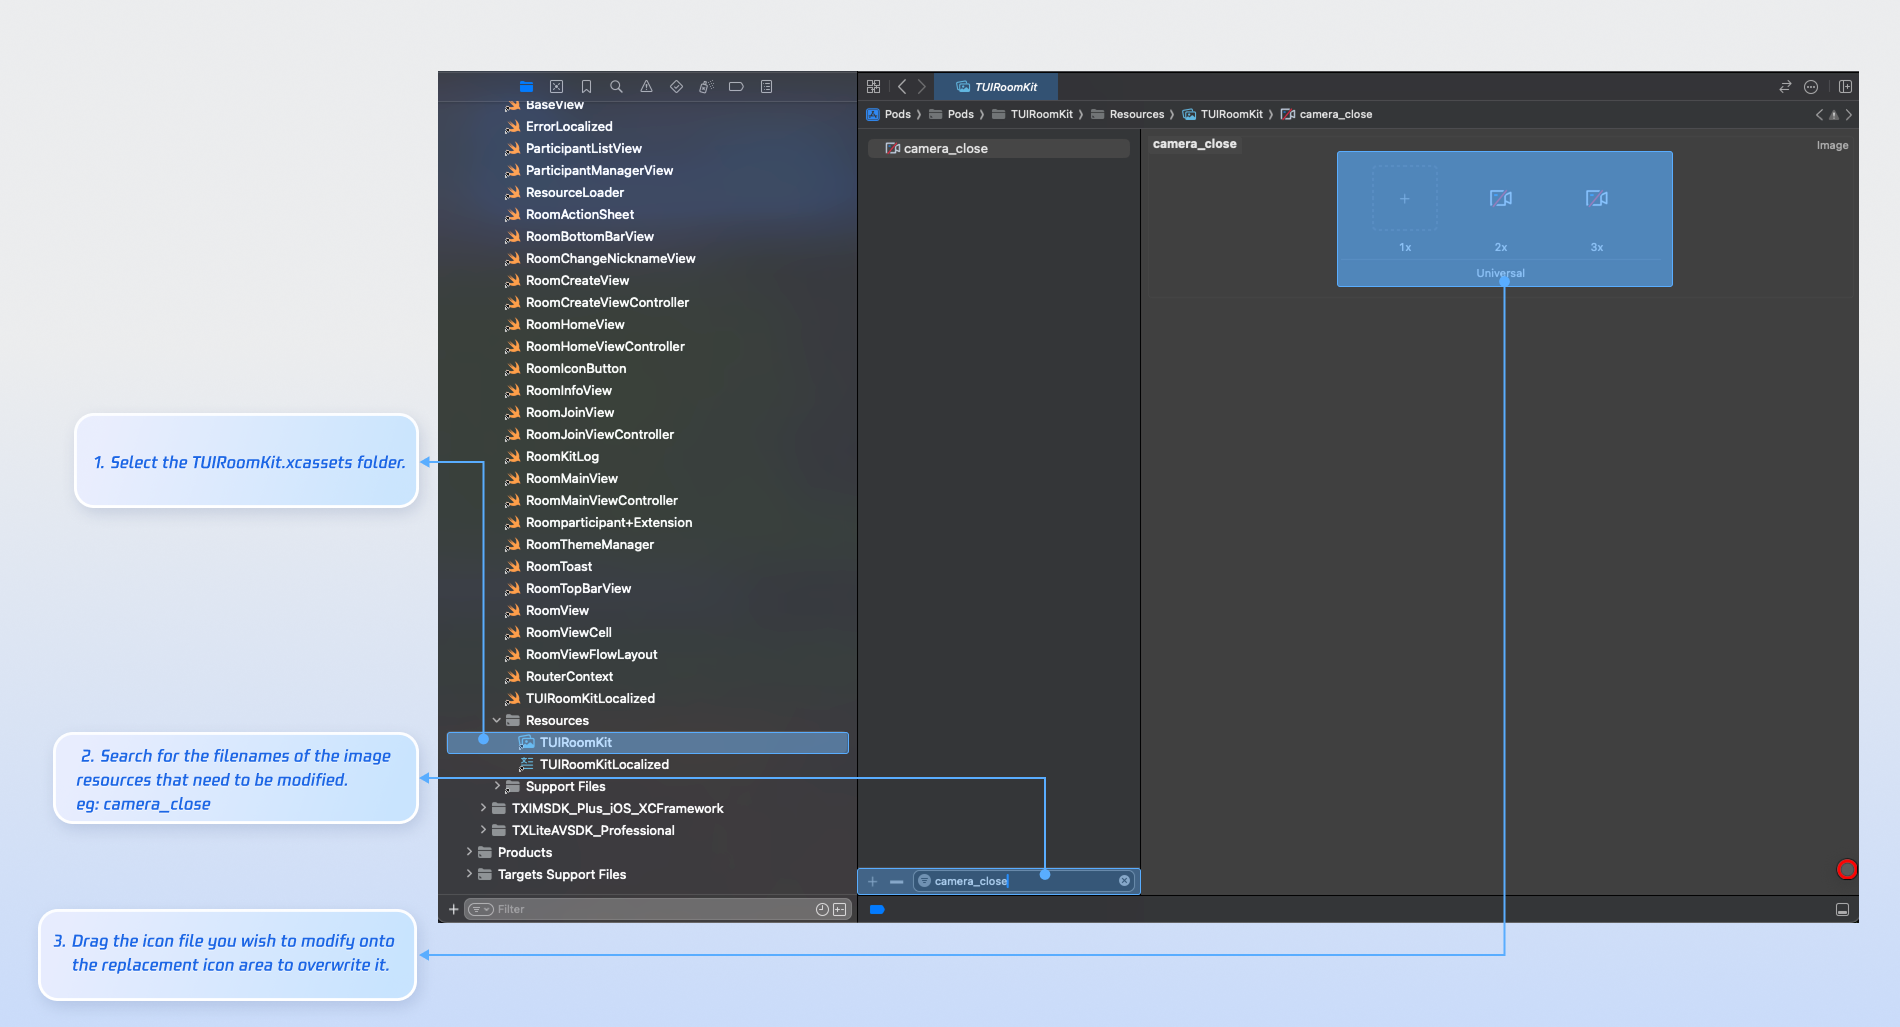
After integrating TUIRoomKit, you can directly replace icon assets in the component to better match your UI and business needs.
TUIRoomKit manages UI image resources in TUIRoomKit.xcassets. Use Xcode's graphical tools to quickly modify custom icons.
Common Icon Files
Icon
Filename
Description
camera_close.png
Camera off icon.
camera_open.png
Camera on icon.
room_mic_off_red.png
Microphone off icon.
room_mic_on_big.png
Microphone on icon.
room_admin_tag.png
Administrator badge icon.
room_owner_tag.png
Room owner badge icon.
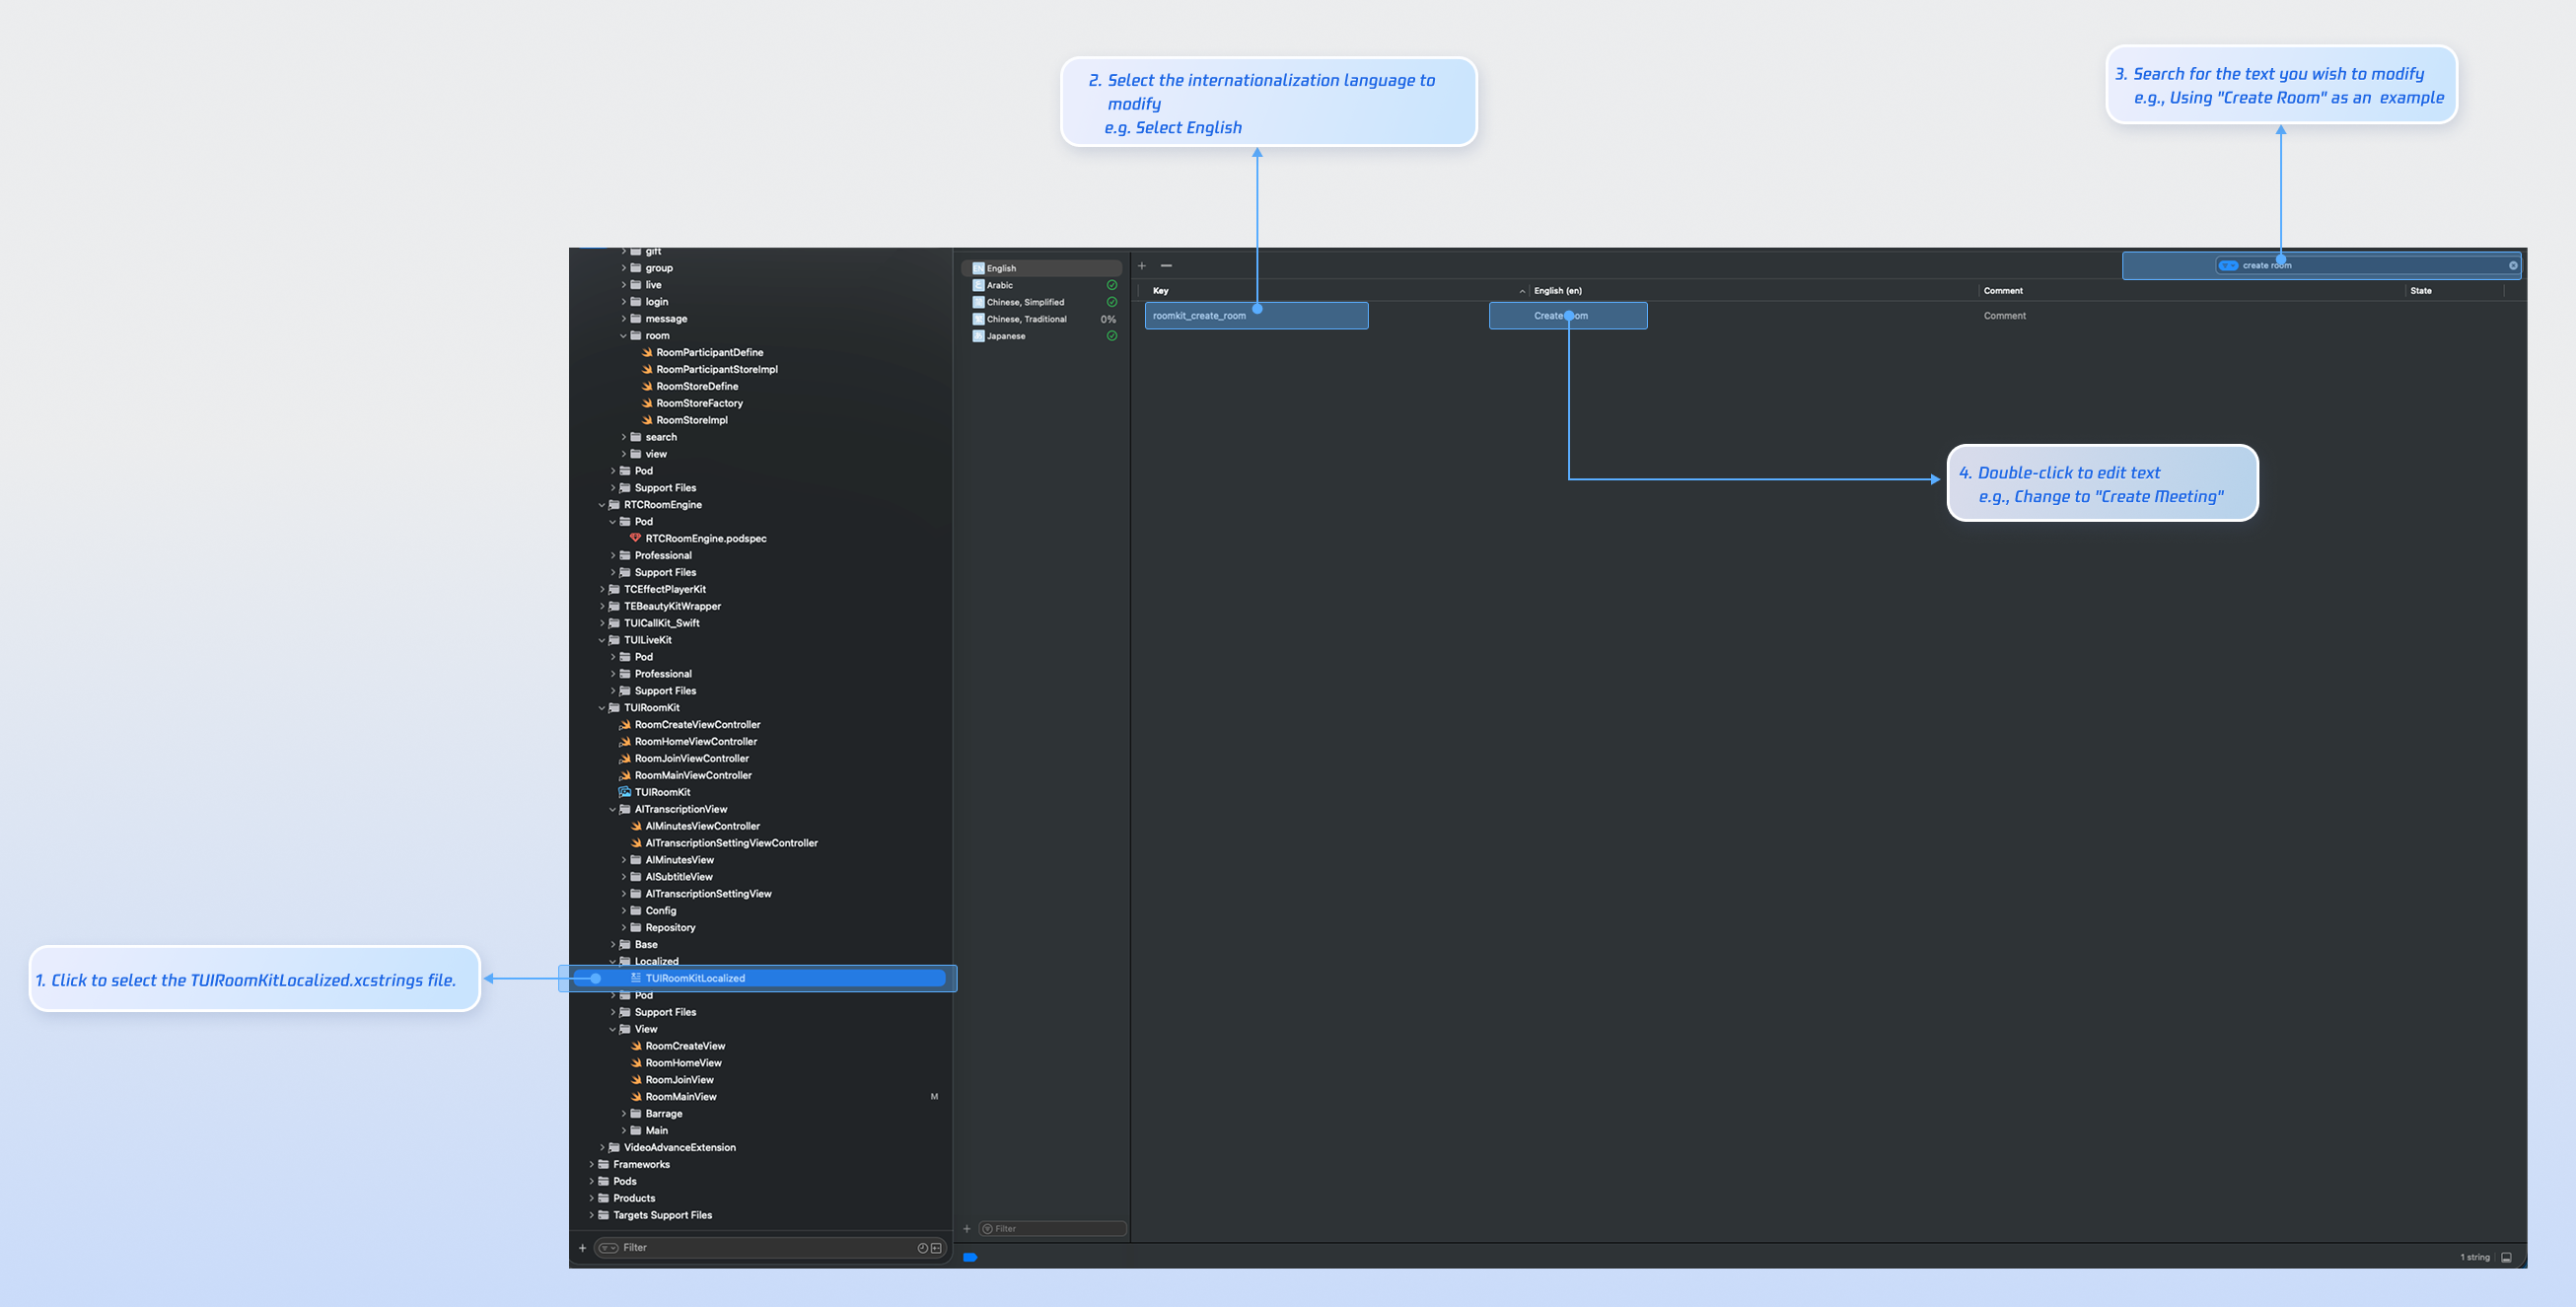
Customize Texts
TUIRoomKit uses the Apple Strings Catalog tool to manage UI text. You can easily adjust text using Xcode's visual tools.
Note:
The Apple Strings Catalog (.xcstrings) format, introduced in Xcode 15, streamlines localization management. It supports structured formats for plurals, device-specific variants, and more, and is now the recommended localization approach for iOS and macOS apps.
FAQs
Can't Find the Latest Version of TUIRoomKit After Running pod install?
If you're unable to install the latest version of TUIRoomKit, follow these steps:
1.
Delete Podfile.lock and the Pods directory in your project folder. You can do this manually or run:
// cd to the directory containing your Podfile
rm -rf Pods/
rm Podfile.lock
2.
Run pod install --repo-update in your project directory:
// cd to the directory containing your Podfile
pod install --repo-update
Do I Need to Call Login Every Time I Enter a Room?
No. You only need to call LoginStore.shared.login once. We recommend linking LoginStore.shared.login and LoginStore.shared.logout with your own authentication logic.
Is There a Sample Podfile Configuration I Can Reference?