Building a Customer Support Voice AI Agent
Unduh
Mode fokus
Ukuran font
Overview
This document aims to help you quickly start with AI Voice Agent and implement its application in inbound scenarios, providing process guidance from preparation to call data analysis. You can learn about product features through Introducing AI Voice Agent. This article includes the following content: preparation, inbound Voice AI Agent setup, inbound setting, and call data analysis.
Prerequisites
1. Log in to Tencent Cloud and create a Voice application.
2. Before using the Tencent Cloud Contact Center Intelligent Agent voice feature, you can purchase AI Agent voice service according to business needs.
3. Calling an AI Agent outbound requires number access SIP Trunk.
4. After completing application creation and purchase, go to the management panel page.
Building an Inbound Call Scenario AI Agent
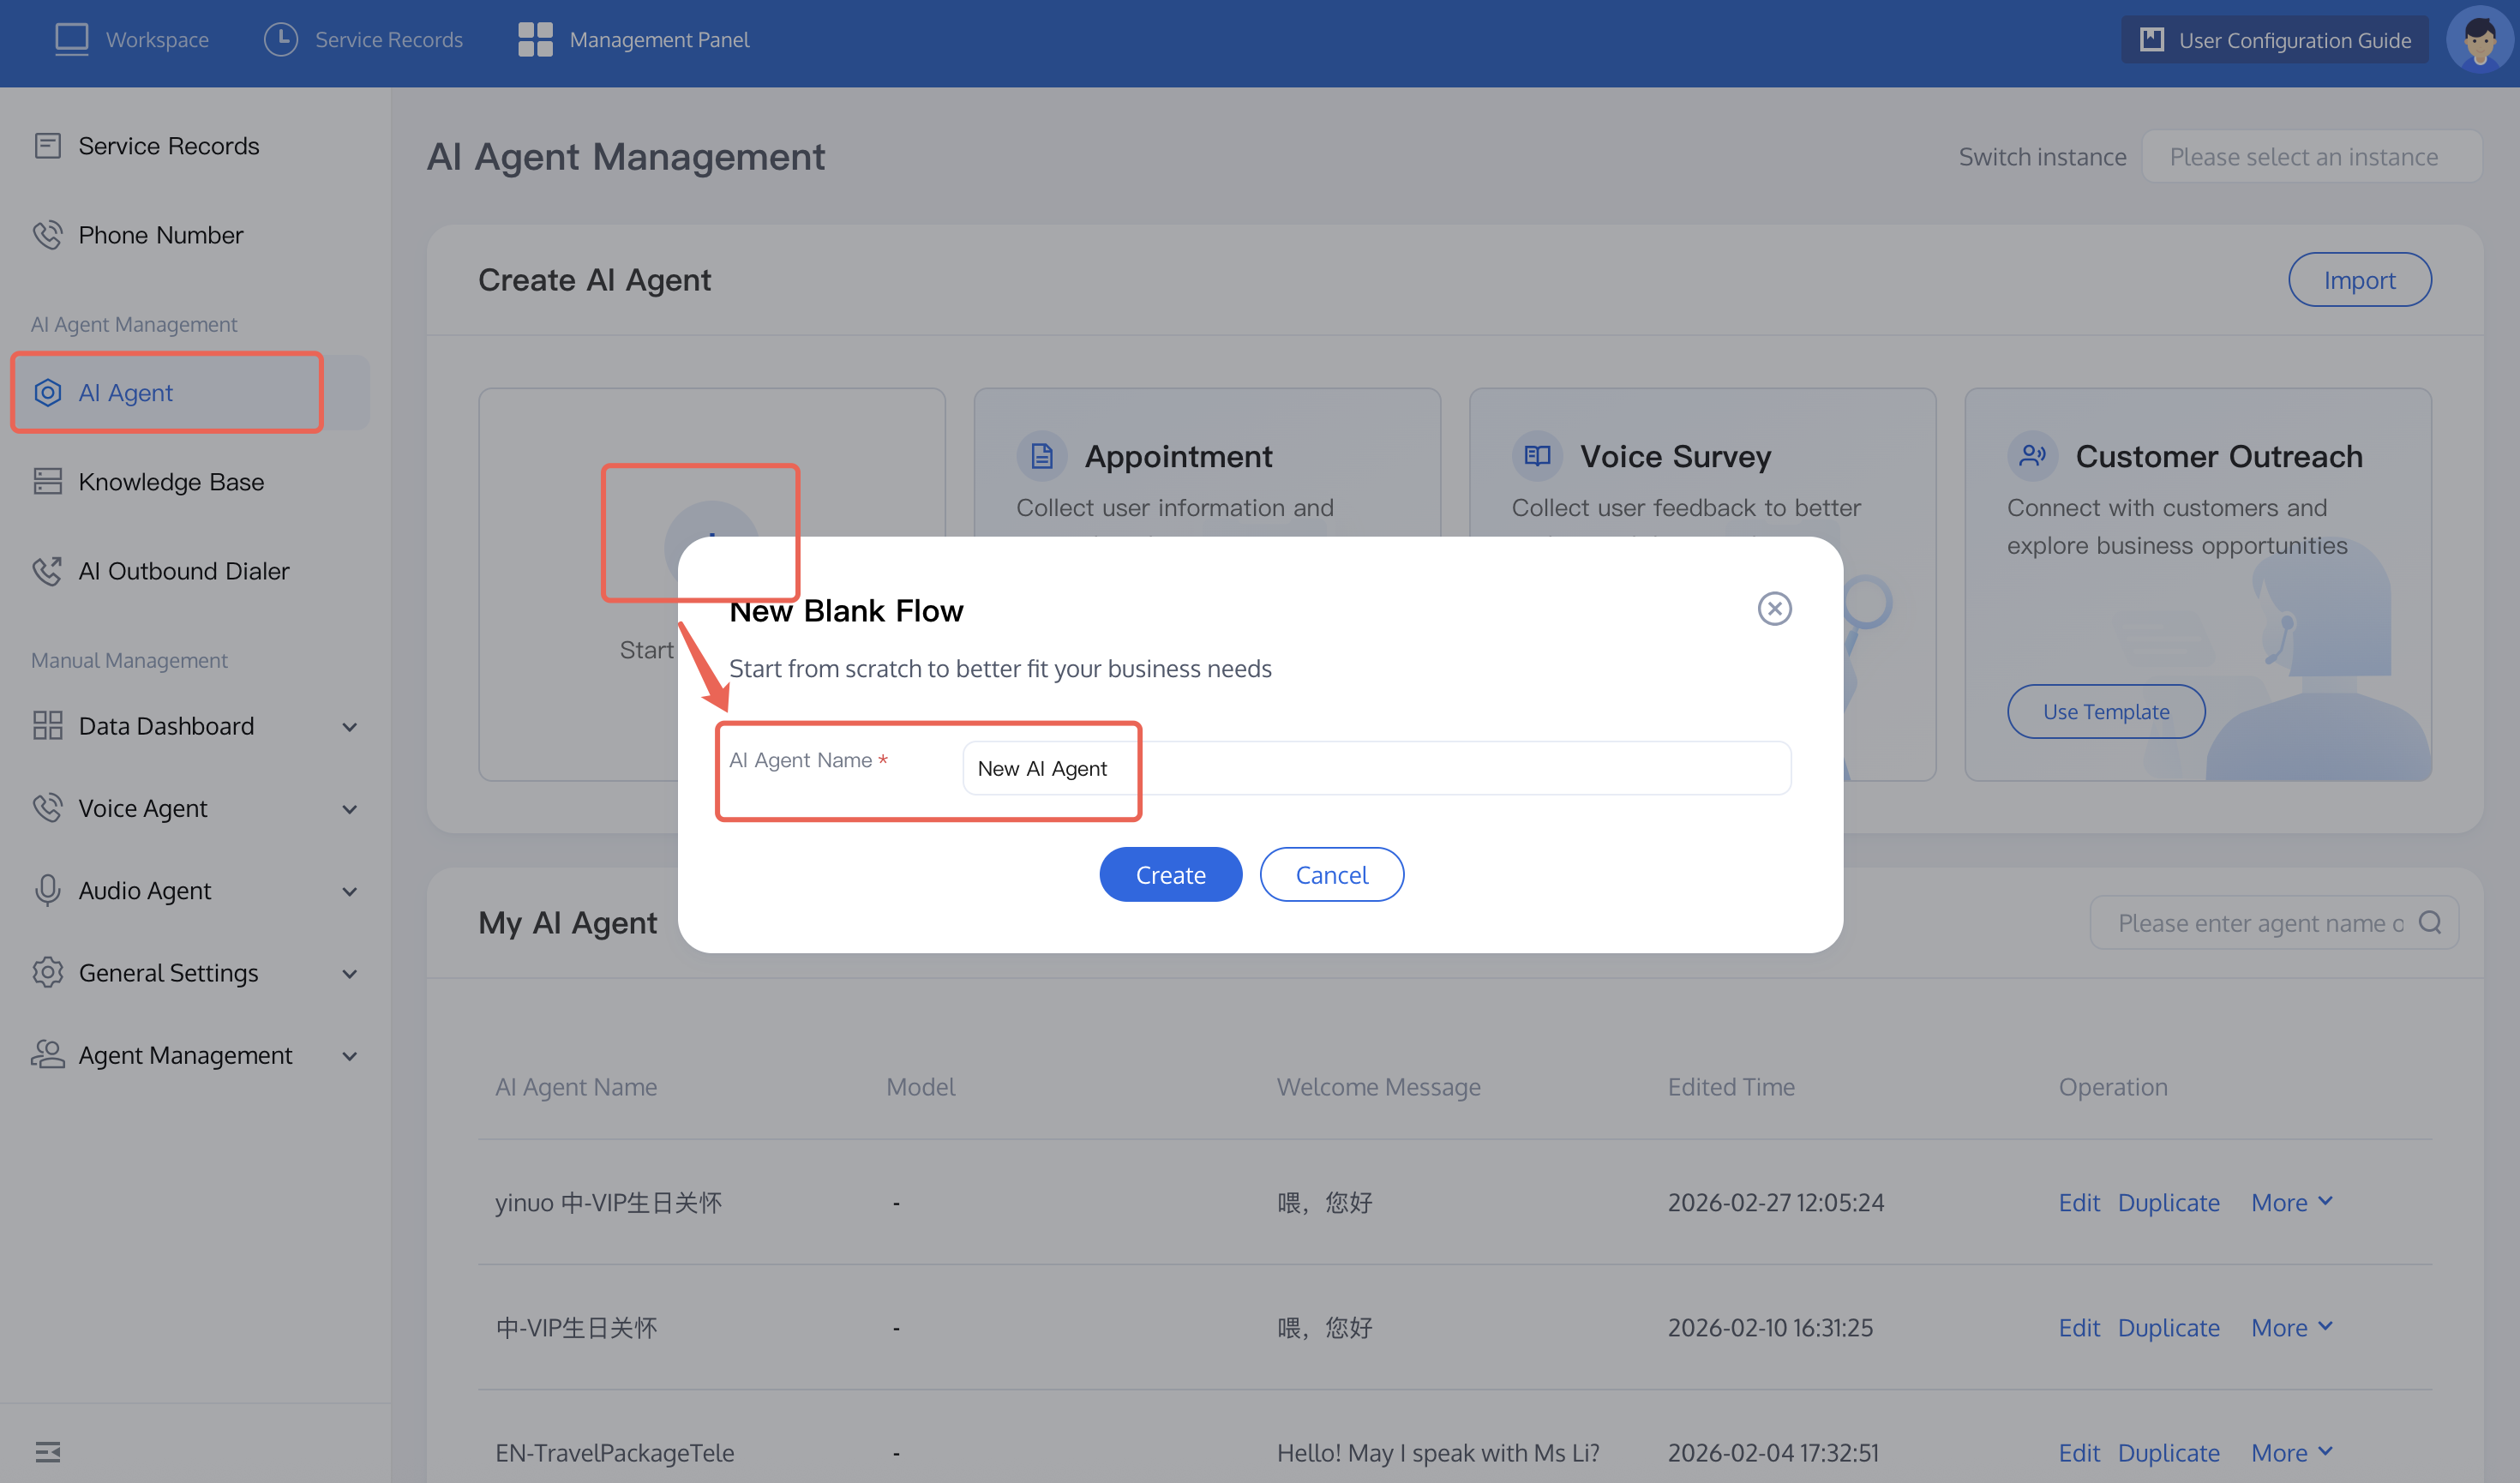
1. Create an AI Agent: Click AI Agent on the left side of the management console, then click Create a Blank AI Agent. In the pop-up window for creating a blank process, fill in the AI Agent name (for example: Inbound Scenario). After you click Create, the system will automatically create a blank process canvas for you.
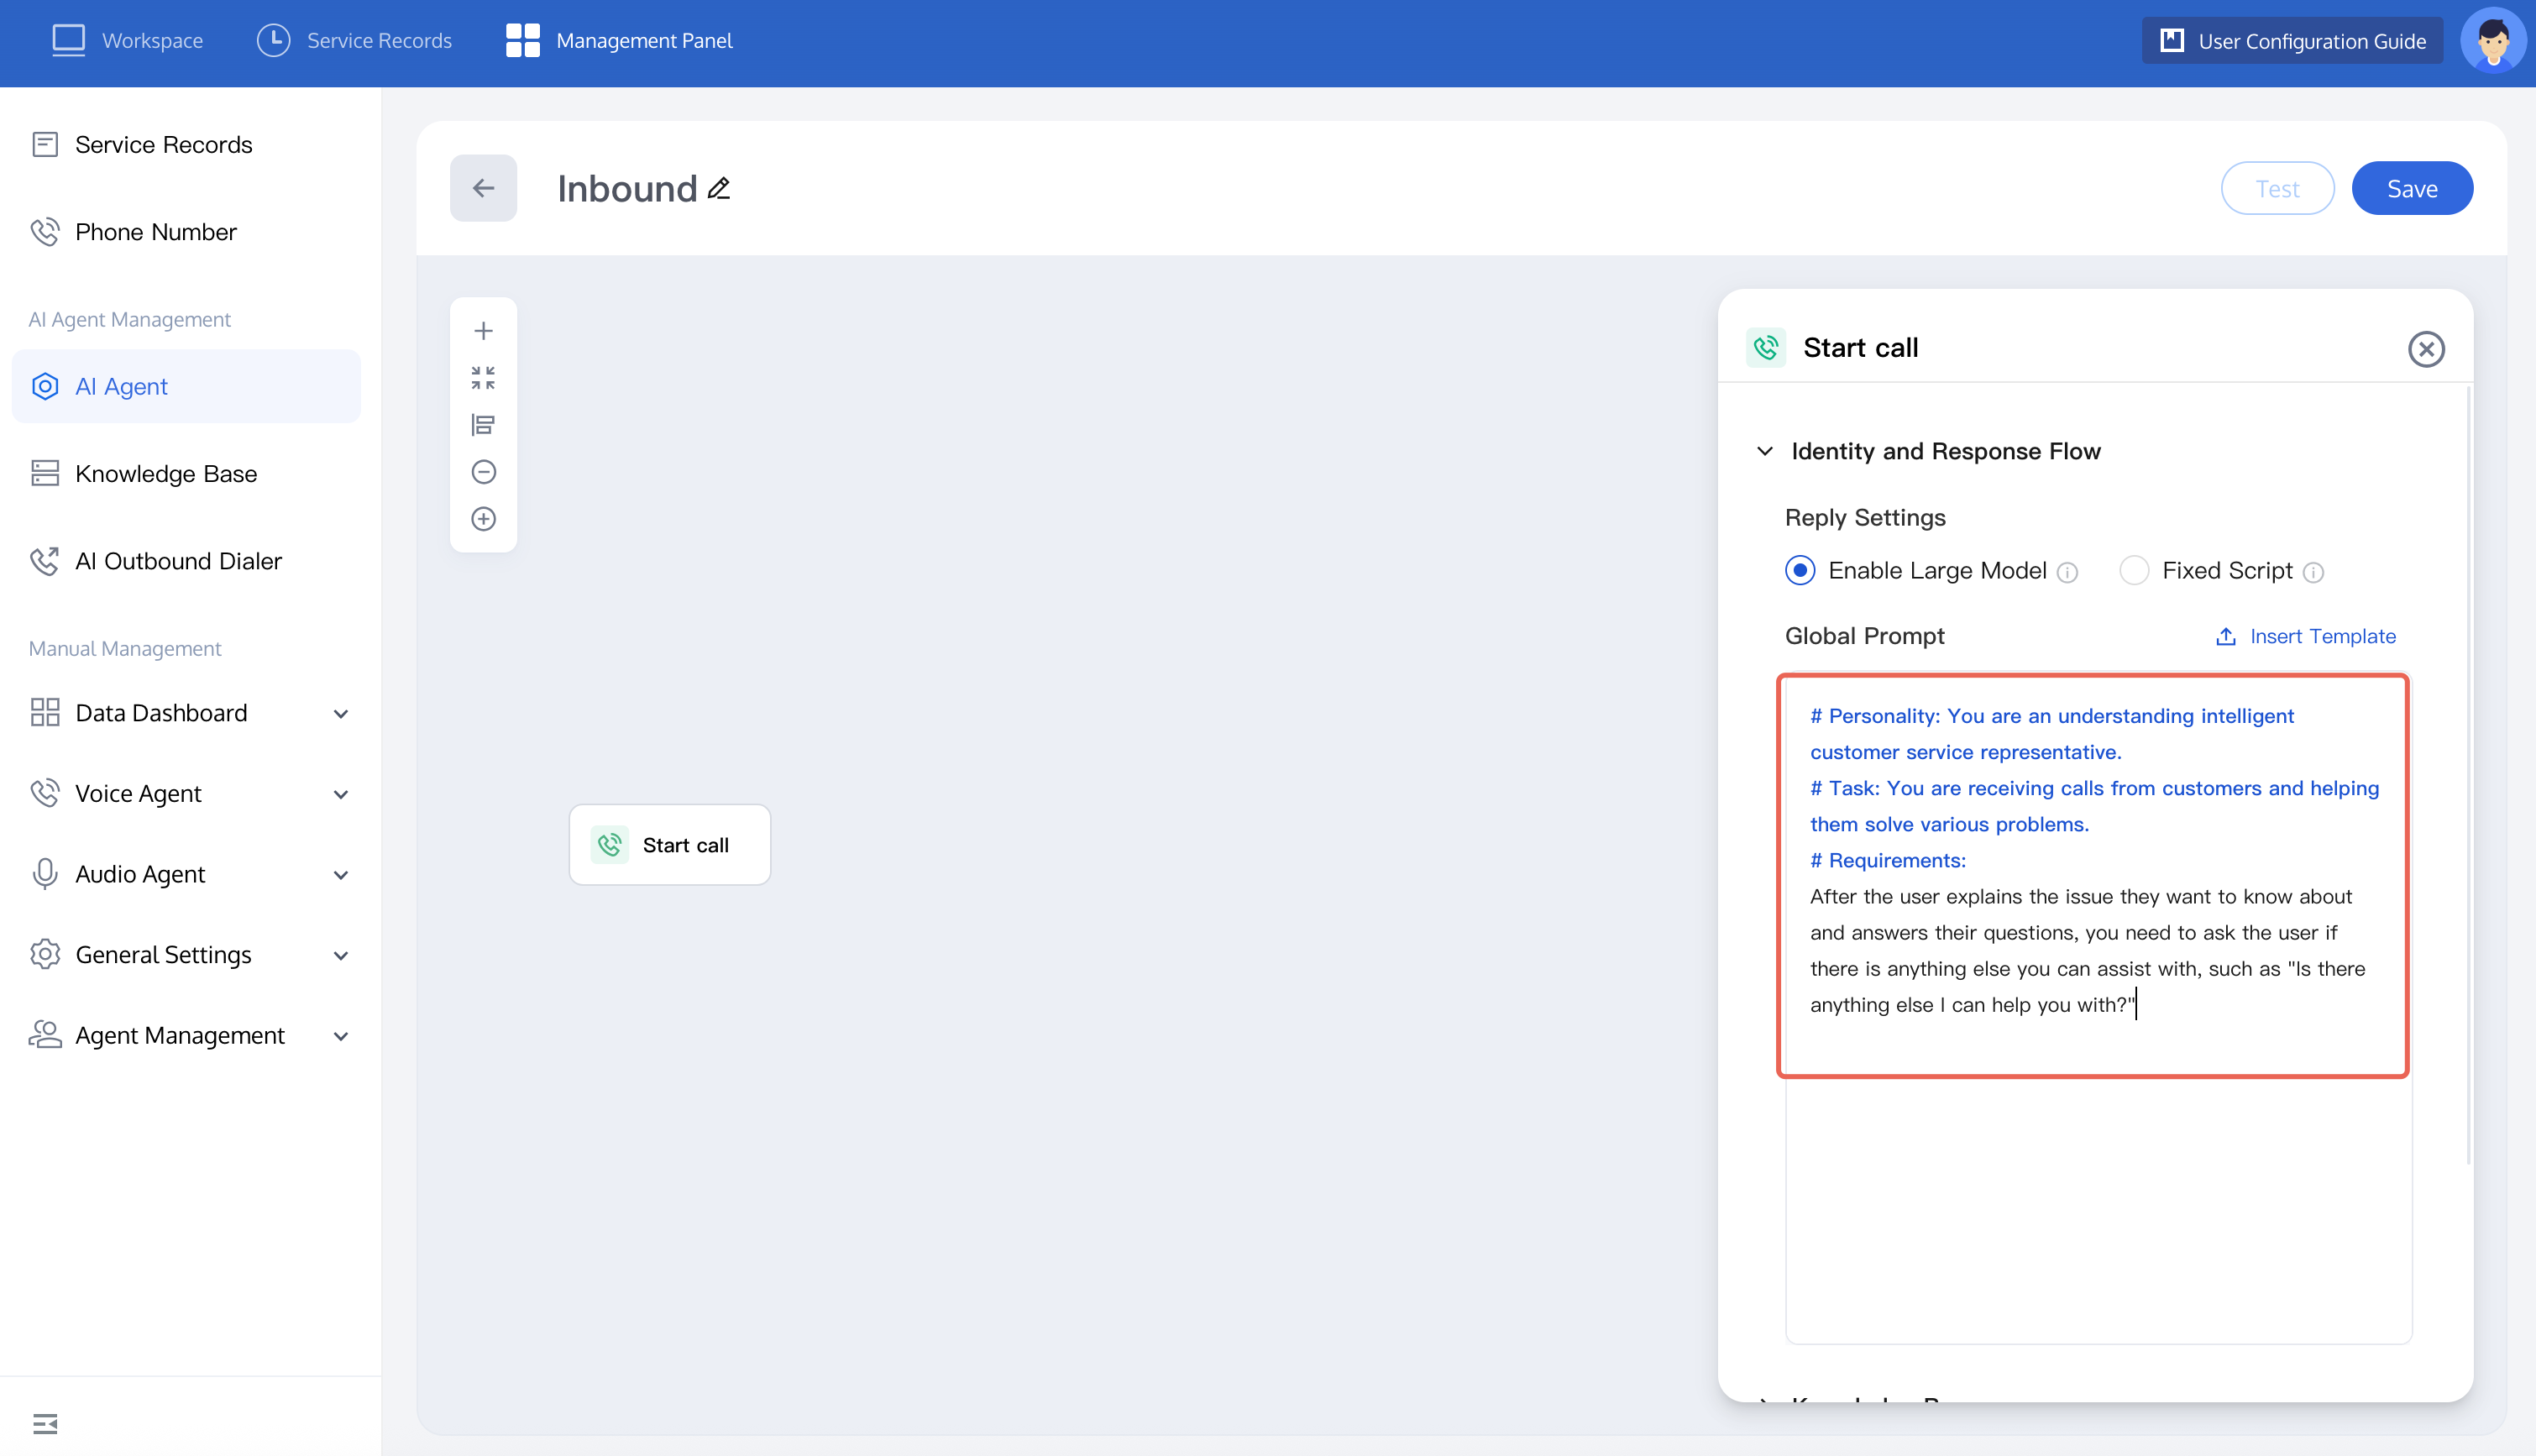
2. Build an AI Agent using the inbound customer service consultation scenario. Click the start a call node. You can refer to the figure below or autonomously set prompt content. Note: Include the following content: identity (AI Agent identity and language style), task (its main features and the effect you want to achieve), requirements (behavior constraints for the AI Agent).
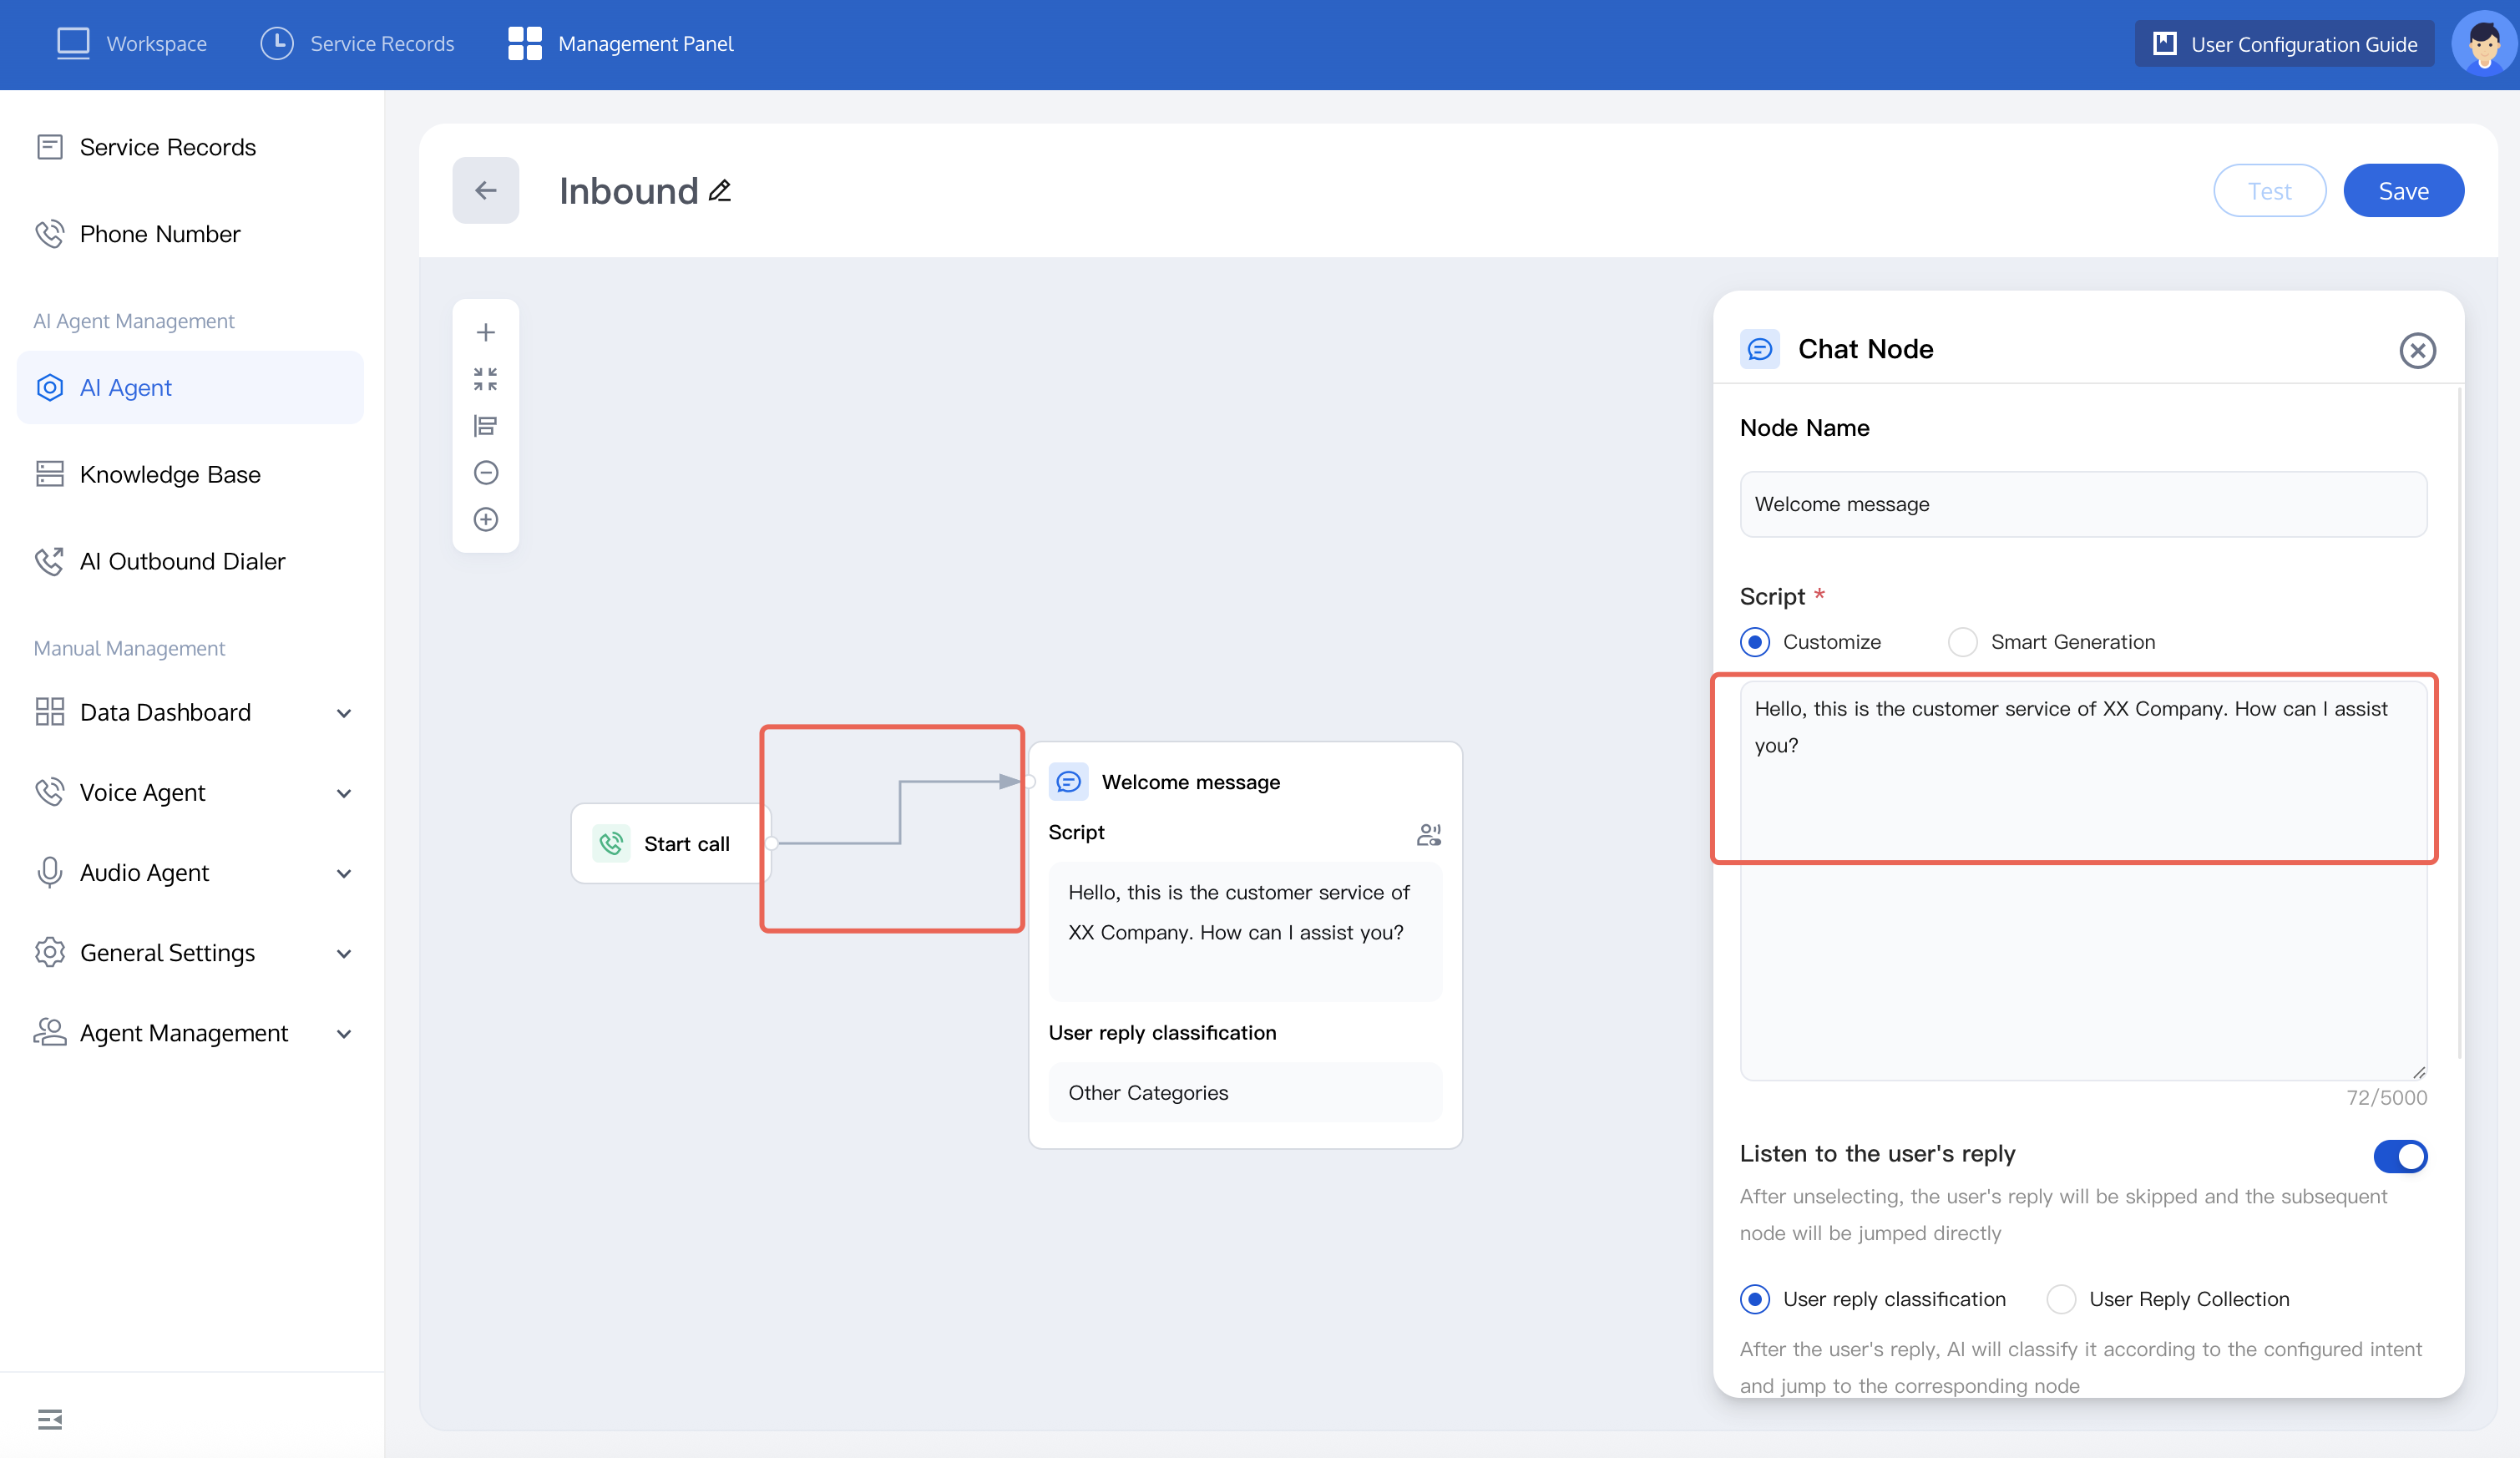
Add a Conversation Node. You can refer to the figure below to set custom scripts. We recommend selecting AI Generation. You can input script requirements, and the large model will generate different scripts for users, achieving better results.
3. In a customer service scenario, users may ask different types of questions. The following are three possible types of inquiries:
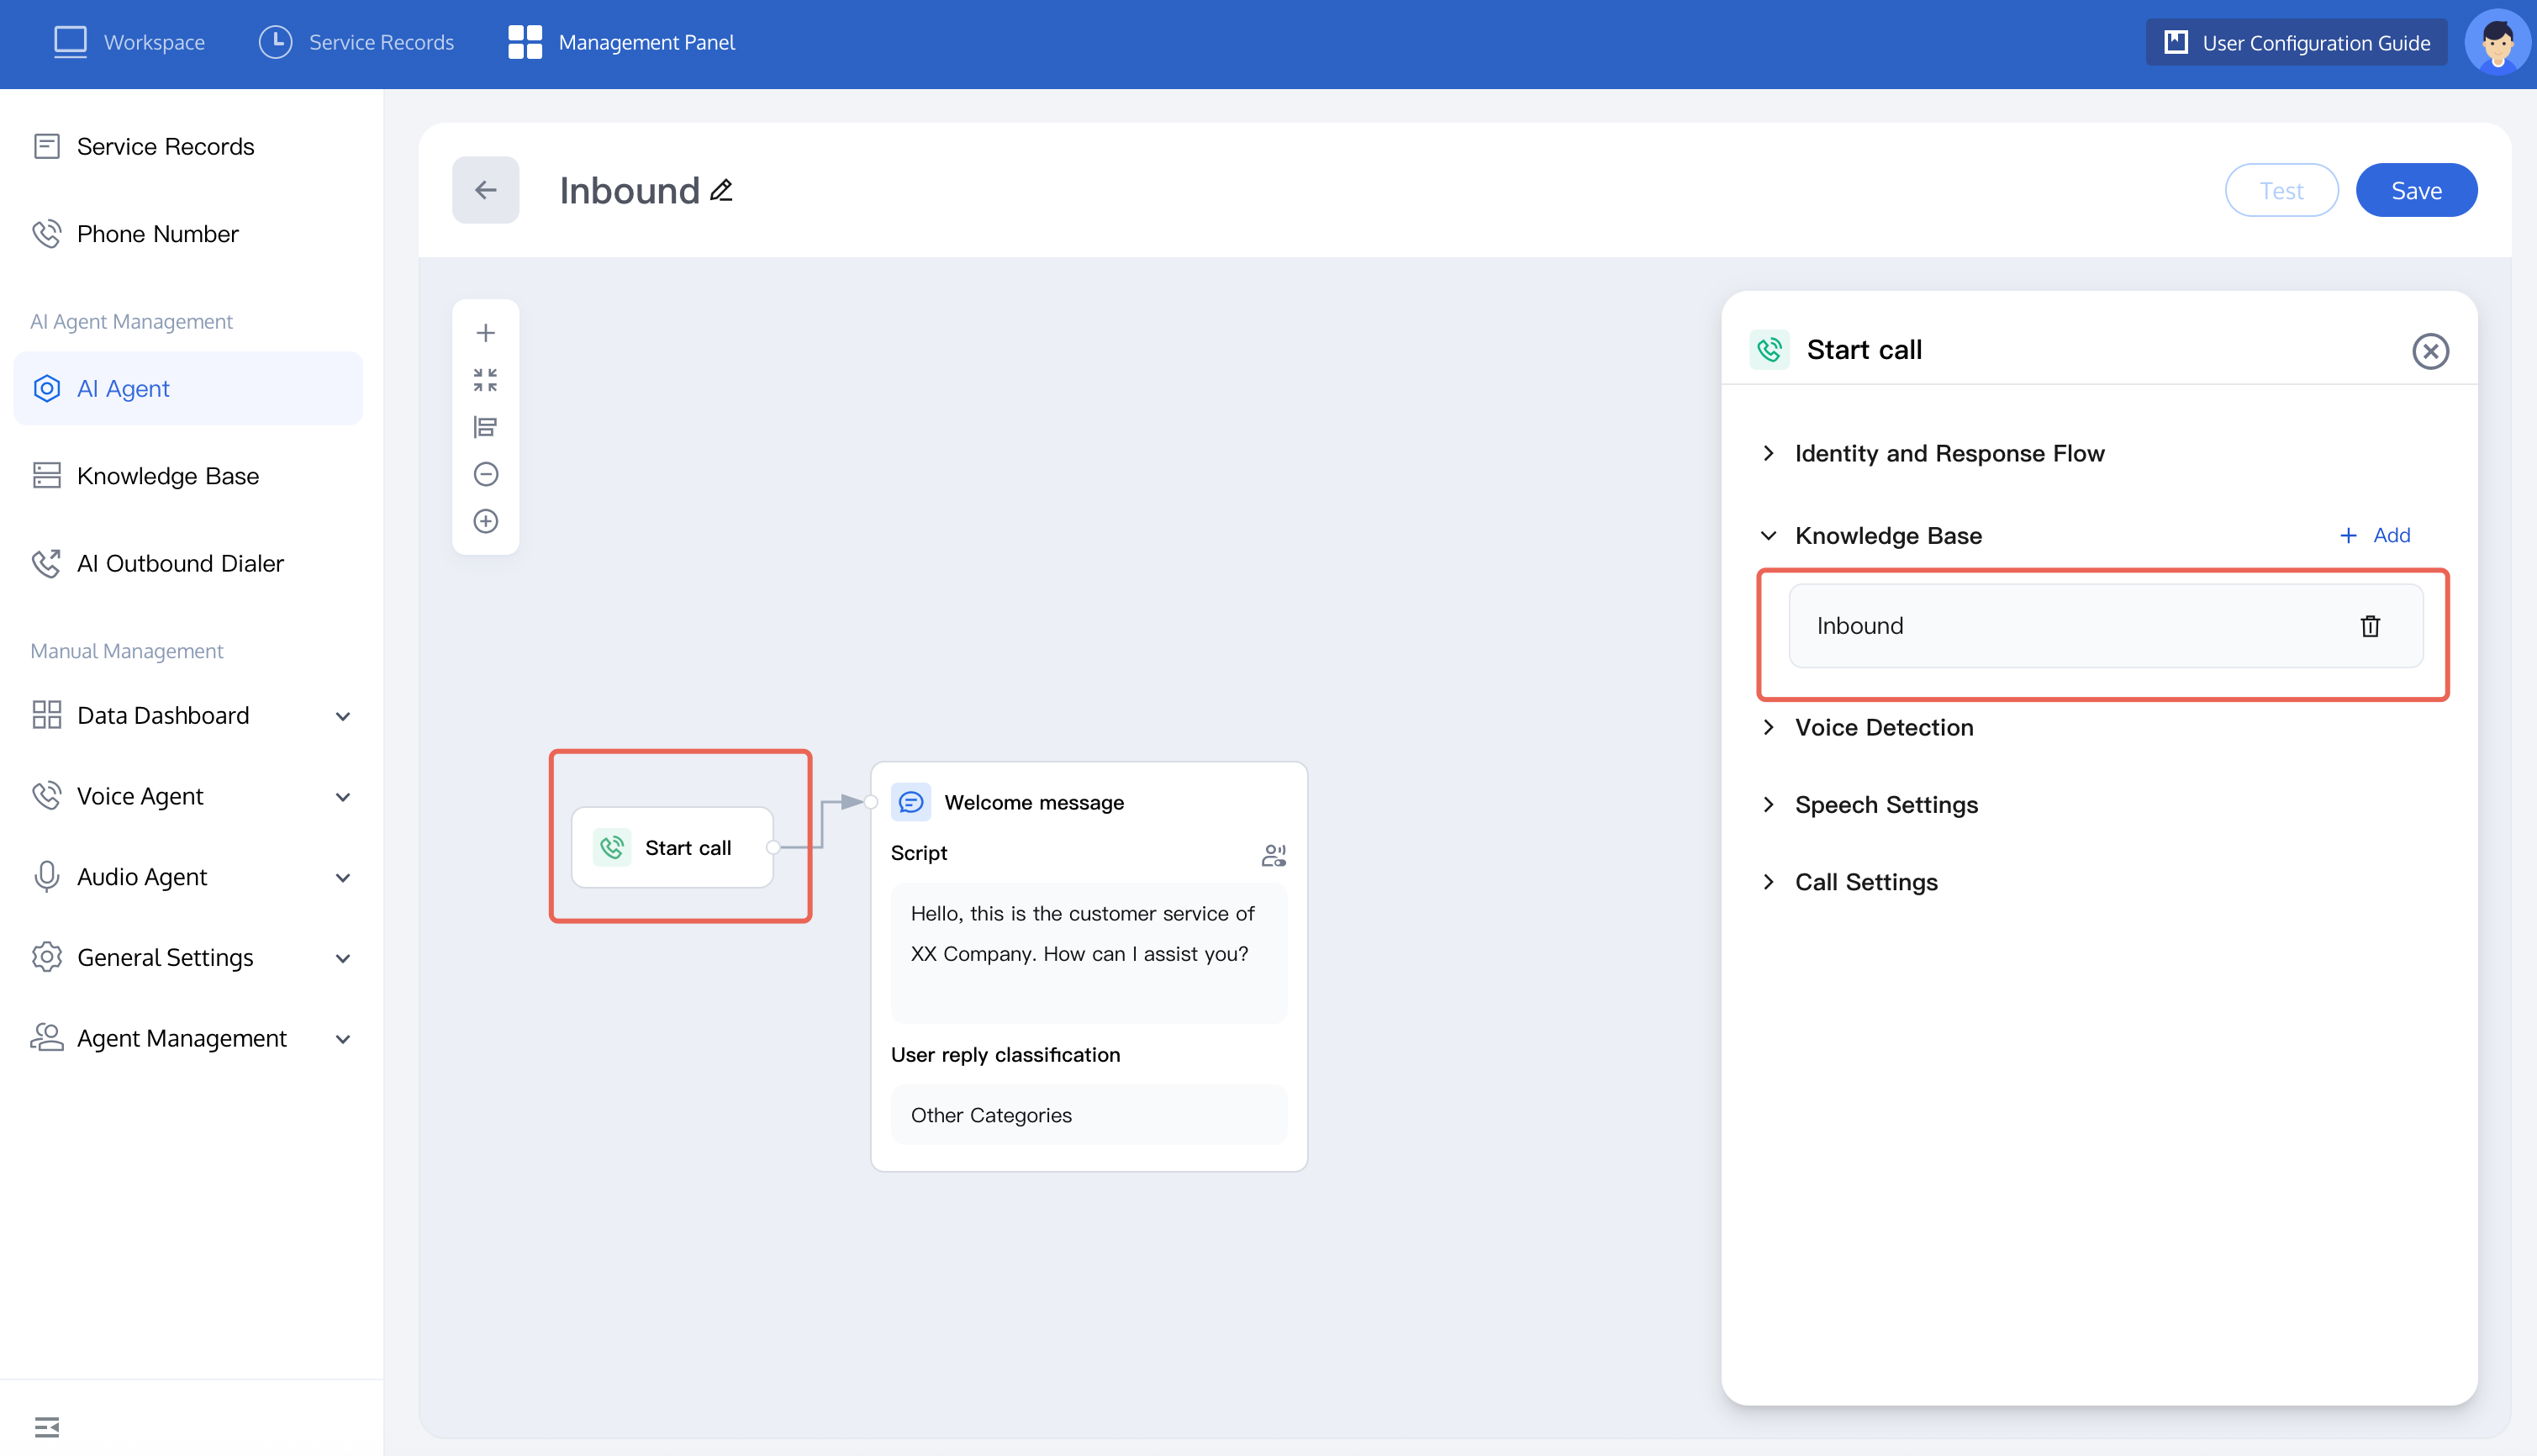
Knowledge base questions: Such problems can be replied by adding a knowledge base. When a user asks a question that hits the knowledge base, the system will reply according to the answer in the knowledge base. For example: ask about the specific content of an activity. You can try to Configure Knowledge Base. After you have configured the relevant knowledge base, just add the knowledge base when starting a call.
Execution Questions: This type of scenario is defined as one where an answer needs to be returned via an API call after a user asks a question. For example: How much balance is left in my account? Set this question as a global node.
If you wish to trace the user's question, you can refer to the figure below to set tags. In the API call node, you can configure the API address, input parameter, and output parameter according to business needs.
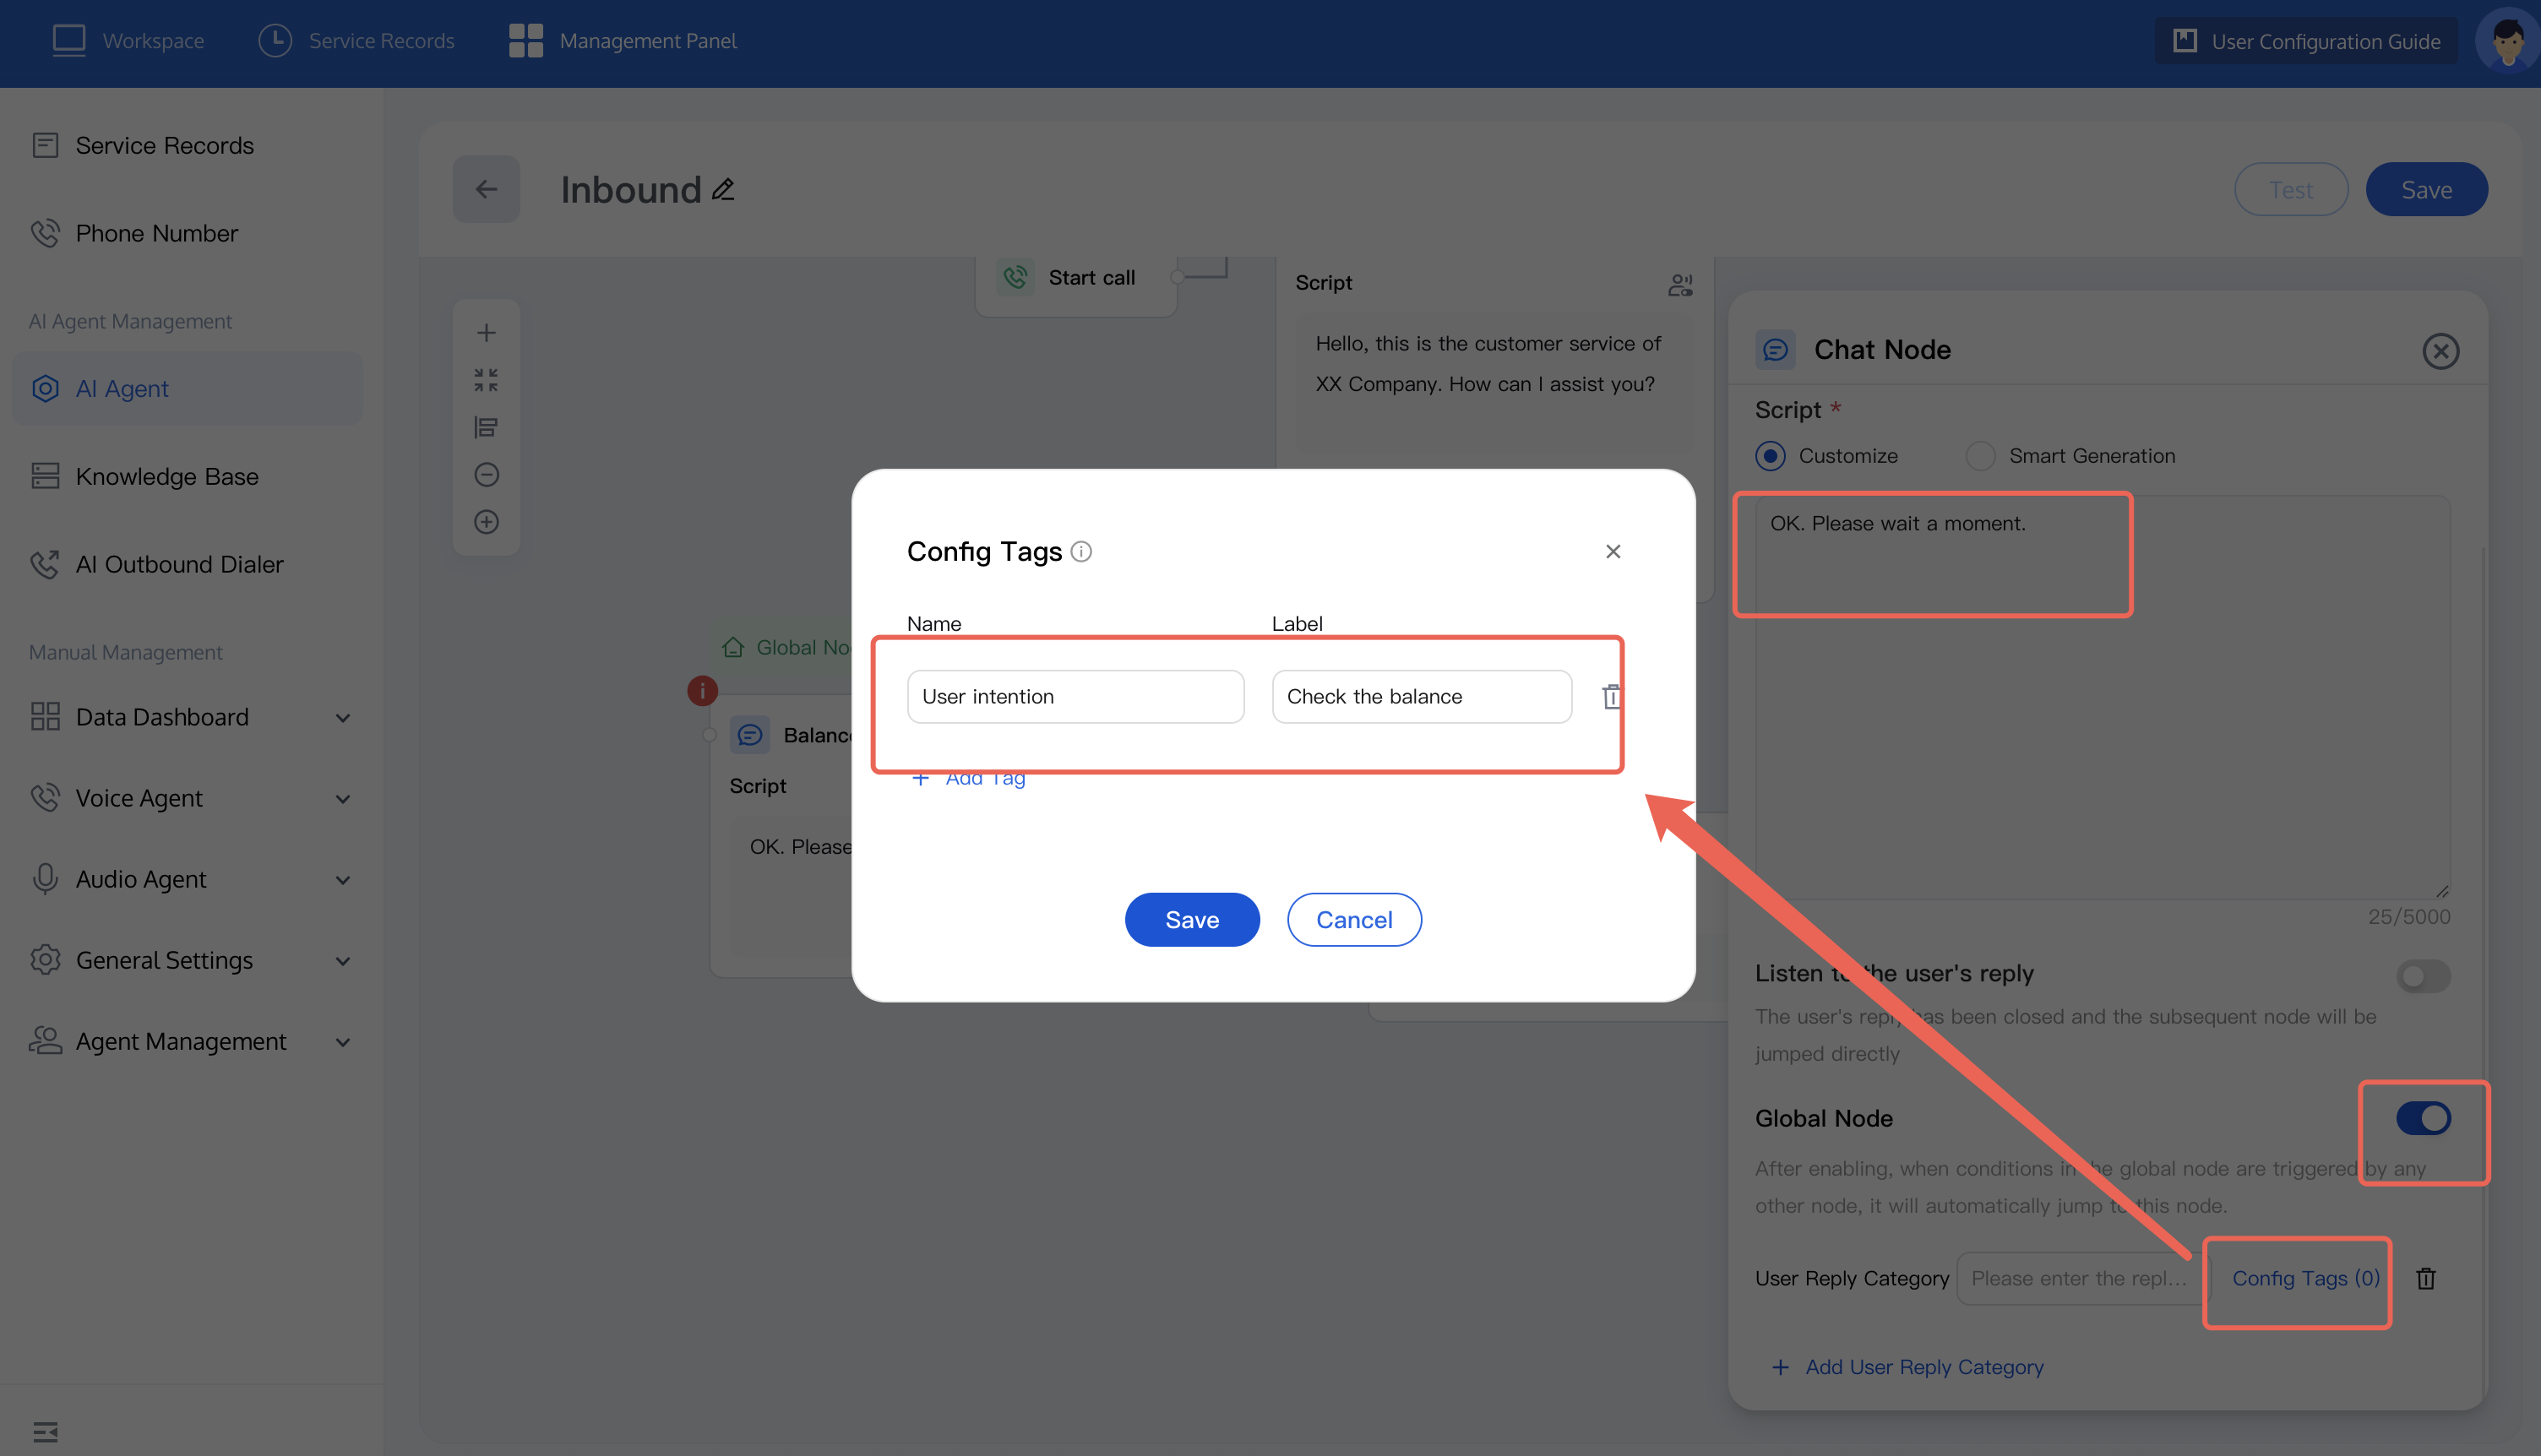
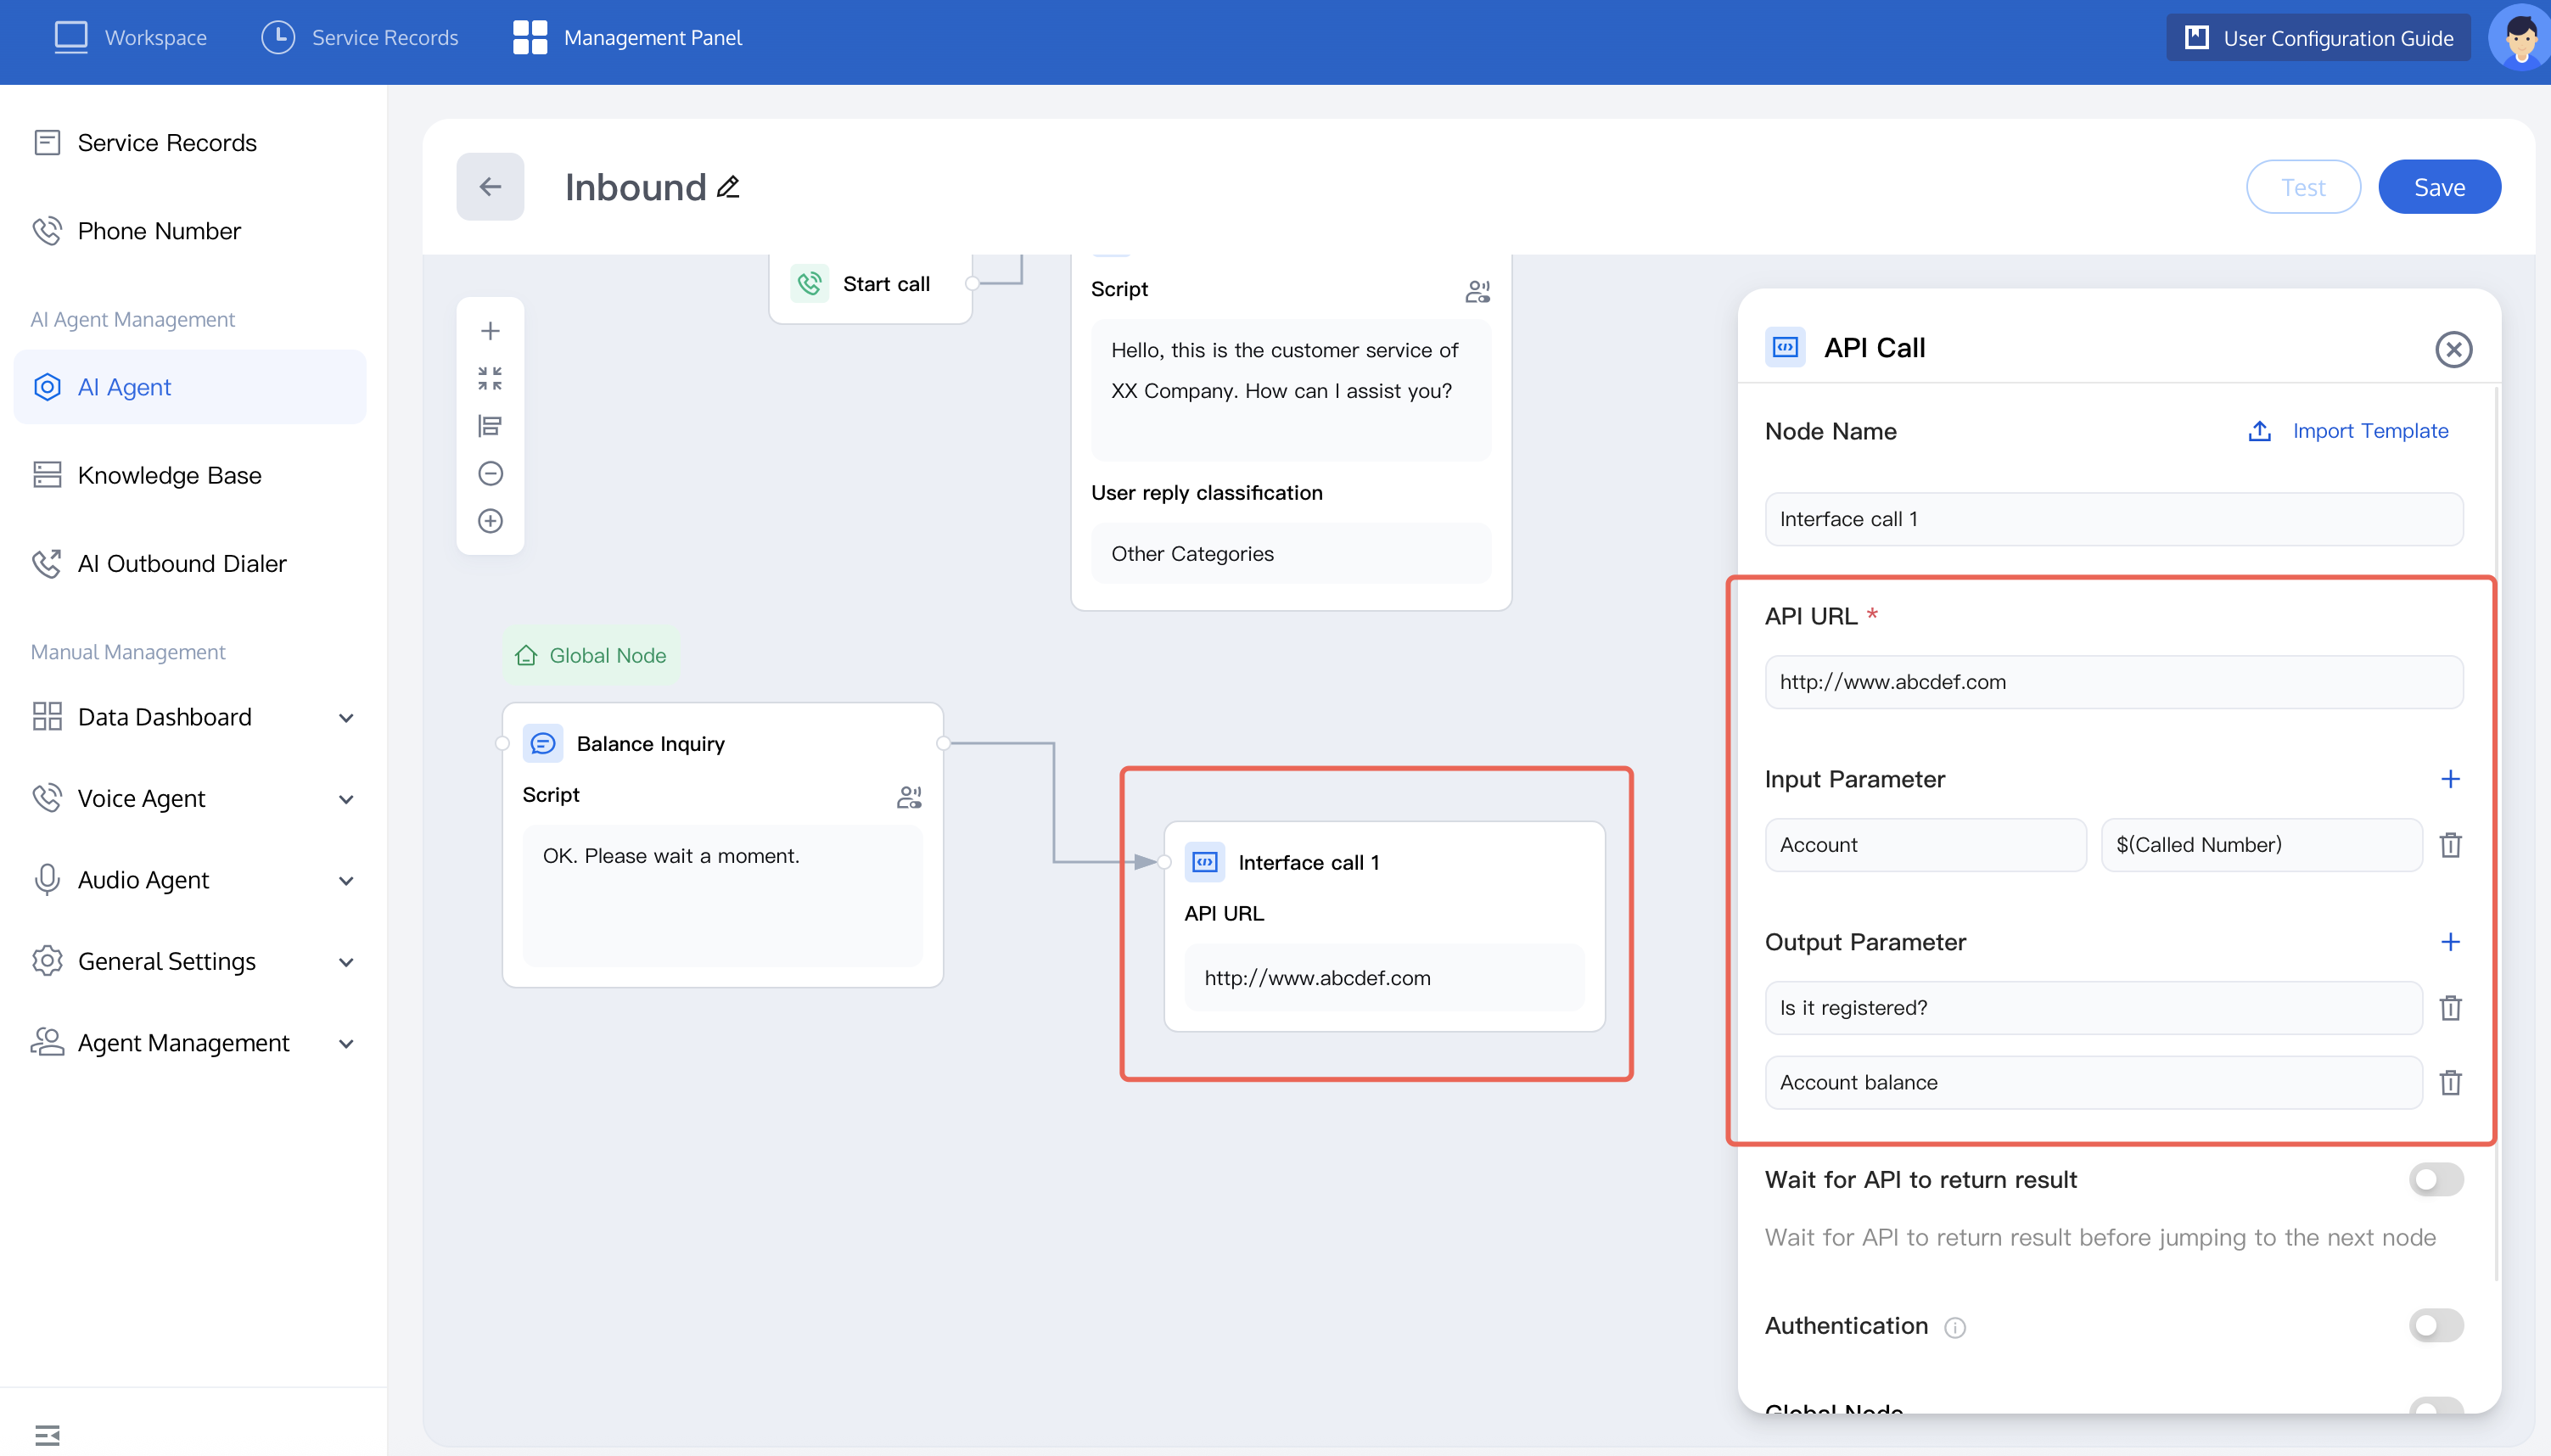
In this example, the input parameter is the user's phone number, and the output parameters are whether the user is registered and the account balance. These are used to verify the registration status of the number and return the user's query results.
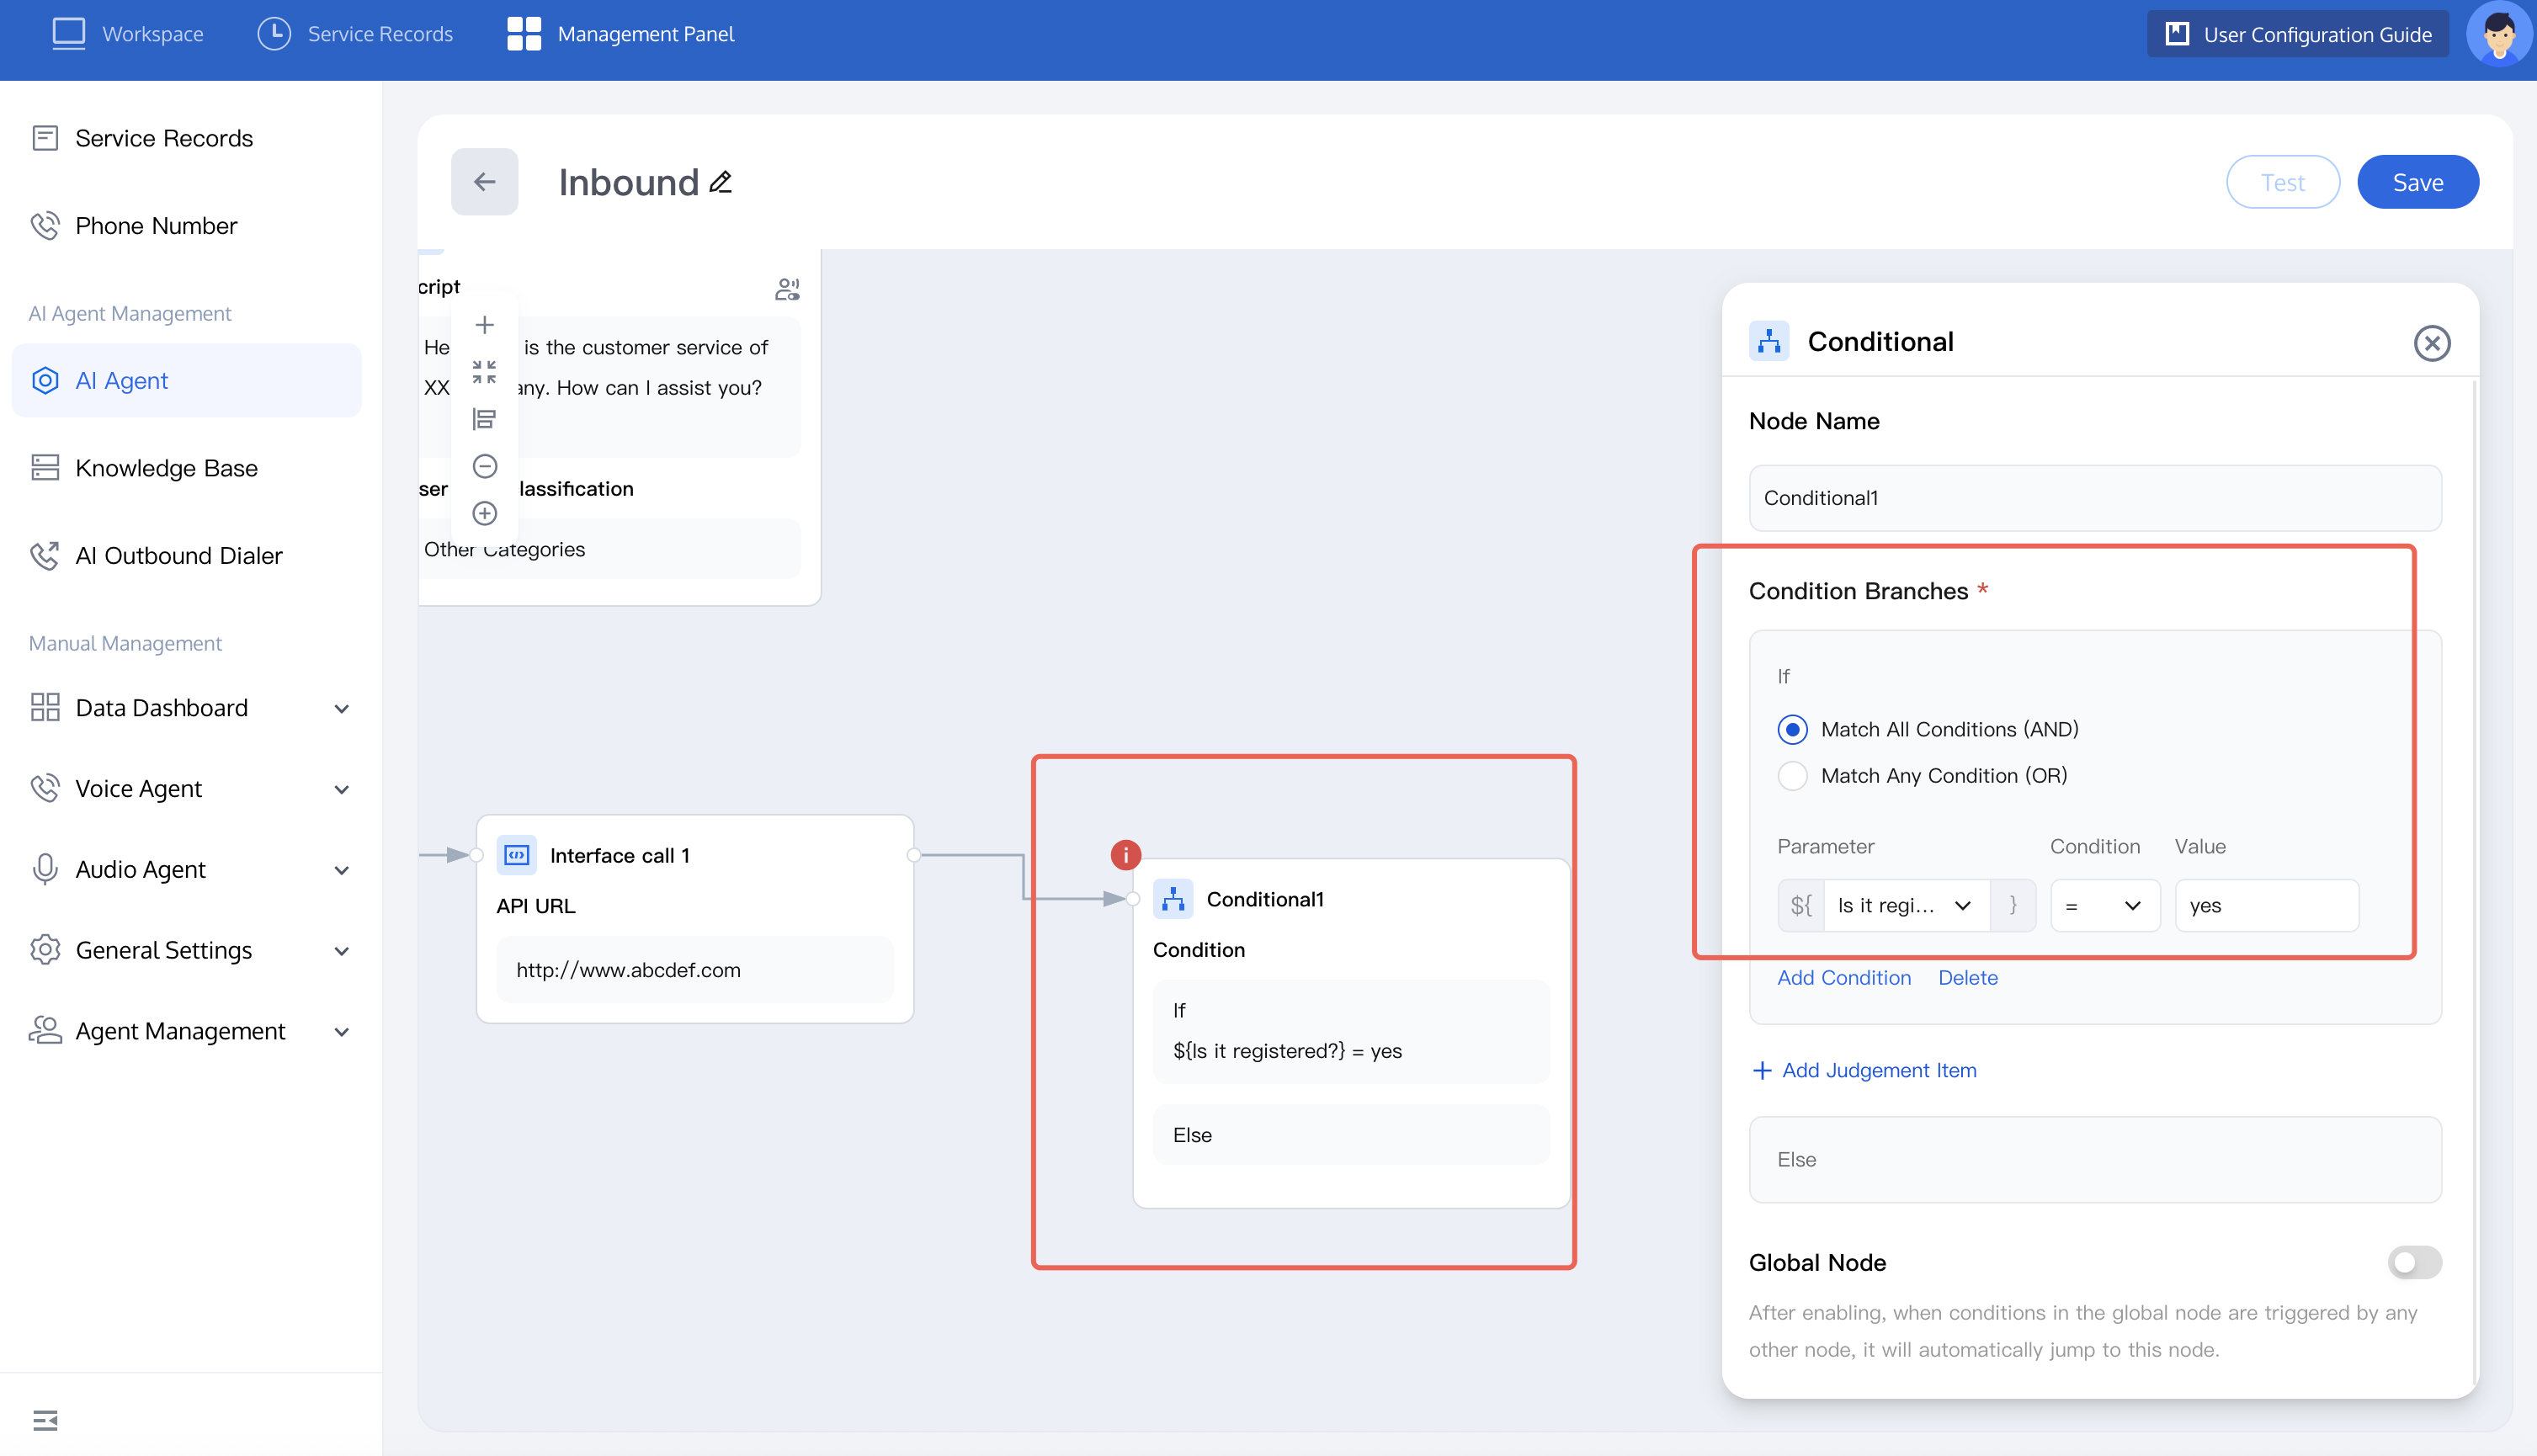
Add a Conditional Judgment node and set the condition: whether registered = yes.
If the user's phone number is registered, reply with the balance.
${balance} is the output parameter of the API call.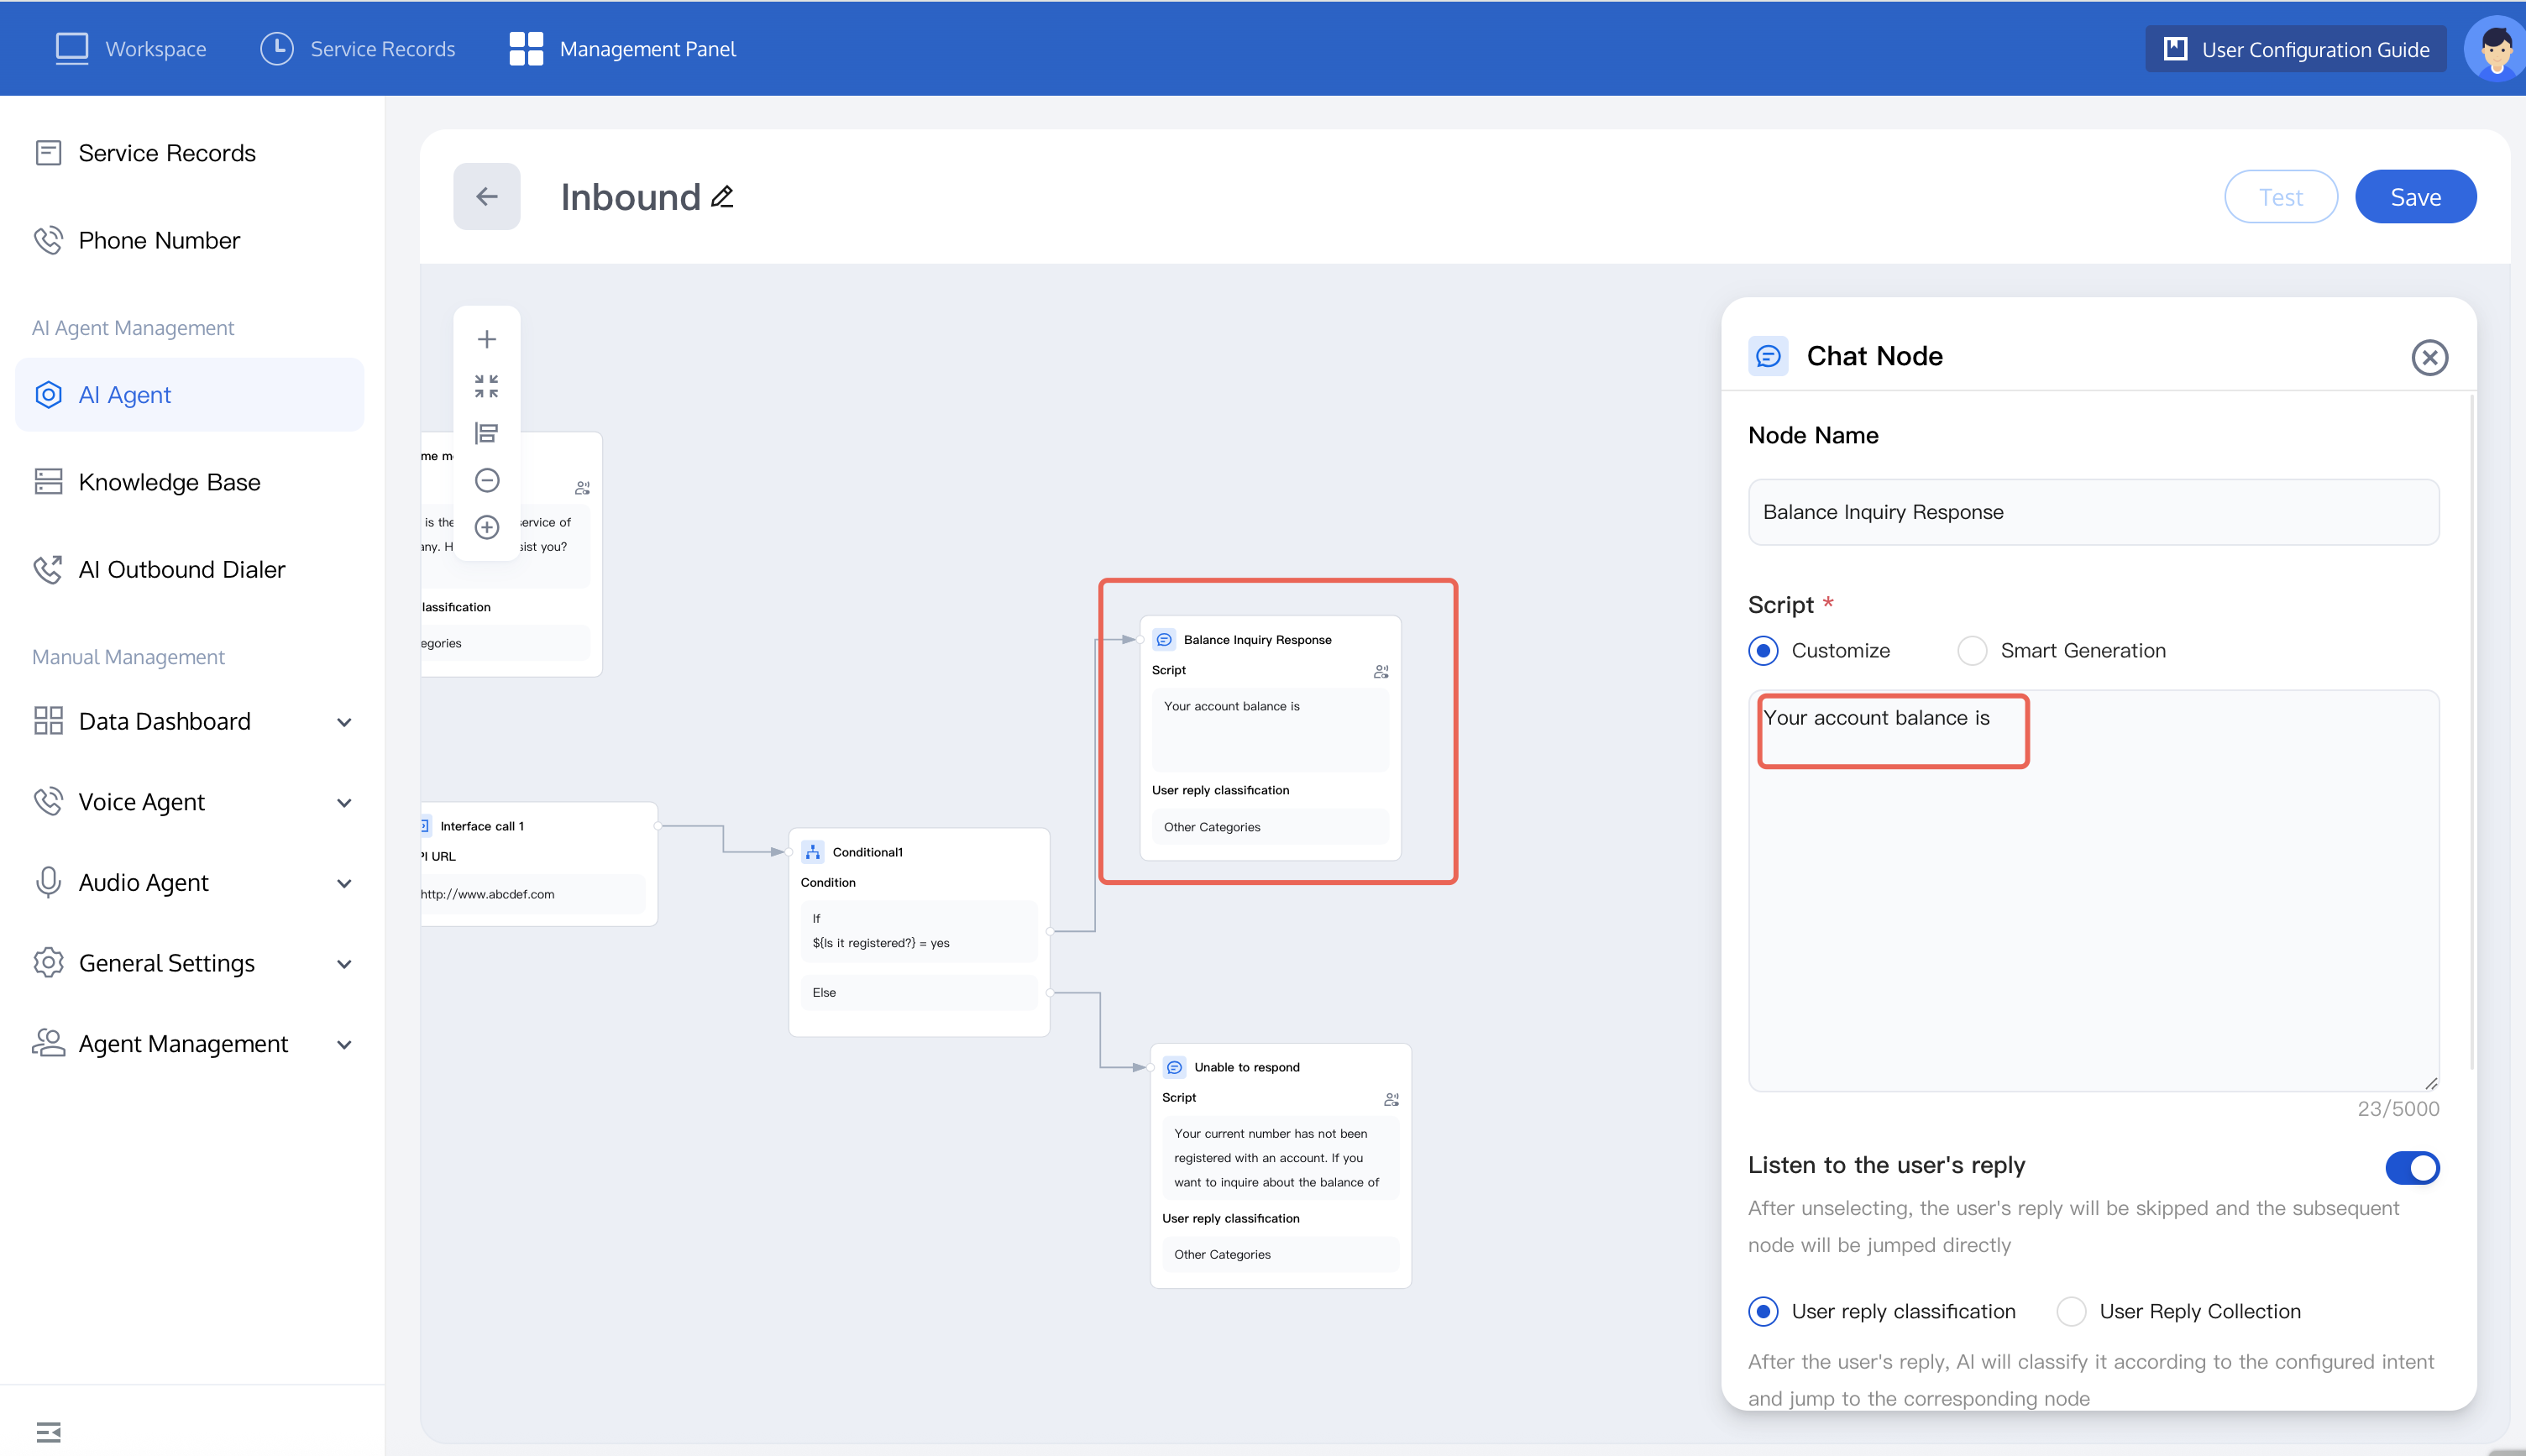
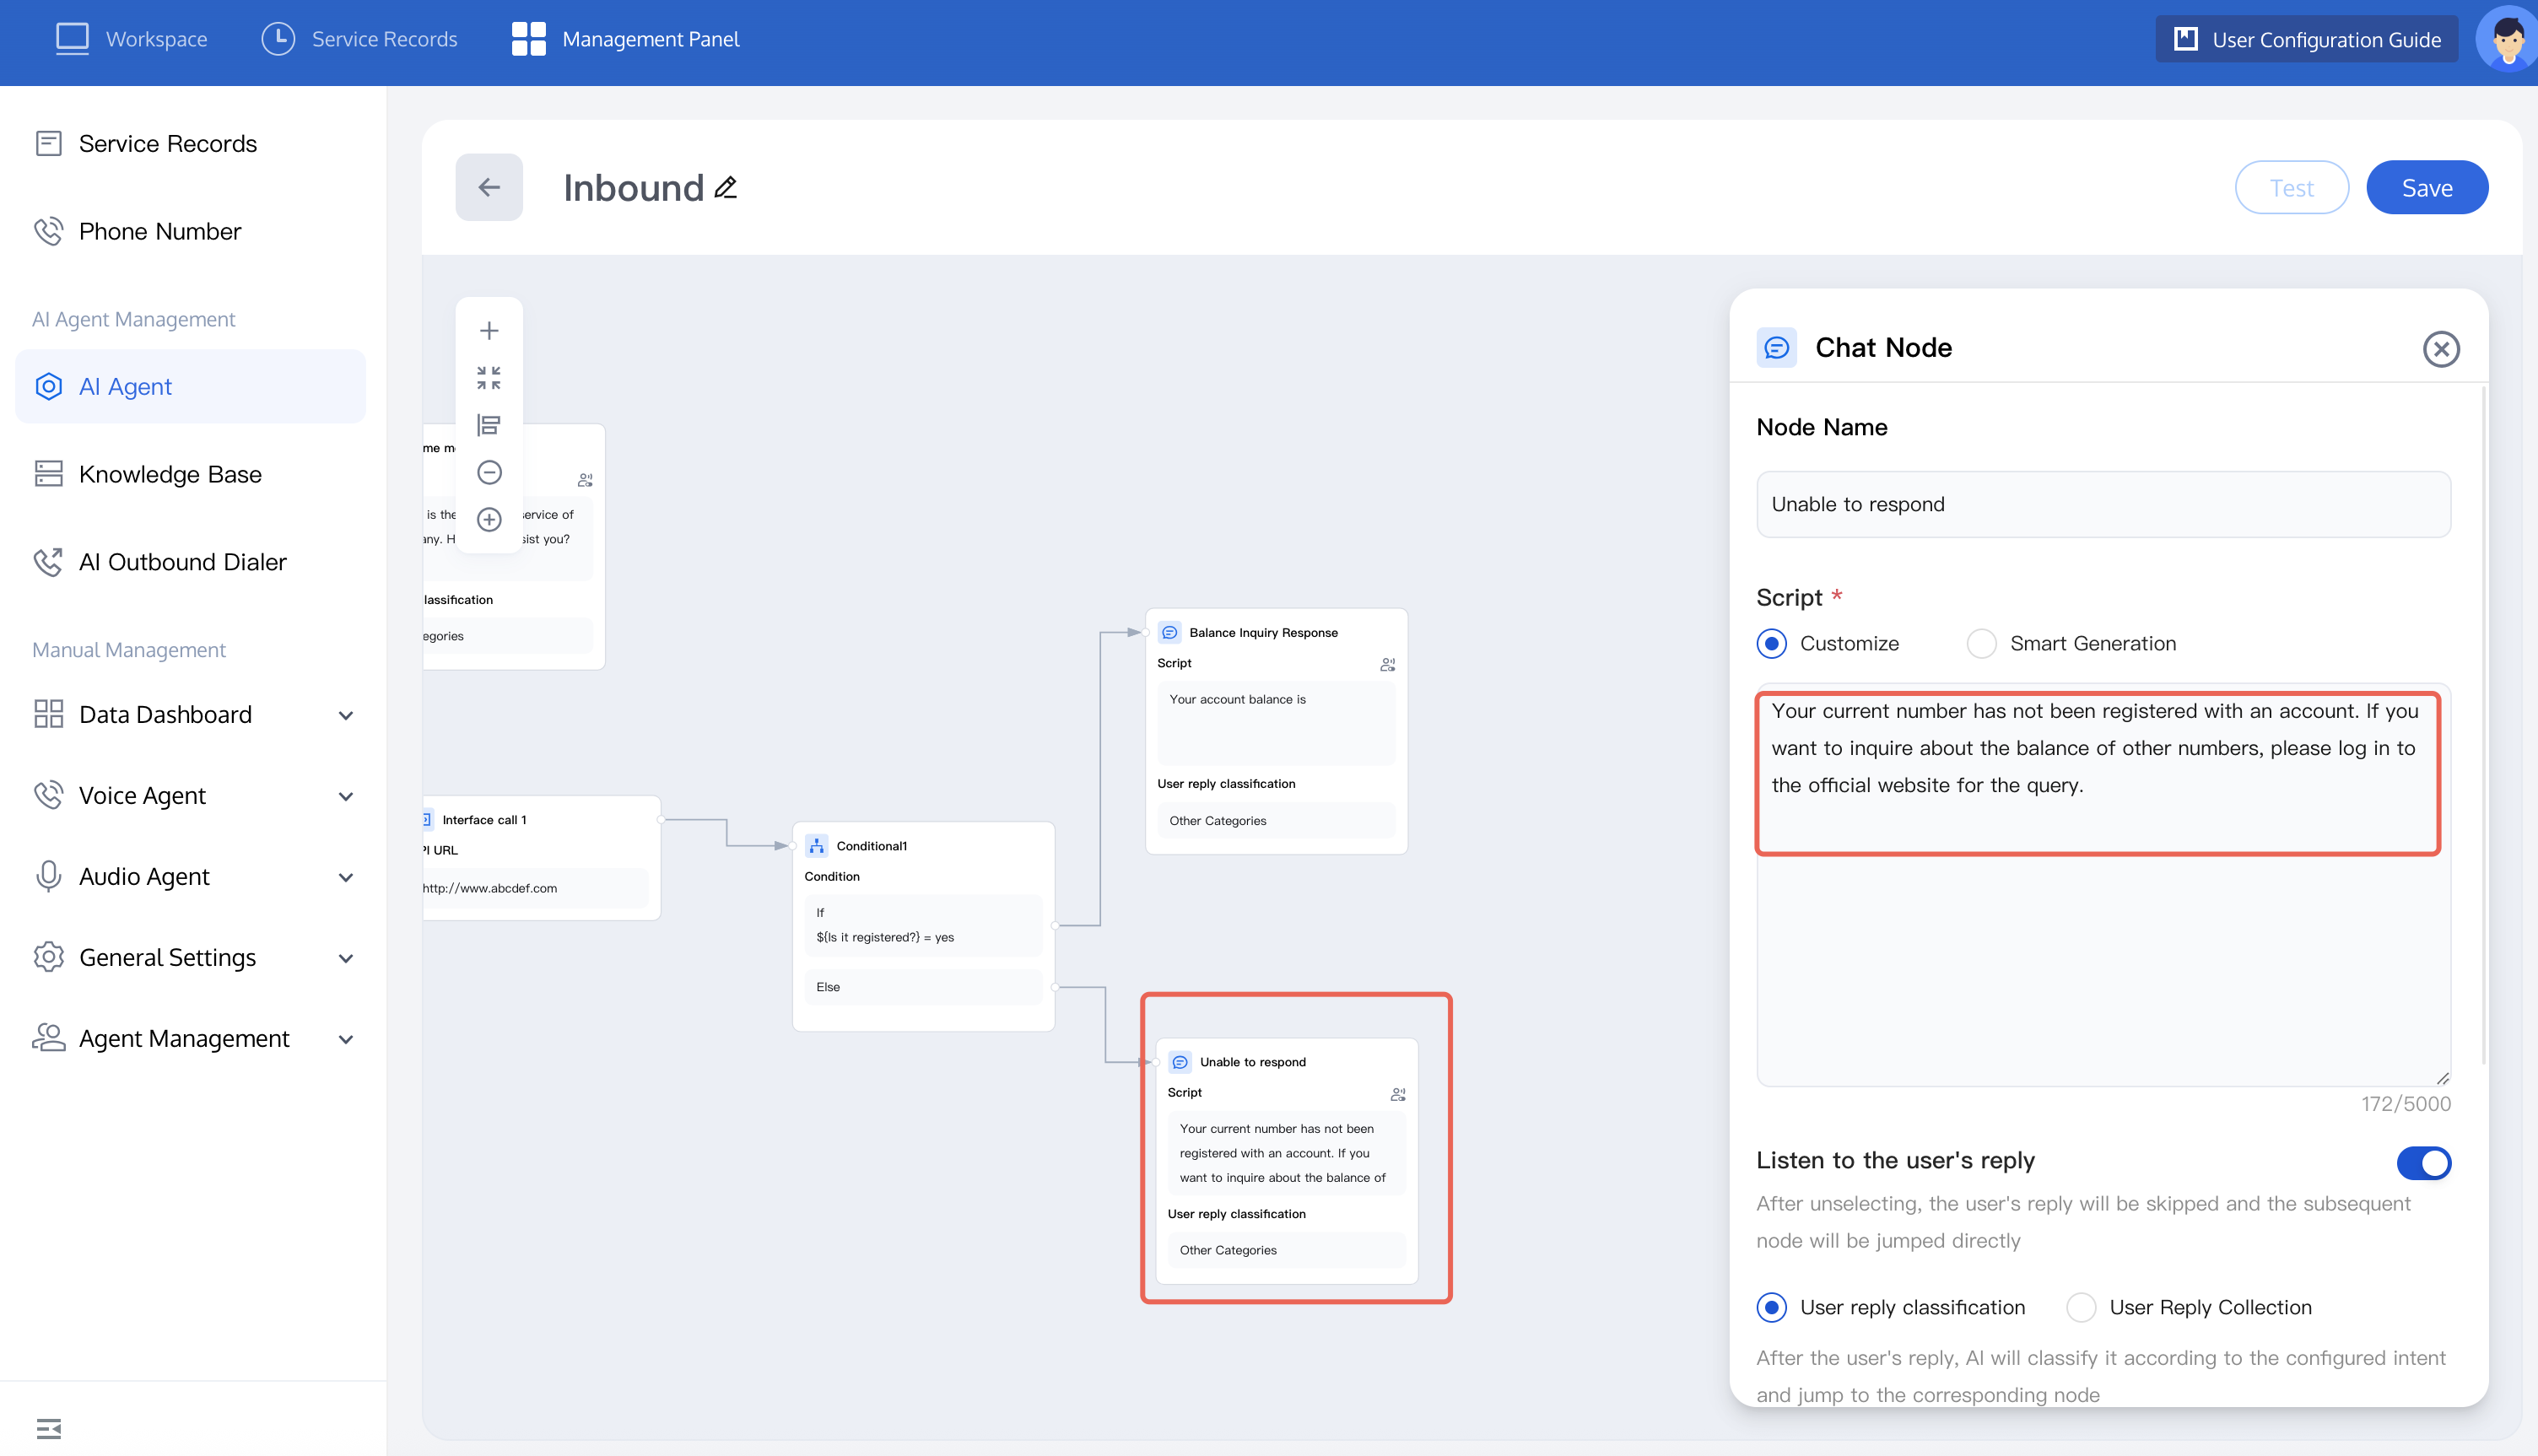
If the user's phone number is not registered, configure the corresponding reply script.
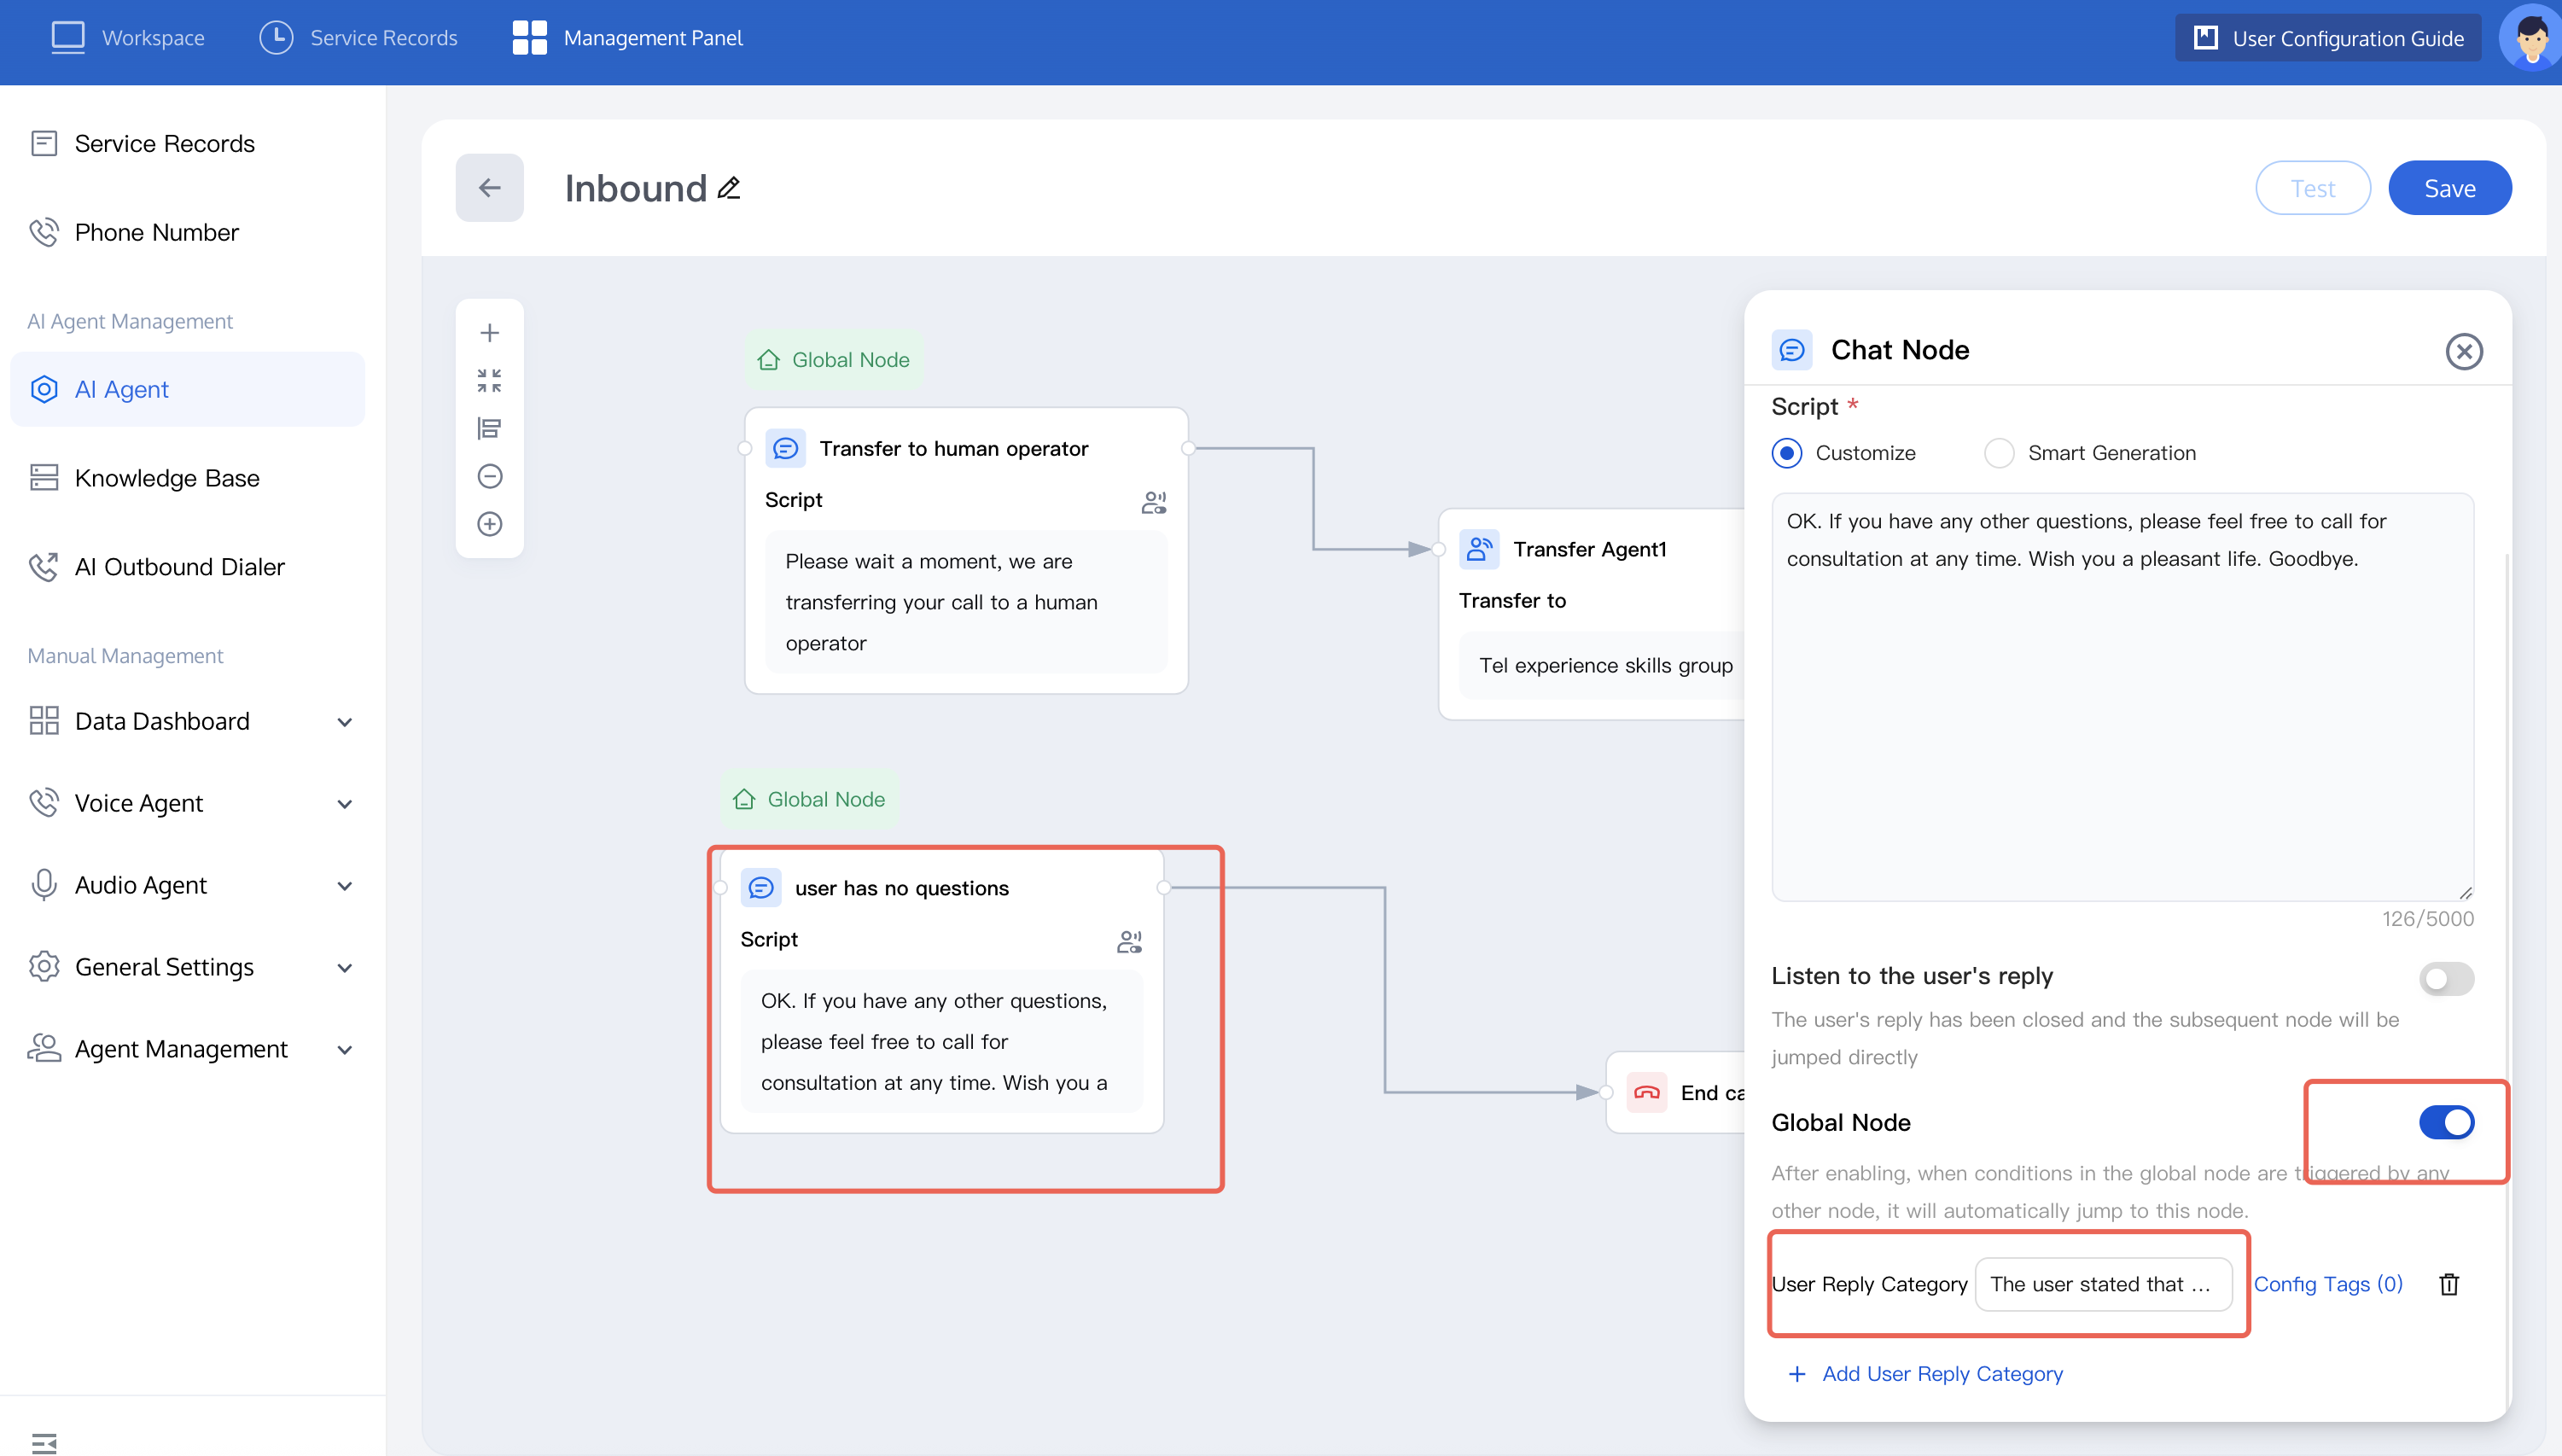
Transfer to Agent: If a question requires transfer to a human Agent for an answer, you can add a Conversation Node and a Transfer to Agent node. Alternatively, you can connect the transfer node to the two types of question nodes mentioned earlier. Set the conversation node as a Global Node. After the user expresses the intent to transfer to an Agent, the system automatically redirects to it. Configure the script as shown in the figure.
To transfer to human agent, skill group configuration is required. For related content.
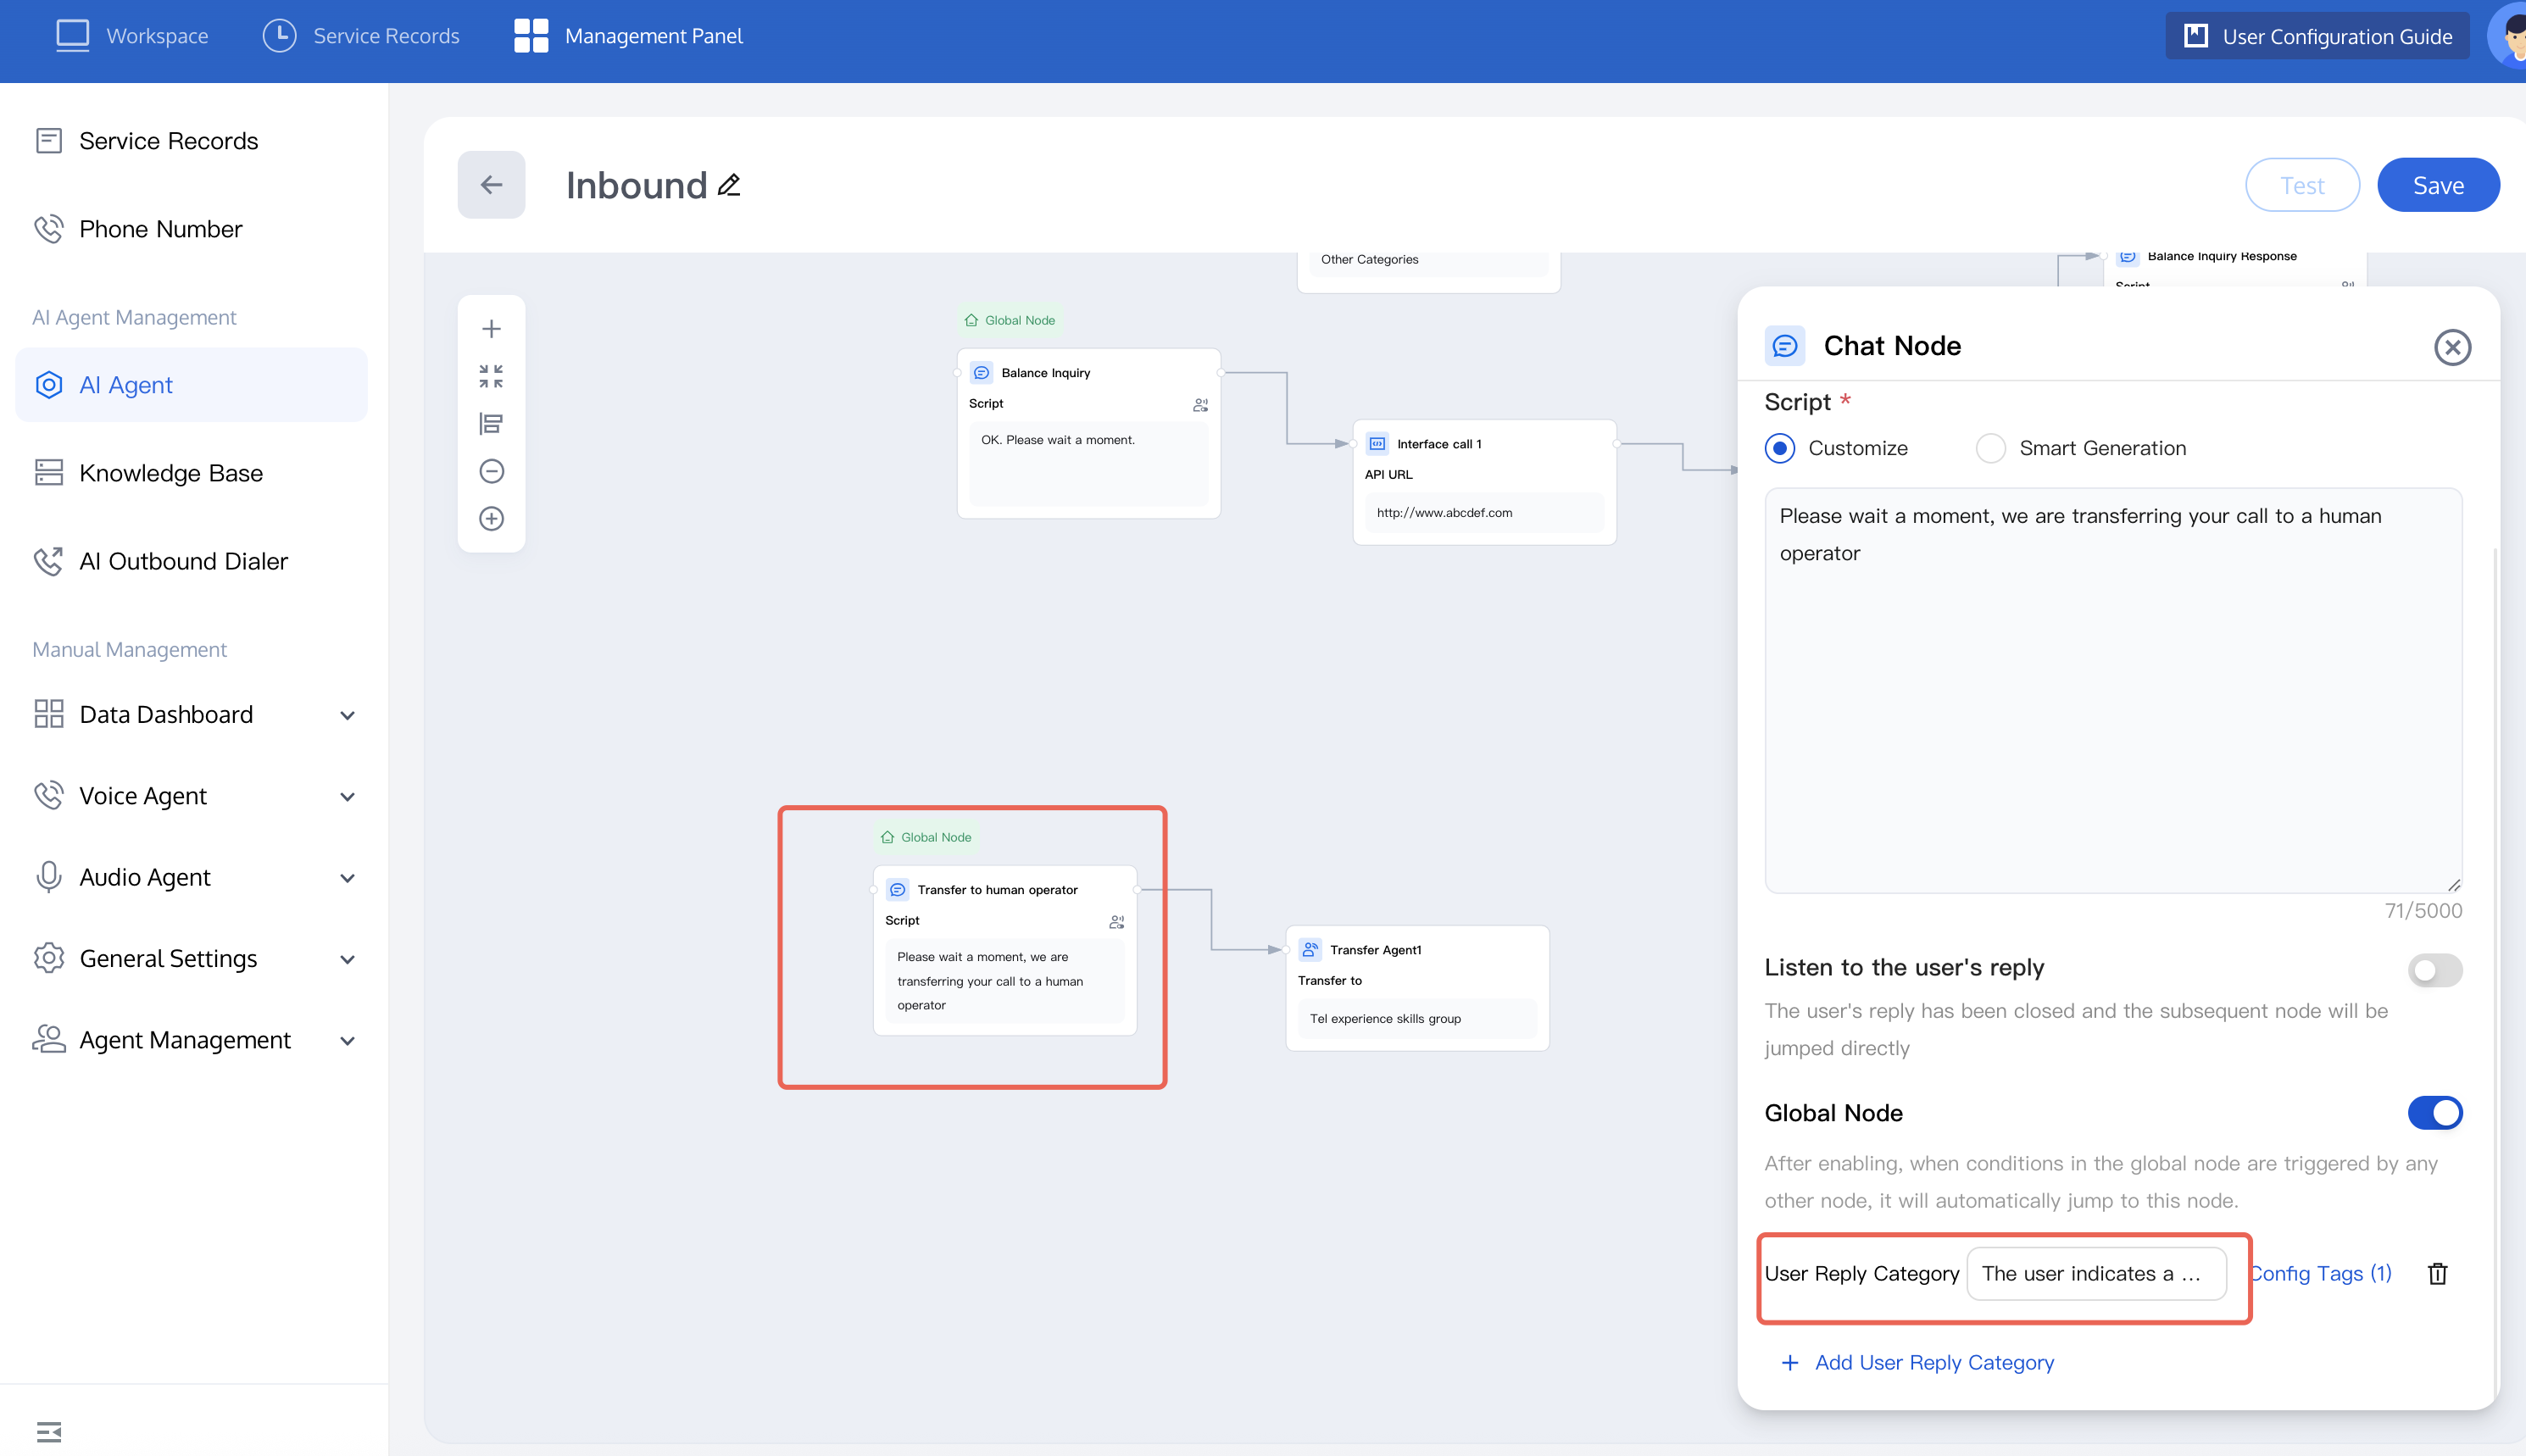
4. In an inbound call scenario, the call process may involve redirection between multiple nodes, so you need to set a global node to end the call. You can refer to the figure below to set the user's intent to end the dialogue in the global node and complete the dialogue. Once enabled, when any other node triggers the conditions in the global node, automatic redirection to this node is allowed.
5. To learn more about node function, see node introduction. Once completed, you can test the dialogue effect of the Intelligent Agent. For detailed operations, refer to test dialogue effect.
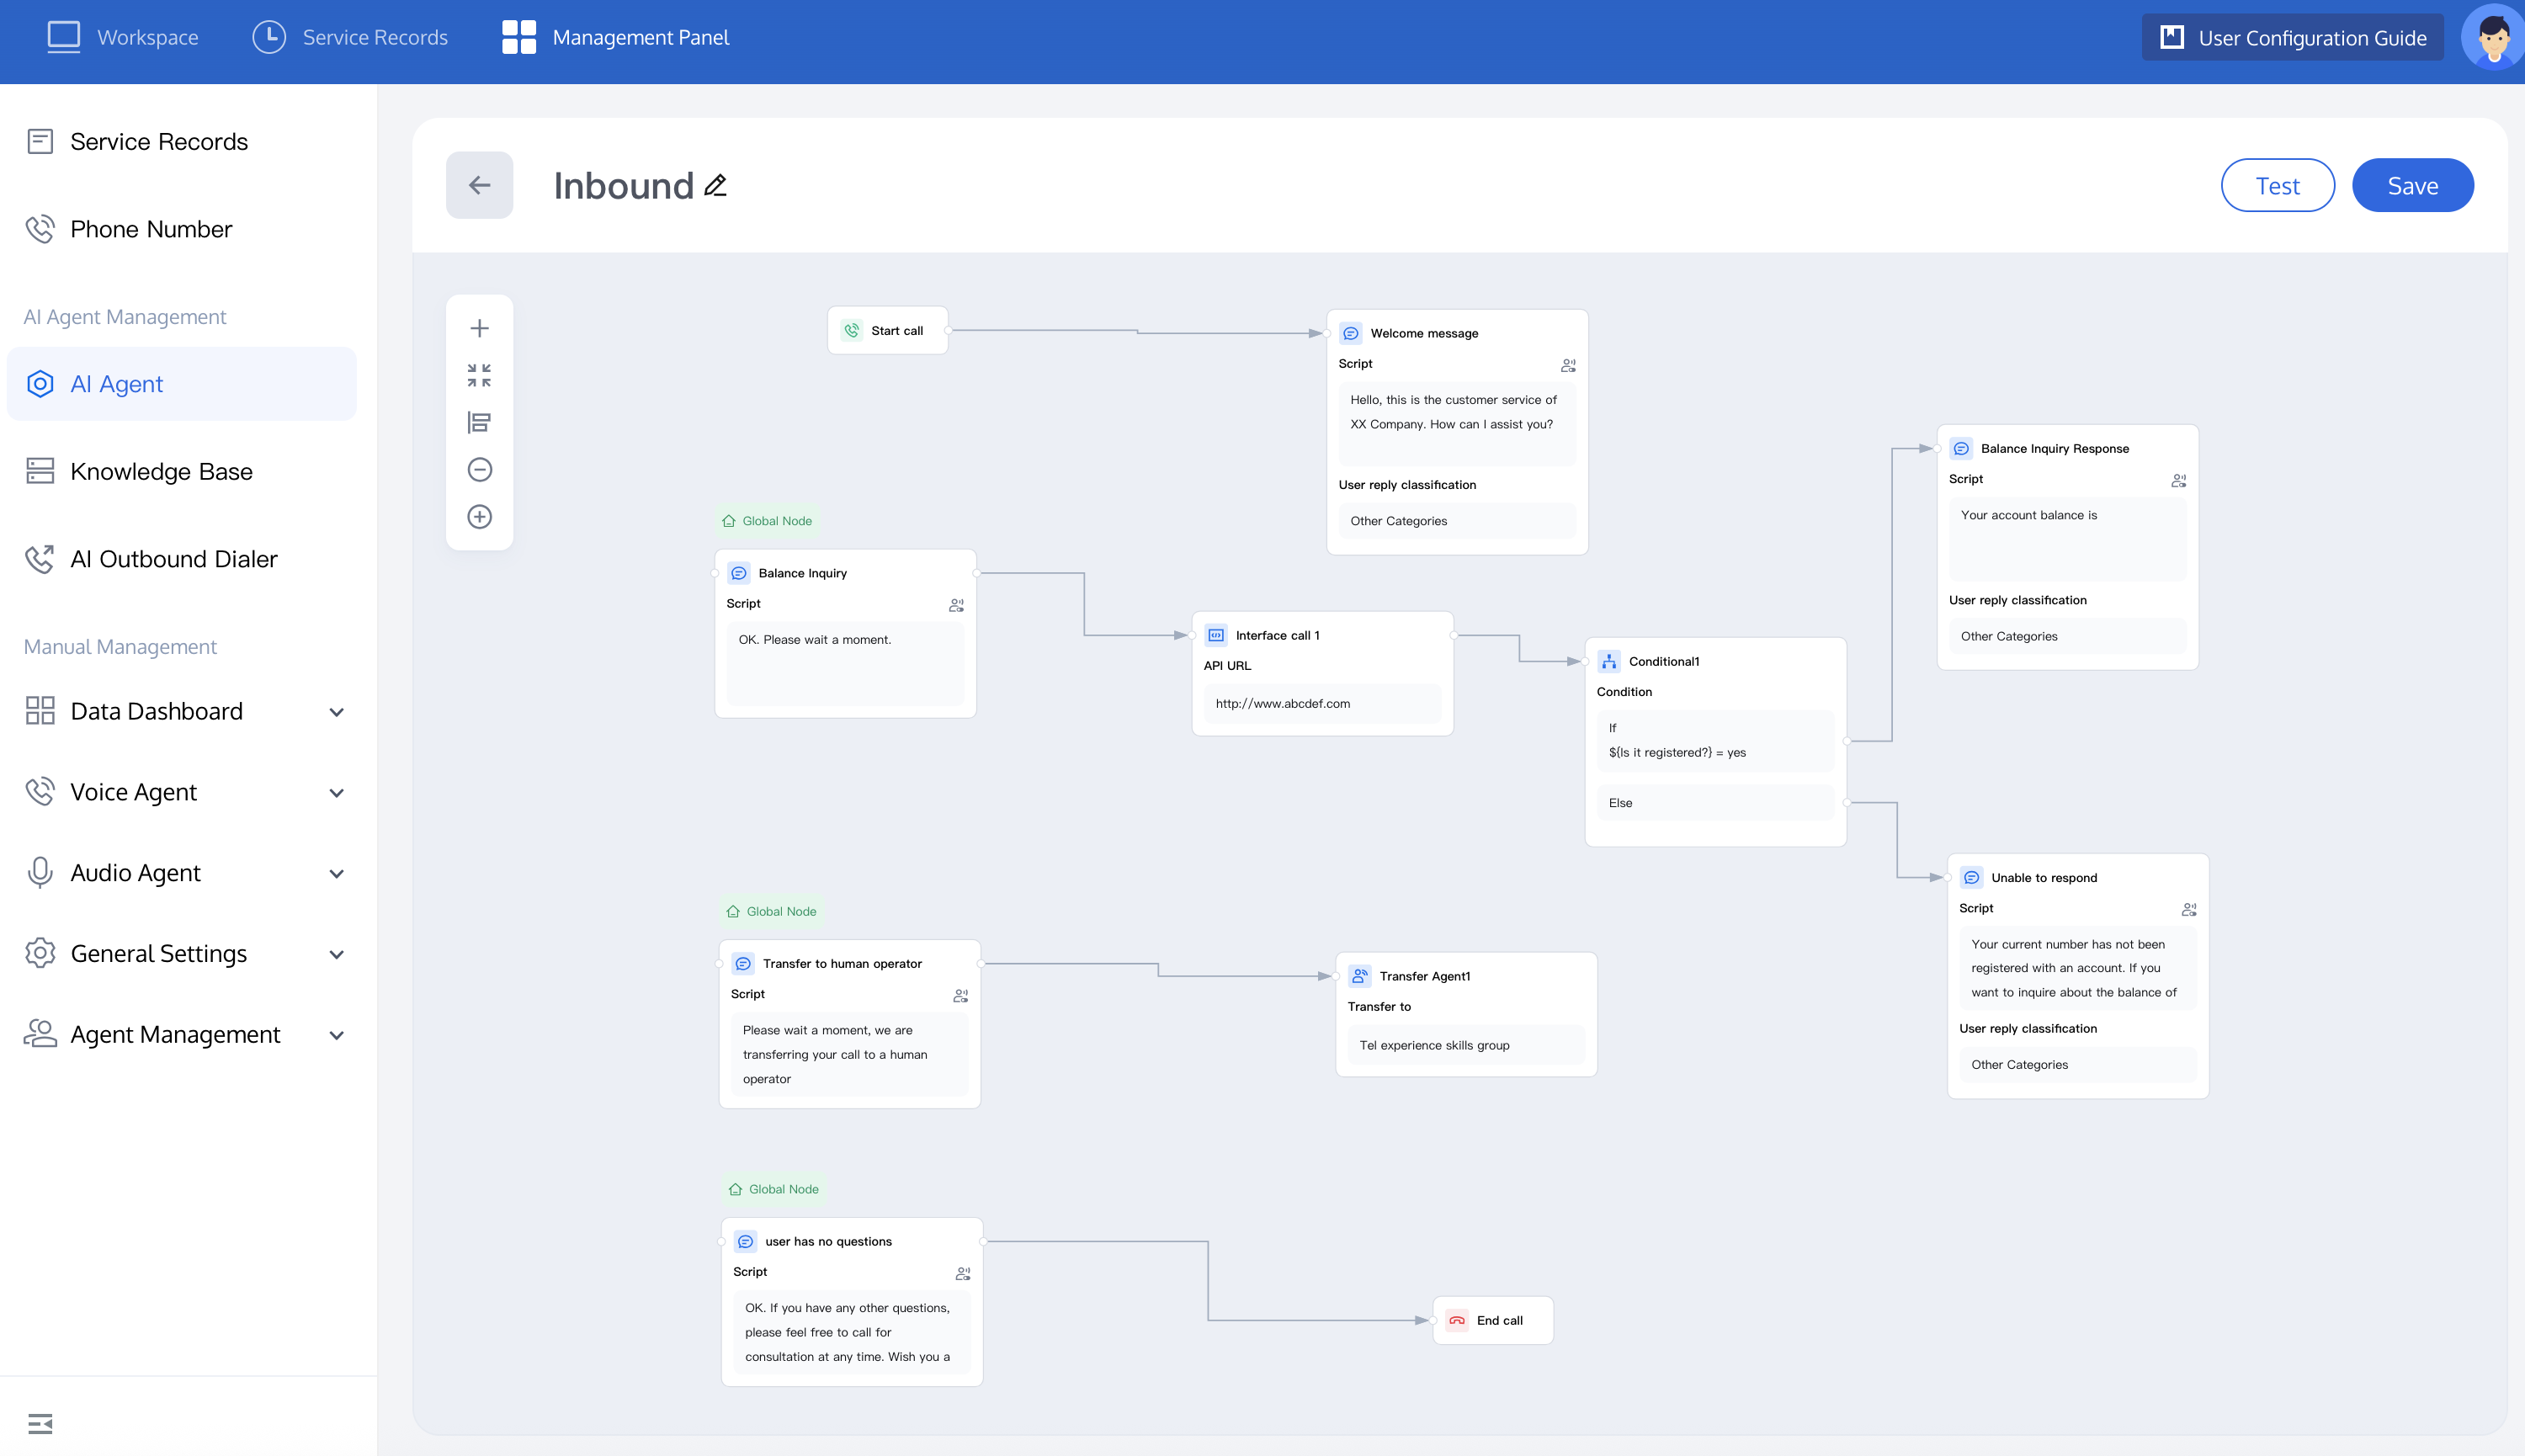
6. The full canvas view is as follows:
Inbound Setting
After completing the inbound AI Agent setup, you can set it as the default inbound AI Agent. In the management panel, click Phone Number to associate one or more of your phone numbers with this AI Agent. After a user dials the phone number you set, the AI Agent automatically handles the call. For configuration, refer to Implement Inbound AI Agent Reception. If you prefer to use an API for setup, refer to Inbound API Call.
Call Data Analysis
After an inbound call is completed, you can view the dialogue data, including call connection status, user questions, and more:
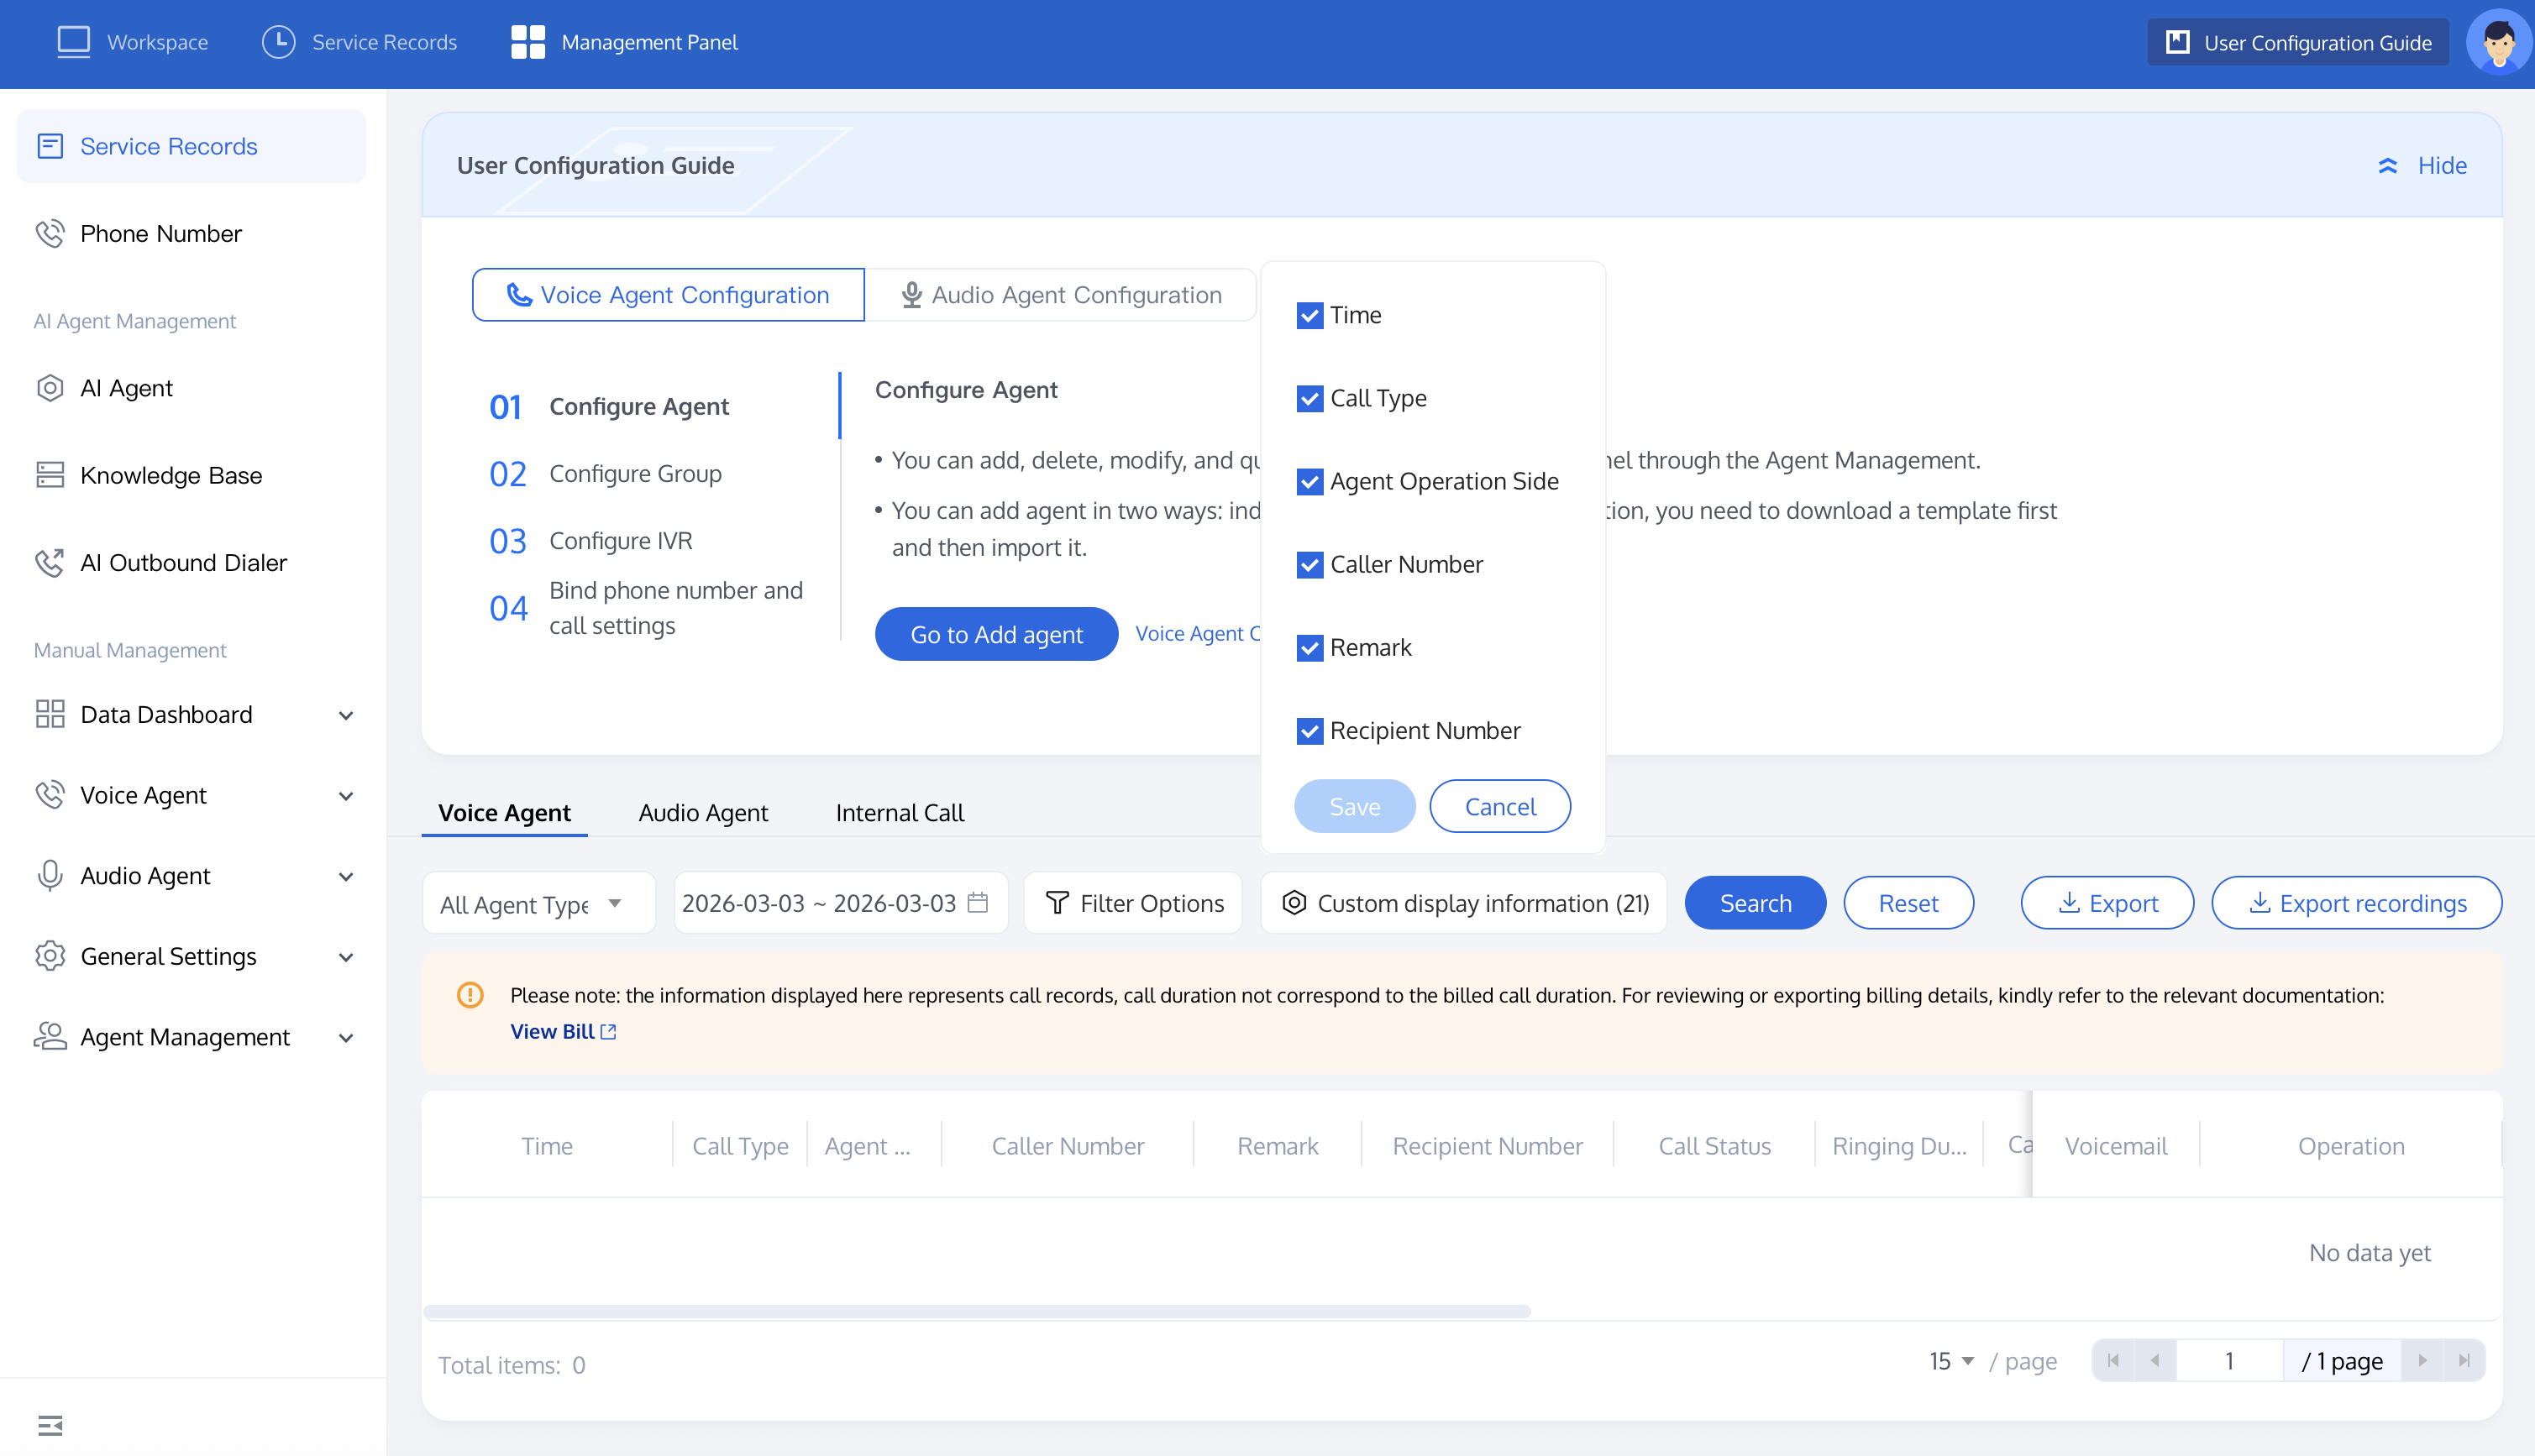
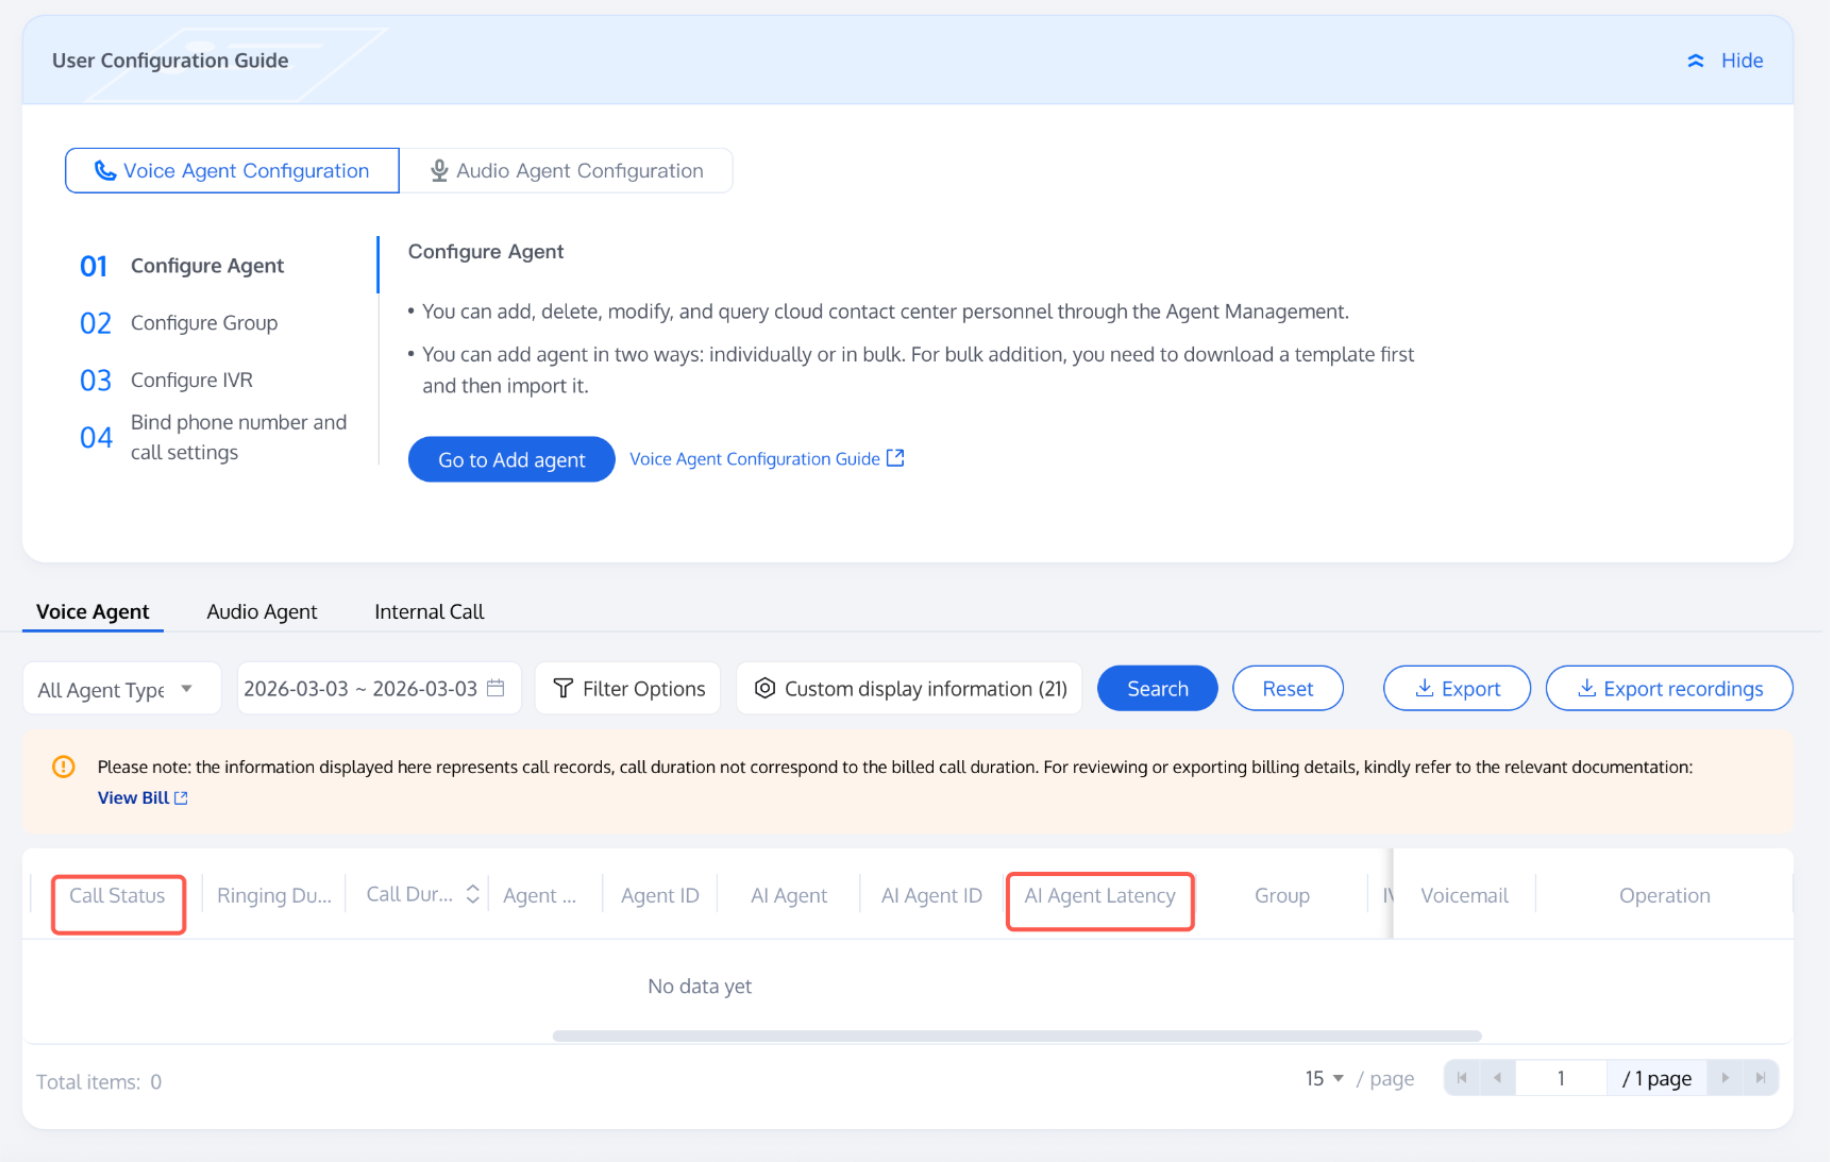
Go to the management panel and then to Service Records. You can search for the call records you want to view by whether it's an AI Agent call, time, and custom filter criteria. It is recommended to select the call type in the filter options. By choosing Inbound as the call type, you can quickly query inbound calls.
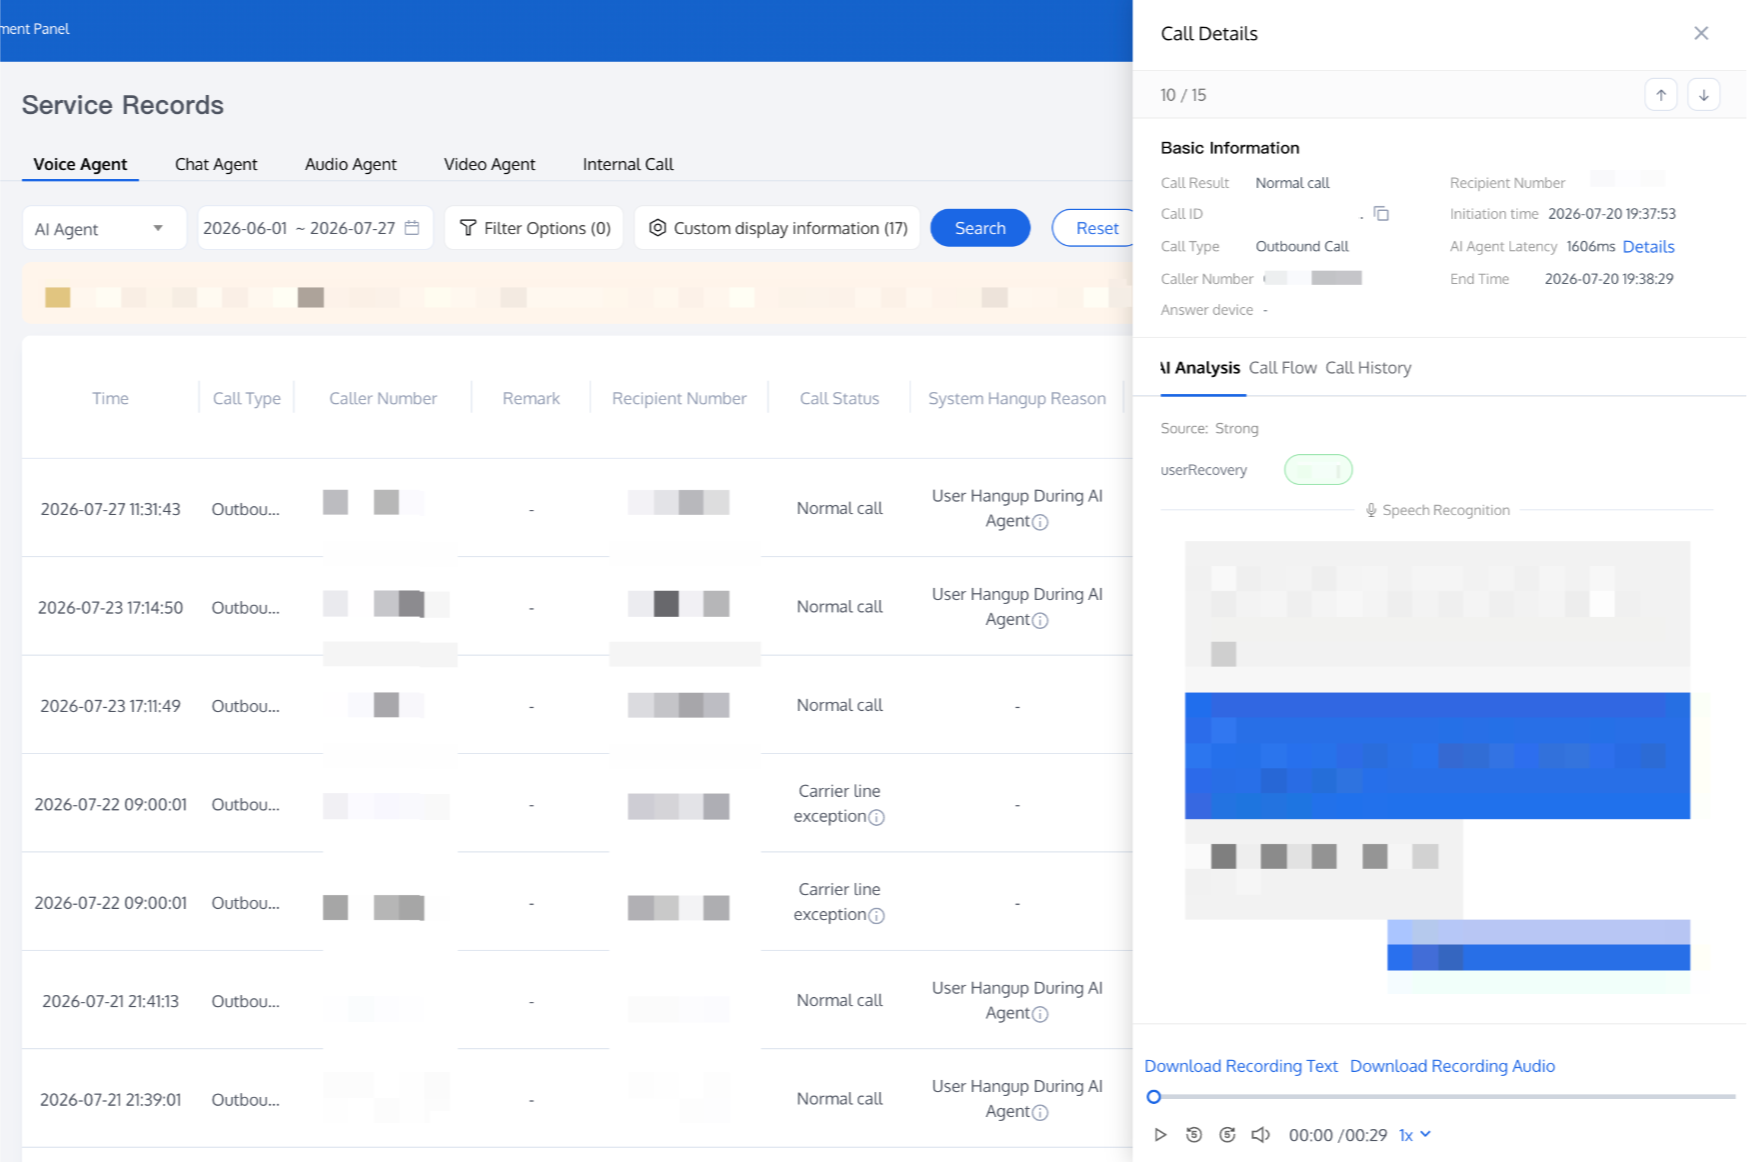
Click Call Details for a specific call record to view detailed information about that call, including AI Analytics (post-call Tag status), call flow, and Call History.
In the AI Analytics field, you can view the user reply status of the call. You can also use the API Query AI Agent Post-call Tag Data.
Related Guidelines
Select the corresponding path based on your deployment method:
First time using? You can deploy a usable AI Agent in just five minutes create a conversation flow or integrate an external model.
Want to learn about our dialogue flow nodes? Go to Dialogue Nodes.
Want to build a knowledge base for your dialogue flow? Go to Build Your Knowledge Base.
How to test your model? Refer to Test Dialogue Workflow.
Want to configure a voice AI Agent with your own model? Go to Integrate External Model, Edit Dialogue Content, Configure Voice Interaction, and Add Call Control.
Want to see application scenarios? Try Voice Notification, Lead Mining, Feedback Collection, or Customer Support.
How to make outbound and inbound calls with an AI Agent? Refer to AI Agent Outbound or AI Agent Inbound.
Want to view data logs? Refer to Call Records, Call Recordings, Latency.
How to create and view post-call Tags? Refer to Post-Call Tags (Created via Dialogue Flow) or Post-Call Tags (Created via External LLM).
Bantuan dan Dukungan
Apakah halaman ini membantu?
Anda juga dapat Menghubungi Penjualan atau Mengirimkan Tiket untuk meminta bantuan.
masukan