제품 업데이트
Tencent Cloud 오디오/비디오 단말 SDK 재생 업그레이드 및 권한 부여 인증 추가
TRTC 월간 구독 패키지 출시 관련 안내
iOS | Android | Mac OS | Windows | Electron | Google Chrome Browser |
✓ | ✓ | ✓ | ✓ | ✓ | ✓ |
startScreenCapture provided by RoomEngine and pass in the input parameter appgroup.updateVideoQualityEx to modify the encoding parameters. The encoding parameters we recommend for iOS screen sharing are:Parameter Item | Parameter Name | Regular Recommended Value | Text Teaching Scenario |
Resolution | videoResolution | 1280 × 720 | 1920 × 1080 |
Frame Rate | fps | 10 FPS | 8 FPS |
Maximum Bit Rate | bitrate | 1600 kbps | 2000 kbps |
import RTCRoomEnginelet roomEngine = TUIRoomEngine.sharedInstance()roomEngine.startScreenCapture(appGroup: "")let params = TUIRoomVideoEncoderParams()params.fps = 10 //replace with the actual value you needparams.resolutionMode =.portrait //portrait resolutionparams.bitrate =.1600 //replace here with the actual value you needparams.videoResolution =.quality720P //replace here with the actual value you needroomEngine.updateVideoQualityEx(streamType: .screenStream, params: params)
TXLiteAVSDK_ReplayKitExt.framework, which is specially customized for the expansion module in the SDK compression package, in it.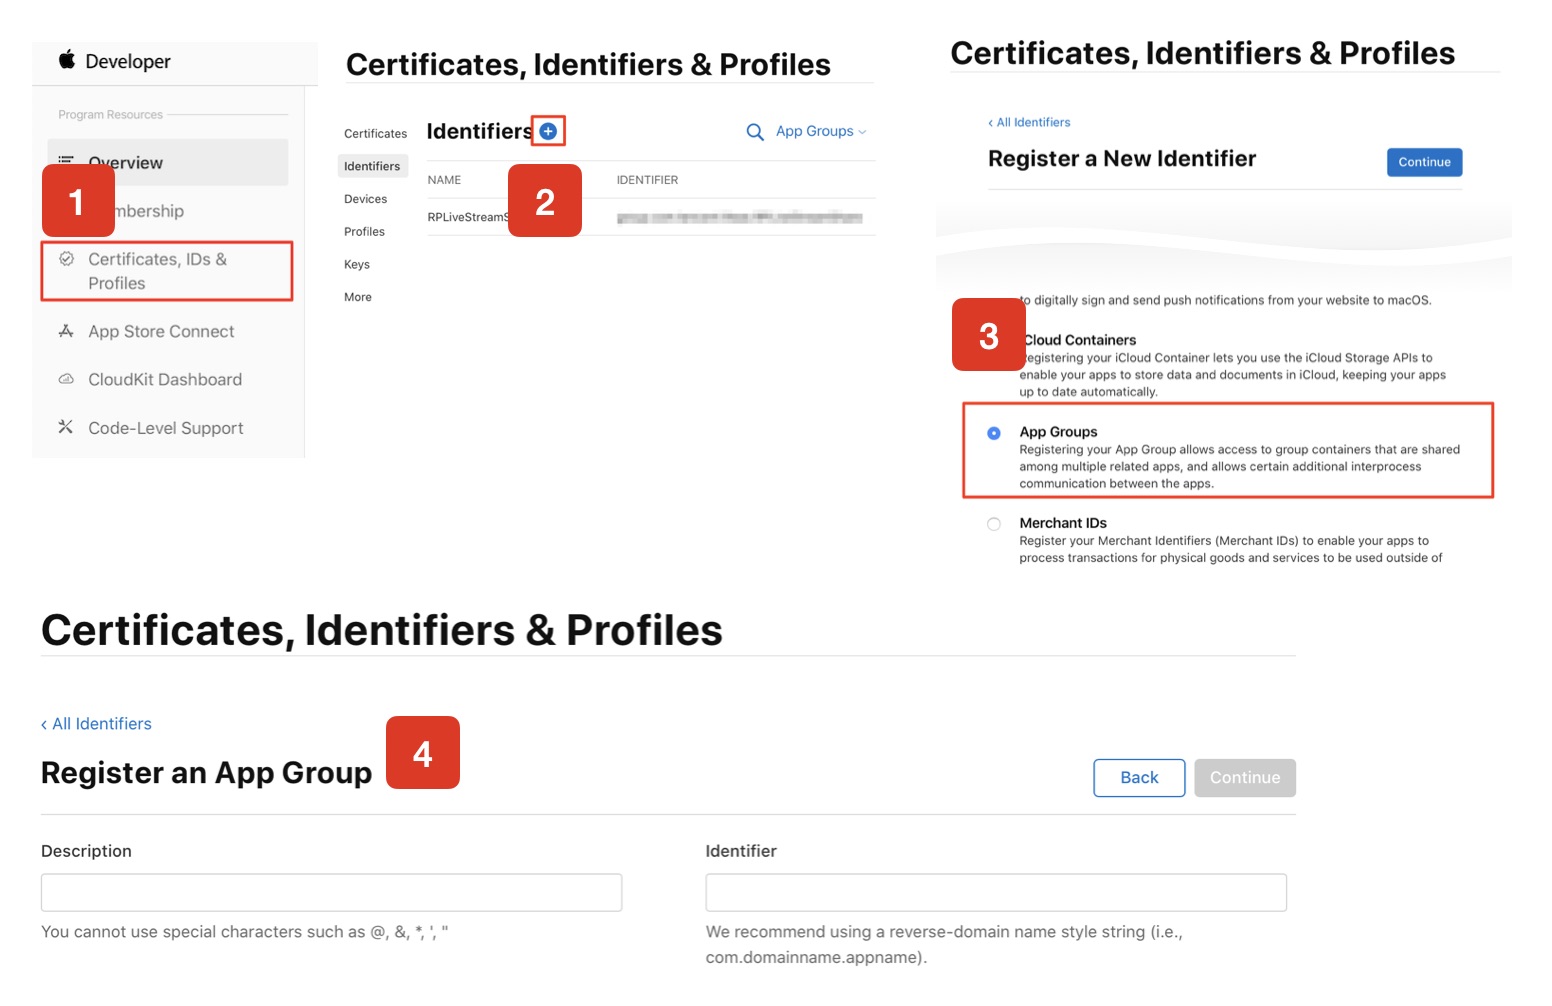
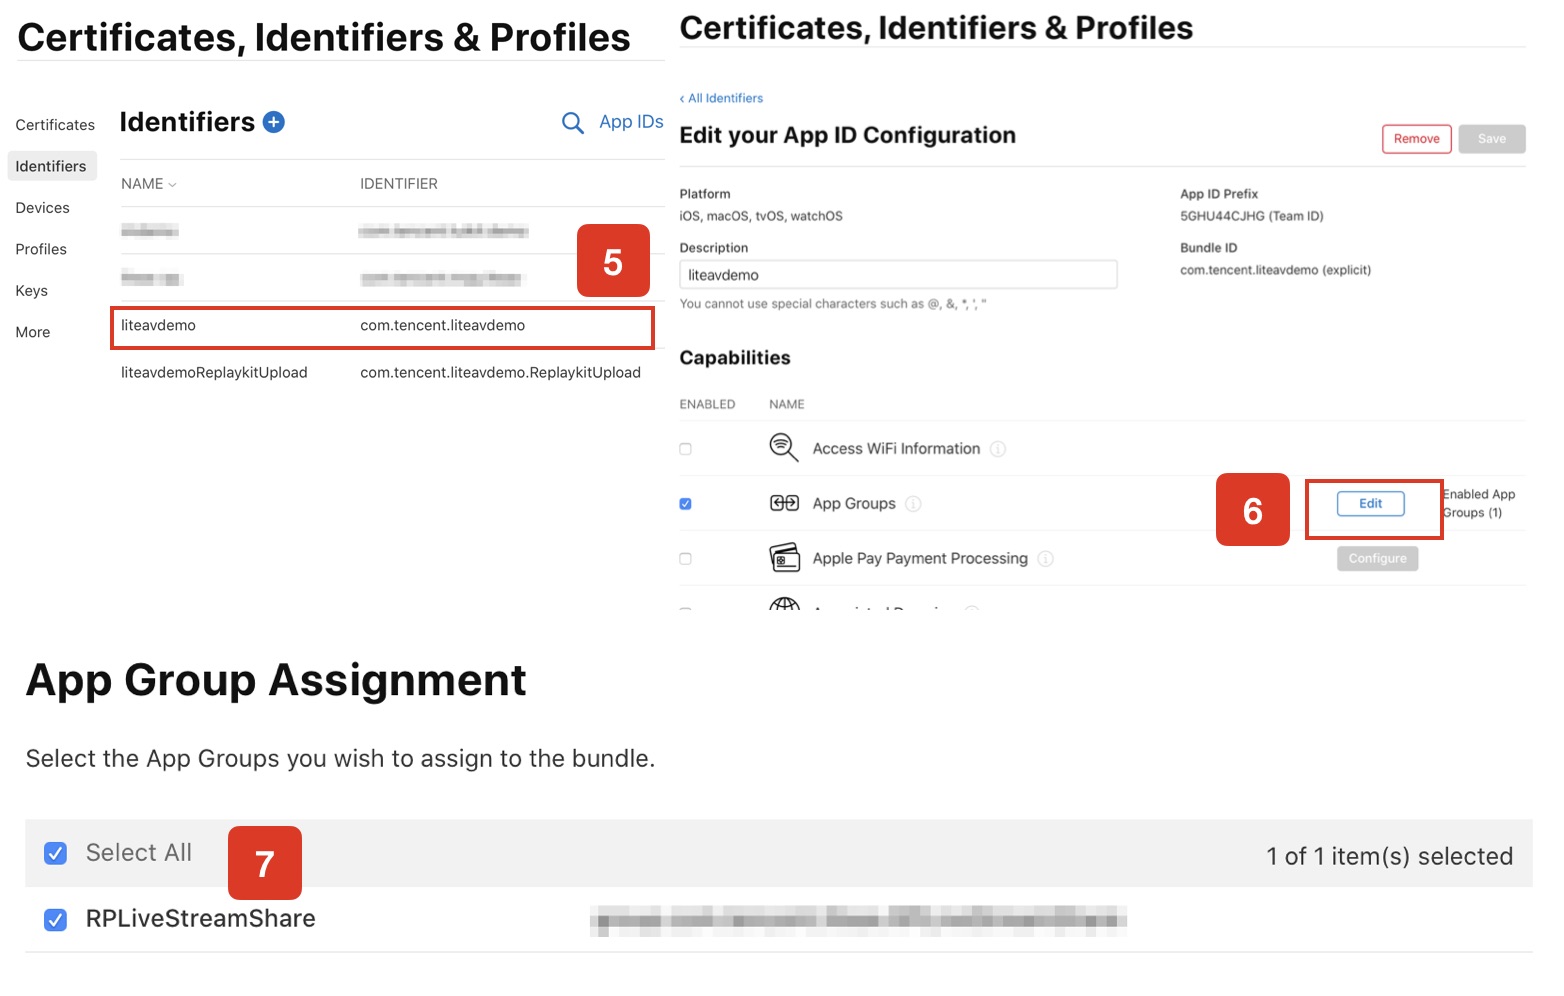
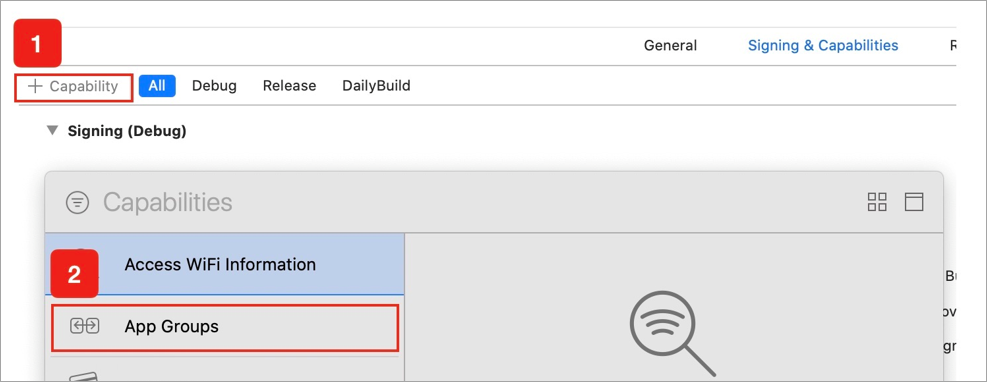
Target Name.entitlements will be generated in the file list. As shown in the figure below, select the file and click the + sign to fill in the App Group from the above steps.
import ReplayKitimport TXLiteAVSDK_ReplayKitExtlet APPGROUP = ""class SampleHandler: RPBroadcastSampleHandler, TXReplayKitExtDelegate {let recordScreenKey = Notification.Name.init("TRTCRecordScreenKey")override func broadcastStarted(withSetupInfo setupInfo: [String : NSObject]?) {if let setupInfo = setupInfo {}TXReplayKitExt.sharedInstance().setup(withAppGroup: APPGROUP, delegate: self)}override func broadcastPaused() {// Add logic for resource release or status save during suspension}override func broadcastResumed() {// Can add logic for reinitializing resources when recovering}override func broadcastFinished(){// User has requested to finish the broadcast.TXReplayKitExt.sharedInstance().broadcastFinished()}func broadcastFinished(_ broadcast: TXReplayKitExt, reason: TXReplayKitExtReason) {var tip = ""switch reason {case TXReplayKitExtReason.requestedByMain:tip = "Screen sharing has ended"breakcase TXReplayKitExtReason.disconnected:tip = "Application disconnected"breakcase TXReplayKitExtReason.versionMismatch:tip = "Integration error (SDK version mismatch)"breakdefault:break}let error = NSError(domain: NSStringFromClass(self.classForCoder), code: 0, userInfo: [NSLocalizedFailureReasonErrorKey:tip])finishBroadcastWithError(error)}override func processSampleBuffer(_ sampleBuffer: CMSampleBuffer, with sampleBufferType: RPSampleBufferType) {switch sampleBufferType {case RPSampleBufferType.video:TXReplayKitExt.sharedInstance().send(sampleBuffer, with: .video)breakcase RPSampleBufferType.audioApp:// You can process application audio herebreakcase RPSampleBufferType.audioMic:// You can process microphone audio herebreak@unknown default:let error = "Unknown sampling buffer type: \\(sampleBufferType)"finishBroadcastWithError(NSError(domain: error, code: -1, userInfo: nil))}}}
startScreenCapture method and input the AppGroup set in Step 1 to put the SDK in the "waiting" status.stopScreenCapture api, you can terminate screen sharing at any time.import RTCRoomEngineTUIRoomEngine.sharedInstance().startScreenCapture(appGroup: "")TUIRoomEngine.sharedInstance().stopScreenCapture()
launch function in TRTCBroadcastExtensionLauncher in the button's response function. You can then activate the screen-sharing feature.@objc private func buttonTapped() {TRTCBroadcastExtensionLauncher.sharedInstance.launch()}
import UIKitimport TXLiteAVSDK_ReplayKitExtclass TRTCBroadcastExtensionLauncher: NSObject {var systemBroacastExtensionPicker = RPSystemBroadcastPickerView()var prevLaunchEventTime : CFTimeInterval = 0static let sharedInstance = TRTCBroadcastExtensionLauncher()override init() {super.init()let picker = RPSystemBroadcastPickerView(frame: CGRect(x: 0, y: 0, width: 44, height: 44))picker.showsMicrophoneButton = falsepicker.autoresizingMask = [.flexibleTopMargin, .flexibleRightMargin]systemBroacastExtensionPicker = pickerif let pluginPath = Bundle.main.builtInPlugInsPath,let contents = try? FileManager.default.contentsOfDirectory(atPath: pluginPath) {for content in contents where content.hasSuffix(".appex") {guard let bundle = Bundle(path: URL(fileURLWithPath: pluginPath).appendingPathComponent(content).path),let identifier : String = (bundle.infoDictionary?["NSExtension"] as? [String:Any])? ["NSExtensionPointIdentifier"] as? Stringelse {continue}if identifier == "com.apple.broadcast-services-upload" {picker.preferredExtension = bundle.bundleIdentifierbreak}}}}static func launch() {TRTCBroadcastExtensionLauncher.sharedInstance.launch()}func launch() {// The pop-up on iOS 12 is slow and will crash if you click quickly.let now = CFAbsoluteTimeGetCurrent()if now - prevLaunchEventTime < 1.0 {return}prevLaunchEventTime = nowfor view in systemBroacastExtensionPicker.subviews {if let button = view as? UIButton {button.sendActions(for: .allTouchEvents)break}}}}
RPSystemBroadcastPickerView in iOS 12.0, which can pop up a launcher from the application for user confirmation to start screen sharing. So far, RPSystemBroadcastPickerView does not support customization of the interface, nor does it have an official triggering method.RPSystemBroadcastPickerView to find a UIButton and trigger its click event.import RTCRoomEnginelet roomEngine = TUIRoomEngine.sharedInstance()let layoutManager = roomEngine.getExtension(extensionType: .liveLayoutManager) as? TUILiveLayoutManagerlayoutManager.setLiveStreamLayoutInfo(roomID: roomInfo.roomId,layoutInfo: "" //see belowonSuccess: {//Modification succeeded},onError: {code ,message in})//Format requirements for layoutInfo:{"RoomId": "live_adams", //Replace with your Room ID// When layouttype is 1000, modify LayoutInfo while modifying VideoEncode. In 9-grid view mode, LayoutInfo will be automatically modified and updated based on resolution by default."VideoEncode": {"Width": 1080,"Height": 1920,},"LayoutMode": 0, // 0-9 built-in layout templates, 1000 custom layout, LayoutInfo can only be modified when it is 1000, 0 is nine-square grid"LayoutInfo":{"LayoutList": [{"LocationX": 0, // Specific values"LocationY": 0, // Specific values"ImageWidth": 1080, // Specific values"ImageHeight": 960, // Specific values"ZOrder": 0, // Level"StreamType": 0, // 0 for camera, 1 for screen sharing"Member_Account": "admin001", // Replace with your userId"BackgroundImageUrl": "ImageUrl","RoomId":"live_adams", //Replace with your RoomId"BackgroundColor":"0x1F212C"},{"LocationX": 0, // Specific values"LocationY": 960, // Specific values"ImageWidth": 1080, // Specific values"ImageHeight": 960, // Specific values"ZOrder": 0, // Level"StreamType": 0, // 0 for camera, 1 for screen sharing"Member_Account": "admin001", // Replace with your UserId"BackgroundImageUrl": "ImageUrl","RoomId":"live_adams", //Replace with your RoomId"BackgroundColor":"0x1F212C"}],"MaxUserLayout": {"LocationX": 0, // Specific values"LocationY": 0, // Specific values"ImageWidth": 1080, // Specific values"ImageHeight": 1920, // Specific values"ZOrder": 0, // Level"StreamType": 0, // 0 for camera, 1 for screen sharing"Member_Account": "admin001", // Replace with your userId"BackgroundImageUrl": "ImageUrl","RoomId":"live_adams", // Replace with your roomId"BackgroundColor":"0x1F212C"}}
stopScreenCapture API to close and call the setLiveStreamLayoutInfo API to recover the screen layout.import RTCRoomEnginelet roomEngine = TUIRoomEngine.sharedInstance()let layoutManager = roomEngine.getExtension(extensionType: .liveLayoutManager) as? TUILiveLayoutManagerlayoutManager.setLiveStreamLayoutInfo(roomID: roomInfo.roomId,layoutInfo: "",//see belowonSuccess: {},onError: { code ,message in})//When you want to restore the default grid layout, the layoutInfo parameter you need to input is as follows:{"RoomId": "live_12121", // Replace with the actual room number"VideoEncode": {"Width": 1080,"Height": 1920},"LayoutMode": 0}
onUserVideoStateChanged in TUIRoomObserver to perceive the screen share stream.startRemoteView API.import RTCRoomEngineextension ScreenSharedController: TUIRoomObserver { // Replace with your specific business class, here is just an examplefunc onUserVideoStateChanged(userId: String, streamType: TUIVideoStreamType, hasVideo: Bool, reason: TUIChangeReason) {}}
피드백