In BOT and Business Security, users can enable and configure the corresponding module content in BOT Management. They can then observe and analyze the data in conjunction with BOT traffic analysis and access logs. Based on the session state information provided by traffic analysis, users can set fine-grained policies to protect the website's core APIs and business from BOT attacks.
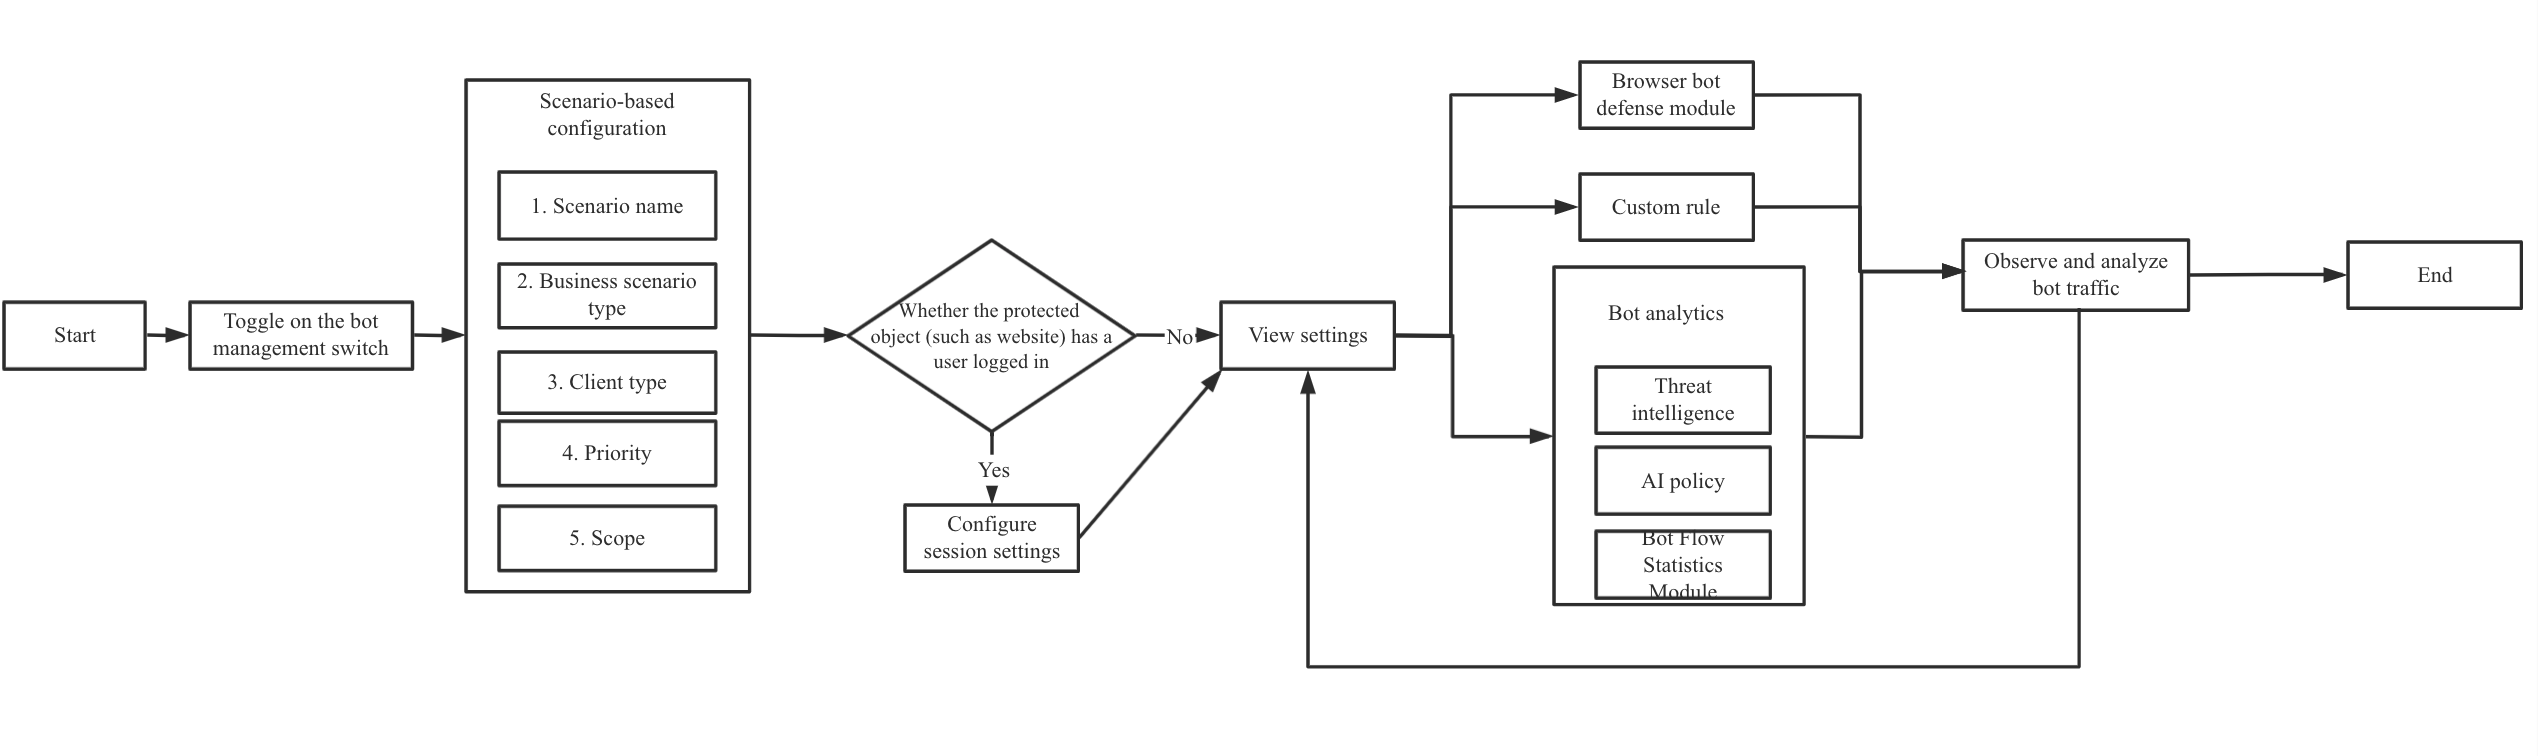
BOT Management settings support the configuration of BOT scenario types, client risk identification (frontend defense), threat intelligence, AI policies, intelligent statistics, action scores, custom rules, session management, and legitimate crawler modules. By configuring these modules, you can achieve refined BOT management. The BOT practice tutorial flowchart is shown below:
This feature is configured based on Tencent's years of expert experience in BOT governance. It addresses common BOT scenarios such as flash sales, price/content scraping, and logins. The configuration is performed across multiple dimensions, including client risk identification (frontend defense), threat intelligence, AI policies, intelligent analysis, action scores, session management, legitimate crawlers, and custom rules. This approach solves the problem of difficult customer configuration, making the feature simple, easy to use, and quick to get started with.
1. Log in to the WAF console, and then choose Configuration Center > BOT and Business Security in the left sidebar.
2. On the BOT and Business Security page, select the domain to protect in the top-left corner, and then click BOT Management.
3. On the BOT Management page, click New Scenario.
4. In the New Scenario dialog box, configure the relevant parameters and click Create Now.
Attention:
Selecting any one of the flash sale, login, or content scraping/copying scenarios is mutually exclusive with the custom scenario.
After you select a scenario, custom rules for protecting the corresponding business scenario will be automatically generated. The rules are in "Observe" mode by default, and you can switch them to "Block" mode after observing the matched traffic.
Parameter description:
Scenario Name: Enter a name for the scenario. The name cannot exceed 50 characters.
Business Scenario Type: Multiple selection is supported. You can select flash sale, login, content scraping/copying, or custom scenarios.
Client Type: The type of client that accesses the target to protect.
Priority: The execution priority of this scenario. Enter an integer from 1 to 100. A smaller value indicates a higher priority.
Effective Scope: The scope within which this scenario takes effect for the domain. Both global scope and custom scope are supported.
5. In the scenario management list, the created scenario card data will appear, and you can then configure it further.
Session Management
By configuring this feature to specify the location of the session Token, users can distinguish and identify the access behaviors of different users under the same IP address. This enables precise handling of users with abnormal access behaviors without affecting other users.
1. Log in to the WAF console, and then choose Configuration Center > BOT and Business Security in the left sidebar.
2. On the BOT and Business Security page, select the domain to protect in the top-left corner, and then click BOT Management.
3. On the BOT Management page, locate the session management module within the Global Settings, and then click Go to Configuration.
4. On the Session Management page, click Add policy, configure the relevant parameters, and then click OK.
Note:
The session identifier should be a persistent record tokenid, such as the value of set-cookies after login.
Field Name
Description
Session Identifier Location
Specify the parameter name in a specific location (QUERY, BODY, COOKIE, or HEADERS) as the session identifier, and use the value corresponding to that parameter name as the session ID.
Session Identifier Parameter
Value identifier. Use the . character to separate parameters at each level. Example:
test: Identifies the value of the test parameter in a JSON string as the session ID.
test1.test2: Identifies the value of the test2 parameter contained in test1 within a JSON string as the session ID.
Except for HEADERS, all other configurations are case-sensitive.
Advanced Settings
Click Advanced settings to configure. If not specifically set, the settings are applied to all scenarios by default with a priority of 1.
Application scenarios: It supports selecting All scenes or Some scenarios, and the rules take effect on the selected scenarios.
Priority: Enter an integer from 1 to 100. A smaller value indicates a higher priority, and the corresponding session identifier is matched first. If priorities are the same, the most recently updated one takes precedence.
The Client Risk Identification feature uses client-side dynamic security verification technology to generate a unique ID for each client making a business request. It detects potential robot and malicious crawler activities during client visits to Web or H5 pages, thereby protecting website business security.
Note
This feature does not support cloud-native WAF, wildcard domains, or App/mini programs. It applies only to Web or H5 pages. If non-dynamic authentication is used, automated API scripts must be added to the allowlist first.
Based on the design of the frontend defense feature, enabling it inserts JavaScript into responses, which may slightly increase the bandwidth between WAF and the origin server.
Adding Allowlist
Adding an allowlist is primarily used to allow traffic for APIs that do not require configuration.
1. Log in to the WAF console, and then choose Configuration Center > BOT and Business Security in the left sidebar.
2. On the BOT and Business Security page, select the domain to protect in the top-left corner, and then click BOT Management.
3. On the BOT Management page, locate the frontend defense module within the Global Settings, and then click Go to Configuration.
4. On the Browser Bot Defense page, click Add rule to open the Add Allowlist Rule window.
5. In the Add Allowlist Rule window, configure the relevant parameters and click OK.
Case 1: Automated Script Requests from a Large Number of Machines
When there are a large number of automated script requests to the service, access requests from tools such as CURL, SOAPUI, JMETER, and POSTMAN are blocked.
1. Log in to the WAF console, and then choose Configuration Center > BOT and Business Security in the left sidebar.
2. On the BOT and Business Security page, select the domain to protect in the top-left corner, and then click BOT Management.
3. On the BOT Management page, locate the frontend defense module within the Global Settings, and then click Go to Configuration.
4. Click the
identified by the automated tool to confirm the allowlist.
5. In Scenario Management, select the target scenario, and then click View Configuration on the right.
6. On the scenario details page, click the
of the frontend defense module in this scenario, select Block as the protection mode, and enable the frontend defense feature.
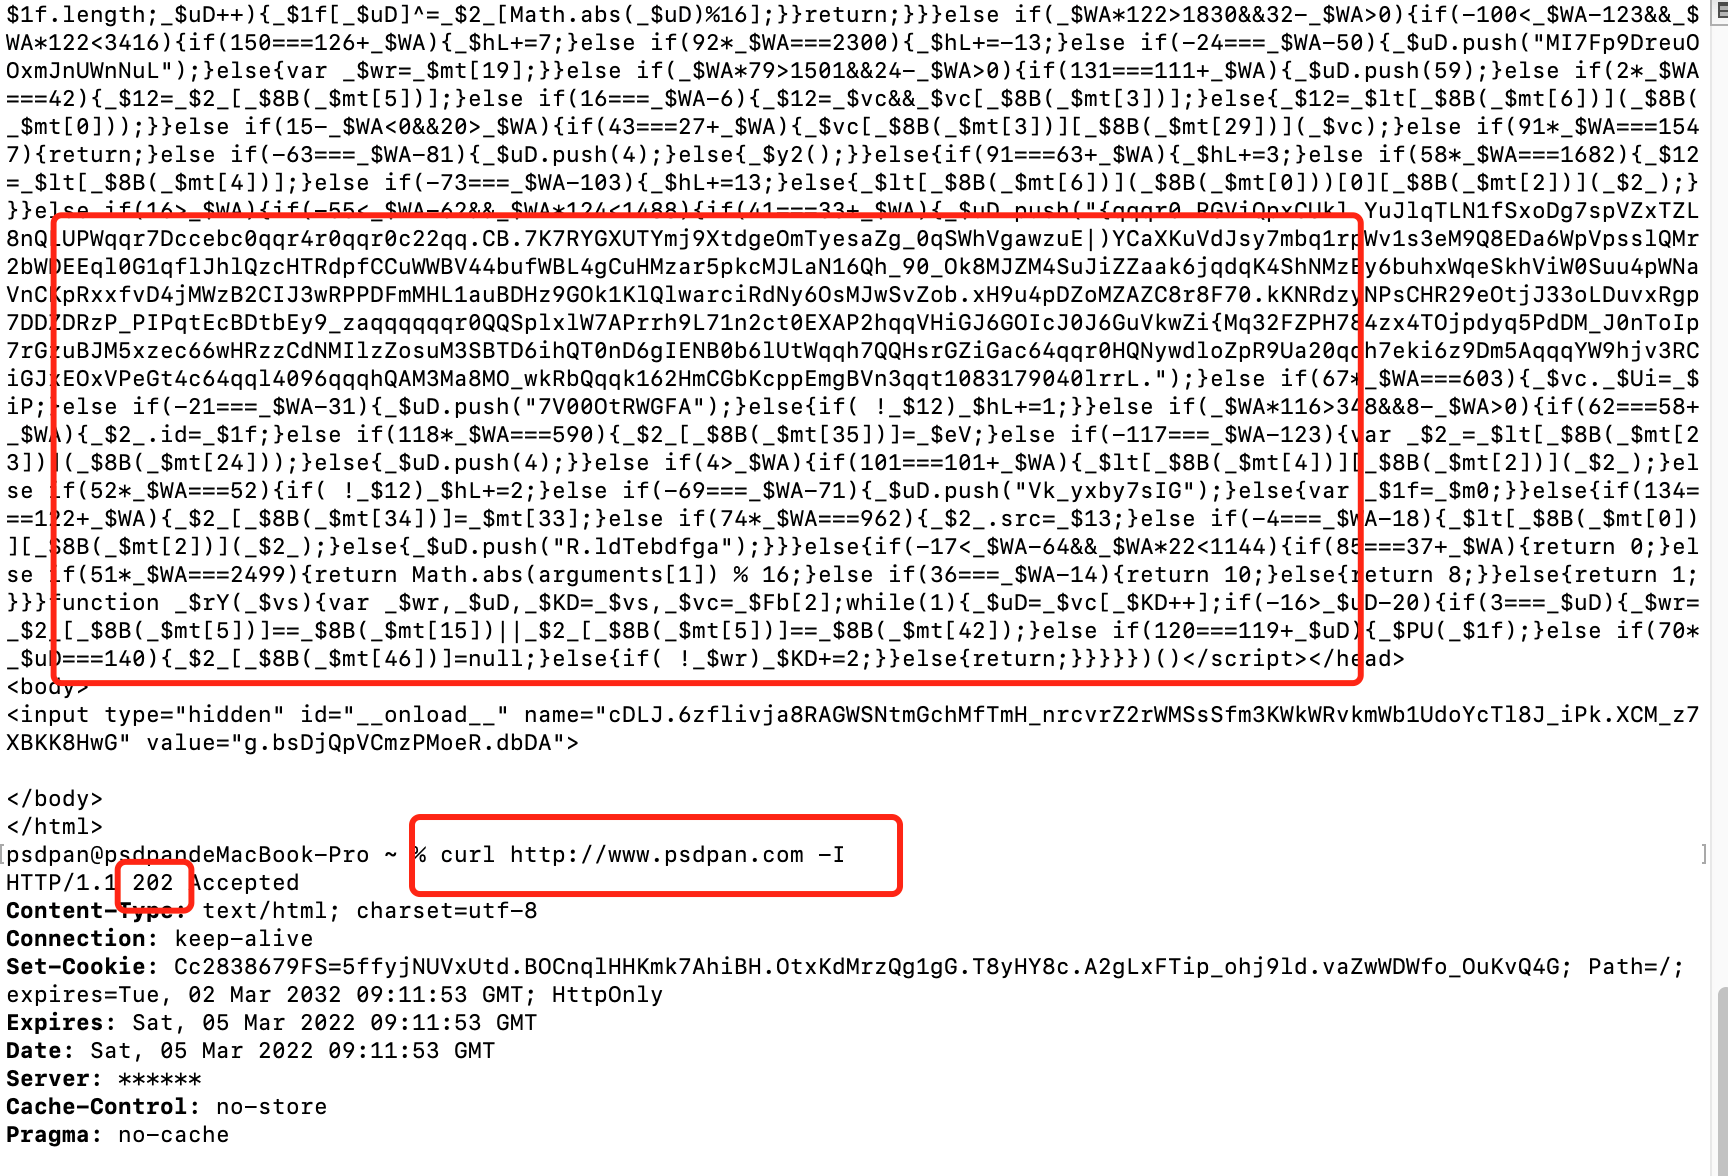
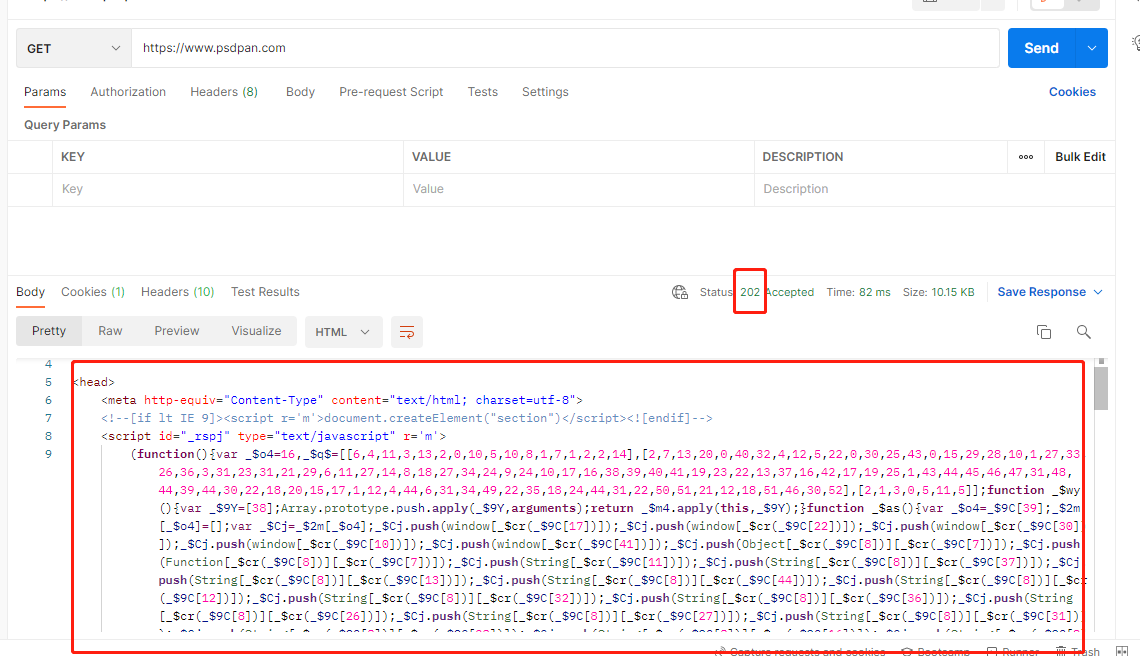
7. The request results using CURL, SELENIUM, and POSTMAN are shown below:
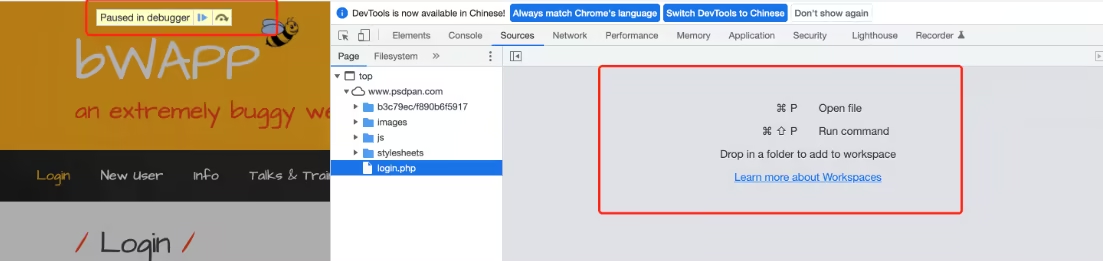
Case 2: Disabling Web Page Debugging
Disable web debugging for users to prevent the development of targeted crawlers.
1. Log in to the WAF console, and then choose Configuration Center > BOT and Business Security in the left sidebar.
2. On the BOT and Business Security page, select the domain to protect in the top-left corner, and then click BOT Management.
3. On the BOT Management page, locate the frontend defense module within the Global Settings, and then click Go to Configuration.
4. Click the
for page debug prevention to confirm the allowlist.
5. In Scenario Management, select the target scenario, and then click View Configuration on the right.
6. On the scenario details page, click the
of the frontend defense module in this scenario, select Block as the protection mode, and enable the frontend defense feature.
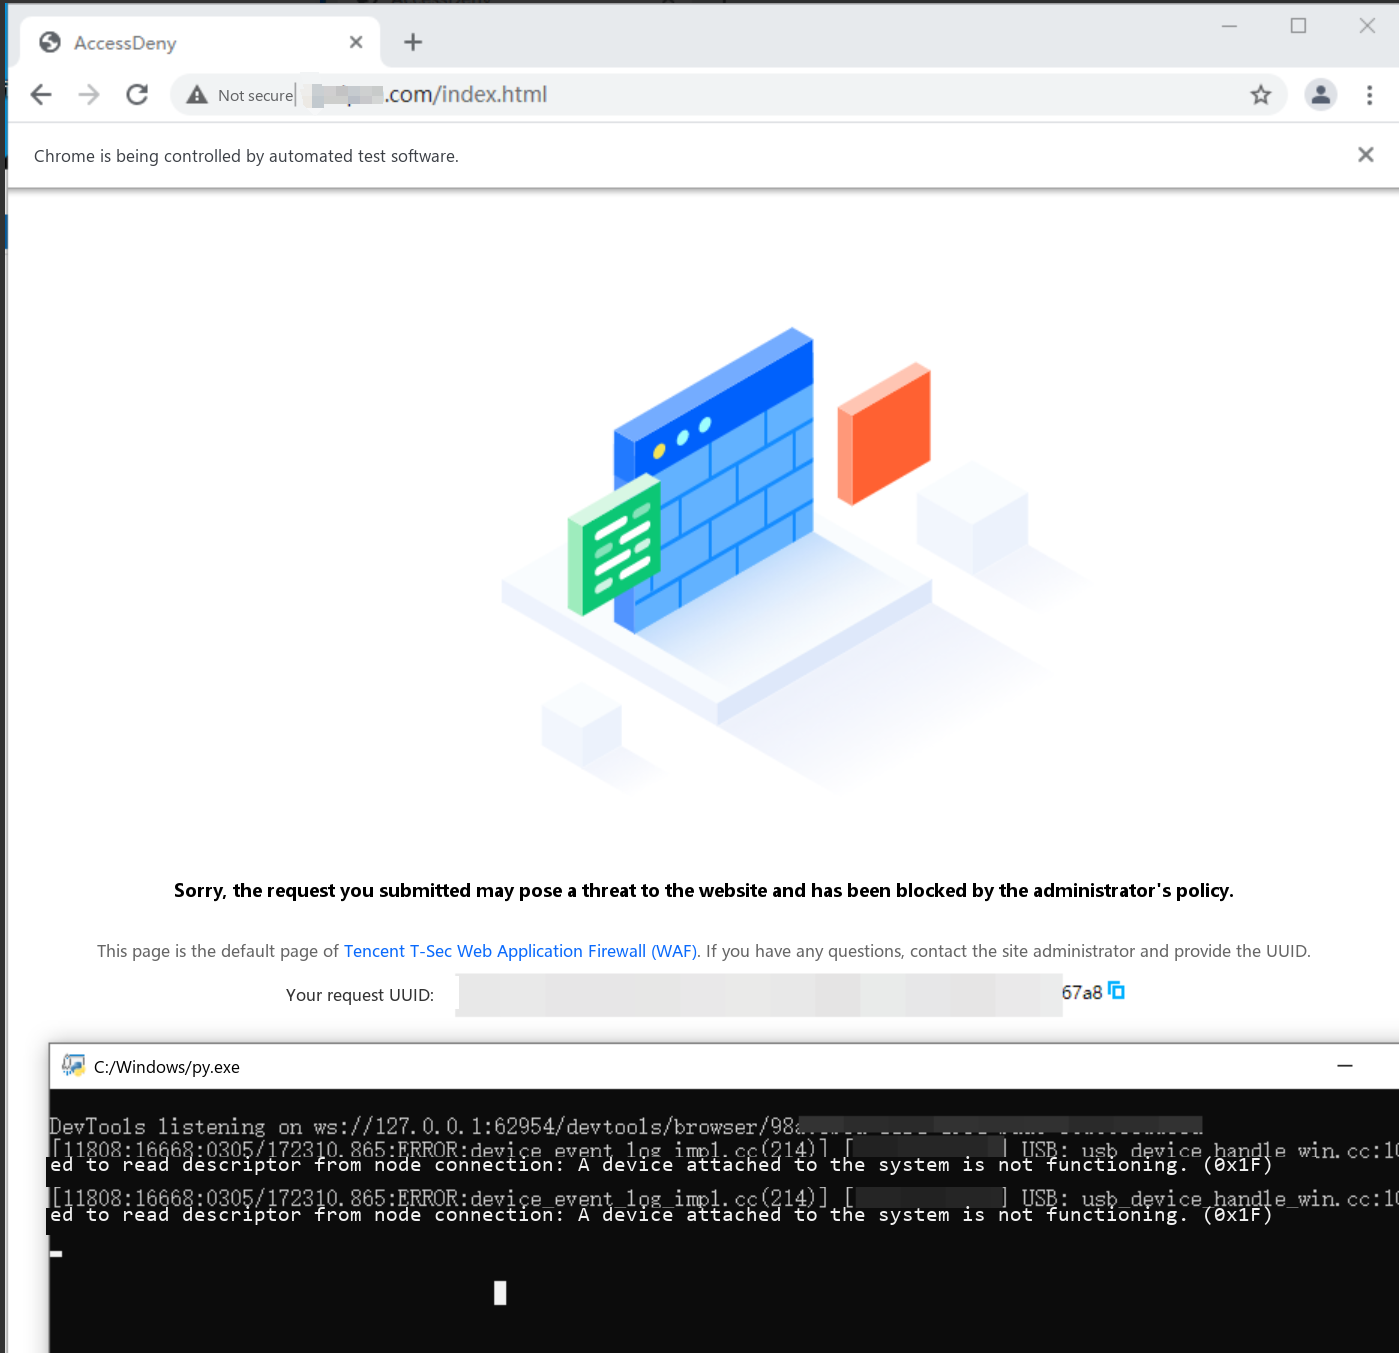
7. The request result using Chrome is shown below:
Threat Intelligence
The Threat Intelligence feature leverages Tencent's nearly two decades of cybersecurity experience and big data intelligence. It works by assessing IP address status in real time, employing a scoring mechanism, and quantifying risk values to accurately identify access from malicious dynamic IP addresses and IDCs. Simultaneously, it intelligently identifies malicious crawler characteristics to address risky access originating from malicious crawlers, distributed crawlers, proxies, credential stuffing, and fraudulent activities.
Note
Before enabling the Threat Intelligence feature, confirm whether the business has user access from the IDC side. If IDC traffic is confirmed, disable the IDC network identification switch in Threat Intelligence first, and then enable the Threat Intelligence feature.
1. Log in to the WAF console, and then choose Configuration Center > BOT and Business Security in the left sidebar.
2. On the BOT and Business Security page, select the domain to protect in the top-left corner, and then click BOT Management.
3. On the BOT Management page, locate the intelligent analysis module within the Global Settings, and then click Go to Configuration.
4. On the Threat Intelligence page, if there is IDC traffic, click One-Click Disable for the IDC network to disable the feature.
5. If there is no IDC traffic, select the target scenario in Scenario Management, and then click View Configuration on the right.
6. On the scenario details page, click Intelligent Statistics, and then click the
of the Threat Intelligence module in this scenario to directly enable the Threat Intelligence feature.
AI Policies
The AI policy feature leverages AI technologies and Tencent's risk control practices to transform risk control features and anti-fraud experience into an AI policy model. It performs big data analysis and AI modeling on access traffic to rapidly identify malicious visitors and deeply hidden malicious visitors, addressing risky access behaviors from Advanced Persistent Threat BOTs and covert threat BOTs.
Note
The AI policy is automatically learned based on AI modeling and can be directly enabled. If there is a false evaluation, add the corresponding URL to the allowlist.
Enabling AI Policies
1. Log in to the WAF console, and then choose Configuration Center > BOT and Business Security in the left sidebar.
2. On the BOT and Business Security page, select the domain to protect in the top-left corner, and then click BOT Management.
3. In Scenario Management, select the target scenario, and then click View Configuration on the right.
4.Toggle the AI policy switch to enable the AI policy.
Adding Allowlist
Background Information
On the AI Policy page, this request is a normal request, but it is falsely reported by AI.
Operation Step
1. Log in to the WAF console, and then choose Configuration Center > BOT and Business Security in the left sidebar.
2. On the BOT and Business Security page, select the domain to protect in the top-left corner, and then click BOT Management.
3. On the BOT Management page, locate the intelligent analysis module within the Global Settings, and then click Go to Configuration.
4. Go to the AI Policy page, click Add Allowlist, enter the name, description, and URL to be added to the allowlist, and then click OK.
Intelligent Statistics
The Intelligent Statistics feature works by performing big data analysis and statistics. It automatically classifies traffic based on user group characteristics, identifies malicious traffic with anomalies, and adjusts the malicious traffic threshold through big data analysis. This addresses risky access from regular BOTs and high-frequency BOTs. Furthermore, by automatically adjusting the statistical model, it resolves most BOT behavior bypass issues.
Note
You can directly enable Intelligent Statistics, and the Intelligent mode is recommended.
1. Log in to the WAF console, and then choose Configuration Center > BOT and Business Security in the left sidebar.
2. On the BOT and Business Security page, select the domain to protect in the top-left corner, and then click BOT Management.
3. On the BOT Management page, locate the intelligent analysis module within the Global Settings, and then click Go to Configuration.
4.Go to the Intelligent Statistics page to adjust the Intelligent Statistics configuration.
Action Policies
The Action Setting feature performs comprehensive scoring on website access requests through threat intelligence, AI policies, and intelligent statistics. The score ranges from 0 to 100, where a higher score indicates a higher probability of BOT activity and greater harm/pressure on the website. By intelligently identifying the risk level of access behaviors based on scores, users can configure different action policies, their corresponding effective scopes, and actions for different score segments to achieve precise interception of risky access.
Background Information
When threat intelligence, AI policies, and intelligent statistics flag a large volume of traffic, the default configuration cannot achieve more granular interception. In this case, you need to customize actions and analyze how to configure them.
Operation Step
1. Log in to the WAF console, and then choose BOT Traffic Analysis in the left sidebar.
2. On the BOT Traffic Analysis page, select the domain to protect in the upper-left corner, select the desired access source, and then click View Details.
3. In the Basic Session Information module on the BOT Traffic Details page, view the city and IP region.
4. When your business has no traffic from a specific region, it indicates that the score for that region is abnormal. In this case, you can customize the action settings to implement more granular configurations.
5. On the BOT and Business Security page, select the domain to protect in the top-left corner, and then click BOT Management.
6. In Scenario Management, select the target scenario, and then click View Configuration on the right.
7. On the scenario details page, click Add Action Policy in the action policy module of this scenario.
8. On the action policy page, configure the relevant parameters, and then click Publish Now.
Parameter description:
Policy Name: Enter a name for the action policy.
Status: Whether the current action policy is enabled.
Scope: The effective scope of the current action policy.
Priority: The execution priority of the current action policy. Enter an integer from 1 to 100. A smaller value indicates a higher execution priority for this policy.
Mode Settings: Four default handling modes are provided: Lenient, Moderate, Strict, and Custom. The Lenient, Moderate, and Strict modes are preset modes, each representing the recommended classification and handling policy for BOTs of different threat levels in BOT traffic management. These three preset modes can be modified, and after modification, they become the Custom mode.
Score Segment Settings: The total score range for segments is 0 to 100 points. Up to 10 entries can be added for each score segment. Configured score intervals follow a left-closed, right-open rule. Score segments must not overlap. Score intervals can be set to empty. When set to empty, no handling action is taken for that score segment.
Action Setting: The action can be set to Trust, Monitor, Redirect (redirect to a specific website URL), Human-Machine Identification (Captcha), or Block.
Tag Setting: It can be set to Friendly BOT, Malicious BOT, Normal Traffic, or Suspected BOT.
Friendly BOT: Identified as a BOT that is friendly/legitimate to the website.
Suspected BOT: The traffic from this access source is identified as suspected BOT, but whether it is harmful to the website cannot be determined.
Normal Traffic: Identified as normal traffic generated by human access.
Malicious BOT: Identified as a BOT that generates malicious traffic/unfriendly access requests to the website.
God Bots
By configuring legitimate crawlers (such as search engines and subscription bots) to properly obtain website data, the website can be indexed normally.
1. Log in to the WAF console, and then choose Configuration Center > BOT and Business Security in the left sidebar.
2. On the BOT and Business Security page, select the domain to protect in the top-left corner, and then click BOT Management.
3. On the BOT Management page, locate the legitimate crawler module within the Global Settings, and then click Go to Configuration.
4. On the Legitimate Crawler page, click
to enable the corresponding feature.
Custom rule
By configuring the custom rule feature, you can precisely handle crawlers that match the behavior configuration and accurately process access requests with corresponding characteristics.
Note:
Currently, when a BOT scenario is created, a custom rule set for the corresponding scenario has been pre-configured based on the scenario type.
This content is for reference only and should not be used as a standard business configuration. Web crawlers are classified into many types and vary by business type.
Case Details
Currently, interception based on action scores cannot meet the demand for more refined countermeasures. You need to configure abnormal behavior characteristics. After identifying general anomalies in BOT traffic analysis, click Details to view abnormal data metrics and compare them in conjunction with actual business conditions.
For example, if the URL repetition rate is 1, the number of sessions is 100/minute, or UA abuse is detected, you need to check in conjunction with your business whether there are identical requests or proxy services. If not, it indicates a malicious attack. In that case, you can view and configure interception policies by using the following methods.
Case Analysis
1. Log in to the WAF console, and then choose BOT Traffic Analysis in the left sidebar.
2. On the BOT Traffic Analysis page, select the domain to protect in the upper-left corner and the desired access source. The display shows that this IP address has a high request rate, a single URL, and belongs to the IDC type.
3. Click View Details. The basic session information shows the average session rate and the total number of sessions. You can also configure settings directly based on these conditions.
4. On the Threat Intelligence page, you can determine whether this IP address has been used by legitimate users based on the intelligence data.
5. On the Request Characteristics page, you can view request details.
Policy Syntax
1. Log in to the WAF console, and then choose Configuration Center > BOT and Business Security in the left sidebar.
2. On the BOT and Business Security page, select the domain to protect in the top-left corner, and then click BOT Management.
3. In Scenario Management, select the target scenario, and then click View Configuration on the right.
4. On the scenario details page, click Add Rule in the custom rule module.
5. In the Add Custom Rule window, set the URL repetition rate to greater than 70% (only this metric exceeded 70% during the process) and the session rate to greater than 500 sessions/minute based on the above analysis, and then click OK.
Captcha Parsing
When the client type is App, mini program, client, or cross-origin call, the Captcha sent by WAF cannot be parsed and recognized. As a result, when BOT traffic management sends a human-machine recognition action, the human-machine recognition Captcha cannot be parsed and displayed properly. Users cannot complete the human-machine recognition interaction. After multiple Captcha triggers, access requests from legitimate users are blocked, causing service disruption.
Therefore, when configuring the handling action as human-machine recognition, you need to make targeted modifications to the frontend/client application so that it can adapt to the relevant Captcha. For the modification guide, see Integrating WAF Captcha for Frontend-Backend Separated Sites.