For details about the features and principles of the native node dedicated scheduler, see Product Introduction.
General Issues
What Does It Mean That the Scheduler Only Applies to Native Nodes?
Native nodes are enhanced nodes released by TKE for cloud-native scenarios, with extensive special optimizations for container scenarios. The scheduler features depend on the unique characteristics of native nodes and therefore take effect only on native nodes. Even if ordinary nodes are selected, the scheduler parameter configuration CRD cannot take effect.
What Is the CRD for Scheduler Parameter Configuration?
In addition to console operations, the parameter configuration of the native node dedicated scheduler also supports YAML configuration. Each configuration file is stored in a resource object named clusternoderesourcepolicies, which you can directly create or modify.
What Are the Precautions for Using CRDs?
Customizing node scaling factors and waterline levels is highly flexible. You can select a single node or node pool, a batch of nodes or node pools, or even the entire cluster to configure the same node specification scaling factors and waterline levels. You can create multiple configuration files and apply them to different nodes. If a node is declared by multiple configuration files with different parameters, an exception will occur.
What Are the Effects of Having Both Regular Nodes and Native Nodes in a Cluster?
It does not affect normal scheduling behavior.
What Are the Effects of Configuring Scheduling Parameters on Only Some Native Nodes in a Cluster?
If scheduler parameters are configured on certain native nodes, these native nodes will be scheduled according to the configured scheduling parameters. Other native nodes without scheduler parameters configured and ordinary nodes will be scheduled according to normal scheduling rules.
How Is CPU Utilization Calculated in the Scheduler?
1. Obtain the current CPU time (user, nice, system, idle, iowait, irq, softirq, steal, guest, guest_nice) and the previously obtained CPU time.
2. Calculate the total CPU time (total = user + nice + system + idle + iowait + irq + softirq + steal + guest + guest_nice).
3. Calculate the total increase in CPU time since the last check (delta_total = total - last_total).
4. Calculate the increase in CPU idle time since the last check (delta_idle = idle - last_idle).
5. Calculate the CPU utilization (cpu_percent = 100.0 * (1.0 - delta_idle / delta_total)).
Where, last_total and last_idle are the CPU time and CPU idle time from the previous check.
How to Configure Scheduler Parameters in Batches?
Each configuration file is stored in a resource object named clusternoderesourcepolicies, which you can directly create or modify.
What Are the Consequences If Two Scheduler Configuration CRDs Apply to the Same Native Node?
The relationship between CRDs and nodes is similar to that of other resource objects, such as between Deployments and Pods, and between HPAs and Pods, all of which are controlled through label selectors. If a native node is acted upon by two CRDs simultaneously, these two CRDs will continuously overwrite and modify the same native node.
What Are the Risks If the Scheduler Encounters OOM?
A scheduler OOM triggers the kubelet restart logic, causing a restart on the node. During the restart, scheduling or eviction operations may be briefly affected. After the restart is complete, the scheduler feature will work normally.
What Do Eviction Line, Scheduling Line, Runtime Watermark, and Low-Load Node Mean?
Scheduling line: the watermark for scheduling, corresponding to targetLoadThreshold in the CRD, which is the watermark that Pods reference during scheduling.
Eviction line: the watermark at runtime, corresponding to evictLoadThreshold in the CRD. When the node utilization reaches this watermark, an eviction is triggered.
Low-load node: During eviction, to ensure the success rate, the scheduler requires at least three nodes to meet the low-load utilization by default. A node is considered low-load if its utilization is lower than targetLoadThreshold.
If you are using Crane Scheduler 1.1.10 and have configured an eviction stop watermark, the utilization of at least three native nodes must be lower than the eviction stop watermark.
Eviction stop watermark: When an eviction occurs, the eviction stops after the node utilization reaches a certain level. The default value is targetLoadThreshold.
If you are using Crane Scheduler 1.1.10, the value is evictTargetLoadThreshold. If you have not set this parameter, it defaults to targetLoadThreshold.
Why Are There Limits on Node Amplification Parameters?
The maximum limit for the node CPU scaling factor in the console is 3, and the maximum limit for the memory scaling factor is 2. This is to prevent node instability caused by setting an excessively large scaling factor. A larger scaling factor causes the node to schedule more Pods, increasing resource contention among Pods and thereby increasing the risk of node instability.
How to Set a Larger Amplification Factor?
You can perform configuration through CRDs. Each configuration file is stored in a resource object named clusternoderesourcepolicies, which you can directly create or modify.
Scheduling Level Threshold
What Happens When the Scheduling Level Threshold Is Configured?
For example, the scheduling level threshold of a native node is configured as CPU: 30% and memory: 80%.
Effect: When a Pod needs to be scheduled, if the CPU utilization of this native node is greater than 30%, or the memory utilization is greater than 80%, this native node is not a target node for scheduling.
How Is Utilization Calculated?
5-minute average CPU utilization: If the node's average CPU utilization over the past 5 minutes exceeds the configured threshold, Pods will not be scheduled to this node.
1-hour maximum CPU utilization: If the node's maximum CPU utilization over the past 1 hour exceeds the configured threshold, Pods will not be scheduled to this node.
5-minute average memory utilization: If the node's average memory utilization over the past 5 minutes exceeds the configured threshold, Pods will not be scheduled to this node.
1-hour maximum memory utilization: If the node's maximum memory utilization over the past 1 hour exceeds the configured threshold, Pods will not be scheduled to this node.
Taking the previous question as an example, both CPU utilization thresholds are 30%, and both memory utilization thresholds are 80%.
Does the Scheduler Only Take Effect in the Predicate Phase?
No, the scheduler operates in both the filtering stage and the scoring stage. In the filtering stage, native nodes are filtered, and in the scoring stage, the filtered nodes are scored and ranked.
If the Scheduling Level Threshold Is Not Configured, Will the Predicate Node Score Be 0?
No, the default Kubernetes scheduler supports a rich set of scheduler plugins. The native node dedicated scheduler only extends the scheduler's capabilities and does not override the filtering and scoring policies of the default scheduler.
What Is the Relationship Between the Kubernetes Default Scheduler and the Native Node Dedicated Scheduler?
They have an intersection relationship. The native node dedicated scheduler extends some scheduling capabilities but does not override the default scheduler. Both participate in filtering and scoring together.
How to View Scheduler Logs?
You can view the logs of the Deployment crane-scheduler in the kube-system namespace.
Why Does Cluster Node Load Imbalance Still Exist When the Native Node Scheduler Is Used?
The native node scheduler helps the cluster achieve load balancing through scheduling-time and runtime water levels.
The scheduling-time watermark enables Pods to consider the actual node load during scheduling. Nodes with high load are not scheduled, and only low-load nodes are selected, resulting in more balanced node loads.
The runtime watermark enables nodes to trigger eviction actions under high load, making the load of each node in the cluster more balanced.
Logically, both watermarks help make your cluster relatively more balanced. However, overall cluster load balancing is a systematic feature, for example:
Business fluctuation: The load may be balanced at scheduling time, but after the system has been running for a period, the business traffic itself fluctuates with peaks and troughs, resulting in low utilization on some nodes. In addition, no rescheduling action is triggered for nodes with high utilization.
Node issues: The node experiences state changes such as going offline, eviction, or restart, which causes Pods to be evicted and rescheduled, and the node utilization also changes.
Runtime Level Threshold
What Happens When the Runtime Level Threshold Is Configured?
For example, the runtime watermark of a native node is configured as CPU: 50% and memory: 90%.
Effect: When a Pod needs to be scheduled, if the CPU utilization of this native node is greater than 50%, or the memory utilization is greater than 90%, the native node starts eviction and evicts specific Pods on the node.
What Are the Requirements for Eviction?
The node utilization has reached the runtime watermark.
If there are Pods that can be evicted, you need to add the annotation: descheduler.alpha.kubernetes.io/evictable: 'true'.
There is space to accommodate Pods: Following community requirements, the utilization of at least three native nodes must be lower than the scheduling level threshold.
If you are using Crane Scheduler 1.1.10 and have configured an eviction stop watermark, the utilization of at least three native nodes must be lower than the eviction stop watermark.
Why Are No Pods Evicted When the Runtime Level Threshold Is Reached?
There may be multiple causes. In addition to the issues mentioned above, if you are not viewing the monitoring data through TCOP, the discrepancy may be related to differences in the monitoring system.
Why Is Eviction Delayed?
Eviction delays may exist in multiple steps:
Currently, eviction follows the community logic. The minimum monitoring sampling point is the average utilization over the last 5 minutes, updated every 5 minutes.
The scheduler itself has a check interval and an action execution time.
Is the Eviction Annotation Applied to the Workload or the Pod?
Both are acceptable. We recommend adding it to the Workload metadata, as this action does not trigger Pod recreation, and all Pods under the Workload can be evicted. If you add it to a Pod or the Pod template of a Workload, Pod recreation is triggered. We recommend testing in a test environment.
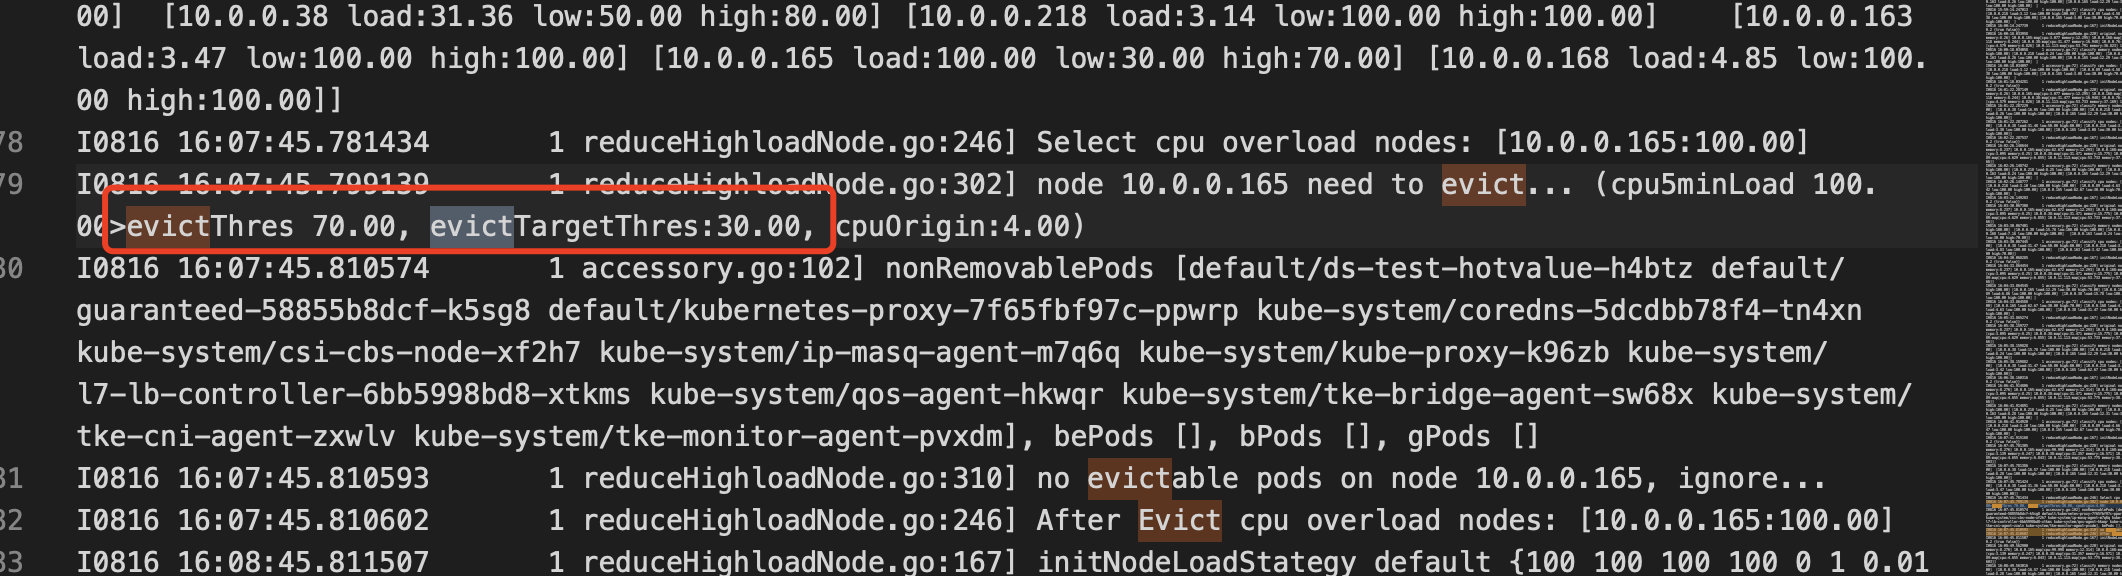
How to View Scheduler Eviction Logs?
You can view the logs of the Deployment crane-descheduler in the kube-system namespace, for example, an eviction log entry, as shown in the following figure:
What Is the Relationship Between PDB and Eviction?
PDB takes precedence over eviction. PDB ensures the minimum Pod availability, and Pods can be scheduled to different nodes. When each node performs eviction, it considers the minimum available number of workloads and can interrupt the eviction operation to prevent business impact.
Why Do Monitoring Metrics Drop Significantly After Eviction?
There are two reasons for this:
1. Due to resource sharing among running Pods, the monitoring values after eviction are larger than the actual situation.
2. The Pod utilization calculation standard during eviction is based on the eviction moment. Therefore, when the actual load of the node has decreased, the monitoring system may show multiple evictions.
What Is the Priority Order for Pod Eviction?
Priority: Priority > podQOS > podload load
The podload metric reads the CPU/Memory usage of Pods from metricClient. Higher usage indicates higher priority.
How Does Pod Eviction Work?
When eviction conditions are met, if podLoad/node.Status.Capacity[res]*100 > the eviction threshold, the Pod will not be evicted. Otherwise, the eviction operation starts.
Note:
The resource usage of a Pod on a node is considered. If the usage of this Pod directly exceeds the eviction threshold, the Pod will not be evicted.
If the eviction succeeds, all resource usage of the Pod is subtracted from nodeload, and the resource usage of the Pod is subtracted from the resource load of the last 5 minutes.
Determine whether the resource load in the last 5 minutes is less than or equal to the target value. If so, skip the eviction of other Pods on the node.
If the Pods on the node have been evicted, update the eviction time on the node: node.Annot[node.kubernetes.io/last-evicted-time] = time.Now()