Kerberos is a unified authentication service widely used in the big data ecosystem. GooseFS, as an accelerated storage service for big data and data lake scenarios, supports cluster nodes and user access to integrate with the Kerberos authentication service. This document will provide a detailed introduction on how to configure GooseFS to integrate with the Kerberos authentication service and how to use Hadoop Delegation Token authentication.
Integrating GooseFS with Kerberos Authentication Architecture
GooseFS Kerberos Authentication Advantage
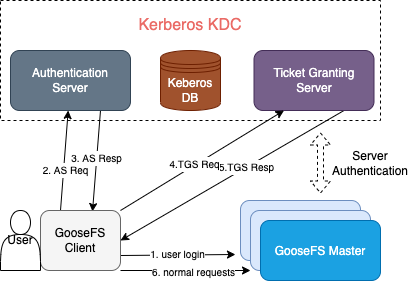
The authentication architecture and process for integrating with HDFS using Kerberos are generally the same. Applications that have enabled the Kerberos authentication process on HDFS can be easily migrated to GooseFS.
Supports the Delegation Token authentication mechanism for Hadoop, therefore it is highly compatible with Hadoop ecosystem application jobs.
Configuring GooseFS to Integrate with Kerberos Authentication
Prerequisites
GooseFS 1.3.0 and above versions;
Environment for JDK 1.8; JDK 11 and above are temporarily incompatible;
Ensure that the Kerberos KDC service already exists in the environment, and GooseFS as well as application clients can access the Kerberos KDC service-related ports normally.
Creating GooseFS-Related Identity Information in Kerberos KDC
First, we need to create Kerberos identity information related to the GooseFS cluster Server and Client in the Kerberos KDC before proceeding with subsequent access configuration. Here, we use the kadmin.local interactive tool on the Kerberos KDC server to complete the creation:
Note:
The kadmin.local tool requires root/sudo privileges to execute.
$ sudo kadmin.local
If executed successfully, you will enter the interactive shell environment of kadmin:
Authenticating as principal root/admin@GOOSEFS.COM with password.
kadmin.local:
Among them, kadmin.local refers to the command prompt of this interactive execution environment.
Create Identity Information Related to GooseFS Server/Client
The following introduces the entire Kerberos configuration process through a simple test cluster and application scenario example.
1. Cluster environment description
1. Adopt a Standalone deployment architecture with a single Master and two Workers:
Master(JobMaster):172.16.0.1
Worker1(JobWorker1):172.16.0.2
Worker2(JobWorker2):172.16.0.3
Client:172.16.0.4
2. In kadmin.local, create identity verification information for Server and Client:
The reason for using the -randkey option here is that GooseFS uses the keytab file for authentication whether the Server or Client logs in, and does not use plaintext passwords. If identity information is required for password login scenarios, this option can be removed.
3. Generate and export the keytab file corresponding to each identity:
2. On the corresponding machine, change the associated user/user group of the Server Principal KeyTab file to the user and user group used by GooseFS Server at startup (the purpose is to ensure GooseFS has sufficient permission reading during startup).
3. Change the associated user/user group of the Client's KeyTab to the client account that initiates the GooseFS request. The purpose is likewise to ensure the Client has sufficient permissions to read the file.
Client side needs to specify the Server's principal. The reason is that in the Kerberos authentication system, the KDC needs to know the Service currently accessed by the Client, and GooseFS distinguishes the Service requested by the Client's current request through the Server's principal.
The basic authentication for GooseFS's integration with Kerberos is complete. Subsequently, all requests initiated by clients will transit through Kerberos for identity authentication.
Integrating GooseFS with Hadoop Delegation Token Authentication
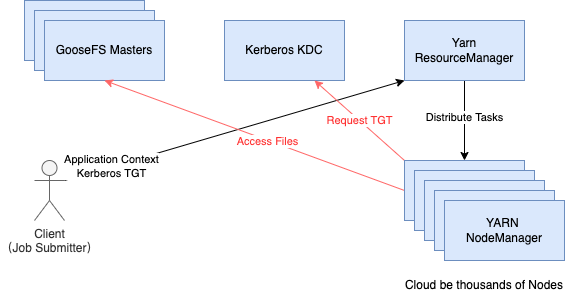
Although Kerberos can theoretically be used for identity authentication independently, in large-scale distributed systems like Hadoop, if all work tasks for each MapReduce job need to request a TGT, then Kerberos's KDC will definitely become the bottleneck of the entire system's operation. As shown below:
If a YARN cluster has hundreds or thousands of NodeManager nodes while multiple IO-intensive job tasks are running in parallel, the credential requests each execution node needs to send to the Kerberos KDC for normal access to files in GooseFS can result in a massive DDos attack.
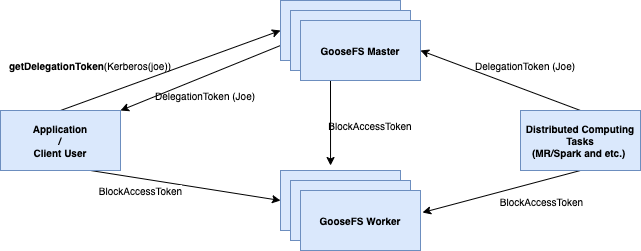
Therefore, the Hadoop community has supplemented the design of a lightweight authentication mechanism called Delegation Token to avoid such large-scale and frequent Kerberos authentication requests. Kerberos is a third-party authentication, whereas after the initial Kerberos authentication when submitting a job, the Master issues a Delegation Token to the client for caching. Subsequent requests can be authenticated by presenting the Delegation Token, so the Delegation Token authentication mechanism only involves two parties. The specific authentication process is as follows:
1. When submitting a computing job to YARN, the YARN Client (which also loads the GooseFS Client) will obtain a Delegation Token from the GooseFS Master after Kerberos authentication, then add it to the Delegation Token update service of the YARN Resource Manager.
2. When the ResourceManager of YARN (which is actually the ApplicationMaster) starts executing the Container created by the NodeManager, each Task will carry this Delegation Token to access the GooseFS cluster. It is worth noting that due to mutual authentication, the Client not only needs to complete authentication with the GooseFS Master but will also implicitly carry the BlockAccessToken to access the Worker cluster. The BlockAccessToken is returned by the Master each time a file is accessed, containing the identity information and permission information required for authentication, making it easy for the Worker to determine whether to allow the Client to perform read-write operations on the designated Block.
3. The Delegation Token update service of YARN regularly updates the Token until the maximum lifecycle of the Token ends.
Note: Unlike general third-party authentication schemes such as Kerberos, the Delegation Token authentication mechanism is unique to the Hadoop ecosystem. Therefore, it can only be used in big data environments within the Hadoop ecosystem, and each Delegation Token has a maximum lifecycle limit. For resident jobs (e.g., real-time stream computing jobs), the maximum lifecycle of Delegation Tokens should be carefully set, with a typical default of 7 days.
Delegation Token Configuration
If you need to use Delegation Token, besides requiring the basic Hadoop Kerberos and Delegation Token authentication environment, it is required that the version of GooseFS used is 1.4.5 or higher, simultaneouslyadd the following configuration in ${GOOSEFS_HOME}/conf/goosefs-site.properties:
Then, distribute all configurations to the nodes of Master/Worker and Client to enable the Hadoop Delegation Token authentication configuration.
Note:
In an environment where Hadoop Delegation Token authentication is enabled, if the Hadoop Delegation Token is turned off midway, since the Master has written the information of DelegationTokenManager into the Checkpoint and Journal of the metadata, it is necessary to reformat the cluster to complete the shutdown of the Hadoop Delegation Token and restart the GooseFS cluster for the changes to take effect.
Usage Examples
Here is a sample cluster and job to briefly demonstrate the activation and lifecycle test of Hadoop Delegation Token.
Testing environment:
EMR V3.6.0 environment, Kerberos authentication is enabled by default, high availability architecture is enabled;
GooseFS version 1.4.5, the client of GooseFS version 1.4.5 is placed under ${HADOOP_HOME}/share/hadoop/common/lib;
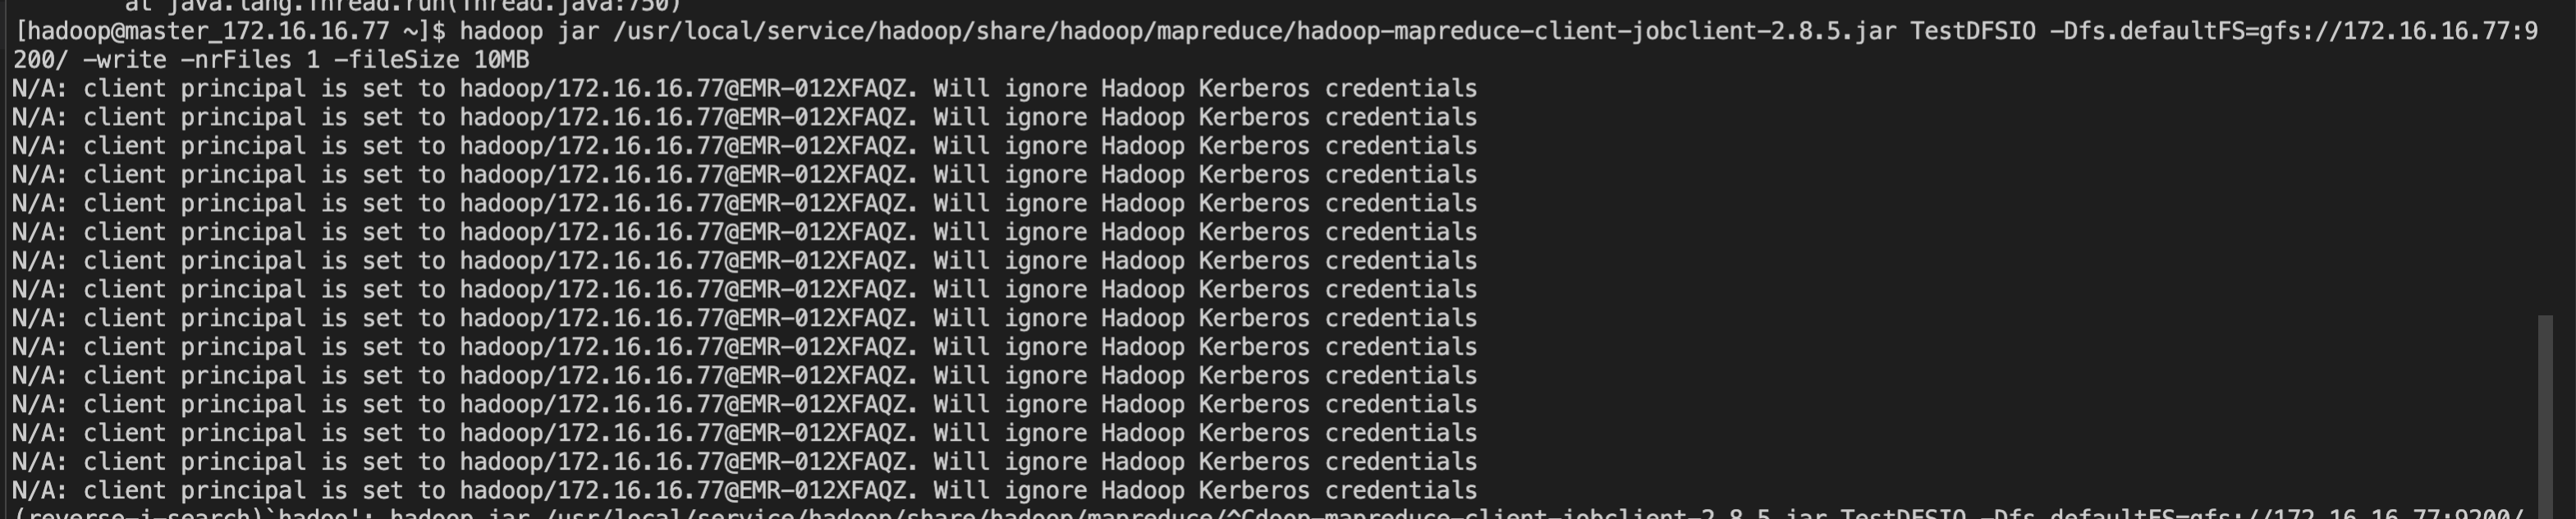
hadoop jar /usr/local/service/hadoop/share/hadoop/mapreduce/hadoop-mapreduce-client-jobclient-2.8.5.jar TestDFSIO -Dfs.defaultFS=gfs://172.16.16.77:9200/ -write -nrFiles 1 -fileSize 10MB
Since the lifecycle and refresh interval of the Token are both by default and within the runtime cycle of the entire job, it is expected to run normally as follows:
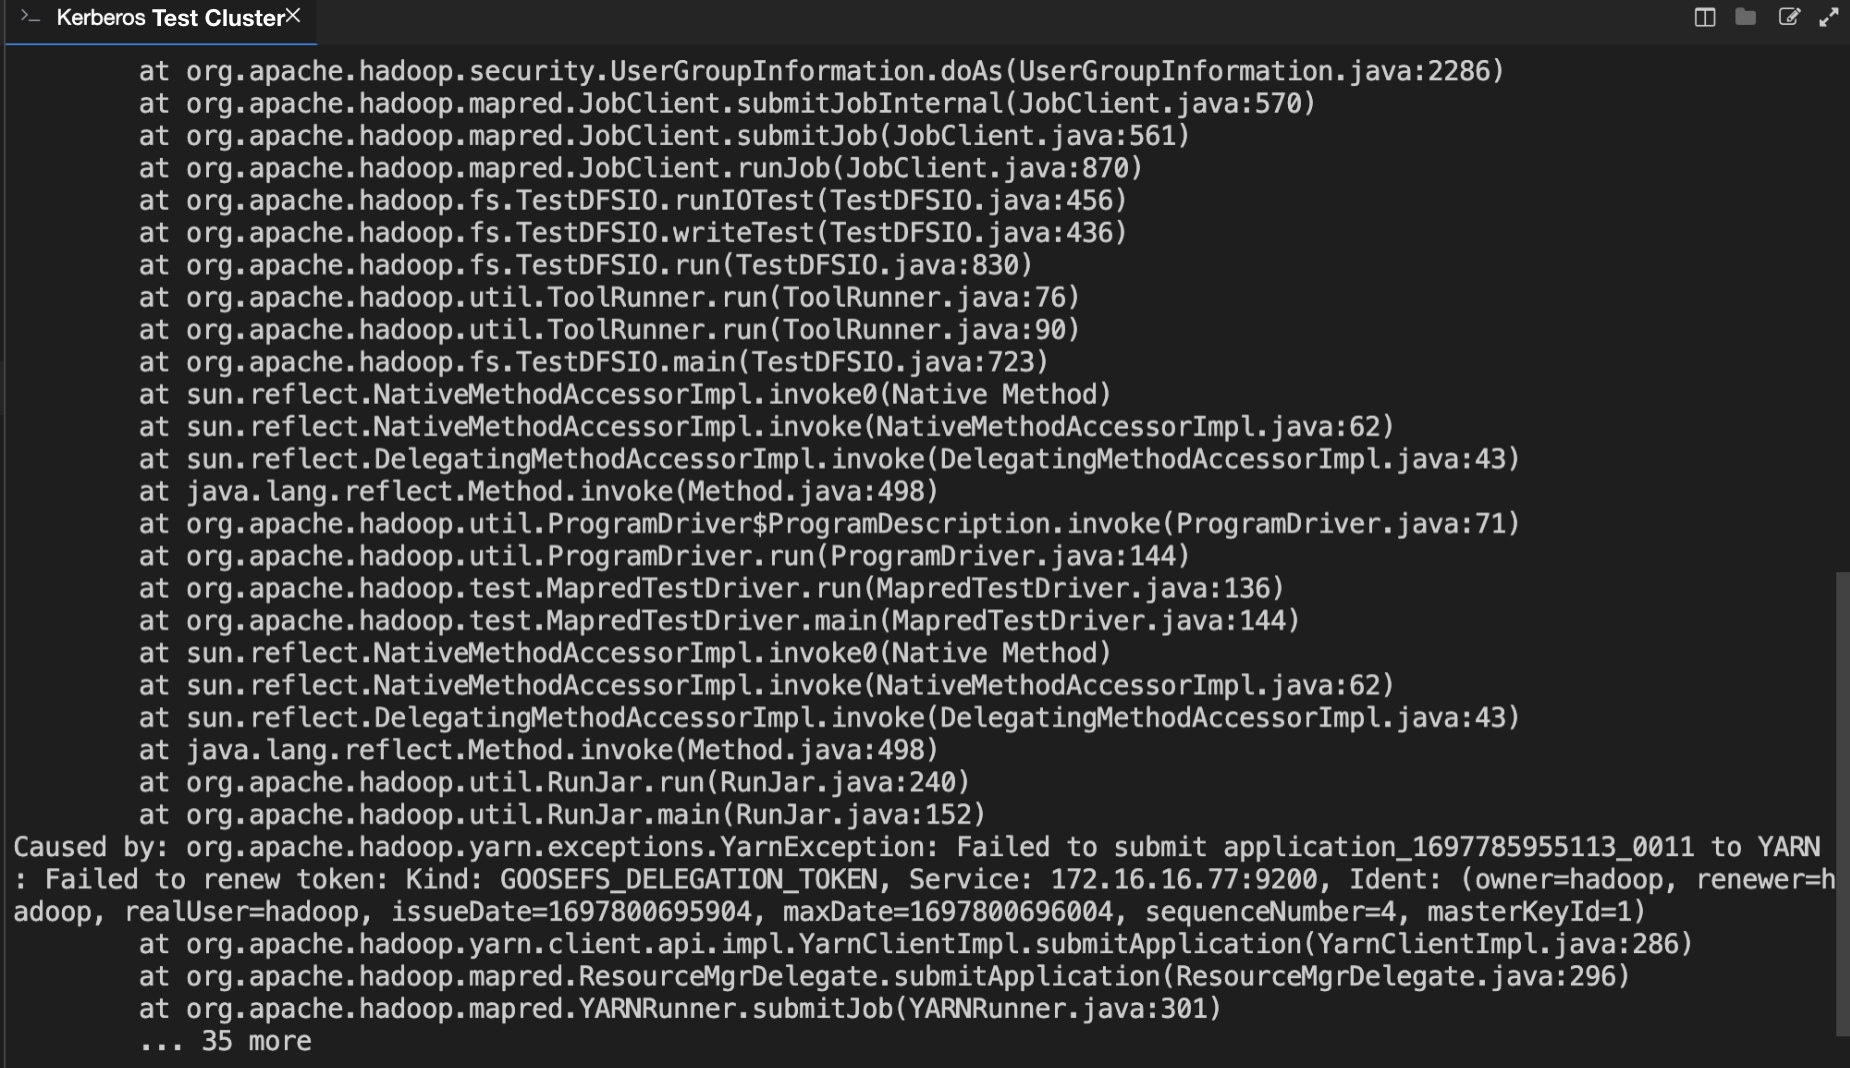
Then modify the lifecycle of the Token to a very small value, such as 100ms. Note that all GooseFS Servers need to be restarted, then execute the above test command. The expected result is an error will be reported.
As shown above, since the Token's lifecycle was set to a very small value, which is insufficient to complete the test job, a Token expiration error occurred, and it cannot be renewed.