Log Shipping
Baixar
Modo Foco
Tamanho da Fonte
Database audit of TDSQL-C for MySQL provides the log shipping feature. Through log shipping, database audit logs of TDSQL-C for MySQL can be collected and shipped to Cloud Log Service (CLS) for aggregation, management, and analysis. Logs can also be shipped to TDMQ for CKafka (CKafka). After shipping, real-time stream computing can be performed on the logs in the CKafka console. In addition, logs can be shipped to Cloud Object Storage (COS) for ARCHIVE storage. This document describes how to configure the log shipping feature of database audit via the console.
Prerequisites
Prerequisites for shipping to CLS:
Before using this feature, ensure that you have activated CLS.
The instance status is Running.
If you need to ship logs to TDMQ for CKafka, the prerequisites are as follows:
A routing policy has been added for CKafka instances.
The instance status is Running.
Prerequisites for shipping logs to COS:
Before using this feature, make sure you have activated COS.
The instance status is Running.
Supported Versions and Architecture
MySQL 5.7,MySQL 8.0.
The instance form is the provisioned resource or Serverless.
Billing Overview for Log Shipping
The feature of shipping TDSQL-C for MySQL database audit logs to CLS involves CLS, which is a third-party, independently billed cloud product. For billing standards, see CLS > Billing Overview.
The feature of shipping TDSQL-C for MySQL database audit logs to the TDMQ for CKafka involves TDMQ for CKafka, which is a third-party, independent billing cloud product. For the billing standards, you can view CKafka Billing Overview.
The feature of shipping TDSQL-C for MySQL database audit logs to COS involves COS, which is an independently billed third-party cloud product. For pricing, see Billing Overview.
After the database audit log shipping for TDSQL-C for MySQL is enabled, traffic fees will be involved. Fees are based on the traffic of the shipped logs. You can view the table below for details.
Note:
After the log shipping feature is enabled, traffic fees are incurred. However, regardless of whether you enable one or more log shipping paths (CLS, CKafka, or COS), the system only charges traffic fees incurred by this feature as a whole.
Billable Item: Audit Log Traffic | |
Chinese Mainland (USD/GB) | Hong Kong (China), other countries and regions (USD/GB) |
0.05882353 | 0.08823529 |
Description of Log Shipping Traffic Monitoring
After enabling the log shipping, you can learn about the real-time shipping traffic generated by log shipping through the monitoring feature.
Monitoring Metric Name | Callable Metric Name | Unit | Description |
Shipping traffic | AuditDeliverRate | MB | Shipping traffic generated by the log shipping |
You can find instances with the log shipping feature enabled in Audit Instance List. Under the Log Shipping field, you can click the monitoring icon to view the monitoring status of the shipping traffic.
Description of Log Shipping Status

As shown in the preceding figure, on the Database Audit page of TDSQL-C for MySQL, the shipping status of audit logs for the corresponding instance is displayed under the Log Shipping field. The description of each shipping status is as follows.
Display CKafka: The log shipping to the TDMQ for CKafka is enabled on the database audit page of the current instance.
Display CLS: The log shipping to CLS is enabled on the database audit page of the current instance.
COS: Indicate that you have enabled shipping database audit logs of an instance to COS.
Display Not Enabled: Log shipping is not configured on the database audit page of the current instance.
Related Documentation
For the specific steps to ship database audit logs to CLS, TDMQ for Ckafka, or COS, refer to the instructions in the following sections respectively.
Enabling Log Shipping to CLS
1. Log in to the TDSQL-C for MySQL console.
2. In the left sidebar, select SQL Insight (Database Audit).
3. After selecting a region at the top, go to the Audit Instance page. Click Audit Log Storage Status and select Enabled to filter out instances with audit enabled.
4. Find the target instance in the audit instance list (or search for the instance by resource attributes in the search box), and choose More > Configure Log Shipping in the Operation column.
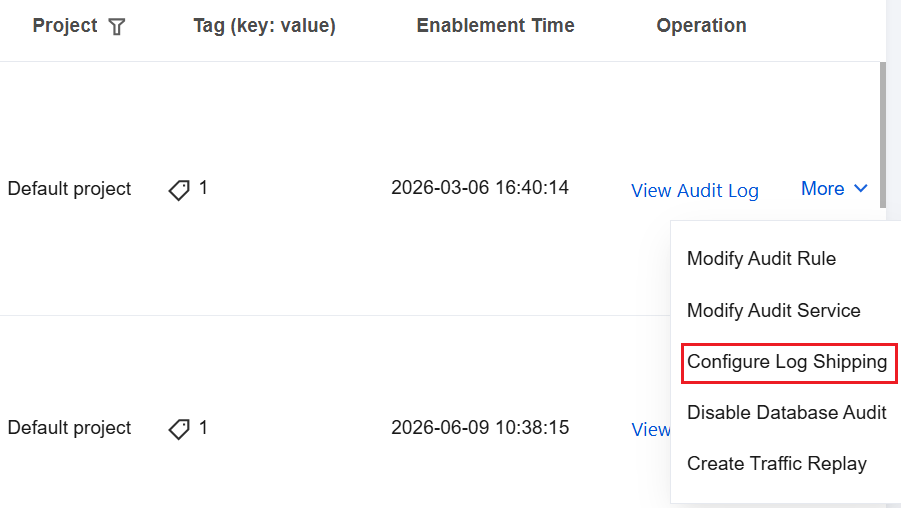
5. (Skip this step if CLS has already been activated.) Click Go to Activate in the pop-up sidebar to activate CLS.
6. (Skip this step if CLS has already been activated.) Return to the console after activation and click Activation Completed in the pop-up window for activation confirmation.
Note:
During the activation process, the system will verify whether activation is successful. If the system prompts that activation has failed, wait for a while and try again.
7. (Skip this step if COS has already been authorized.) In the sidebar, click Go to authorize. Then, in the Service Authorization pop-up window, click Grant.
Note:
During the authorization process, the system will verify whether the service role authorization is successful. If the system prompts that the authorization fails, you can try authorization again later.
8. Click Enable Now in the Shipping to CLS area in the sidebar.
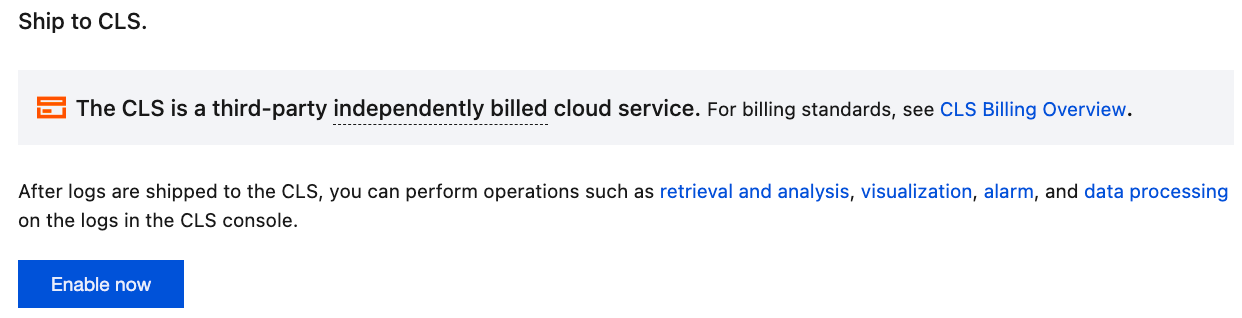
9. Complete the following configurations in the pop-up window and click Enable Now.
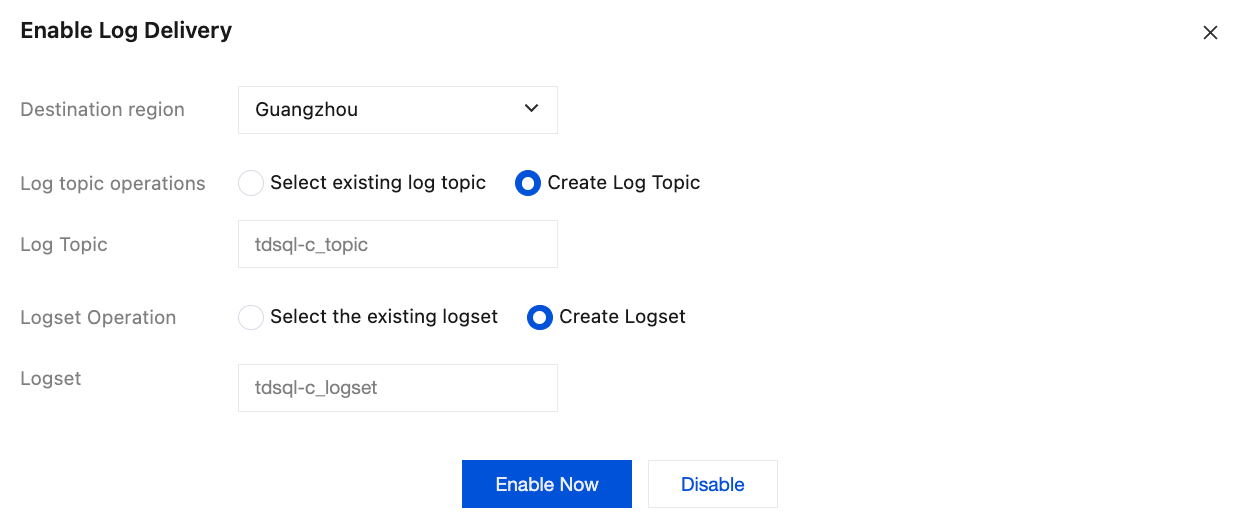
Parameter | Description |
Destination region | Select the region for log shipping. If the region where the database instance is located is supported on the CLS, the location of the instance will be selected by default. You can also choose other available regions; if the region where the database instance is located is not supported on the CLS, you can choose other regions supported by the CLS. |
Log topic operations | It supports selecting an existing topic or creating one. |
Select existing log topic | If the log topic is set to select an existing topic, you need to further select the existing logsets and log topics. Logset: Logsets classify log topics to facilitate log topic management. You can filter existing logsets in the search box. Log topic: A log topic is the basic unit for collecting, storing, retrieving, and analyzing log data. You can filter log topics of the selected logset in the search box. Note: Log topics that can be selected in this step should be those created with the Create Log Topic option selected for log topic operations when enabling log shipping in the console. Log topics created in the CLS console cannot be selected. |
Create Log Topic | If the log topic is set to create a log topic, you need to further customize the log topic and then assign it to an existing logset or a created logset. Log topic: A log topic is the basic unit for collecting, storing, retrieving, and analyzing log data. You need to create a log topic. Select the existing logset: The log topic to be created will be added to an existing logset. If you select this option, you can filter existing logsets in the search box. Create logset: The log topic to be created will be added to a newly created logset. If you select this option, you need to create a logset. |
Viewing Log Shipping to CLS
After the log shipping to CLS for the instance database audit is enabled, you can view the current log shipping status to CLS of this instance (view the logset and log topic of the current log shipping).
1. Log in to the TDSQL-C for MySQL console.
2. In the left sidebar, select SQL Insight (Database Audit).
3. Select a region at the top. On the Audit Instance page, find the target instance (or search for the instance by resource attributes in the search box), and choose More > Configure Log Shipping in the Operation column.
4. In the pop-up sidebar, view the current log shipping information.
5. Click the logset name, log topic name, or search and analysis to navigate to the CLS console to view log shipping status.
Disabling Log Shipping to CLS
Note:
After disabling log shipping, the shipping of the current instance's Database Audit logs will be stopped. Note that after disabling, only the shipping of newly generated database audit logs will be stopped, and logs shipped to CLS will continue to be stored in the log topic until expiration. During this period, storage fees will be generated continuously. If you want to delete one or more log topics, please go to Log Topic Management.
1. Log in to the TDSQL-C for MySQL console.
2. In the left sidebar, select SQL Insight (Database Audit).
3. Select a region at the top. On the Audit Instance page, find the target instance (or search for the instance by resource attributes in the search box), and choose More > Configure Log Shipping in the Operation column.
4. Click Disable Shipping in the upper right corner of the Shipping to CLS area in the pop-up sidebar.
5. Read the precautions in the pop-up window, select Disable, and click OK.
Enabling Log Shipping to TDMQ for CKafka
1. Log in to the TDSQL-C for MySQL console.
2. In the left sidebar, select SQL Insight (Database Audit).
3. After selecting a region at the top, go to the Audit Instance page. Click Audit Log Storage Status and select Enabled to filter out instances with audit enabled.
4. Find the target instance in the audit instance list (or search for the instance by resource attributes in the search box), and choose More > Configure Log Shipping in the Operation column.
5. (Skip this step if CKafka has already been activated.) Click Go to Activate in the pop-up sidebar to activate CKafka.
6. (Skip this step if CLS has already been activated.) Return to the console after activation and click Activation Completed in the pop-up window for activation confirmation.
Note:
During the activation process, the system will verify whether activation is successful. If the system prompts that activation has failed, wait for a while and try again.
7. (Skip this step if COS has already been authorized.) In the sidebar, click Go to authorize. Then, in the Service Authorization pop-up window, click Grant.
Note:
During the authorization process, the system will verify whether the service role authorization is successful. If the system prompts that the authorization fails, you can try authorization again later.
8. Click Enable Immediately in the Shipping to Ckafka Message Queue area in the pop-up sidebar.
9. Complete the following configurations in the pop-up window and click OK.
Parameter | Description |
Target Region | Select the region for log shipping. If the region where the database instance is located is supported on the TDMQ for CKafka, the location of the instance will be selected by default. You can also choose other available regions; if the region where the database instance is located is not supported on the TDMQ for CKafka, you can choose other regions supported by the TDMQ for CKafka. |
CKafka Instance | Select a CKafka instance in the target region. Note: Note: Audit log shipping is supported only in CKafka 2.4.1 and later versions. CKafka instances of other versions do not support it. |
Topic | Select a topic to ship. If there is no available topic, you can also create one. For operations, view Creating Topic. |
Viewing Log Shipping to TDMQ for CKafka
After log shipping to TDMQ for CKafka for the instance database audit is enabled, you can view the current log shipping status to the TDMQ for CKafka of this instance (view the CKafka instance, CKafka Topic ID/name, region, and creation time of the current log shipping).
1. Log in to the TDSQL-C for MySQL console.
2. In the left sidebar, select SQL Insight (Database Audit).
3. Select a region at the top. On the Audit Instance page, find the target instance (or search for the instance by resource attributes in the search box), and choose More > Configure Log Shipping in the Operation column.
4. In the pop-up sidebar, view the current log shipping information.
5. Click the CKafka instance ID, CKafka topic ID/name, and Message Query button to view instance details and query messages in the CKafka console.
Modifying Shipping
After the log shipping to TDMQ for CKafka for the instance database audit is enabled, if you want to change the CKafka instance, region, or topic (CKafka Topic ID/name) for shipping, see the following steps.
1. Log in to the TDSQL-C for MySQL console.
2. In the left sidebar, select Database Audit.
3. Select a region at the top. On the Audit Instance page, find the target instance (or search for the instance by resource attributes in the search box), and choose More > Configure Log Shipping in the Operation column.
4. Click Modify Shipping in the upper right corner of the Ship to TDMQ for CKafka area in the pop-up sidebar.
5. Select another CKafka instance, region, or topic (CKafka topic ID/name) in the pop-up window and click OK.
Disabling Log Shipping to TDMQ for CKafka
Note:
After disabling log shipping, the shipping of the current instance's database audit logs will be stopped. Note that after disabling, only the shipping of newly generated logs will be stopped. Existing logs will continue to be stored in the TDMQ for CKafka until expiration, and storage fees will be incurred during this period. To delete messages, go to the CKafka console to configure.
1. Log in to the TDSQL-C for MySQL console.
2. In the left sidebar, select SQL Insight (Database Audit).
3. Select a region at the top. On the Audit Instance page, find the target instance (or search for the instance by resource attributes in the search box), and choose More > Configure Log Shipping in the Operation column.
4. Click Disable Shipping in the upper right corner of Ship to TDMQ for CKafka area in the pop-up sidebar.
5. Read the notes in the pop-up window, select Disable, and click OK.
Enabling Log Shipping to COS
1. Log in to the TDSQL-C for MySQL console.
2. In the left sidebar, select SQL Insight (Database Audit).
3. After selecting a region at the top, go to the Audit Instance page. Click Audit Log Storage Status and select Enabled to filter out instances with audit enabled.
4. Find the target instance in the audit instance list (or search for the instance by resource attributes in the search box), and choose More > Configure Log Shipping in the Operation column.
5. (Skip this step if COS has already been authorized.) In the sidebar, click Go to Activate. Then, in the Service Authorization pop-up window, click Authorize.
Note:
During the authorization process, the system will verify whether the service role authorization is successful. If the system prompts that the authorization fails, you can try authorization again later.
6. In the pop-up sidebar, click Enable Immediately below Shipping to Cloud Object Storage (COS).
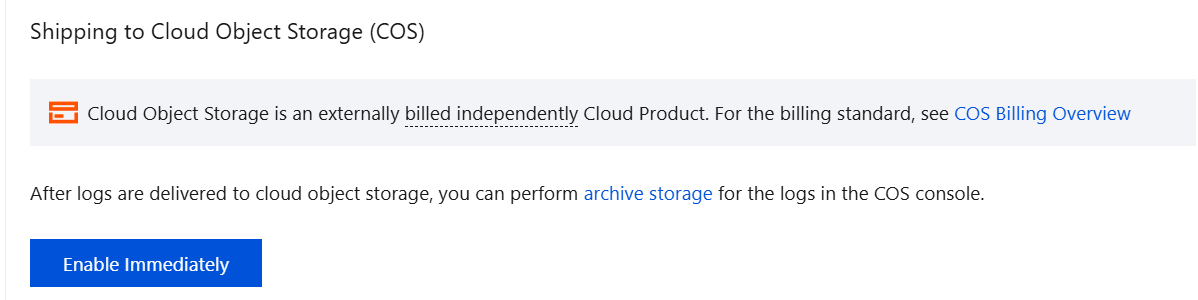
7. In the Shipping to COS pop-up window, complete the following configurations, and click OK.
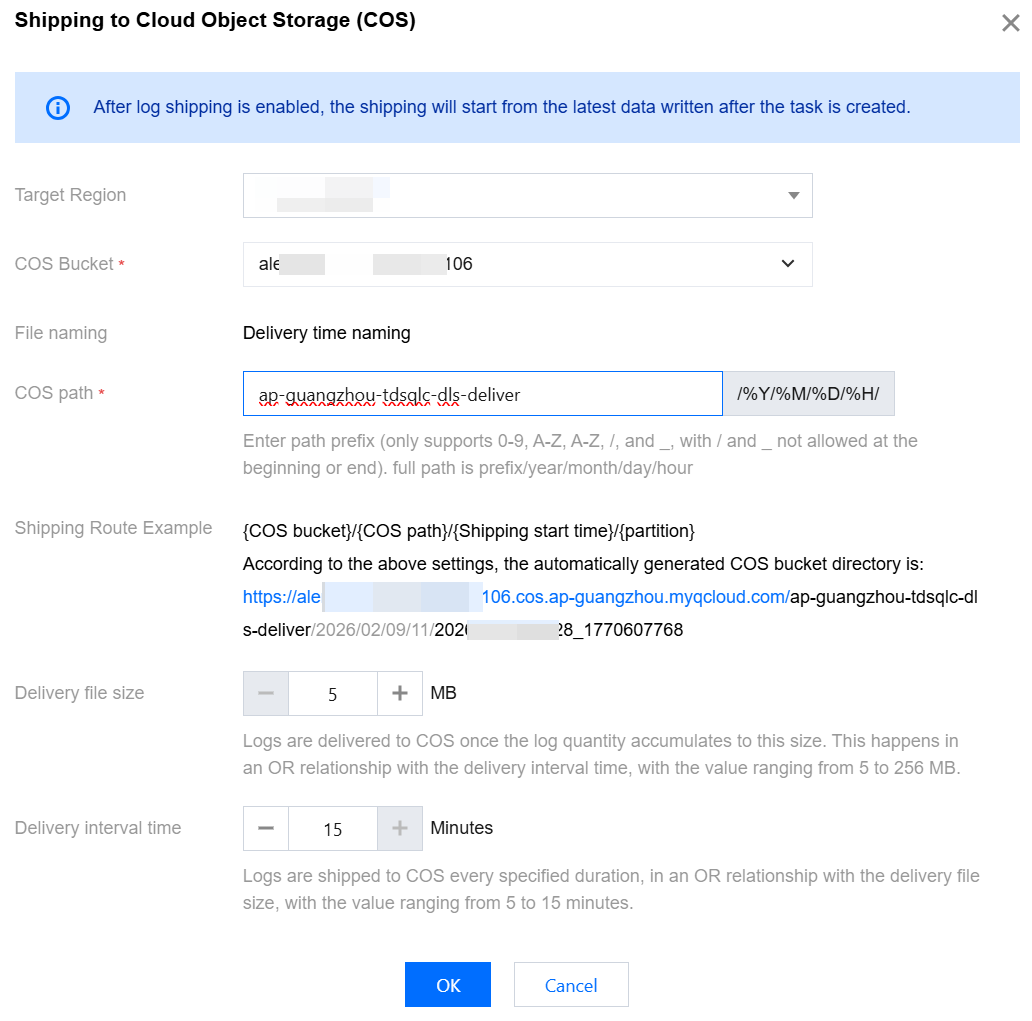
Parameter | Description |
Target Region | Select the region for log shipping. If the region where the database instance is located is supported on the COS, the location of the instance will be selected by default. You can also choose other available regions; if the region where the database instance is located is not supported on the COS, you can choose other regions supported by the COS. |
COS Bucket | Select an existing COS bucket. The dropdown list supports quick search. If no COS bucket exists, you can select Create Bucket in the dropdown list. If you have not activated COS, the system guides you to activate it during the bucket creation process before you can proceed to complete the bucket creation operation. |
File naming | Name the shipping file. By default, the file is named based on the shipping time. |
COS Path | Enter a COS path prefix here (Only 0-9, A-Z, a-z, /, and _ are allowed. The / and _ characters cannot be used at the beginning or end of the prefix). Complete path format: prefix/year/month/day/hour. This is the address within your COS bucket where shipped audit log files will be stored. |
Shipping Route Example | Automatically generate a COS bucket directory based on the settings of the previous field. You can know the set COS bucket directory as displayed by this field. |
Delivery File Size | Set the shipping file size in MB. It is used together with the shipping interval. If any of the conditions are met, the file is compressed and shipped to COS according to the corresponding rule. Default value: 5. Value range: 5 to 256. For example, you set the size to 256 MB and the interval to 15 minutes. If the file size reaches 256 MB in 5 minutes, the file size condition is met, which triggers a shipping task. |
Delivery interval time | Specify the interval to trigger a shipping task in minutes. It is used together with the file size. If any of the conditions are met, the file is compressed and shipped to COS according to the corresponding rule. Default value: 15. Value range: 5 to 15. For example, you set the size to 256 MB and the interval to 15 minutes. If the file size is only 200 MB after 15 minutes, the shipping interval is met, which triggers a shipping task. |
Viewing Log Shipping to COS
After database audit log shipping to COS is enabled for an instance, you can view the current information on log shipping to COS (such as the COS bucket, region, and creation time for log shipping).
1. Log in to the TDSQL-C for MySQL console.
2. In the left sidebar, select SQL Insight (Database Audit).
3. Select a region at the top. On the Audit Instance page, find the target instance (or search for the instance by resource attributes in the search box), and choose More > Configure Log Shipping in the Operation column.
4. In the pop-up sidebar, view the current log shipping information.
5. Click the COS bucket name to navigate to the file list details page of the corresponding bucket. Click Archive Storage to navigate to the COS console and view the stored shipping file.
Modifying Shipping
After database audit log shipping to COS is enabled for an instance, you can follow the steps below to modify shipping configurations as needed.
1. Log in to the TDSQL-C for MySQL console.
2. In the left sidebar, select SQL Insight (Database Audit).
3. Select a region at the top. On the Audit Instance page, find the target instance (or search for the instance by resource attributes in the search box), and choose More > Configure Log Shipping in the Operation column.
4. In the pop-up sidebar, click Modify Delivery on the right of Shipping to Cloud Object Storage (COS).
5. In the Shipping to COS pop-up window, re-select the required configurations, and click OK.
Disabling Log Shipping to COS
Note:
After log shipping is disabled, database audit log shipping of the current instance stops. Note: After disabling, only the shipping of newly added logs stops, while logs already shipped to COS are retained until expiration. During this period, storage fees are incurred continuously. If you want to delete logs, go to the COS console for configuration.
1. Log in to the TDSQL-C for MySQL console.
2. In the left sidebar, select SQL Insight (Database Audit).
3. Select a region at the top. On the Audit Instance page, find the target instance (or search for the instance by resource attributes in the search box), and choose More > Configure Log Shipping in the Operation column.
4. In the pop-up sidebar, click Disable Delivery on the right of Shipping to Cloud Log Storage (COS).
5. Read the notes in the pop-up window, select Confirm Closure, and click OK.
Appendix 1: Adding a Routing Policy
To ship database audit logs to TDMQ for CKafka (CKafka), you need to add a routing policy for the CKafka instance first. Otherwise, an error may occur during log shipping configuration, indicating that CKafka has no routing policy with the route type of Supporting Environment and the access mode of PLAINTEXT. Follow the steps below to add a routing policy.
1. Log in to the CKafka console.
2. Click Instance List in the left sidebar and click the ID/name of the target instance to go to the basic information page.
3. On the Basic Information page, click Add Routing Policy in the Access Method section.

4. In the pop-up window, select Supporting Environment as the route type, select PLAINTEXT as the access method, and click Submit.
Appendix 2: Creating a Bucket
When enabling log shipping to COS, you need to select a COS bucket. If no COS bucket exists, you can follow the steps below to create a bucket and then select it.
1. Click Create Bucket in the dropdown list.
2. In the pop-up window, complete the following configurations, and click Create.
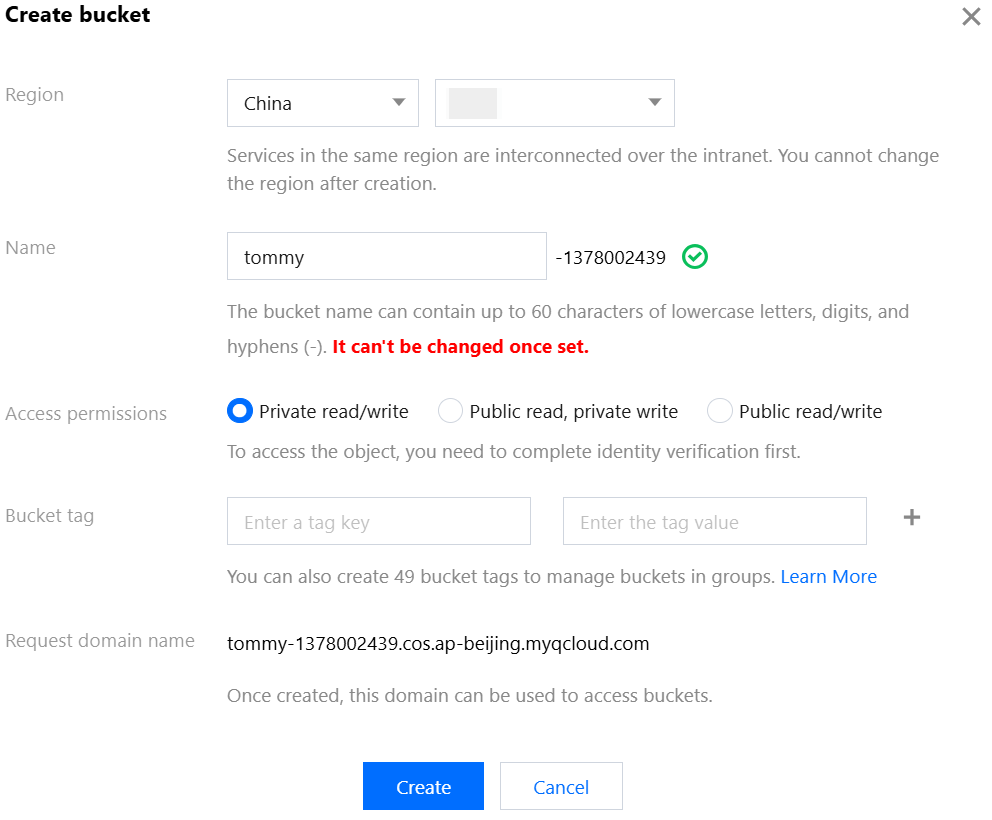
Parameter | Description |
Region | Select a region of the bucket. You should select a COS region corresponding to the physical region where your business is mainly located for communication with other Tencent Cloud services in the same region via the private network. The region cannot be modified after creation. |
Name | Enter a custom bucket name. Only lowercase letters, digits, and hyphens (-) are supported. The total number of characters in the domain name cannot exceed 60. The bucket name cannot be modified once set. |
Access Permissions | Select the access permission. By default, a bucket is provided with three access permissions: private read/write, public read/private write, and public read/write. The permission can be modified after setting. For details, see ACL. |
Bucket Tag | Bucket tags are used as identifiers for bucket management. You can set tags for buckets to facilitate group-based bucket management. For details, see Setting Bucket Tags. |
Request Domain Name | This field displays the request domain name after the settings are completed. You can use this domain name to access the bucket. |
References
Relevant CLS documents:
Related documents of TDMQ for CKafka are as follows:
Relevant COS documents:
Ajuda e Suporte
Esta página foi útil?
Você também pode entrar em contato com a Equipe de vendas ou Enviar um tíquete em caso de ajuda.
comentários