This document describes how to install and use a TcaplusDB PB table on Linux.
Runtime Environment
Linux 2.6 and SUSE 12 64-bit.
Prerequisites
Before installing and using TcaplusDB PB, you need to install Protobuf. Currently, TcaplusDB supports Protobuf v2.6.1 and v3.5.0.
Protobuf is a cross-language lightweight structured data storage format launched by Google. TcaplusDB supports defining data tables with Protobuf definition files (.proto). Before using a TcaplusDB PB API, you need to install Protobuf on your development server first. You are recommended to use the source code to install Protobuf in the following steps:
1. Prepare the CVM instance environment.
You need a server on which CentOS 6 or 7 on the x86_64 architecture has been installed. To compile and construct Protobuf, you also need to install the following programs accordingly:
Autoconf
Automake
Libtool
cURL (used to download Google Mock)
Make
g++
Unzip
2. Download the Protobuf source code installation package. For more information, please see SDK Download.
3. Please install an appropriate version of Protobuf based on your actual needs. The following steps use Protobuf 2.6.1 as an example:
4. Run the following command to decompress the source code installation package and enter the source code root directory:
tar -xzvf protobuf-2.6.1.tar.gz
cd ./protobuf-2.6.1
5. Configure and specify the installation path prefix. You are recommended to install it under /usr/local/protobuf.
./configure --prefix=/usr/local/protobuf
6. Compile and install it.
make
make check
makeinstall
7. Perform the test. Run the protoc command to check whether the installation succeeded. If the following information is displayed, the installation is successful.
# protoc --version
libprotoc 2.6.1
Directions
Step 1: Installing TcaplusDB SDK
Download the TcaplusDB SDK onto the development server and run the following command to install the file to the specified installation directory:
tar –xzf <installation package path> -C <installation directory>,
Step 2: Verifying
After the installation, the root directory structure is as shown below:
Directory and File
Description
include/tcaplus_service/
TcaplusDB service API header file
lib/libtcaplusserviceapi.a
TcaplusDB service API library file
include/tcaplus_service/protobuf/
Protobuf API header file
lib/libtcaplusprotobufapi.a
TcaplusDB Protobuf API library file
examples/tcaplus/ProtoBuf
TcaplusDB Protobuf API sample
Step 3: Running example and accessing TcaplusDB
You can develop the corresponding data access logic on the GameSvr game server by referring to API samples in example.
1. Decompress the TcaplusDB PB API release package.
tar -xzvf TcaplusPbApi3.36.0.152096.x86_64_release_20170712.tar.gz
2. Configure the TcaplusDB system connection information.
2.1 Enter the following code on the command line to enter the directory:
cd TcaplusPbApi3.36.0.152096.x86_64_release_20170712/release/x86_64/examples/tcaplus/C++_common_for_pb2
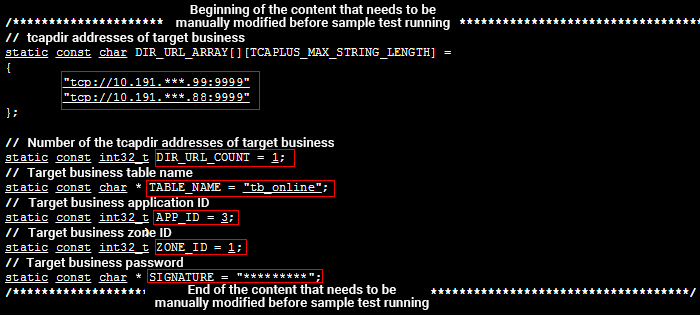
2.2 On the command line, enter vi common.h to modify the common.h header file. Modify the content in the figure below based on your actual business needs:
DIR_URL_ARRAY: cluster access IP address and port.
DIR_URL_COUNT: value fixed at 1.
TABLE_NAME: target table to be accessed.
APP_ID: target access ID.
ZONE_ID: ID of the table group to be accessed.
SIGNATURE: cluster access password.
3. Modify the environment configuration file.
In the TcaplusPbApi3.36.0.152096.x86_64_release_20170712/release/x86_64/examples/tcaplus directory, there are sample files of calling APIs asynchronously or by using a coroutine. This step uses calling the Set API with a coroutine to set data as an example.
Enter the following code on the command line to enter the directory:
cd TcaplusPbApi3.18.0.152096.x86_64_release_20170712/release/x86_64/examples/tcaplus/C++_pb2_coroutine_simpletable/SingleOperation/set
All code of the example of calling the Set API with a coroutine is in the directory. Modify the envcfg.env file, set the PROTOBUF_HOME environment variable to the Protobuf installation path on this server (specified by --prefix), and set the TCAPLUS_HOME environment variable to the absolute path of the release/x86_64 directory in the TcaplusDB PB API package as shown below:
4. Run the following command under the code directory to set the environment variables:
source envcfg.env
bash conv.sh
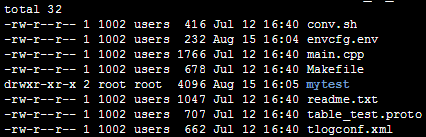
5. Compile the binary program.
Run the make command to compile the binary program of example. After the compilation succeeded, a mytest executable file will be generated.
6. Run the binary program.
On the command line, enter ./mytest to run the binary program. The execution result will be displayed in the command line standard output. If any error occurs, please check the tcaplus_pb.log log file in the code directory.